Introduction
Welcome to this guide on how to download photos from iCloud to Windows 10! iCloud is a cloud storage and cloud computing service provided by Apple Inc., allowing users to store and access various types of data, including photos, across multiple devices. While iCloud is primarily designed for Apple devices, it is also possible to access and download photos from your iCloud account on a Windows 10 computer.
Having your iCloud photos available on your Windows 10 PC can be beneficial in many ways. It allows you to easily backup and access your photos, share them with others, and even edit them using Windows-based applications. Whether you want to download a single picture or transfer your entire photo library, we will walk you through three different methods to accomplish this.
Before we dive into the methods, there are a few prerequisites you need to fulfill in order to download photos from iCloud to Windows 10. Remember, it’s essential to have an active iCloud account and have previously enabled iCloud Photo Library or iCloud Photos on your Apple devices. Additionally, make sure you have a stable internet connection as you may need to access your iCloud account online.
Now that you have met the prerequisites let’s explore the three different methods you can use to download your precious photos from iCloud to your Windows 10 computer. Remember, each method offers different advantages, so choose the one that suits your preferences and needs the best.
Prerequisites
Before you can download photos from iCloud to Windows 10, there are a few prerequisites you need to fulfill. By ensuring that you have met these requirements, you’ll be ready to access your iCloud photos effortlessly. Here are the essential prerequisites:
- An active iCloud account: To access your iCloud photos, you must have an active iCloud account. If you don’t already have an account, you can sign up for one on the iCloud website or through your Apple devices.
- iCloud Photo Library or iCloud Photos enabled: In order to have your photos synced to iCloud and accessible on your Windows 10 PC, you need to have either iCloud Photo Library or iCloud Photos enabled on your Apple device. You can activate this feature in the iCloud settings on your iPhone, iPad, or Mac.
- Stable internet connection: Since you’ll be accessing your iCloud account online, it’s crucial to have a reliable and stable internet connection. This will ensure that you can smoothly access and download your photos without any interruptions.
By fulfilling these prerequisites, you’ll have everything set up to proceed with the methods we will discuss next. It’s important to note that while these prerequisites are necessary, the specific steps to enable iCloud Photo Library or iCloud Photos may vary slightly depending on the version of iOS or macOS you’re using.
Now that you’re ready with your active iCloud account and have iCloud Photo Library or iCloud Photos enabled, let’s move on to the methods you can use to download photos from iCloud to your Windows 10 PC.
Method 1: Using the iCloud for Windows App
If you prefer a straightforward and easy-to-use method, using the iCloud for Windows app is an excellent option. This method allows you to sync your iCloud photos directly to your Windows 10 PC. Here’s how you can do it:
- Download and install iCloud for Windows: Visit the official Apple website and download the iCloud for Windows application. Once downloaded, run the installer and follow the on-screen instructions to install the app on your computer.
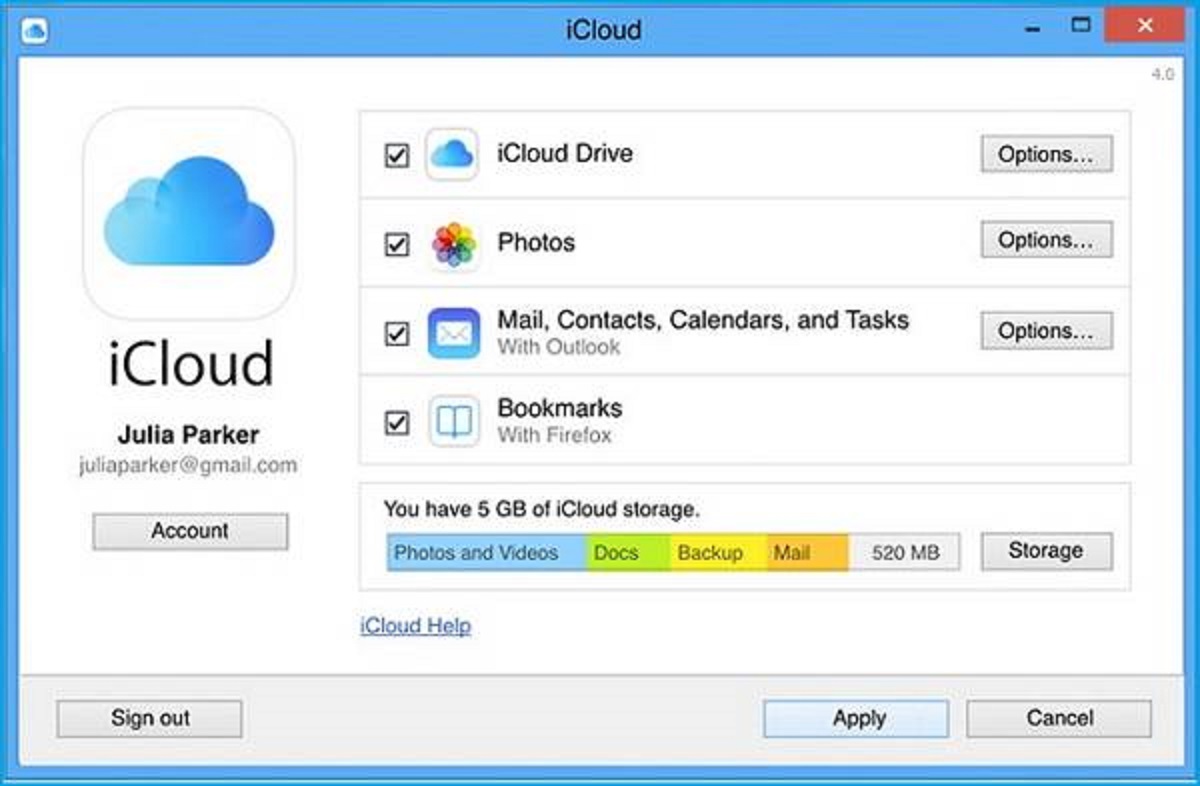
- Login and select options: After installing the app, launch it and sign in with your iCloud account credentials. Once logged in, you’ll see various options for syncing data. Make sure the “Photos” option is checked, and select any additional settings you prefer.
- Choose download location: Next, you’ll be prompted to choose a location on your Windows 10 PC where your iCloud photos will be downloaded. Select a suitable folder and click “Apply” to save the settings.
- Start the syncing process: Once you’ve finished selecting the download location, click on the “Options” button again and choose “Apply”. This will initiate the syncing process, and your iCloud photos will start downloading to the specified folder on your computer.
Depending on the size of your photo library and the speed of your internet connection, the syncing process may take some time. Once completed, you’ll have access to all your iCloud photos on your Windows 10 PC, conveniently stored in the selected folder.
Using the iCloud for Windows app provides the advantage of automatic syncing, ensuring that any new photos added to your iCloud account will also be downloaded to your computer. Additionally, you can easily manage your iCloud photos, create albums, and organize them directly from the Windows File Explorer.
Now that you know how to use the iCloud for Windows app to download your iCloud photos, let’s explore another method to accomplish the same task.
Method 2: Using iCloud.com and a Web Browser
If you prefer to access your iCloud photos without installing any additional software on your Windows 10 PC, using iCloud.com and a web browser is a convenient option. This method allows you to access your iCloud account and download your photos directly from the iCloud website. Here’s how you can do it:
- Open a web browser: Launch your preferred web browser on your Windows 10 PC and navigate to the iCloud website (www.icloud.com).
- Login to your iCloud account: Once on the iCloud website, sign in with your Apple ID and password associated with your iCloud account.
- Access the Photos app: After logging in, you’ll see various app icons. Click on the “Photos” app to open it.
- Select and download photos: In the Photos app, you can browse through your albums or use the search function to find specific photos. Once you’ve located the photos you want to download, select them by clicking on the checkboxes next to each photo.
- Download the selected photos: After selecting the desired photos, click on the “Download” button located at the top right corner of the screen. The selected photos will then be downloaded to your Windows 10 PC.
Using iCloud.com and a web browser provides the flexibility to access your iCloud photos from any device with an internet connection. It allows you to download your photos without the need to install any additional software on your Windows 10 PC.
Keep in mind that the availability of features may vary slightly between the iCloud.com version and the iCloud for Windows app. However, both methods provide the ability to download your iCloud photos to your Windows 10 PC.
Now that you’re familiar with using iCloud.com and a web browser to download your iCloud photos, let’s move on to another method that utilizes the File Explorer on your Windows 10 PC.
Method 3: Using File Explorer
If you prefer a more manual approach to download your iCloud photos to your Windows 10 PC, you can utilize the File Explorer. By accessing your iCloud Drive through File Explorer, you’ll be able to download individual photos or entire albums. Here’s how you can do it:
- Open File Explorer: Launch the File Explorer on your Windows 10 PC by either clicking on the folder icon in the taskbar or pressing the Windows key + E.
- Access iCloud Drive: In the File Explorer, locate and click on “This PC” in the sidebar. Under the “Devices and drives” section, you should see your iCloud Drive listed as “iCloud Drive”. Click on it to open.
- Navigate to the Photos folder: Once in the iCloud Drive, look for the “Photos” folder. Double-click on it to access your iCloud photos.
- Select and download photos: In the Photos folder, you’ll find your photos organized by year and month. You can browse through the folders and select the photos you want to download. To download multiple photos, hold down the Ctrl key while clicking on each photo. To download an entire album, select the folder containing the album.
- Download the selected photos: After selecting the desired photos or albums, right-click and choose “Copy” from the context menu. Then, navigate to the desired location on your Windows 10 PC using the File Explorer and right-click again. Choose “Paste” to download and save the selected photos or albums to your computer.
Using File Explorer to download your iCloud photos provides you with more control and flexibility. It allows you to manually select and download specific photos or albums, giving you the freedom to organize them as you wish on your Windows 10 PC.
Keep in mind that the availability of features and options may differ between the iCloud Drive accessed through File Explorer and the iCloud for Windows app or iCloud.com. However, all three methods provide you with a way to access and download your iCloud photos on Windows 10.
Now that you’re familiar with using File Explorer to download your iCloud photos, let’s conclude this guide.
Conclusion
Downloading your photos from iCloud to Windows 10 is a simple and efficient process that allows you to access and enjoy your precious memories on your PC. In this guide, we discussed three different methods that give you the flexibility to choose the one that suits your preferences and needs.
The first method involved using the iCloud for Windows app, which provides automatic syncing of your iCloud photos to your Windows 10 PC. This method is ideal for those who prefer a seamless and effortless process.
The second method involved accessing iCloud.com and using a web browser. This method allows you to download your iCloud photos without installing any additional software, providing the convenience of accessing your photos from any device with an internet connection.
The third method involved utilizing File Explorer to manually download your iCloud photos. This method gives you more control and flexibility, allowing you to select and organize specific photos or albums on your Windows 10 PC.
Remember to ensure you have an active iCloud account and have enabled iCloud Photo Library or iCloud Photos on your Apple devices before attempting to download your photos to Windows 10. Additionally, ensure you have a stable internet connection to access your iCloud account and download your photos seamlessly.
By following the methods described in this guide, you can easily download your photos from iCloud to Windows 10 and keep them readily accessible on your PC. Whether you choose the iCloud for Windows app, iCloud.com, or File Explorer, you can enjoy your cherished memories on your Windows 10 computer.
Now that you are equipped with the knowledge of how to download your iCloud photos to Windows 10, you can enjoy browsing, organizing, and sharing your precious moments effortlessly on your PC.