Introduction
Are you tired of having limited access to your precious memories stored in your iCloud account? Well, we have good news for you! In this article, we will guide you through the process of downloading your iCloud photos to your PC, giving you the freedom to view, edit, and cherish them anytime, anywhere.
Your iCloud account is a convenient way to store and sync your photos across all your Apple devices. However, accessing these photos from a PC can be a bit tricky if you don’t know the right steps. Fortunately, with the help of iCloud for Windows, you can effortlessly download your photos and enjoy them on your computer.
In this comprehensive guide, we will walk you through the necessary steps to prepare your iCloud account, download iCloud for Windows, and successfully transfer your beloved photos to your PC. Whether you’re a professional photographer or someone who simply wants to keep their memories safe, this article is for you.
By following our step-by-step instructions, you will have the opportunity to access your iCloud photos from your PC, allowing you to organize, print, and share them with ease. So, let’s dive in and unlock the full potential of your iCloud account!
Preparing Your iCloud Account
Before you can start downloading your iCloud photos to your PC, there are a few preparatory steps you need to take. These steps will ensure smooth synchronization and effortless transfer of your photos. Here’s what you need to do:
1. Update your devices: Make sure that all your Apple devices, including your iPhone, iPad, and Mac, are running the latest version of the iOS or macOS operating system. This ensures compatibility and reduces the chances of any synchronization issues.
2. Enable iCloud Photos: On your iOS device, go to “Settings” and tap on your name. Then, select “iCloud” and “Photos”. Make sure that “iCloud Photos” is enabled. This will automatically upload and sync all your photos to your iCloud account.
3. Check available storage: Verify that you have enough available storage in your iCloud account to accommodate the photos you want to download. You can check your iCloud storage by going to “Settings” on your iOS device, tapping on your name, and selecting “iCloud” and “Manage Storage”.
4. Connect to a Wi-Fi network: To ensure a stable and uninterrupted download process, connect your iOS device and your PC to the same Wi-Fi network. This will enable fast data transfer and reduce any potential issues.
Once you have completed these preparations, you are ready to proceed with downloading iCloud for Windows and accessing your iCloud photos on your PC. So, let’s move on to the next step!
Downloading iCloud for Windows
To access your iCloud photos on your PC, you will need to download and install the iCloud for Windows application. Follow these simple steps to get started:
1. Open your preferred web browser and visit the official Apple website.
2. Navigate to the iCloud for Windows download page.
3. Click on the “Download” button to initiate the download process.
4. Once the download is complete, locate the downloaded file and double-click on it to begin the installation.
5. Follow the on-screen instructions to complete the installation process. You may be prompted to agree to the terms and conditions and enter your Apple ID credentials.
6. After the installation is complete, launch the iCloud for Windows application.
Now that you have successfully downloaded and installed iCloud for Windows, you are ready to sign in and access your iCloud photos on your PC. The next section will guide you through the process of signing in to iCloud for Windows.
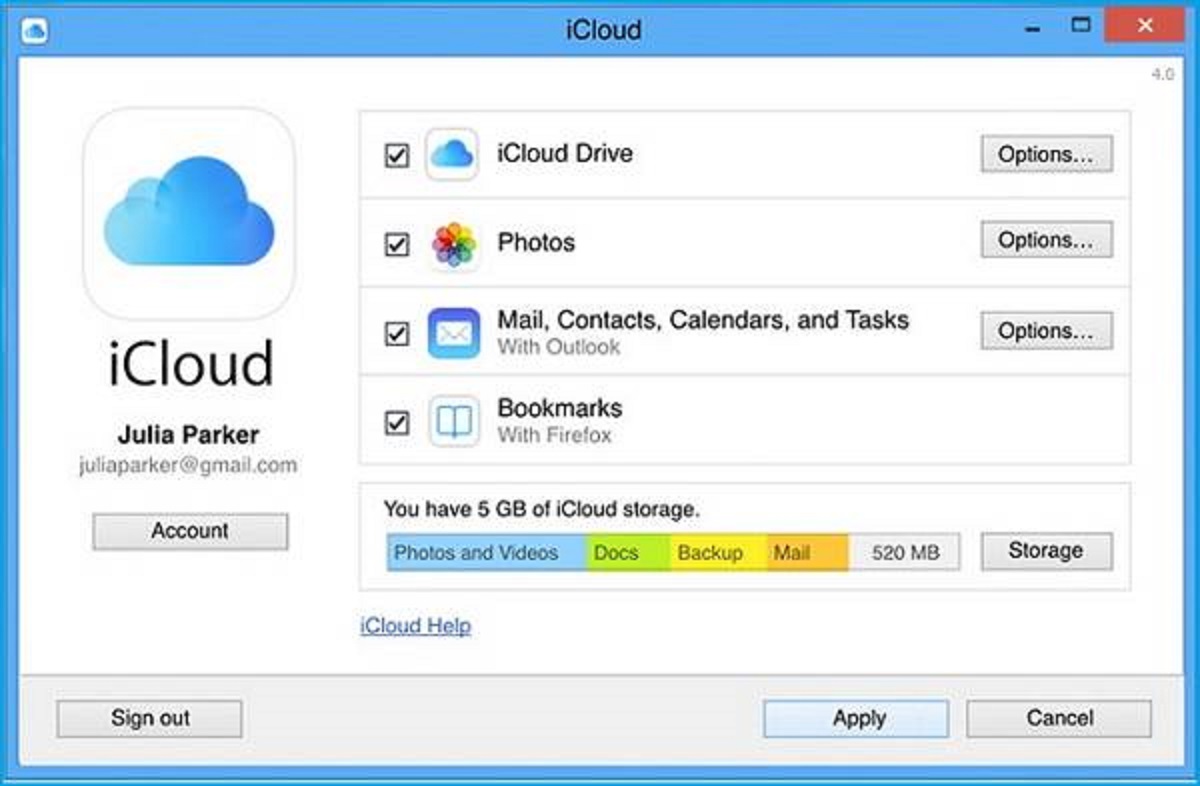
Signing in to iCloud for Windows
After you have installed the iCloud for Windows application, the next step is to sign in to your iCloud account. Follow these steps to get started:
1. Launch the iCloud for Windows application on your PC.
2. Enter your Apple ID and password in the designated fields. If you have enabled two-factor authentication, you may be required to enter a verification code sent to your trusted device or phone number.
3. Click on the “Sign In” button.
4. Select the features you want to enable for your PC. These may include iCloud Drive, Photos, Mail, Contacts, Calendars, and Tasks. For accessing your iCloud photos, make sure the “Photos” option is checked.
5. Click on the “Apply” button to save your settings.
Once you have successfully signed in to iCloud for Windows, you will have access to your iCloud photos through the iCloud Photos application on your PC. In the next section, we will discuss how to select the specific photos you want to download.
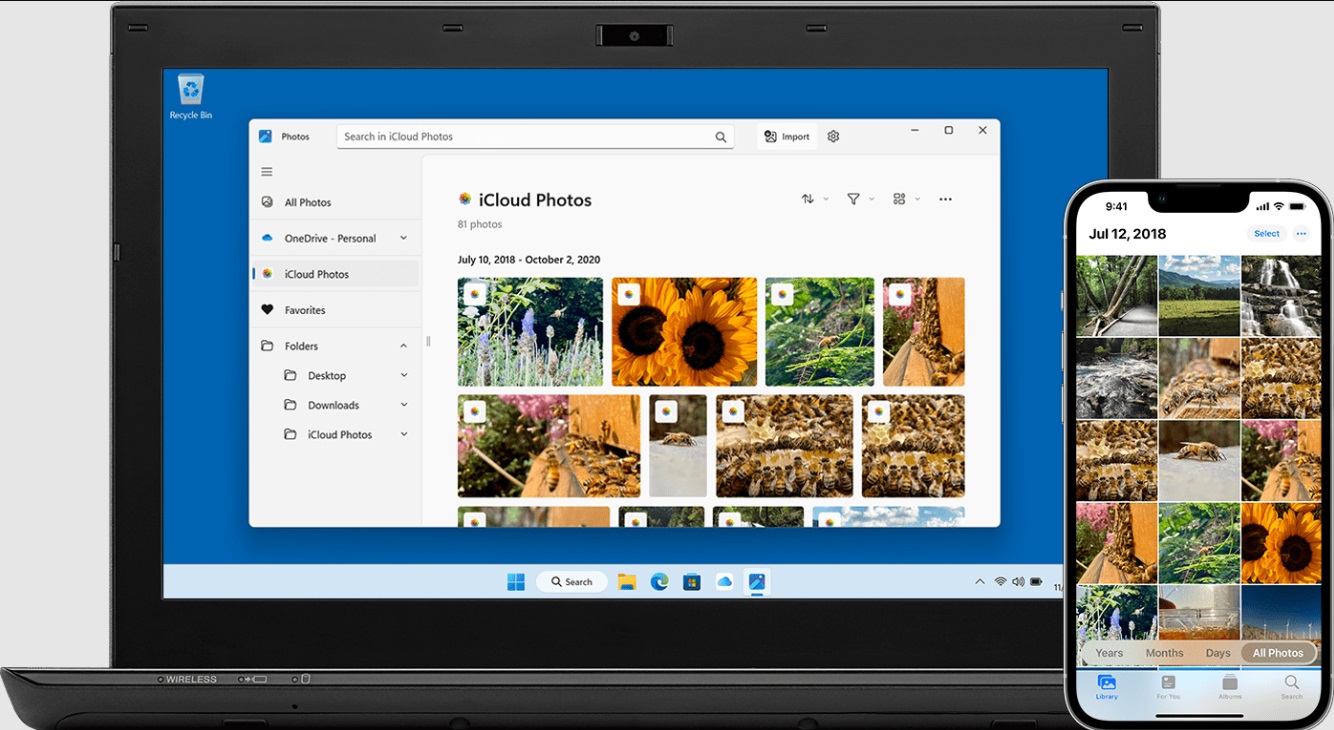
Selecting the Photos You Want to Download
Now that you’re signed in to iCloud for Windows, it’s time to choose which photos you want to download to your PC. Follow these steps:
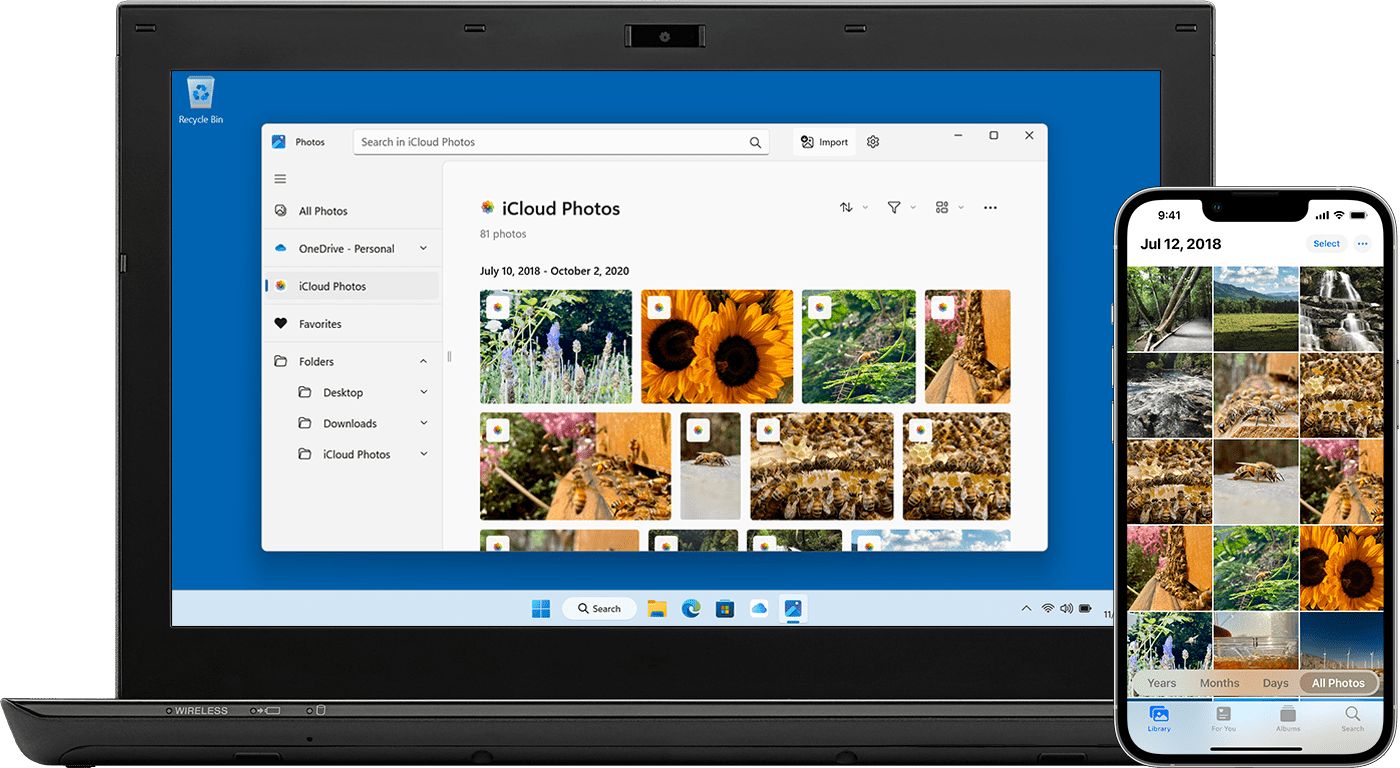
1. Open the iCloud Photos application on your PC.
2. You will see different albums and folders that contain your iCloud photos. Navigate through these albums to find the specific photos you want to download.
3. To select multiple photos, hold the Ctrl key (or Command key on Mac) while clicking on each desired photo.
4. If you want to download an entire album, click on the album to open it, and then press Ctrl+A (or Command+A on Mac) to select all the photos in that album.
5. Once you have selected the desired photos, right-click on any of the selected photos and choose “Download” from the context menu.
6. Alternatively, you can click on the “Download” button located in the top toolbar of the iCloud Photos application.
7. The selected photos will now begin downloading to your designated download location on your PC. You can monitor the progress of the download in the status bar.
By following these steps, you can selectively choose the photos you want to download from your iCloud account to your PC. Here comes the exciting part – choosing the download location for your photos! We will cover this in the next section.
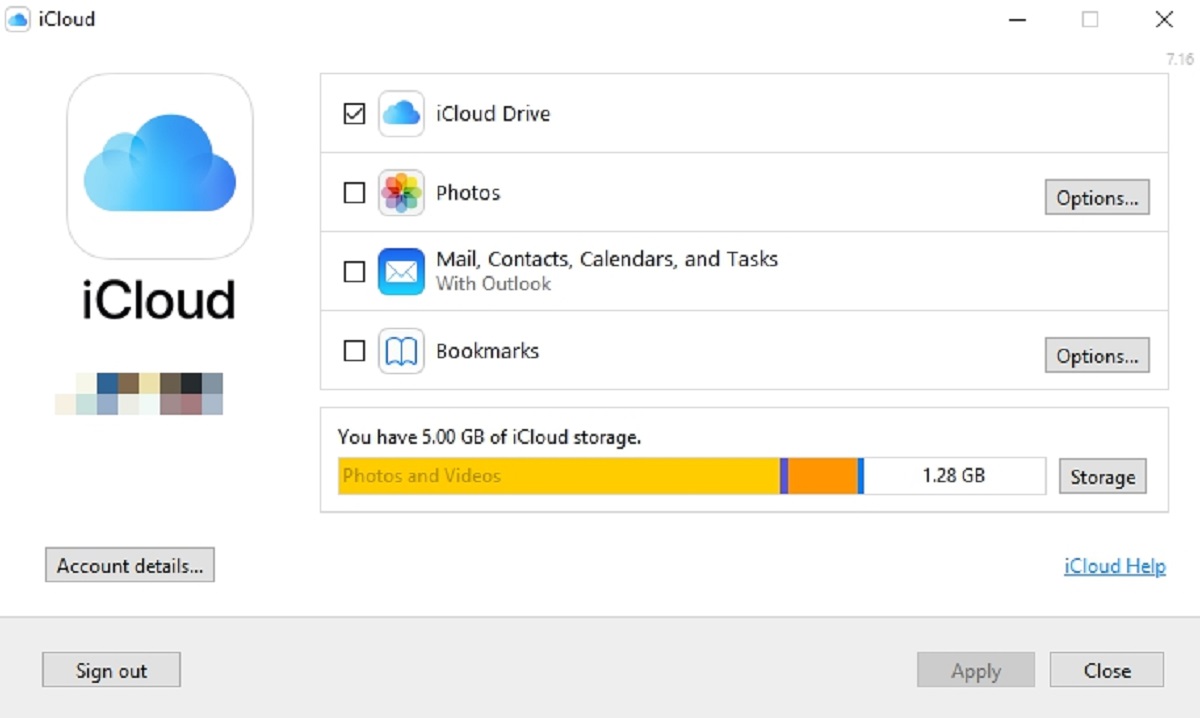
Choosing a Download Location
When downloading your iCloud photos to your PC, it’s essential to choose a suitable download location where you can easily access and organize your downloaded photos. Here’s how you can choose a download location:
1. In the iCloud Photos application on your PC, click on the “Options” button located next to the “Photos” tab in the toolbar.
2. A pop-up window will appear. Under the “Downloads” section, click on the “Change” button.
3. Browse to the desired location on your PC where you want to save your downloaded iCloud photos.
4. Click on the “OK” button to confirm the download location.
5. If you want to keep your downloaded photos organized, consider creating a new folder specifically for your iCloud photos within the chosen download location. This will make it easier to locate and manage your photos.
By selecting a suitable download location, you can ensure that your downloaded iCloud photos are stored in an easily accessible and organized manner on your PC. Once you have chosen the download location, you’re all set to initiate the download process in the next section.
Starting the Download Process
Now that you have selected the photos you want to download and chosen a download location, it’s time to initiate the download process. Follow these steps to start downloading your iCloud photos to your PC:
1. In the iCloud Photos application on your PC, ensure that the photos you want to download are selected.
2. Click on the “Download” button located in the top toolbar of the iCloud Photos application.
3. The download process will begin, and you can monitor the progress in the status bar.
4. Depending on the size of the selected photos and your internet connection speed, the download process may take some time. It is recommended to have a stable internet connection during this process.
5. Once the download is complete, you will find your iCloud photos in the designated download location on your PC.
It’s that simple! By following these steps, you can successfully download your iCloud photos to your PC. In the next section, we will discuss how you can check the downloaded photos on your PC and ensure they are successfully transferred.
Checking the Downloaded Photos on Your PC
Once the download process is complete, it’s important to verify that your iCloud photos have been successfully transferred to your PC. Use the following steps to check the downloaded photos:
1. Open the File Explorer on your PC by clicking on the folder icon in the taskbar or pressing Windows key + E.
2. Navigate to the download location you selected for your iCloud photos.
3. Look for a folder or subfolders containing your downloaded photos. Depending on your settings and the organization of your iCloud account, the photos may be organized in folders by date, albums, or other criteria.
4. Open the photo folders to view the downloaded photos. You can use any image viewer or photo management software installed on your PC to open and view the photos.
5. Check that all the downloaded photos are intact, and you can easily view them without any issues.
By following these steps, you can confirm that your iCloud photos have been successfully downloaded to your PC and are accessible for viewing and further management.
In case you encounter any issues or face difficulties in accessing or viewing your downloaded photos, consider referring to the additional tips and troubleshooting section that will be discussed later in this article.
Now that you have confirmed the successful download of your iCloud photos, you may consider deleting the photos from your iCloud account if you have limited storage space. The process for deleting photos from your iCloud account will be covered in the next section.
Deleting Photos from Your iCloud Account
If you have limited storage space in your iCloud account and have successfully downloaded your photos to your PC, you may consider deleting them from your iCloud account to free up space. Here’s how you can delete photos from your iCloud account:
1. Open your preferred web browser and visit the iCloud website.
2. Sign in to your iCloud account using your Apple ID and password.
3. Click on the “Photos” app on the iCloud website to access your iCloud photo library.
4. Navigate through your photo library to find the photos you want to delete. You can use various sorting and filtering options to locate specific photos or albums.
5. Select the photos you want to delete. You can select multiple photos by holding the Ctrl key (or Command key on Mac) while clicking on each photo. Alternatively, you can select all photos in an album by clicking on the ellipsis (three dots) icon and choosing “Select All”.
6. Once you have selected the desired photos, click on the trash can icon or the “Delete” button, depending on the interface of the iCloud website.
7. Confirm the deletion by clicking on the “Delete” button in the confirmation dialog.
8. The selected photos will be deleted from your iCloud account.
It’s important to note that deleting photos from your iCloud account only removes them from the cloud storage, not from your PC. The downloaded photos on your PC will remain intact.
If you ever need to retrieve deleted photos from your iCloud account, you can restore them within 30 days from the “Recently Deleted” folder in the Photos app on the iCloud website.
Now that you have successfully downloaded and verified your iCloud photos on your PC, you have gained control over your precious memories. In the next section, we will provide additional tips and troubleshoot common issues you may encounter during the download process.
Additional Tips and Troubleshooting
While downloading your iCloud photos to your PC is generally a straightforward process, you may encounter some issues or have specific requirements. Here are some additional tips and troubleshooting steps to help you:
1. Check your internet connection: Ensure that you have a stable and reliable internet connection during the download process. Slow or intermittent connections may result in interrupted downloads or errors.
2. Monitor your storage: Keep an eye on your PC’s storage capacity during the download process. If your PC’s storage is running low, consider cleaning up unnecessary files or transferring your downloaded photos to an external storage device.
3. Use a download manager: If you have a large number of photos to download, consider using a download manager application to improve the download speed and manage the downloading process more effectively.
4. Download in batches: If you have an extensive collection of iCloud photos, consider downloading them in batches to avoid overwhelming your PC’s resources and ensure a smoother download experience.
5. Keep your iCloud account synced: To ensure that all your latest photos are available for download, regularly sync your iCloud account on your iOS devices to upload any new photos to the cloud.
6. Clear cache and cookies: If you encounter any issues with the iCloud for Windows application, try clearing the cache and cookies of your web browser. This can resolve potential compatibility or loading issues.
Remember, if you encounter any specific errors or technical difficulties during the download process, it’s always a good idea to refer to the official Apple support website or contact Apple support for assistance.
By following these tips and troubleshooting steps, you can ensure a smoother and more efficient download process for your iCloud photos. Now that you are equipped with all the necessary information, you can confidently access and manage your iCloud photos on your PC.
Conclusion
Congratulations! You have successfully learned how to download your iCloud photos to your PC. By following the steps outlined in this guide, you can now enjoy the freedom of accessing and managing your iCloud photos from your Windows computer.
We started by preparing your iCloud account, ensuring that your devices are up to date, and enabling iCloud Photos. Then, we walked you through the process of downloading iCloud for Windows and signing in to your iCloud account on your PC.
Next, we discussed how to select the specific photos you want to download and choose a download location on your PC. We then explained how to initiate the download process and check the downloaded photos to ensure a successful transfer.
In addition, we discussed how to delete photos from your iCloud account to free up storage space and provided some additional tips and troubleshooting steps to enhance your download experience.
Now, you can access and cherish your precious memories stored in your iCloud account right on your PC. Whether you want to organize them, edit them, or share them with your loved ones, you have full control over your iCloud photos.
Remember to regularly check for updates to the iCloud for Windows application to ensure the best performance and compatibility with your PC. Additionally, always keep your iCloud account and devices synced to have the latest photos available for download.
If you ever encounter any issues or have specific requirements, refer back to this guide for guidance or reach out to Apple support for further assistance.
Thank you for choosing our guide to download your iCloud photos to your PC. We hope this article has been helpful and that you enjoy managing your iCloud photos effortlessly. Happy downloading!