Introduction:
Welcome to the digital age, where memories are stored not only in photo albums on shelves, but also in the vast realm of social media. Facebook, being one of the most popular platforms for sharing and preserving memories, provides users with the ability to create and share photo albums filled with precious moments. These albums capture milestones, adventures, and cherished memories that we want to savor and revisit.
However, relying solely on Facebook to keep these memories safe is not always ideal. Photos and albums have the potential to get lost due to accidental deletion, account deactivation, or even technical issues. That is why it can be incredibly useful to have a backup of your albums stored on your personal devices.
In this guide, we will show you how to download albums from Facebook, giving you peace of mind knowing that your memories are not solely reliant on the fate of your Facebook account. Whether you want to create physical photo albums, showcase your memories on a different platform, or simply have a backup for safekeeping, downloading your Facebook albums is a simple and effective solution.
By following the step-by-step instructions in this guide, you will be able to quickly and easily download your Facebook albums. So, let’s get started and take control of your cherished memories!
Benefits of Downloading Albums from Facebook:
Downloading your albums from Facebook offers a multitude of benefits that go beyond just having a backup copy. Here are some of the key advantages:
1. Preservation of Memories: Facebook may undergo changes or even shut down in the future. By downloading your albums, you ensure that your cherished memories remain securely stored on your personal devices, allowing you to revisit them whenever you want.
2. Easy Sharing: Having a downloaded copy of your album permits easy sharing on other platforms. You can select your favorite photos and effortlessly post them on social media, send them via messaging apps, or even print them for physical copies.
3. Creative Freedom: With a downloaded album, you can exercise your creative freedom to edit and enhance your photos using various software and applications. You can apply filters, crop or resize images, and even create personalized collages or slideshows.
4. Offline Access: By saving your albums locally, you gain the ability to view them offline, making it convenient for situations where internet access may be limited or unavailable. This is especially useful when traveling or in areas with a weak internet connection.
5. Increased Privacy: Downloading your albums also provides an additional layer of privacy. You have control over who can access your photos, ensuring that they are not visible to the public or vulnerable to unauthorized downloads.
6. Safeguard Against Loss: Accidental deletion, account hacking, or technical glitches can result in the loss of your Facebook albums. By downloading them, you guard yourself against such unforeseen circumstances, ensuring your memories are safe and sound.
With these benefits in mind, it becomes clear why downloading your Facebook albums is not just a simple backup option but a vital step in preserving and enjoying your precious memories for years to come.
Step 1: Open Facebook
The first step to downloading an album from Facebook is to open the Facebook website or launch the Facebook app on your device. Ensure that you are logged in to your Facebook account to access your albums.
If you are using a web browser, go to www.facebook.com and enter your login credentials to access your account. If you are using the Facebook app, locate the app on your device, tap on it to open, and proceed to log in to your account.
Once logged in, you will be directed to your News Feed, where you can see updates from your friends and the pages you follow. Now that you have successfully opened Facebook, you can proceed to the next step to find the album you want to download.
Please note that the Facebook interface and layout may vary slightly depending on the device and version you are using. However, the basic functionality and steps for downloading albums remain the same.
It is important to mention that you should always exercise caution when logging in to Facebook from public computers or devices. Ensure that you log out after completing your tasks and avoid storing your login credentials on shared devices to maintain the security of your account.
Now that you have opened Facebook and are logged in to your account, let’s move on to the next step to find the specific album you want to download.
Step 2: Find the Album
Once you have successfully logged in to your Facebook account, the next step is to locate the album you want to download. Facebook provides various ways to navigate and find albums, depending on how they have been shared or organized.
Here are a few methods you can try to find the specific album you wish to download:
1. Profile Albums: If the album you want to download is one of your own albums, you can easily find it on your profile page. Click on your profile picture or name at the top of the Facebook homepage to access your profile. Then, navigate to the “Photos” tab, where you will find all the albums you have created. Scroll through the list to find the specific album you want to download.
2. Friends’ Albums: If the album you are looking for is owned by one of your friends, you can find it by visiting their profile and navigating to their “Photos” section. Search for the specific album within their collection of albums to locate the one you want to download.
3. Group or Page Albums: If the album is shared within a Facebook group or a page, you can find it by visiting the group or page and navigating to the “Photos” section. Look for the album within the list of photos shared by the group or page.
4. Search Bar: If you remember the name or a keyword related to the album, you can use the search bar at the top of the Facebook page to search for it. Simply enter the album title or keyword and click on the search icon. Facebook will display the relevant results, including albums matching your search query.
5. Tagged Photos: If you are searching for an album where you or your friends are tagged, you can locate it by clicking on the “Photos” tab on your profile page and selecting the “Photos of You” section. Here you will find all the albums where you have been tagged, making it easier to locate the specific album you want to download.
Once you have found the album you want to download, you are ready to proceed to the next step and choose the download option.
Step 3: Choose the Download Option
Now that you have located the album you want to download on Facebook, it’s time to choose the download option. Facebook provides a built-in feature that allows users to download their albums conveniently. Follow these steps to proceed:
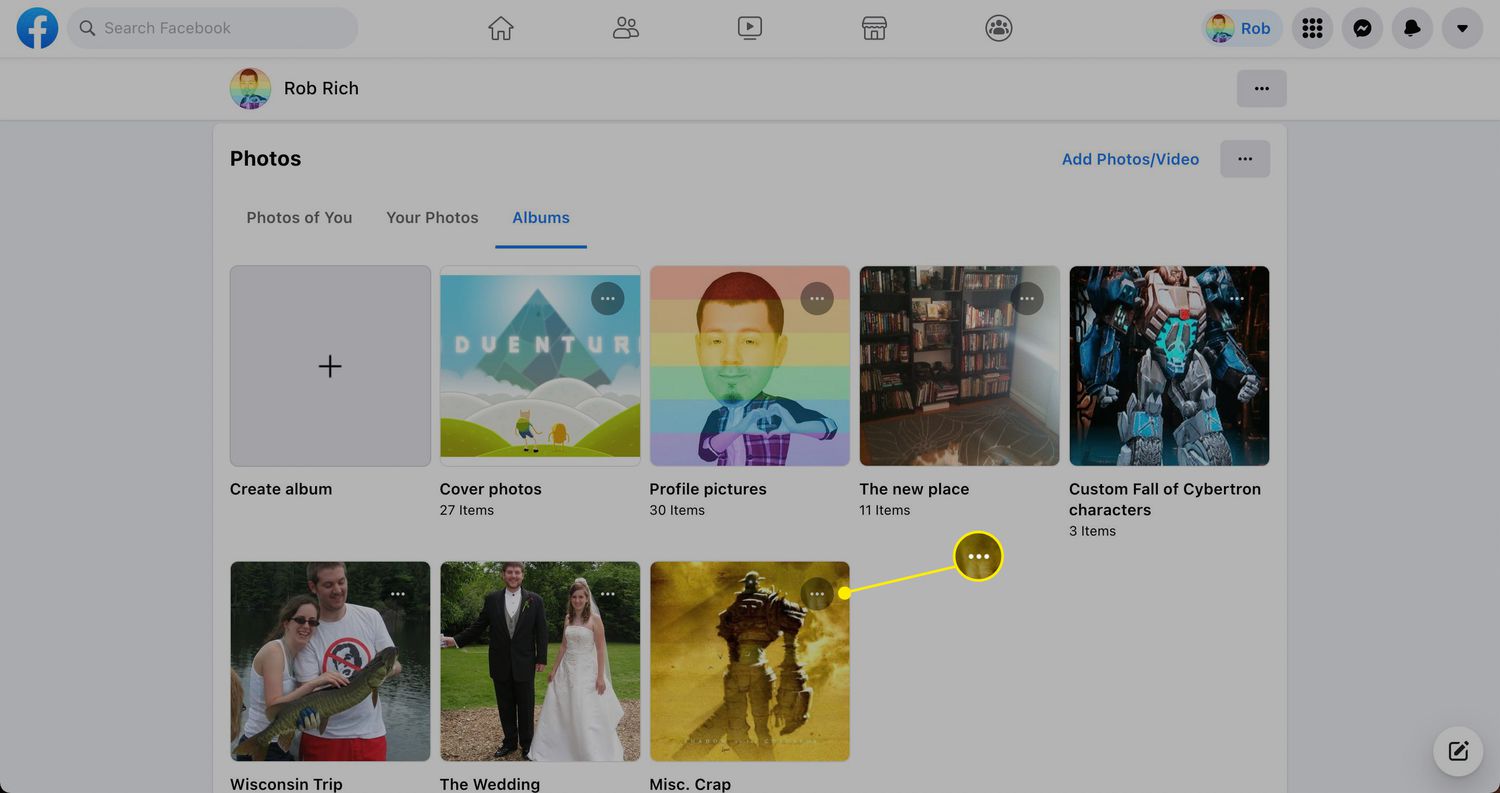
1. Open the Album: Click on the album you want to download to open it. This will display all the photos within the album in a grid or slideshow format, depending on the layout of the album.
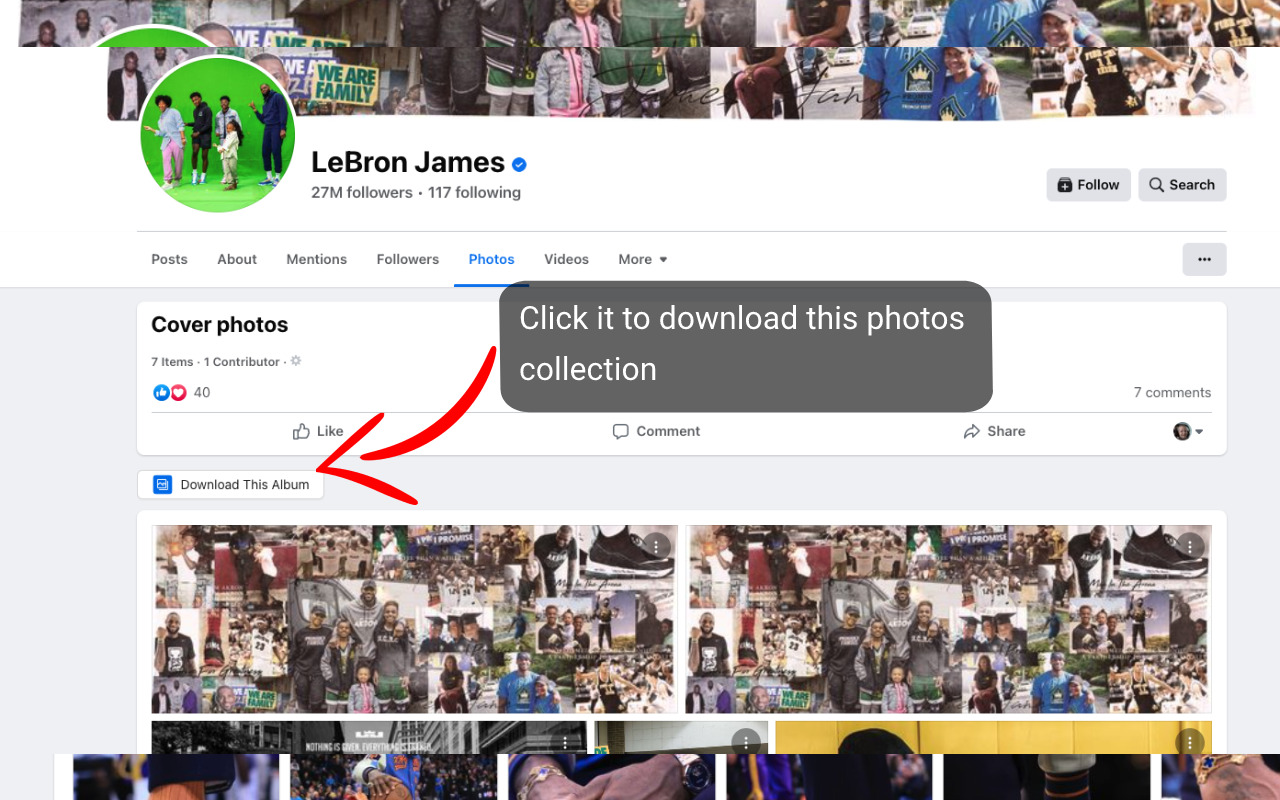
2. Click on the Three Dots: Look for the “Options” or “More” button usually represented by three dots located near the top right corner of the album page. Click on these three dots to open a dropdown menu with various options.
3. Select “Download Album”: In the dropdown menu, look for the “Download Album” or similar option and click on it. This will initiate the process of gathering all the photos and preparing them for download. Depending on the size of the album and the number of photos, it may take some time to generate the download file.
4. Confirm the Download: After clicking on the “Download Album” option, Facebook may prompt you to confirm and provide additional details. Verify the album name and any other relevant information before confirming the download.
5. Wait for the Download File: Once you have confirmed the download, Facebook will begin creating a ZIP file containing all the photos from the album. The time it takes to generate this file depends on the size of the album and your internet connection speed. You may need to wait for a few moments until the download file is ready.
6. Save the Downloaded File: Once the ZIP file is ready, Facebook will prompt you to save it to your device. Choose a location on your computer or mobile device where you want to store the downloaded album file. Select the desired location, and the ZIP file will be saved to that location.
Now that you have successfully chosen the download option and saved the album file to your device, you can proceed to the next step and learn how to access the downloaded album.
Step 4: Download the Album
After selecting the download option and saving the album file to your device, it’s time to download the album itself. Follow these steps to complete the downloading process:
1. Locate the Downloaded ZIP File: Open the file explorer or the location where you saved the downloaded album file. Look for the ZIP file with the name of the album or a similar identifier. It should have a .zip file extension.
2. Extract the ZIP File: Right-click on the ZIP file and select the “Extract” or “Extract All” option from the context menu. Choose a destination folder where you want to extract the contents of the ZIP file. Click “Extract” to start the extraction process.
3. Wait for the Extraction: The extraction process may take some time, depending on the size of the album. Once the extraction is complete, the contents of the ZIP file will be extracted to the chosen destination folder and will be accessible separately.
4. Access the Extracted Album: Open the destination folder where the contents of the ZIP file were extracted. You will find a collection of individual image files corresponding to the photos in the album. These files can be accessed and viewed using any image viewer or photo management software.
5. Organize and Rename Photos (Optional): If desired, you can organize the extracted photos into folders, rename them, or even create subfolders to categorize them further. This will help you easily locate specific photos in the future.
6. Backup and Store the Album: It is crucial to create a backup of the extracted album and store it in a safe location on your device or external storage. This ensures that you have a copy of the album even if the original files are accidentally deleted or lost.
Now that you have successfully downloaded the album from Facebook and extracted its contents, you can move on to the final step and learn how to access the downloaded album at any time.
Step 5: Access the Downloaded Album
Once you have downloaded and extracted the album from Facebook, accessing the downloaded album is a straightforward process. Follow these steps to access your downloaded album:
1. Open the Destination Folder: Navigate to the folder where you extracted the downloaded album. This is the location where you saved the individual image files that make up the album.
2. Browse the Photos: Open the folder containing the extracted photos and browse through the images. You can use any image viewer or photo management software installed on your device to view the photos in the downloaded album.
3. Edit or Share the Photos (Optional): Now that the album is on your device, you have the freedom to edit, enhance, or share the photos as desired. Use photo editing software or applications to add filters, crop images, adjust colors, or perform any other modifications you prefer. You can also easily share the photos on social media platforms, messaging apps, or print them for physical copies.
4. Organize the Album: If you wish to keep your downloaded albums organized, you can create separate folders for different albums, rename the image files to more descriptive names, or categorize them based on themes or dates. By organizing your albums, you can easily locate and browse through specific photos when you want to revisit your cherished memories.
5. Backup the Downloaded Album: Remember to regularly backup the folder containing your downloaded album. You can create multiple copies and store them in different locations, such as external hard drives, cloud storage services, or other secure backup solutions. This ensures that you have a backup of your downloaded albums, providing extra security for your precious memories.
With these simple steps, you can easily access and enjoy your downloaded Facebook album whenever you want, even offline. Take some time to explore the photos, relive the memories, and share them with your loved ones if you wish.
Now that you have successfully accessed your downloaded album, let’s conclude this guide on downloading albums from Facebook.
Conclusion:
Congratulations! You have successfully learned how to download albums from Facebook and preserve your precious memories. By following the simple steps outlined in this guide, you can now have a backup of your albums stored on your personal devices, providing you with easy access and peace of mind.
Downloading your albums from Facebook offers numerous benefits. It allows you to preserve your memories even if Facebook undergoes changes or shuts down in the future. You can also exercise creative freedom by editing and enhancing the photos, easily share them on other platforms, and have offline access to them whenever needed.
Remember to follow the step-by-step instructions provided in this guide to open Facebook, find the album, choose the download option, and ultimately download and access your album. It is important to note that the process may slightly vary depending on the device and version of Facebook you are using.
Additionally, consider organizing and backing up the downloaded albums to ensure the longevity and safety of your cherished memories. Create multiple copies, store them in secure locations like external hard drives or cloud storage services, and regularly update your backups to avoid any potential loss.
With your downloaded albums safely stored on your personal devices, you can relive those precious moments, share them with loved ones, and have the peace of mind that your memories are secured outside of Facebook.
So, what are you waiting for? Start downloading your favorite albums from Facebook today and enjoy the freedom of accessing and enjoying your cherished memories anytime and anywhere!