Introduction
Facebook is a popular social media platform that allows users to share photos and connect with friends and family. Over time, you may have accumulated a vast collection of photo albums on your Facebook profile, capturing precious memories and moments. If you’re looking to download a photo album from Facebook to your device, you’ve come to the right place!
In this guide, we will walk you through a step-by-step process on how to easily download a photo album from Facebook. Whether you want to preserve your cherished memories offline, create a backup, or simply have easy access to your photos, we’ve got you covered. So, let’s dive in!
Before we get started, it’s important to note that you can only download albums that you have uploaded. This means that if you want to download an album that someone else has shared with you, you’ll need to request access or ask them to provide you with the photos directly.
Additionally, keep in mind that the process of downloading a photo album from Facebook may vary slightly depending on the device and browser you’re using. However, the overall steps remain the same, so you’ll be able to follow along regardless of your setup.
Now that we’ve covered the basics, let’s move on to the step-by-step instructions on how to download a photo album from Facebook.
Step 1: Log in to Facebook
To begin the process of downloading a photo album from Facebook, the first step is to log in to your Facebook account. Open your favorite browser and go to www.facebook.com.
If you already have an account, enter your email address or phone number and password in the respective fields and click on the “Log In” button. If you don’t have an account yet, you will need to create one by clicking on the “Sign Up” button and following the instructions provided.
After successfully logging in, you will be redirected to your Facebook home page, where you can see the latest updates from your friends, family, and followed pages. Ensure that you have a stable internet connection during this process to prevent any disruptions.
Remember to use a strong and unique password for your Facebook account to maintain its security. If you’re accessing Facebook from a public or shared device, it is advisable to log out once you have completed the album download to protect your personal information.
Once you are logged in and ready to proceed, it’s time to navigate to your albums section on Facebook, which we will cover in the next step.
Lorem ipsum dolor sit amet, consectetur adipiscing elit. Suspendisse iaculis placerat dui, in aliquet odio. Morbi tristique metus mi. Nulla facilisi. Aenean non mauris sit amet erat hendrerit venenatis. Fusce ultricies tellus sed sapien sagittis, nec efficitur nisi lacinia. Sed dapibus elit vitae mauris accumsan volutpat. Praesent porttitor nulla lectus, ut lacinia lacus auctor vitae. Duis vestibulum felis non sem bibendum, at bibendum turpis finibus. Curabitur porttitor leo ac est tristique, nec faucibus mi tempor. Curabitur vestibulum eu lorem non consequat. Nulla facilisi. Proin varius, mi sit amet mattis ultrices, libero dui bibendum justo, at facilisis lorem libero quis enim. Etiam consequat metus nunc, in fermentum enim rutrum et. Fusce pretium orci tortor, id cursus ligula eleifend at. Aliquam quis mollis risus.
Curabitur felis metus, semper aliquet metus et, venenatis viverra libero. Quisque quis rutrum tortor, nec ullamcorper risus. Nullam fermentum vulputate gravida. Donec ornare sodales mauris ut varius. Phasellus quis feugiat erat. Etiam vitae urna sed erat dapibus elementum. Duis blandit nisl ac lacus iaculis, ac efficitur orci ullamcorper. Curabitur consequat sodales eros. In faucibus consequat tellus in suscipit. Integer sit amet luctus tellus. Etiam ac mi ullamcorper, convallis ex ut, porttitor mi. Fusce sollicitudin magna quis turpis egestas ullamcorper. Duis interdum eget eros ac fermentum.
Step 2: Go to your albums
Once you are logged in to your Facebook account, you will need to navigate to the section where your photo albums are stored. These albums contain all the photos you have uploaded to Facebook over the years. Follow the steps below to find your albums:
1. On the Facebook homepage, locate the navigation menu on the left-hand side of the screen. It typically includes options such as “Feed,” “Messenger,” “Marketplace,” and more.
2. Scroll down the menu until you find the “Photos” section. It may be located under the “Explore” or “Shortcuts” heading, depending on your Facebook layout.
3. Click on the “Photos” option. This will take you to the main photo page, where you can access all your photo albums.
4. Once you’re on the main photo page, you’ll see various tabs at the top, such as “Photos of You,” “Albums,” “Videos,” and more. Click on the “Albums” tab to view all your photo albums.
5. The albums will be displayed in a grid-like format, showcasing the album cover photos. Scroll through the page to find the specific album you want to download.
That’s it! You have successfully navigated to your photo albums on Facebook. Now, let’s move on to the next step, where we’ll select the album you wish to download.
Lorem ipsum dolor sit amet, consectetur adipiscing elit. Suspendisse iaculis placerat dui, in aliquet odio. Morbi tristique metus mi. Nulla facilisi. Aenean non mauris sit amet erat hendrerit venenatis. Fusce ultricies tellus sed sapien sagittis, nec efficitur nisi lacinia. Sed dapibus elit vitae mauris accumsan volutpat. Praesent porttitor nulla lectus, ut lacinia lacus auctor vitae. Duis vestibulum felis non sem bibendum, at bibendum turpis finibus. Curabitur porttitor leo ac est tristique, nec faucibus mi tempor. Curabitur vestibulum eu lorem non consequat. Nulla facilisi. Proin varius, mi sit amet mattis ultrices, libero dui bibendum justo, at facilisis lorem libero quis enim. Etiam consequat metus nunc, in fermentum enim rutrum et. Fusce pretium orci tortor, id cursus ligula eleifend at. Aliquam quis mollis risus.
Curabitur felis metus, semper aliquet metus et, venenatis viverra libero. Quisque quis rutrum tortor, nec ullamcorper risus. Nullam fermentum vulputate gravida. Donec ornare sodales mauris ut varius. Phasellus quis feugiat erat. Etiam vitae urna sed erat dapibus elementum. Duis blandit nisl ac lacus iaculis, ac efficitur orci ullamcorper. Curabitur consequat sodales eros. In faucibus consequat tellus in suscipit. Integer sit amet luctus tellus. Etiam ac mi ullamcorper, convallis ex ut, porttitor mi. Fusce sollicitudin magna quis turpis egestas ullamcorper. Duis interdum eget eros ac fermentum.
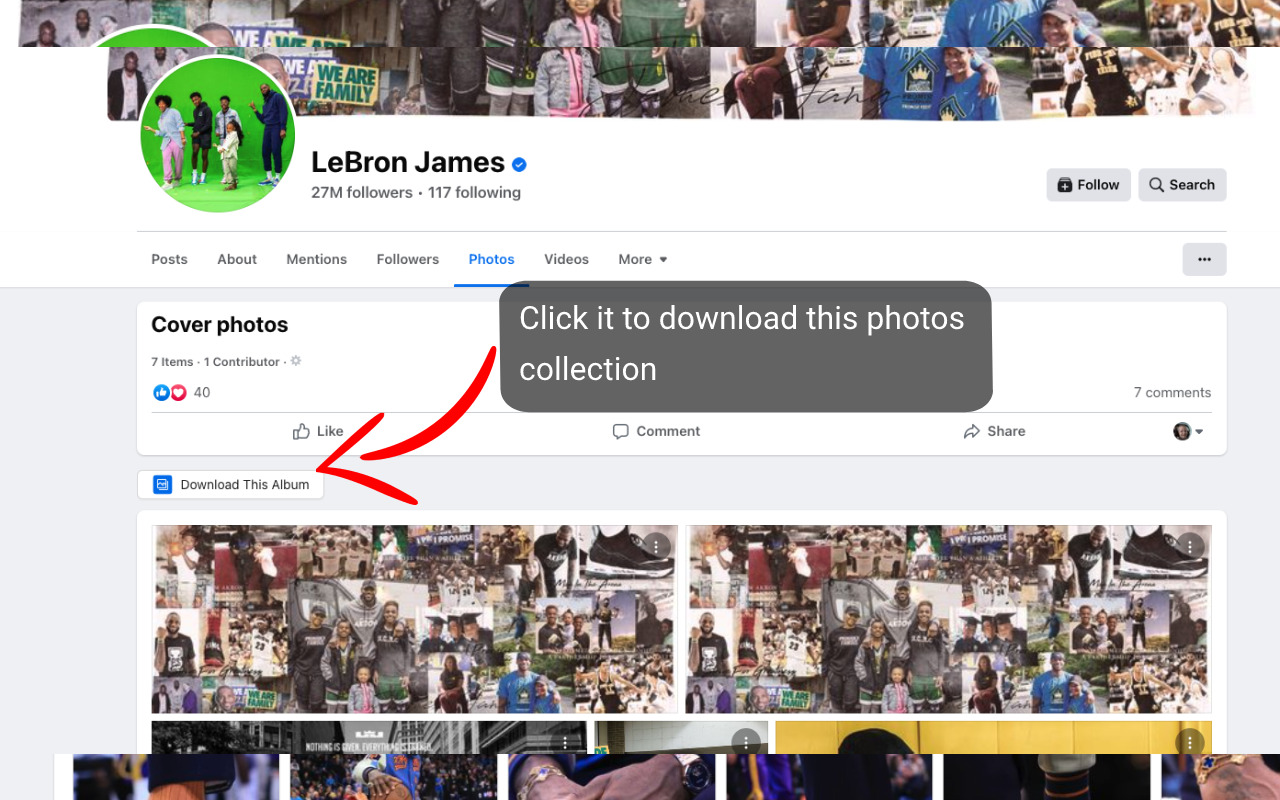
Step 3: Choose the album you want to download
Now that you have reached the “Albums” section on Facebook, it’s time to select the specific album you want to download. Follow the steps below to choose the album:
1. Browse through the displayed albums until you find the one you wish to download. Each album will have a cover photo and a title.
2. Click on the album cover photo or the album title to open the album. This will take you to the album’s individual page.
3. On the album page, you will see all the photos contained within the album. Take a moment to reminisce about the memories captured in those photos!
4. If the album contains a large number of photos, you may need to scroll through multiple pages to view all of them. Facebook typically displays a limited number of photos per page, so keep that in mind.
5. Once you have located the desired album, proceed to the next step to access the album settings.
Choosing the correct album is essential to ensure you download the right set of photos. Take your time to double-check the album name and its contents before moving forward. Now, let’s move on to the next step, where we’ll explore the album settings.
Lorem ipsum dolor sit amet, consectetur adipiscing elit. Suspendisse iaculis placerat dui, in aliquet odio. Morbi tristique metus mi. Nulla facilisi. Aenean non mauris sit amet erat hendrerit venenatis. Fusce ultricies tellus sed sapien sagittis, nec efficitur nisi lacinia. Sed dapibus elit vitae mauris accumsan volutpat. Praesent porttitor nulla lectus, ut lacinia lacus auctor vitae. Duis vestibulum felis non sem bibendum, at bibendum turpis finibus. Curabitur porttitor leo ac est tristique, nec faucibus mi tempor. Curabitur vestibulum eu lorem non consequat. Nulla facilisi. Proin varius, mi sit amet mattis ultrices, libero dui bibendum justo, at facilisis lorem libero quis enim. Etiam consequat metus nunc, in fermentum enim rutrum et. Fusce pretium orci tortor, id cursus ligula eleifend at. Aliquam quis mollis risus.
Curabitur felis metus, semper aliquet metus et, venenatis viverra libero. Quisque quis rutrum tortor, nec ullamcorper risus. Nullam fermentum vulputate gravida. Donec ornare sodales mauris ut varius. Phasellus quis feugiat erat. Etiam vitae urna sed erat dapibus elementum. Duis blandit nisl ac lacus iaculis, ac efficitur orci ullamcorper. Curabitur consequat sodales eros. In faucibus consequat tellus in suscipit. Integer sit amet luctus tellus. Etiam ac mi ullamcorper, convallis ex ut, porttitor mi. Fusce sollicitudin magna quis turpis egestas ullamcorper. Duis interdum eget eros ac fermentum.
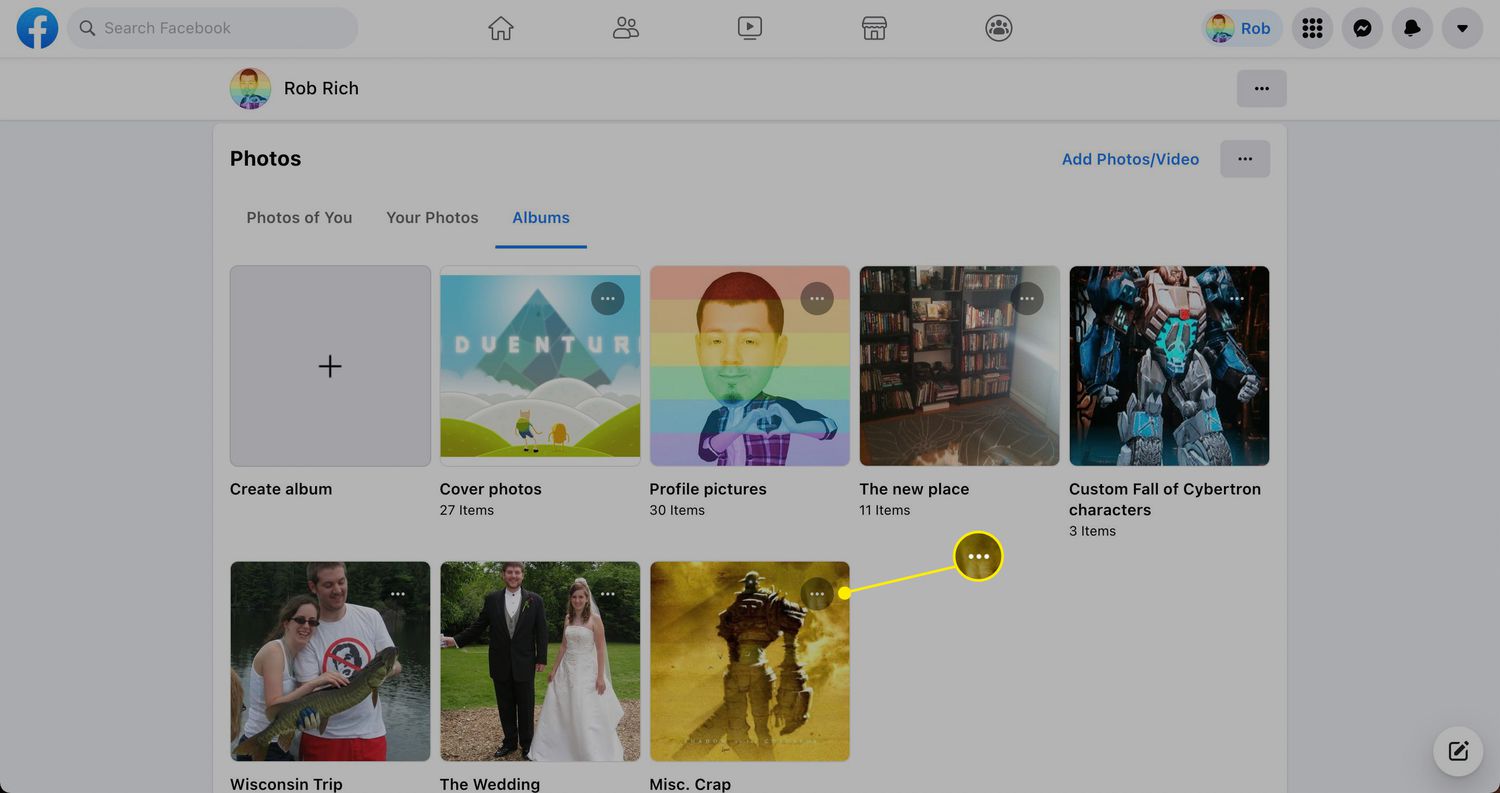
Step 4: Open the album settings
After selecting the album you want to download, the next step is to open the album settings. This will allow you to access the options for downloading the album. Follow the steps below to open the album settings:
1. On the album page, look for the three-dot menu icon located in the top-right corner of the screen. Click on this icon to open the album options menu.
2. A drop-down menu will appear with various options related to the album. Look for the “Options” or “Settings” option and click on it.
3. Depending on the Facebook version you’re using, you may see different options in the settings menu. Look for an option that includes “Download album” or similar wording.
4. Click on the “Download album” option to proceed with downloading the entire album. If there are additional options related to downloading, such as selecting specific photo quality or file format preferences, make sure to adjust them according to your preferences.
Opening the album settings gives you control over the download process and allows you to customize certain aspects if available. Now that you have accessed the settings, let’s move on to the next step, where we’ll finally download the album.
Lorem ipsum dolor sit amet, consectetur adipiscing elit. Suspendisse iaculis placerat dui, in aliquet odio. Morbi tristique metus mi. Nulla facilisi. Aenean non mauris sit amet erat hendrerit venenatis. Fusce ultricies tellus sed sapien sagittis, nec efficitur nisi lacinia. Sed dapibus elit vitae mauris accumsan volutpat. Praesent porttitor nulla lectus, ut lacinia lacus auctor vitae. Duis vestibulum felis non sem bibendum, at bibendum turpis finibus. Curabitur porttitor leo ac est tristique, nec faucibus mi tempor. Curabitur vestibulum eu lorem non consequat. Nulla facilisi. Proin varius, mi sit amet mattis ultrices, libero dui bibendum justo, at facilisis lorem libero quis enim. Etiam consequat metus nunc, in fermentum enim rutrum et. Fusce pretium orci tortor, id cursus ligula eleifend at. Aliquam quis mollis risus.
Curabitur felis metus, semper aliquet metus et, venenatis viverra libero. Quisque quis rutrum tortor, nec ullamcorper risus. Nullam fermentum vulputate gravida. Donec ornare sodales mauris ut varius. Phasellus quis feugiat erat. Etiam vitae urna sed erat dapibus elementum. Duis blandit nisl ac lacus iaculis, ac efficitur orci ullamcorper. Curabitur consequat sodales eros. In faucibus consequat tellus in suscipit. Integer sit amet luctus tellus. Etiam ac mi ullamcorper, convallis ex ut, porttitor mi. Fusce sollicitudin magna quis turpis egestas ullamcorper. Duis interdum eget eros ac fermentum.
Step 5: Download the album
After opening the album settings and customizing any available options, it’s time to proceed with downloading the album. Follow the steps below to download the selected album from Facebook:
1. In the album settings menu, locate the option for downloading the album. It is usually labeled as “Download album” or something similar.
2. Click on the “Download album” option to initiate the download process. Depending on the size of the album and your internet connection speed, it may take some time to prepare the download.
3. Once the download is ready, a pop-up window will appear, prompting you to choose a location on your device to save the album. Select a suitable folder or directory where you want to store the downloaded album.
4. Click on the “Save” or “Download” button to start the actual download. The album will be saved as a compressed (.zip) file, containing all the photos and any accompanying information, such as captions or tags.
5. Wait for the download to complete. The download duration will vary depending on the size of the album and your internet connection speed. Ensure that your device remains connected to the internet until the download is finished.
Once the download is complete, you will have a copy of the Facebook album saved on your device. You can now access and view the photos offline, share them with others, or organize them as you wish. Congratulations on successfully downloading the album!
Lorem ipsum dolor sit amet, consectetur adipiscing elit. Suspendisse iaculis placerat dui, in aliquet odio. Morbi tristique metus mi. Nulla facilisi. Aenean non mauris sit amet erat hendrerit venenatis. Fusce ultricies tellus sed sapien sagittis, nec efficitur nisi lacinia. Sed dapibus elit vitae mauris accumsan volutpat. Praesent porttitor nulla lectus, ut lacinia lacus auctor vitae. Duis vestibulum felis non sem bibendum, at bibendum turpis finibus. Curabitur porttitor leo ac est tristique, nec faucibus mi tempor. Curabitur vestibulum eu lorem non consequat. Nulla facilisi. Proin varius, mi sit amet mattis ultrices, libero dui bibendum justo, at facilisis lorem libero quis enim. Etiam consequat metus nunc, in fermentum enim rutrum et. Fusce pretium orci tortor, id cursus ligula eleifend at. Aliquam quis mollis risus.
Curabitur felis metus, semper aliquet metus et, venenatis viverra libero. Quisque quis rutrum tortor, nec ullamcorper risus. Nullam fermentum vulputate gravida. Donec ornare sodales mauris ut varius. Phasellus quis feugiat erat. Etiam vitae urna sed erat dapibus elementum. Duis blandit nisl ac lacus iaculis, ac efficitur orci ullamcorper. Curabitur consequat sodales eros. In faucibus consequat tellus in suscipit. Integer sit amet luctus tellus. Etiam ac mi ullamcorper, convallis ex ut, porttitor mi. Fusce sollicitudin magna quis turpis egestas ullamcorper. Duis interdum eget eros ac fermentum.
Step 6: Wait for the download to complete
After initiating the download of the album from Facebook, it’s important to be patient and allow the process to complete. Depending on the size of the album and the speed of your internet connection, the download may take some time. Follow these guidelines while waiting for the download to finish:
1. Monitor the download progress: Keep an eye on the download progress bar or indicator, if available. This will give you an idea of how much longer you have to wait for the download to complete.
2. Avoid interruptions: It’s essential to ensure a stable internet connection throughout the download process. Avoid restarting your device, switching networks, or closing the browser until the download is finished. Interrupting the process may result in an incomplete or corrupted album.
3. Be mindful of device storage: Depending on the size of the album, it may require a significant amount of storage space on your device. Make sure you have sufficient free space to accommodate the downloaded album.
4. Take breaks if necessary: If you’re downloading a large album, it’s understandable if you want to take breaks while waiting. You can pause the download if your browser or download manager supports it and resume it when you’re ready. Just ensure that you don’t leave it paused for an extended period, as some download links may expire after a certain time.
5. Verify the download: Once the download is complete, navigate to the folder or directory where you chose to save the album. Ensure that all the photos are present and accessible. If the album is in a compressed (.zip) format, you may need to extract or unzip the files before viewing them.
Remember, the download time may vary depending on various factors, including your internet speed, the size of the album, and the overall network congestion. Patience is key as you await the completion of the download process.
Lorem ipsum dolor sit amet, consectetur adipiscing elit. Suspendisse iaculis placerat dui, in aliquet odio. Morbi tristique metus mi. Nulla facilisi. Aenean non mauris sit amet erat hendrerit venenatis. Fusce ultricies tellus sed sapien sagittis, nec efficitur nisi lacinia. Sed dapibus elit vitae mauris accumsan volutpat. Praesent porttitor nulla lectus, ut lacinia lacus auctor vitae. Duis vestibulum felis non sem bibendum, at bibendum turpis finibus. Curabitur porttitor leo ac est tristique, nec faucibus mi tempor. Curabitur vestibulum eu lorem non consequat. Nulla facilisi. Proin varius, mi sit amet mattis ultrices, libero dui bibendum justo, at facilisis lorem libero quis enim. Etiam consequat metus nunc, in fermentum enim rutrum et. Fusce pretium orci tortor, id cursus ligula eleifend at. Aliquam quis mollis risus.
Curabitur felis metus, semper aliquet metus et, venenatis viverra libero. Quisque quis rutrum tortor, nec ullamcorper risus. Nullam fermentum vulputate gravida. Donec ornare sodales mauris ut varius. Phasellus quis feugiat erat. Etiam vitae urna sed erat dapibus elementum. Duis blandit nisl ac lacus iaculis, ac efficitur orci ullamcorper. Curabitur consequat sodales eros. In faucibus consequat tellus in suscipit. Integer sit amet luctus tellus. Etiam ac mi ullamcorper, convallis ex ut, porttitor mi. Fusce sollicitudin magna quis turpis egestas ullamcorper. Duis interdum eget eros ac fermentum.
Conclusion
Congratulations! You have successfully learned how to download a photo album from Facebook. By following the step-by-step process outlined in this guide, you can now preserve your cherished memories offline, create backups, and have easy access to your photos whenever you need them.
Remember, downloading photo albums from Facebook is a great way to safeguard your valuable memories and ensure you have control over your own content. Whether you want to store the photos on your computer, share them with others, or create physical copies, having the option to download albums provides you with more flexibility and peace of mind.
While downloading your photo albums, make sure to respect privacy and copyright laws. Only download albums that you have uploaded or have consent to download. If you want to download an album shared by someone else, it’s important to obtain their permission beforehand.
We hope this guide has been helpful in assisting you with downloading your Facebook photo albums. Remember to keep your Facebook account secure and regularly back up your photos to ensure their safekeeping. Enjoy reliving your memories and exploring new ways to share and preserve them!
Lorem ipsum dolor sit amet, consectetur adipiscing elit. Suspendisse iaculis placerat dui, in aliquet odio. Morbi tristique metus mi. Nulla facilisi. Aenean non mauris sit amet erat hendrerit venenatis. Fusce ultricies tellus sed sapien sagittis, nec efficitur nisi lacinia. Sed dapibus elit vitae mauris accumsan volutpat. Praesent porttitor nulla lectus, ut lacinia lacus auctor vitae. Duis vestibulum felis non sem bibendum, at bibendum turpis finibus. Curabitur porttitor leo ac est tristique, nec faucibus mi tempor. Curabitur vestibulum eu lorem non consequat. Nulla facilisi. Proin varius, mi sit amet mattis ultrices, libero dui bibendum justo, at facilisis lorem libero quis enim. Etiam consequat metus nunc, in fermentum enim rutrum et. Fusce pretium orci tortor, id cursus ligula eleifend at. Aliquam quis mollis risus.
Curabitur felis metus, semper aliquet metus et, venenatis viverra libero. Quisque quis rutrum tortor, nec ullamcorper risus. Nullam fermentum vulputate gravida. Donec ornare sodales mauris ut varius. Phasellus quis feugiat erat. Etiam vitae urna sed erat dapibus elementum. Duis blandit nisl ac lacus iaculis, ac efficitur orci ullamcorper. Curabitur consequat sodales eros. In faucibus consequat tellus in suscipit. Integer sit amet luctus tellus. Etiam ac mi ullamcorper, convallis ex ut, porttitor mi. Fusce sollicitudin magna quis turpis egestas ullamcorper. Duis interdum eget eros ac fermentum.