Introduction
Are you wondering how to import videos from your iPhone to your PC? Whether you want to free up space on your phone or simply edit and share your videos on a larger screen, there are several methods available to transfer your videos from your iPhone to your PC. In this article, we will explore different approaches that can help you accomplish this task effortlessly.
With the advent of smartphones, capturing videos has become an integral part of our lives. From recording precious family moments to creating stunning vlogs, we rely on our iPhones to capture these memories. However, due to limited storage space on our devices, it’s crucial to transfer our videos to a more substantial storage solution such as a computer.
Importing videos from your iPhone to your PC not only helps you free up space but also allows you to have a backup of your valuable videos. Additionally, it gives you the freedom to edit and enhance the videos using powerful software tools that are commonly available on computers.
In this article, we will walk you through four different methods to import videos from your iPhone to your PC. These methods include using Windows File Explorer, the Photos app, iCloud Photos, and iTunes. Depending on your preference and the resources available, you can choose the most suitable method for your needs.
Before we dive into the details of each method, it’s important to note that these methods are applicable for Windows PC users. If you’re using a Mac, the process may differ slightly. However, most of the concepts covered in this article will still be relevant and can be adapted to suit your Mac-based workflow.
Now, let’s explore these methods step-by-step and learn how to import videos from your iPhone to your PC seamlessly. Whether you’re a novice or an experienced user, we’ve got you covered with easy-to-follow instructions to help you transfer your precious videos in no time.
Why Import Videos from iPhone to PC?
There are several reasons why you may want to import videos from your iPhone to your PC. Let’s explore some of the most common scenarios where transferring videos becomes essential:
- Backup and Storage: By importing your videos to your PC, you can create a backup and ensure that your precious memories are safe. Additionally, it helps free up space on your iPhone, allowing you to capture more videos without worrying about storage limitations.
- Editing and Enhancements: Importing videos to your PC provides you with access to powerful video editing software. This opens up a world of possibilities to enhance your videos with effects, transitions, and other creative elements to make them more captivating and professional-looking.
- Sharing and Collaboration: With videos transferred to your PC, it becomes easier to share them with friends, family, or colleagues. You can upload them to social media platforms, send them via email, or collaborate on projects that require video sharing.
- Better Viewing Experience: Watching videos on a larger screen can greatly enhance the overall viewing experience. When you import videos from your iPhone to your PC, you can enjoy your videos on a bigger display with better clarity and quality.
- Long-Term Preservation: iPhones are susceptible to damage or loss. By importing your videos to your PC, you create an additional layer of protection, ensuring that your videos are safeguarded against any unforeseen events.
As technology evolves, our reliance on smartphones for video capturing and sharing continues to grow. However, it’s important to recognize the limitations of mobile devices when it comes to long-term storage, editing capabilities, and sharing options. By transferring videos from your iPhone to your PC, you unlock a whole new realm of possibilities to preserve, enhance, and share your precious video memories.
Method 1: Using Windows File Explorer
Using Windows File Explorer is one of the simplest and most straightforward ways to import videos from your iPhone to your PC. Here’s how you can do it:
- Connect your iPhone to your PC using a USB cable. Make sure your iPhone is unlocked and the home screen is visible.
- On your PC, open Windows File Explorer by pressing the Windows key + E or by clicking on the File Explorer icon in the taskbar.
- In the left-hand sidebar of File Explorer, you should see your iPhone listed under the “Devices and drives” section. Click on it to open it.
- Navigate to the “Internal Storage” or “DCIM” folder on your iPhone. This is where your videos are stored.
- You will see a list of videos on your iPhone. Select the videos you want to import by holding down the Ctrl key and clicking on each video. Alternatively, you can select all videos by pressing Ctrl + A.
- Right-click on the selected videos and choose “Copy” from the context menu.
- Navigate to the destination folder on your PC where you want to store the imported videos. Right-click inside the folder and choose “Paste” from the context menu.
- Windows will now start copying the selected videos from your iPhone to your PC. The transfer speed may vary depending on the size and number of videos.
- Once the copying process is complete, you can safely disconnect your iPhone from your PC.
Using Windows File Explorer provides a simple and direct way to transfer videos from your iPhone to your PC. It allows you to manually choose the specific videos you want to import and gives you control over the destination folder where the videos will be stored on your PC.
This method is particularly useful if you only need to import a few selected videos or if you want to organize your videos into specific folders on your PC. However, keep in mind that the transferring process may take some time, especially for larger video files.
Method 2: Using the Photos App
If you’re using a Windows 10 PC, you can take advantage of the built-in Photos app to import videos from your iPhone. The Photos app provides a streamlined and intuitive process for transferring your videos. Here’s how you can do it:
- Connect your iPhone to your PC using a USB cable. Unlock your iPhone and tap “Allow” when prompted to trust the computer.
- On your PC, click on the Start button, then search for and open the “Photos” app.
- In the Photos app, click on the “Import” button located at the top right corner of the window.
- The Photos app will detect your iPhone and display the imported media. If you only want to import videos, make sure to select the “Videos” option at the top left corner.
- By default, all videos will be selected for import. If you only want to import specific videos, uncheck the ones you don’t want to import.
- Choose the destination folder where you want to store the imported videos by clicking on the “Import to” drop-down menu. You can either select an existing folder or create a new one.
- Once you’ve made your selections, click on the “Import selected” button to start the transfer process.
- The Photos app will begin importing the selected videos from your iPhone to your PC. You can track the progress of the import process in the Photos app window.
- Once the import is complete, you can disconnect your iPhone from your PC.
Using the Photos app offers a convenient and user-friendly method to import videos from your iPhone to your PC. It allows you to select specific videos for import and provides options to organize them into specific folders. Additionally, the Photos app supports automatic organization and tagging, making it easier to manage your video library.
It’s important to note that the Photos app is only available for Windows 10 users. If you’re using an earlier version of Windows or a different operating system, you may need to explore alternative methods to import videos from your iPhone to your PC.
Method 3: Using iCloud Photos
If you use iCloud to store your photos and videos, you can easily import your iPhone videos to your PC using the iCloud Photos feature. This method allows you to access and download your videos from the iCloud website to your PC. Here’s how you can do it:
- On your iPhone, go to Settings and tap on your Apple ID at the top of the screen.
- Select “iCloud” and then “Photos”.
- Toggle on the “iCloud Photos” option to enable it. This will ensure that your videos are synced to your iCloud account.
- On your PC, open a web browser and go to the iCloud website (https://www.icloud.com).
- Sign in to your iCloud account using your Apple ID and password.
- Click on the “Photos” icon to access your iCloud Photos.
- Navigate to the “Videos” album or any other album where your videos are stored.
- Click on the video you want to import to open it.
- Once the video is open, click on the download icon (a cloud with an arrow pointing down) to download the video to your PC.
- The video will be downloaded to your computer, and you can find it in your designated download folder.
Using iCloud Photos provides a convenient way to access and download your videos from your iPhone to your PC. It eliminates the need for cables or additional software, as everything can be done through the iCloud website. However, keep in mind that the download speed may depend on your internet connection.
It’s important to note that to use this method, you need to have iCloud Photos enabled on your iPhone and have an active iCloud storage plan. Additionally, ensure that you have a stable internet connection to facilitate the smooth transfer of your videos from iCloud to your PC.
Method 4: Using iTunes
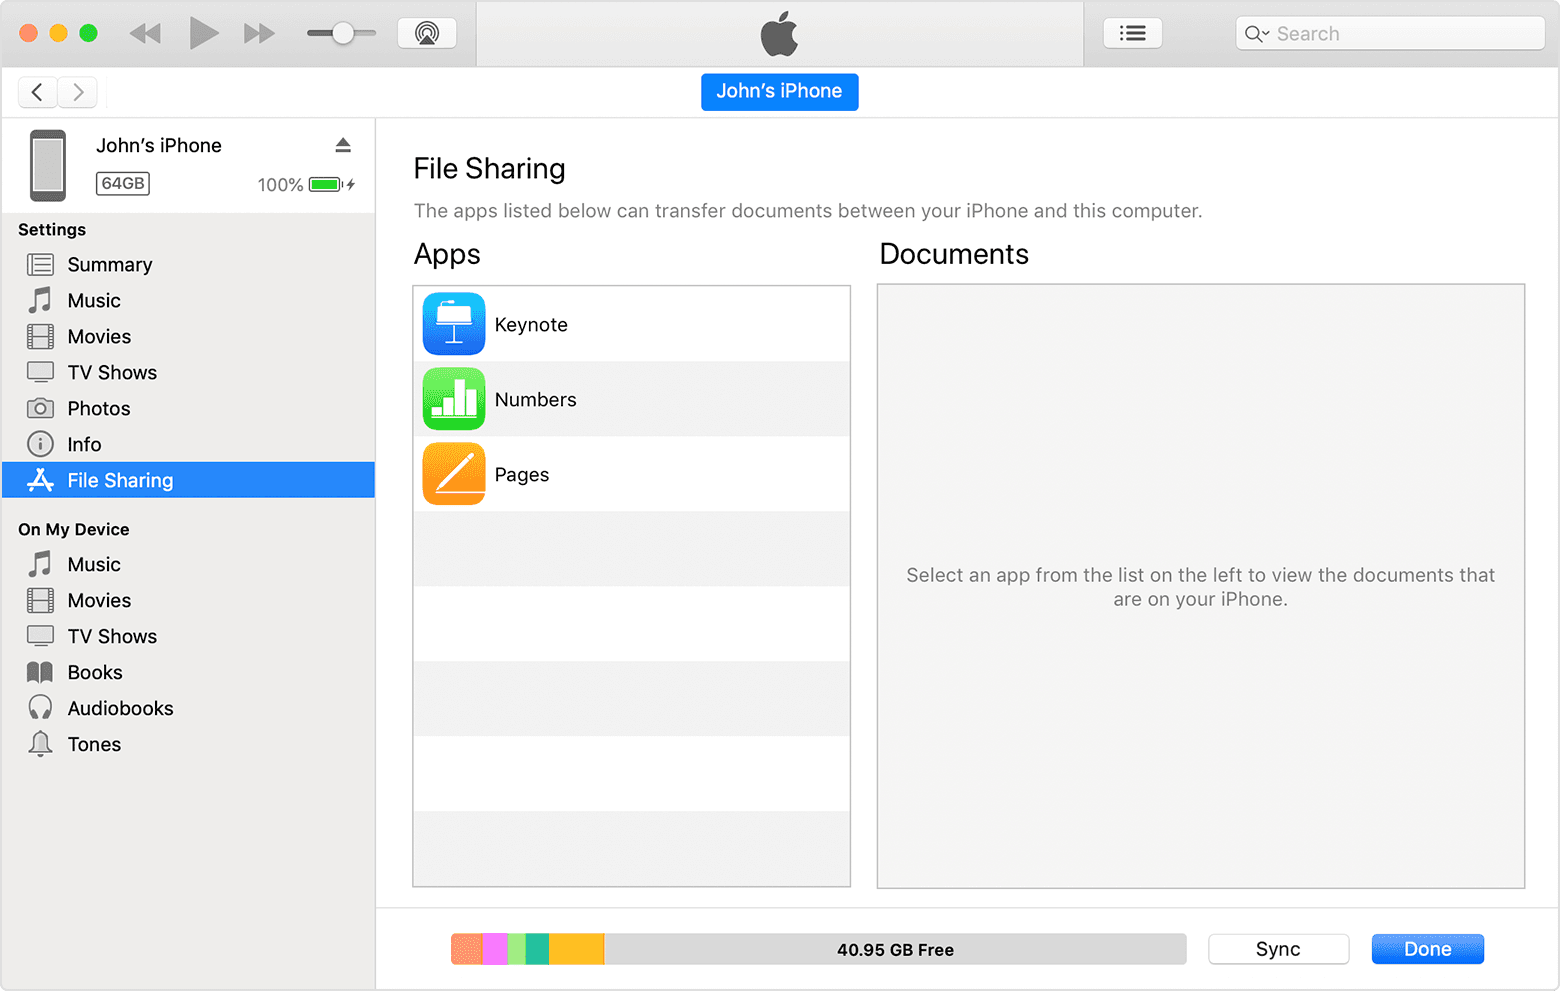
If you prefer using iTunes to manage your media library, you can also import videos from your iPhone to your PC using this software. iTunes allows you to sync your videos and other media files between your iPhone and your computer. Here’s how you can do it:
- Connect your iPhone to your PC using a USB cable and open iTunes.
- If prompted, enter your device passcode or choose to trust the computer.
- In iTunes, click on the device icon located near the top-left corner of the window to access your iPhone’s settings.
- In the left sidebar, click on “Movies” under the “Settings” section.
- Check the box next to “Sync Movies” to enable video syncing.
- Choose whether you want to sync all movies or selected movies by selecting the appropriate option.
- If you choose to sync selected movies, check the box next to each video you want to import.
- Click on the “Apply” or “Sync” button to start the syncing process. iTunes will now transfer the selected videos from your iPhone to your PC.
- Once the syncing is complete, you can access your imported videos in your iTunes library on your PC.
Using iTunes provides a more comprehensive approach to managing your media files, including videos. It allows you to selectively sync videos between your iPhone and PC, giving you greater control over the transfer process. Additionally, iTunes provides options to convert video formats and adjust settings for optimized playback on different devices.
However, it’s worth noting that iTunes is primarily designed for managing media for iOS devices and may not offer the same user-friendly experience as some of the other methods mentioned. If you’re not familiar with iTunes or prefer a simpler approach, you may want to consider alternative methods for importing videos from your iPhone to your PC.
Things to Consider
When importing videos from your iPhone to your PC, there are a few important factors to consider to ensure a smooth and efficient transfer process. Here are some things to keep in mind:
- Available Storage Space: Before importing videos, ensure that your PC has sufficient storage space to accommodate the transferred files. Videos can take up a significant amount of storage, especially if they are high-resolution or lengthy.
- Video Format Compatibility: Check if your PC supports the video format of the videos you want to import. Different devices and software applications may require specific video formats for optimal playback. If necessary, consider converting the video format before importing.
- USB Cable and Connection: Use a high-quality USB cable to connect your iPhone to your PC. A stable and reliable connection is essential to ensure the successful transfer of videos. If you experience connection issues, try using a different USB port or cable.
- iCloud Storage: If you choose to use iCloud Photos or other cloud-based methods, ensure that you have enough storage space in your iCloud account. If necessary, consider upgrading your storage plan to accommodate your video library.
- Video Organization: Have a plan for organizing your imported videos on your PC. Create folders or use existing ones to categorize and store your videos in a logical and easily accessible manner. This will save you time and effort when searching for specific videos in the future.
- Backup Strategy: Consider implementing a backup strategy for your imported videos. Regularly back up your videos to an external hard drive, cloud storage service, or another backup solution to protect them from data loss or device failure.
By taking these factors into account, you can ensure a seamless experience when importing videos from your iPhone to your PC. Whether it’s managing storage space, handling video formats, or organizing your video library, being prepared and mindful of these considerations will make the process more efficient and enjoyable.
Conclusion
Importing videos from your iPhone to your PC allows you to free up space, create backups, and gain access to powerful editing and sharing tools. In this article, we explored four different methods to import videos from your iPhone to your PC: using Windows File Explorer, the Photos app, iCloud Photos, and iTunes.
Using Windows File Explorer provides a straightforward method where you manually select and transfer videos. The Photos app offers a user-friendly interface specifically designed for Windows 10 users, making the process simple and intuitive. With iCloud Photos, you can easily access and download videos from your iCloud account through the iCloud website. iTunes provides a comprehensive solution for managing your media library, allowing you to sync selected videos between your iPhone and PC.
When considering which method to use, take into account factors such as available storage space, video format compatibility, USB cable connection, and your preferred method of organization and backup. By considering these factors, you can ensure a smooth and efficient video transfer process.
Remember, regardless of the method you choose, importing videos from your iPhone to your PC offers numerous benefits such as freeing up space, enhancing videos with editing tools, sharing them with others, and preserving them for the long term. The choice ultimately depends on your personal preferences and needs.
So go ahead and leverage these methods to import your videos from your iPhone to your PC. Enjoy the freedom, convenience, and creative possibilities that come with having your videos accessible on a larger screen!