Introduction
Welcome to the world of Clip Studio Paint, a powerful digital art software widely used by professional artists and enthusiasts alike. One of the most exciting features of Clip Studio Paint is its vast collection of brushes. These brushes allow artists to create stunning digital artwork with incredible precision and versatility.
Whether you’re a digital artist, comic book creator, or just someone who loves to doodle, having a diverse range of brushes can greatly enhance your artistic capabilities. In this article, we will explore how to download, install, and use brushes on Clip Studio Paint.
With the ever-growing popularity of Clip Studio Paint, there are numerous resources available for artists to find and download brushes. The official Clip Studio Assets Store is a great place to start. It offers a wide variety of free and paid brushes created by the Clip Studio community and professional artists.
In this article, we will guide you through the process of downloading brushes from the Clip Studio Assets Store. We will also cover how to install these brushes onto your Clip Studio Paint software, as well as how to effectively utilize them in your artwork.
Additionally, we will provide some useful tips for choosing the right brushes for your style and organizing your growing collection. By the end of this article, you will have a solid understanding of how to find, download, install, and effectively use brushes in Clip Studio Paint.
So, let’s dive into the world of brushes in Clip Studio Paint and unlock your artistic potential!
What are Brushes in Clip Studio Paint?
Brushes in Clip Studio Paint are digital tools that simulate the effect of different traditional art brushes, such as pencils, pens, markers, and watercolor brushes. They allow artists to apply various textures, strokes, and effects to their digital artwork, giving it a realistic and unique look.
Clip Studio Paint offers a wide variety of pre-installed brushes, each with its own characteristics and uses. These brushes can be customized and adjusted to suit your specific needs. You can modify the size, opacity, flow, and other parameters of the brushes to achieve the desired effect.
Additionally, Clip Studio Paint provides a brush engine that allows you to create your own custom brushes. This gives you the freedom to experiment and create brushes that perfectly match your artistic vision.
Brushes in Clip Studio Paint are not only limited to replicating traditional art tools. They also include special brushes like airbrushes, particle brushes, and even 3D brushes. These specialized brushes expand the creative possibilities, allowing you to create unique and visually stunning artwork.
With the ability to simulate a wide range of brushes and artistic tools, Clip Studio Paint brushes give artists the flexibility to explore different styles and techniques without the limitations of physical materials. Whether you prefer a realistic look or a more stylized approach, the wide selection of brushes in Clip Studio Paint has got you covered.
Now that we have understood the importance and versatility of brushes in Clip Studio Paint, let’s move on to discover where and how to find a treasure trove of brushes for your artistic journey.
Where to Find Brushes for Clip Studio Paint
When it comes to finding brushes for Clip Studio Paint, there are various resources available online. The most convenient and reliable option is the official Clip Studio Assets Store.
The Clip Studio Assets Store is a dedicated platform where artists can find an extensive collection of brushes, along with other resources like materials, 3D models, and more. It is a treasure trove of creative tools that can greatly enhance your artistic workflow.
To access the Clip Studio Assets Store, open Clip Studio Paint and navigate to the “menu” tab. From there, click on “Asset” to open the Asset Store window. Alternatively, you can also visit the official Clip Studio website and access the assets section.
Once you’re in the Clip Studio Assets Store, you’ll find a wide range of brushes to choose from. The brushes are categorized based on their characteristics, such as pencil brushes, inking brushes, texture brushes, and more. You can browse through the categories or use the search bar to find specific brushes.
Many of the brushes in the Clip Studio Assets Store are created by fellow artists from the Clip Studio community. They are often shared for free, while some may require a small fee. You can read user reviews and ratings to get an idea of the quality and usability of the brushes before downloading.
In addition to the Clip Studio Assets Store, there are other online platforms where artists share their custom brushes. Websites, forums, and social media platforms dedicated to Clip Studio Paint often have brush collections available for download. These resources can be a great way to discover unique and niche brushes created by talented artists.
When downloading brushes from these platforms, it’s important to make sure that the brushes are compatible with Clip Studio Paint. Many brush packs come with installation instructions and a preview of the brushes, allowing you to evaluate their suitability for your artistic style.
Now that we know where to find brushes for Clip Studio Paint, let’s proceed to the next section, where we will learn how to download and install these brushes onto your Clip Studio Paint software.
How to Download Brushes from the Clip Studio Assets Store
Downloading brushes from the Clip Studio Assets Store is a simple and straightforward process. Here’s a step-by-step guide on how to do it:
- Open Clip Studio Paint and navigate to the “menu” tab.
- Click on “Asset” to open the Asset Store window.
- In the Asset Store window, you will see various categories of assets. Click on the “Brushes” category to explore the available brushes.
- Browse through the brushes or use the search bar to find specific brushes based on your preferences.
- Click on a brush to view its details, including a preview, description, and user ratings.
- If you decide to download the brush, click on the “Download” button. Some brushes may have a free option, while others may require a purchase.
- After clicking “Download,” the brush will be added to your My Assets library. You can access this library from the menu tab in Clip Studio Paint.
- To download more brushes, repeat the process for additional brushes of your choice.
It’s worth mentioning that you can also access the Clip Studio Assets Store through the official Clip Studio website. Simply visit the website and navigate to the assets section, where you can browse and download brushes in a similar manner.
Downloading brushes from the Clip Studio Assets Store is a fantastic way to expand your collection and explore different artistic styles. Whether you’re looking for realistic pencil brushes or unique texture brushes, the Asset Store offers a wide variety of options to suit your needs.
Now that you know how to download brushes from the Clip Studio Assets Store, let’s move on to the next section, where we’ll learn how to install these brushes in your Clip Studio Paint software.
How to Install Brushes in Clip Studio Paint
Installing brushes in Clip Studio Paint is a quick and simple process. Once you have downloaded brushes from the Clip Studio Assets Store or any other reliable source, follow these steps to install them onto your Clip Studio Paint software:
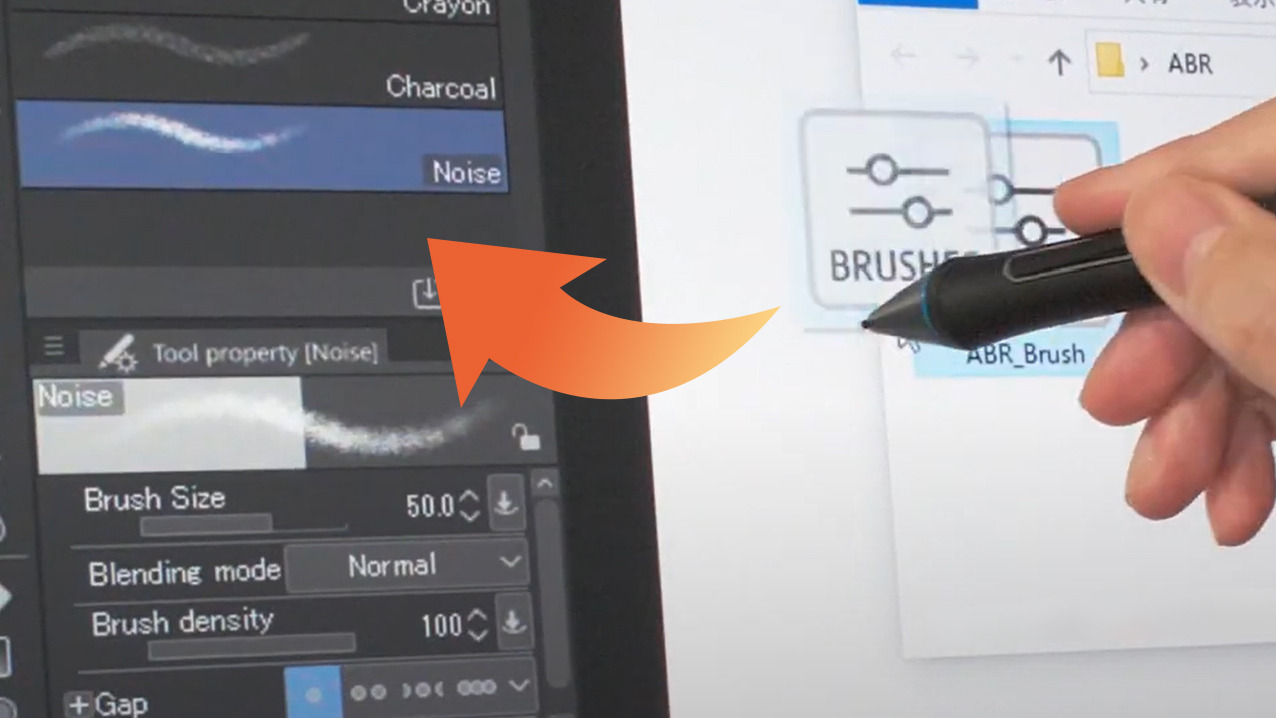
- Make sure you have the brush files saved on your computer. Brushes for Clip Studio Paint usually come in the .sut extension.
- Open Clip Studio Paint and go to the “menu” tab.
- Click on “File” and select “Open” to access your files.
- Navigate to the folder where you saved the brush files.
- Once you locate the brush files, select them and click “Open.”
- A dialog box will appear, asking you to confirm the installation of the brushes. Click “OK” to proceed.
- The brushes will be automatically installed and added to your Clip Studio Paint software.
- You can access the installed brushes from the “Sub Tool” palette in Clip Studio Paint.
It’s important to note that you don’t need to manually move or place the brush files in a specific folder. Clip Studio Paint automatically recognizes and installs the brushes when you open the files.
Once the brushes are installed, you can start using them in your artwork. Experiment with different brushes, adjust their settings, and explore the creative possibilities they offer.
Keep in mind that you can also organize your brushes into different groups or categories within the “Sub Tool” palette. This allows for easy access and efficient workflow management, especially when you have a large collection of brushes.
Now that you know how to install brushes in Clip Studio Paint, you’re ready to unleash your creativity and make the most of these versatile digital tools.
How to Use Brushes in Clip Studio Paint
Once you have installed brushes in Clip Studio Paint, using them is an exciting and intuitive process. Here are some steps to help you get started:
- Select the brush you want to use from the “Sub Tool” palette.
- Adjust the size and opacity of the brush using the sliders or numerical inputs in the tool properties.
- Choose the desired color for your brush by selecting it from the color picker or using the eyedropper tool.
- Hover your cursor over the canvas and start painting or drawing. Experiment with different strokes, pressures, and angles to create the desired effect.
- You can use the eraser tool to erase parts of your artwork or to correct mistakes. The eraser brush may have different shapes and textures, often corresponding to the selected brush.
- Explore the options in the tool properties to further customize your brush. You can adjust settings such as flow, blending mode, texture, and more to achieve different textures and effects.
- Clip Studio Paint also offers various multi-functional brushes that can be used for tasks such as smudging, blending, and adding special effects. These brushes can be found in the “Sub Tool” palette.
- Remember to save your artwork regularly so you don’t lose any progress.
As you become more familiar with the brushes in Clip Studio Paint, you’ll discover that they offer a wide range of creative possibilities. Experiment with different brushes and techniques to find your unique style and explore the full potential of digital art.
It’s worth noting that Clip Studio Paint also provides features like brush stabilization and pen pressure sensitivity adjustment. These features can help in creating smoother lines and achieving more control over the brush strokes.
Don’t be afraid to experiment and play around with different brushes, settings, and combinations. The more you practice and explore, the more you will uncover the true potential of brushes in Clip Studio Paint.
Now that you know how to use brushes in Clip Studio Paint, let’s move on to the next section, where we’ll share some tips for choosing and organizing brushes to improve your artistic workflow.
Tips for Choosing and Organizing Brushes in Clip Studio Paint
Choosing and organizing brushes effectively in Clip Studio Paint is key to optimizing your artistic workflow. Here are some valuable tips to help you make the most of your brush collection:
- Experiment: Don’t be afraid to try out different brushes and explore their capabilities. Experimenting with various brushes and settings will allow you to discover new artistic possibilities and find brushes that best suit your style and preferences.
- Consider your Artistic Needs: Think about the type of artwork you create and the style you want to achieve. Different brushes excel in different areas, so choose brushes that align with your specific needs. For example, if you create digital comics, you may want to have a variety of inking brushes to achieve clean and precise lines.
- Read User Reviews: When downloading brushes from the Clip Studio Assets Store, take the time to read user reviews and ratings. This will give you insight into how others have found the brush’s performance and usability. It can help you make informed decisions and avoid downloading brushes that might not meet your expectations.
- Create Custom Brushes: Clip Studio Paint allows you to create your own custom brushes. Experiment with the brush engine and explore the settings to create brushes that truly match your style and artistic vision. This will give your artwork a unique touch and set you apart from others.
- Organize Your Brushes: As your brush collection grows, organizing them becomes essential. Create folders or categories within the “Sub Tool” palette to group similar brushes together. This makes it easier to find and access the brushes you need, streamlining your workflow and saving time during the creative process.
- Backup Your Brushes: It’s a good practice to regularly back up your brushes so that you don’t lose any of your favorite customized brushes or downloaded assets. Create a backup of your brush library and store it in a safe place to ensure that you can easily restore them if needed.
- Share and Collaborate: If you create your own custom brushes, consider sharing them with other artists. Participate in the Clip Studio community and collaborate with fellow artists by exchanging brushes. This not only fosters a sense of community but also allows you to explore new techniques and styles.
By choosing and organizing your brushes thoughtfully, you can enhance your creative process and ensure that you have a well-curated selection of tools at your disposal. These tips will help you navigate through your brush library efficiently and make the most of your artistic journey in Clip Studio Paint.
Now that you’re equipped with these tips, it’s time to take your digital artwork to the next level with Clip Studio Paint and its versatile brushes.
Conclusion
Clip Studio Paint is a powerful digital art software that offers a wide range of brushes to enhance your artistic creations. Whether you’re a digital artist, a comic book creator, or someone who loves to doodle, the brushes in Clip Studio Paint provide the tools you need to bring your imagination to life.
In this article, we explored the process of finding, downloading, installing, and using brushes in Clip Studio Paint. By utilizing the official Clip Studio Assets Store, you have access to a vast collection of brushes created by both professional artists and fellow members of the Clip Studio community.
We also discussed the importance of experimenting with brushes, considering your artistic needs, and reading user reviews. These steps help you choose the right brushes for your unique style and artistic requirements.
Furthermore, we learned how to organize your growing collection of brushes within the “Sub Tool” palette, creating a streamlined workflow and improving your efficiency as an artist.
Remember, the key to unlocking the full potential of brushes in Clip Studio Paint lies in your creativity and willingness to explore. Don’t be afraid to experiment, create custom brushes, and share your work with others.
Now that you’re equipped with the knowledge and tips shared in this article, it’s time to unleash your creativity and take your digital artwork to new heights with the powerful brushes of Clip Studio Paint.
So, grab your stylus, let your imagination run wild, and enjoy the endless possibilities of creating digital art with Clip Studio Paint’s incredible brushes.


