Introduction
Welcome to the exciting world of Kahoot! Whether you’re an educator, a student, or just someone who loves interactive quizzes, Kahoot is a fantastic platform for creating and playing engaging learning games. One of the key features of Kahoot is the ability to share your created Kahoots with others, allowing them to participate and even make edits to further enhance the experience.
In this guide, we will walk you through the step-by-step process of sharing a Kahoot with others so that they can collaborate and edit the content. Whether you want to work together with fellow educators to create a comprehensive quiz or simply want to get feedback and suggestions from your students, sharing a Kahoot to edit is a seamless and effective way to foster collaboration.
Before we delve into the steps, it’s essential to note that in order to share a Kahoot for editing, you must be the original creator or have edit access granted by the creator. With that in mind, let’s dive into the process of sharing a Kahoot to edit and get ready to unleash the power of collaborative learning!
Step 1: Create and save a Kahoot
The first step in sharing a Kahoot to edit is, of course, creating and saving the Kahoot. If you haven’t already done so, head over to the Kahoot website or open the Kahoot app on your device to get started.
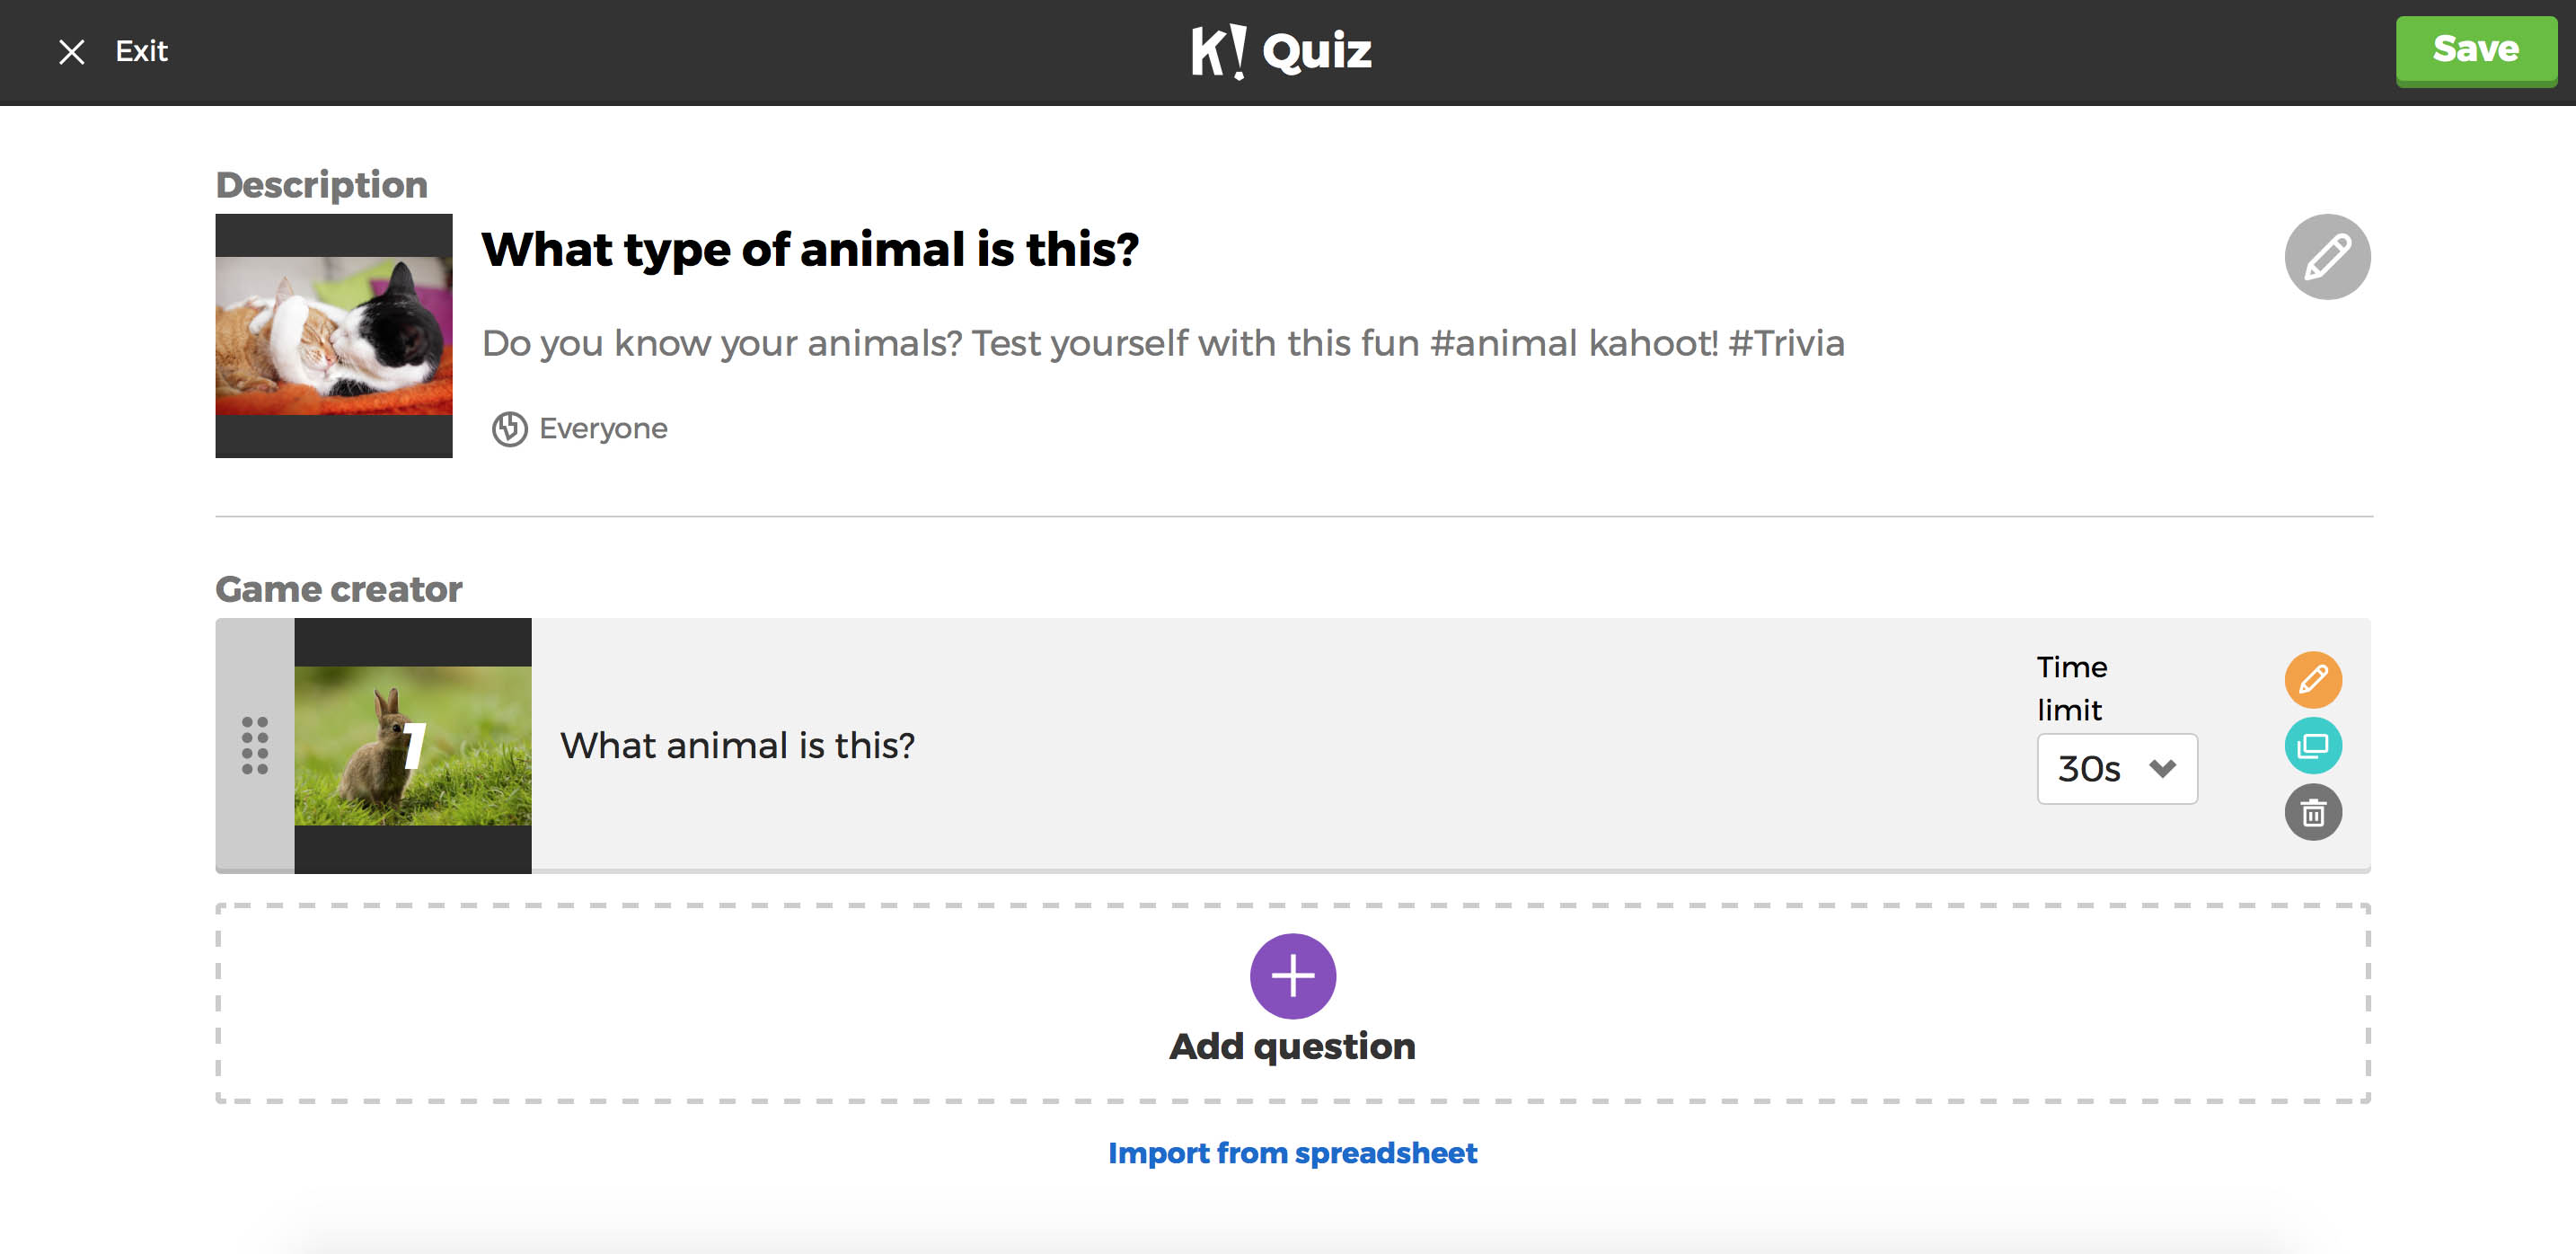
To create a new Kahoot, click on the “Create” button or select the option to create a new Kahoot from your dashboard. Give your Kahoot a captivating title that reflects the topic or theme of your quiz. You can also add a description and cover image to make it more visually appealing.
Next, start adding questions to your Kahoot. You have the option to choose from multiple question types such as multiple choice, true/false, or open-ended. Be sure to craft engaging and relevant questions that will capture the attention of your participants.
Once you’ve added all the questions, it’s time to add answer options and assign points. Make sure to designate the correct answer for each question to ensure accurate assessment and scoring. You can also include images or videos to make your Kahoot even more interactive.
After you’ve finished creating your Kahoot, click on the “Save” button to save your progress. It’s always a good idea to save your Kahoot periodically as you work on it to avoid losing any changes. Giving your Kahoot a unique, memorable name will make it easier to identify and share later on.
That’s it! You’ve successfully created and saved your Kahoot. Now, it’s time to move on to the next step and learn how to share it with others so they can collaborate and make edits.
Step 2: Go to the Kahoot sharing options
Once you’ve created and saved your Kahoot, the next step is to access the sharing options. This will allow you to choose how you want to share your Kahoot with others for editing and collaboration.
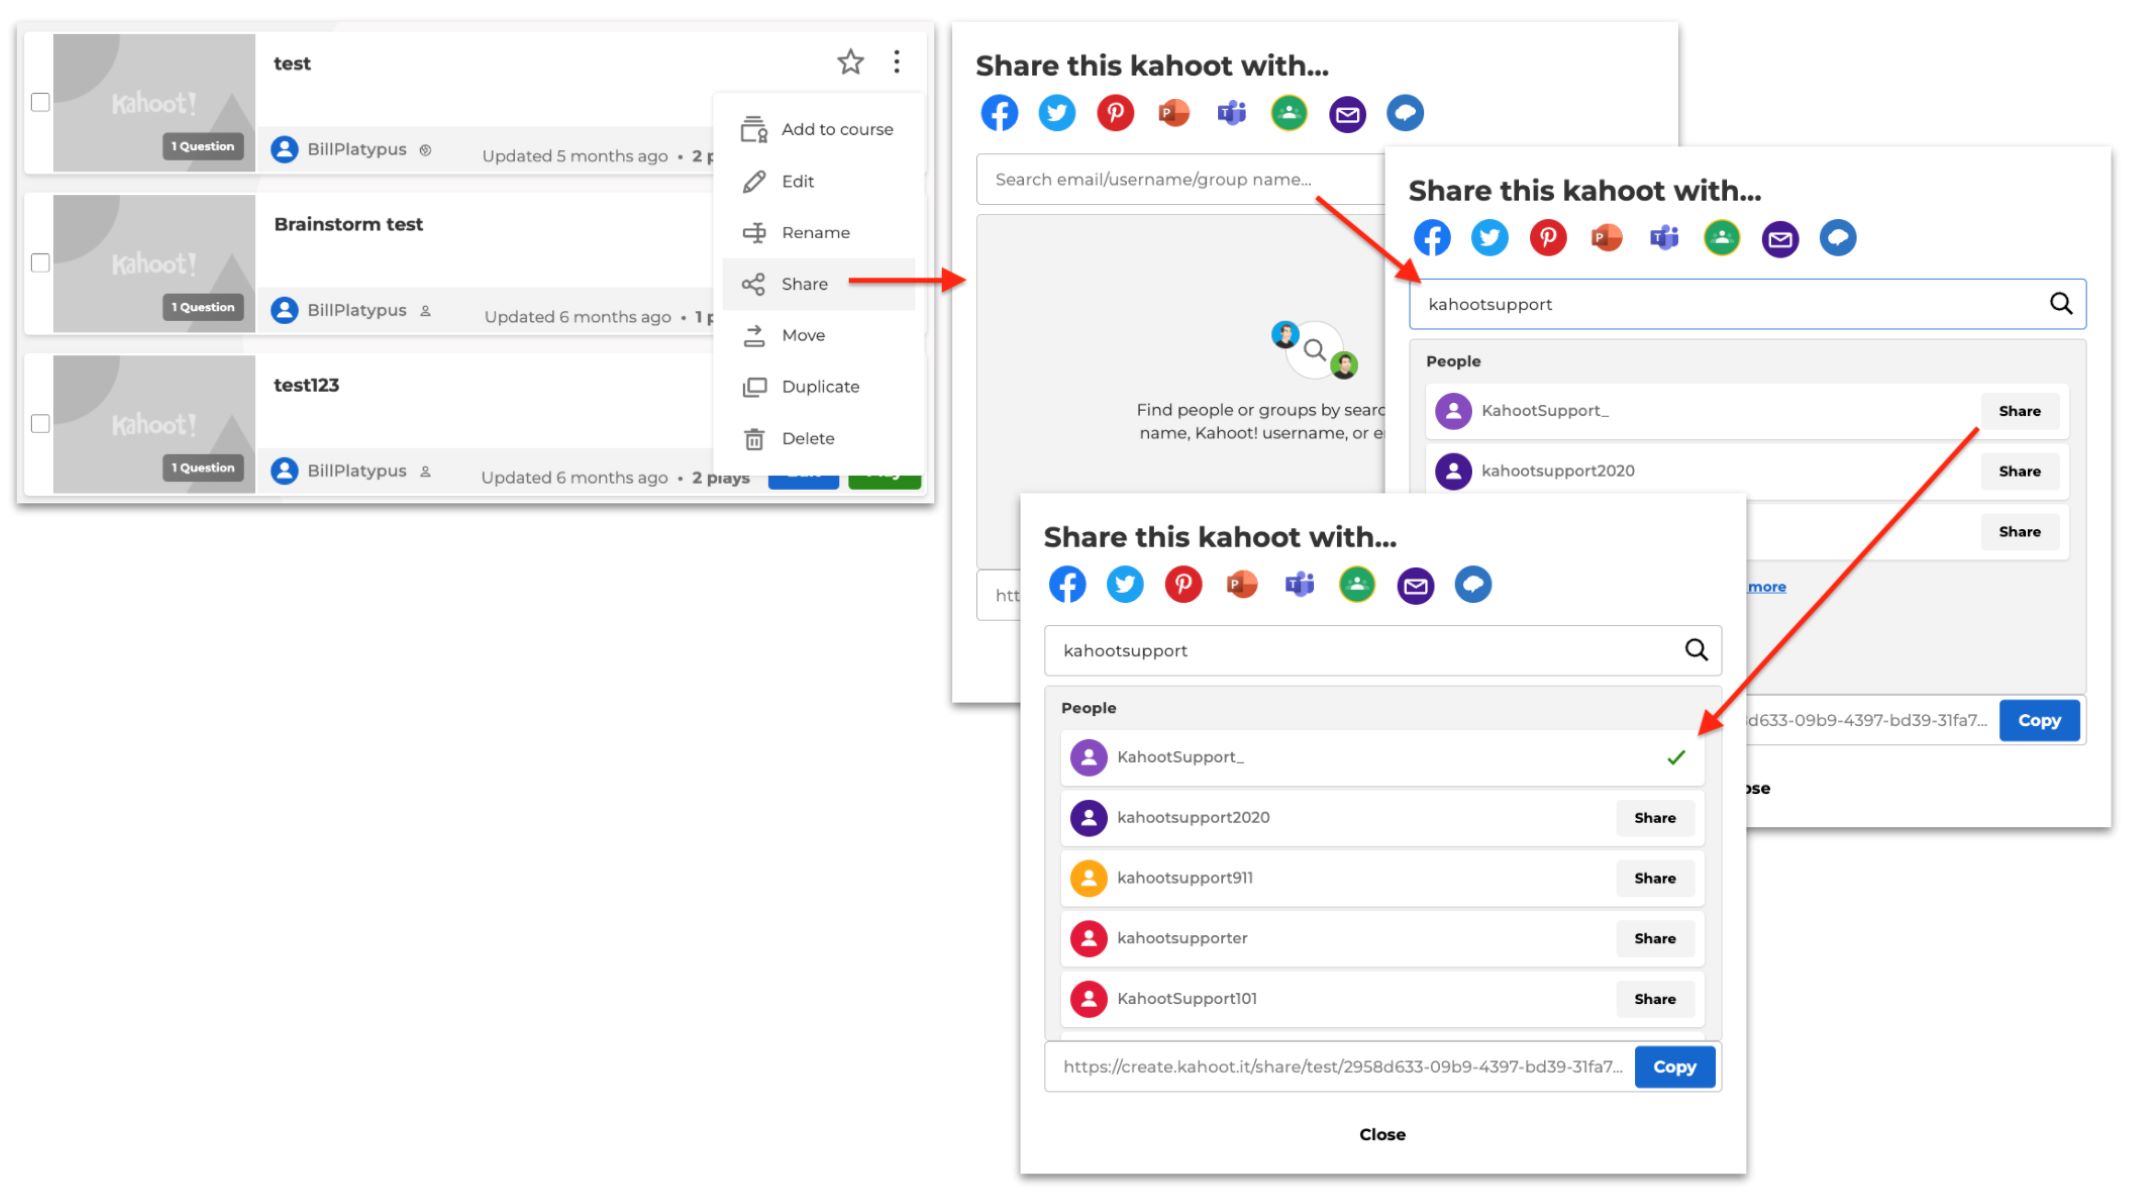
To access the sharing options, go to your Kahoot dashboard and locate the specific Kahoot that you want to share. You can either click on the Kahoot’s title or hover over it and select the three dots that appear on the right-hand side. This will open a dropdown menu with various options.
In the dropdown menu, you’ll find the option to “Share”. Click on this option to proceed to the sharing settings for your Kahoot. This is where you’ll be able to control the level of access and permissions you want to grant to others who will be collaborating on your Kahoot.
Once you click on “Share”, you’ll be taken to a new page or dialog box that displays the sharing options for your Kahoot. Here, you can choose to share your Kahoot publicly or with specific individuals. Additionally, you’ll be able to generate a unique link or PIN that others can use to access and edit your Kahoot.
Take some time to explore the different sharing options available to you. You can choose to share your Kahoot with specific individuals by entering their email addresses, or you can make it public so that anyone with the link or PIN can access and collaborate on it. The choice is yours, depending on your specific needs and preferences.
Remember to ensure that you have the appropriate permissions to share the Kahoot for editing. If you’re not the original creator, you’ll need to have edit access granted by the creator in order to proceed with sharing and collaboration.
Once you’ve selected your preferred sharing options and permissions, it’s time to move on to the next step and choose the method through which you want to share your Kahoot.
Step 3: Choose the “Share with others” option
After accessing the sharing options for your Kahoot, the next step is to choose the “Share with others” option. This will allow you to share your Kahoot with other individuals, granting them the ability to collaborate and make edits.
Once you are on the sharing settings page for your Kahoot, you will see different options for sharing. Look for the option that says “Share with others” or something similar, and click on it to proceed.
By selecting the “Share with others” option, you are giving permission to specific individuals or the general public to access and collaborate on your Kahoot. This allows them to make edits, suggest improvements, and contribute to the development of the Kahoot.
It’s important to note that when choosing the “Share with others” option, you have control over the level of access you grant. You can choose to give editing rights to everyone who has access to the Kahoot, or you can limit editing privileges to specific individuals.
If you want to restrict editing privileges to specific individuals, you may need to enter their email addresses or usernames. By doing so, you ensure that only those individuals can make changes to the Kahoot, while still allowing others to view and play it.
Take a moment to consider the level of collaboration you want to encourage and the people you want to involve in the editing process. Choose the appropriate sharing option that best aligns with your goals for collaborative learning.
Once you have selected the “Share with others” option and set the desired level of access, it’s time to move on to the next step and choose the specific method through which you want to share your Kahoot.
Step 4: Select the sharing method
Now that you have chosen the “Share with others” option for your Kahoot, the next step is to select the specific method through which you want to share it with others. There are several ways you can share your Kahoot for editing and collaboration.
One common method of sharing your Kahoot is by generating a unique link. When you choose this option, you will be provided with a URL that you can share with others. Anyone who has this link will be able to access and edit your Kahoot, based on the permissions you have set.
Another method is to generate a PIN code. This gives you a unique numerical code that you can share with others. They can enter this code on the Kahoot website or app to gain access to the Kahoot and edit it, if they have the necessary permissions.
Sharing via email is also an option. You can enter the email addresses of the individuals you want to collaborate with, and they will receive an email with a direct link to the Kahoot. They can click on the link to access the Kahoot and make edits accordingly.
Additionally, if you have a specific platform or online community where you want to share your Kahoot, you can choose to embed it. This allows you to integrate your Kahoot directly into a website, learning management system, or other online platforms, making it easily accessible for collaboration.
Consider the preferences and accessibility of your collaborators when selecting the sharing method. It’s important to choose a method that works best for everyone involved and allows for seamless collaboration.
Once you’ve selected the sharing method, follow the instructions provided to share the Kahoot with others for editing. This will open up opportunities for collaboration and the ability to enhance the content together.
Now that you’ve chosen the sharing method, it’s time to move on to the next step and share the Kahoot link or PIN with your collaborators so they can access and work on it.
Step 5: Share the Kahoot link or PIN
Now that you’ve selected the sharing method for your Kahoot, it’s time to share the link or PIN with your desired collaborators. This will allow them to access and edit the Kahoot, contributing to its development and enhancing the learning experience.
If you chose the option to generate a unique link, you can simply copy the provided URL and share it with your collaborators through various channels. You can send it via email, share it in a messaging app, or post it on a website or social media platform.
When sharing the link, it’s a good idea to provide some context or instructions to your collaborators. Let them know that the link grants access to the Kahoot and that they have permission to collaborate and make edits. This way, they’ll understand the purpose of the link and what is expected of them.
If you opted for the PIN code sharing method, you can share the numerical code with your collaborators. They can then go to the Kahoot website or app and enter the PIN to gain access to the Kahoot for editing.
When sharing the PIN code, make sure to communicate any additional instructions or expectations for collaboration. This will ensure that your collaborators understand how to access the Kahoot and what actions they are allowed to take.
Remember to keep track of who you have shared the link or PIN with. If you want to limit the number of collaborators or need to revoke access, you can always change the permissions or generate a new link or PIN.
By sharing the Kahoot link or PIN, you are empowering your collaborators to join in the editing process and contribute to the creation of an engaging and interactive learning experience.
Now that you’ve successfully shared the Kahoot link or PIN, it’s time to move on to the next step and grant edit access to your collaborators.
Step 6: Grant edit access to others
Once you’ve shared the Kahoot link or PIN with your collaborators, the next step is to grant them edit access. This will give them the ability to make changes, add questions, modify answers, and contribute to the overall development of the Kahoot.
If you’re using the link sharing method, your collaborators will be able to access the Kahoot directly through the shared link. They will need to sign in to their Kahoot account, if they have one, or create a new account if they don’t have one yet.
Once your collaborators are signed in, they should see an option to “Edit” the Kahoot. By clicking on this option, they will enter the editing mode and have access to all the features and functionalities needed to make changes to the Kahoot.
If you’re using the PIN code sharing method, the individuals who enter the PIN on the Kahoot website or app will automatically be granted edit access. They will be able to start editing the Kahoot without the need for an additional sign-in process.
It’s important to communicate to your collaborators that they have edit access and the responsibility that comes with it. Make sure they understand the expectations and guidelines for collaboration, such as maintaining the integrity of the questions, providing accurate information, and adhering to any specific requirements you may have set.
Remember, it’s always a good idea to have open lines of communication with your collaborators throughout the editing process. Encourage them to ask questions, seek clarification, and provide feedback as they work on the Kahoot together.
If at any point you need to revoke or modify the edit access for a particular collaborator, you can do so by adjusting the sharing settings for the Kahoot. This will help maintain control over the editing process and ensure that only authorized individuals can make changes.
By granting edit access, you’re fostering a collaborative environment where multiple contributors can work together to create an engaging and effective learning experience.
Now that you’ve granted edit access to your collaborators, it’s time to move on to the final step and collaborate and edit the Kahoot together.
Step 7: Collaborate and edit the Kahoot together
Congratulations! You’ve reached the final step of the process – collaborating and editing the Kahoot together with your team of collaborators. Now that they have access and edit permissions, it’s time to leverage their expertise and creativity to improve the Kahoot.
Encourage your collaborators to review the existing questions and answers and suggest any necessary changes or improvements. They can add new questions, modify existing ones, and even contribute additional media such as images or videos to make the Kahoot more engaging.
Collaboration is the key here. Foster an environment where your team can freely communicate ideas, provide feedback, and make suggestions to enhance the Kahoot. Take advantage of the real-time editing capabilities provided by Kahoot to streamline the collaboration process.
Make sure to establish clear guidelines and expectations for the editing process. This can include guidelines on question formatting, length, and appropriateness for the target audience. Encourage your team to adhere to these guidelines while also bringing their own creativity and expertise to the table.
As you collaborate and edit the Kahoot together, don’t forget to periodically save and update the Kahoot to ensure that everyone is working on the most current version. Communicate with your collaborators to coordinate the editing process and avoid any conflicts or duplicate efforts.
Consider scheduling regular check-ins or meetings to discuss the progress, address any questions or concerns, and ensure that everyone is on the same page. This will help maintain momentum and keep the collaboration process focused and productive.
Remember, the goal of this collaborative editing process is to create a Kahoot that is engaging, informative, and effective in achieving the desired learning outcomes. By pooling together the skills and knowledge of your team, you’re able to create a dynamic learning experience that captivates and educates your participants.
Once you and your collaborators are satisfied with the edits and improvements made to the Kahoot, you can consider it finalized and ready to be shared with your intended audience. Be proud of the collaborative effort that went into creating this interactive learning tool!
Now that you’ve successfully collaborated and edited the Kahoot together, you can take a step back and admire the final product. Your collaborative efforts have ensured that it is polished, engaging, and ready to provide a meaningful learning experience.
Conclusion
Sharing a Kahoot for editing is a powerful way to foster collaboration and create engaging learning experiences. By following the steps outlined in this guide, you can easily share your Kahoot and grant edit access to others, allowing them to contribute their ideas and expertise.
Throughout this process, it’s important to remember to communicate clearly with your collaborators, set expectations, and provide guidelines for the editing process. Collaboration is key in creating a Kahoot that is informative, exciting, and tailored to your specific learning objectives.
Together, you and your team can review and refine the questions, add new content, and ensure the accuracy and effectiveness of the Kahoot. By leveraging the diverse perspectives and skills of your collaborators, you’ll be able to create a learning experience that captivates and engages your participants.
Remember to save and update the Kahoot regularly to ensure that everyone is working on the most up-to-date version. Regular check-ins and communication with your team will help keep the collaboration process focused and productive.
Once you’ve finalized the edits and improvements, your collaborative effort has resulted in a dynamic and interactive learning tool ready to be shared with your intended audience. Embrace the accomplishment of creating a Kahoot that will not only educate but also entertain and inspire learners.
So go ahead, explore the world of Kahoot, share your quizzes or learning games for editing, and enjoy the benefits of collaborative learning. Get ready to unleash the full potential of Kahoot in creating impactful and memorable educational experiences!