Introduction
Kahoot is an interactive online learning platform that allows users to create and play educational quizzes, discussions, and surveys. It is widely used in classrooms, corporate training sessions, and social gatherings to engage participants in fun and interactive learning experiences. If you are a Chromebook user and want to make your Kahoot game public, you have come to the right place.
In this article, we will guide you through the step-by-step process of making a Kahoot game public on a Chromebook. Whether you are a teacher looking to share your quiz with a wider audience, or a student eager to showcase your creativity and knowledge, this guide will help you make your Kahoot game accessible to everyone.
We understand that technology can sometimes be overwhelming, especially if you are new to using a Chromebook or the Kahoot platform. However, you don’t need to worry! Our instructions are beginner-friendly and easy to follow. So, grab your Chromebook and let’s get started on making your Kahoot game public!
Please note that making your Kahoot game public means that anyone with the game’s link can access and play it. This can be useful if you want to share your game with a large audience or collaborate with others. However, if you want to keep the game private and only allow specific individuals to play, you can choose the “Invite-only” option instead.
Now that you’re familiar with the purpose of this guide and the importance of making a Kahoot game public, let’s move on to the first step: accessing Kahoot on your Chromebook.
Step 1: Accessing Kahoot on Chromebook
To start making your Kahoot game public on a Chromebook, you first need to access the Kahoot platform. Here’s how you can do it:
- Turn on your Chromebook and connect it to the internet.
- Open the Google Chrome browser by clicking on the Chrome icon on your desktop or by searching for “Chrome” in the application launcher.
- In the Chrome address bar, type in “kahoot.com” and press Enter. This will take you to the Kahoot website.
- If you already have a Kahoot account, click on the “Log in” button at the top right corner of the page and enter your login credentials. If you don’t have an account, click on the “Sign up” button and follow the on-screen instructions to create a new account.
- Once you are logged in, you will be redirected to your Kahoot dashboard, where you can access your existing games and create new ones.
It’s important to note that Kahoot can also be accessed through the Google Play Store on Chromebooks that support Android apps. If your Chromebook has the Play Store, you can download the Kahoot app and access it directly from your app drawer. However, for the purpose of this guide, we will focus on using the web version of Kahoot through the Google Chrome browser.
Now that you have accessed Kahoot on your Chromebook, let’s move on to the next step: navigating to the Kahoot Creator page.
Step 2: Navigating to the Kahoot Creator page
Once you have successfully accessed Kahoot on your Chromebook, the next step is to navigate to the Kahoot Creator page. This is where you can create and customize your own Kahoot game. Follow these instructions to find your way to the Creator page:
- From your Kahoot dashboard, click on the “New K!” button at the top right corner of the page. This will take you to the Creator page.
- On the Creator page, you will see various options for creating different types of Kahoot games, including quizzes, discussions, and surveys. Choose the type of game you want to create by clicking on the respective option.
- Next, you will be prompted to enter a title for your Kahoot game. Choose a catchy and descriptive title that accurately represents the content of your game.
- Below the title field, you will find a dropdown menu where you can select a relevant topic for your Kahoot game. This helps categorize your game and makes it easier for others to discover.
- Once you have entered the title and selected a topic, click on the “Create” button to proceed. You will now be taken to the game editor, where you can start customizing your Kahoot game.
It’s worth mentioning that the Kahoot Creator page offers a range of options to customize your game, such as adding questions, images, videos, and answer choices. You can also set timers, add points, and enable various game settings to make the experience more engaging and challenging for players. Take some time to explore these features and get familiar with the game editor.
Now that you have successfully reached the Kahoot Creator page, let’s move on to the next step: creating a new Kahoot game.
Step 3: Creating a new Kahoot game
Once you are on the Kahoot Creator page and ready to create your own game, follow these steps to get started:
- On the game editor page, you will see a blank template where you can start adding questions. Click on the “+ Add question” button to begin.
- Enter your question in the designated field. Make sure the question is clear and concise, and relates to the topic of your Kahoot game.
- Below the question field, you can add up to four answer choices. Click on the “+ Add answer” button to enter your choices. Make sure to mark the correct answer by selecting the checkbox next to it.
- If needed, you can add images or videos to enhance your question. Click on the respective icons in the answer choices to upload or search for multimedia content.
- Repeat the above steps to add more questions to your Kahoot game. You can customize each question individually, including their point values, timers, and feedback options.
- As you add questions, you will see a preview of your Kahoot game on the right-hand side of the editor. This allows you to visualize the game and make any necessary adjustments.
Remember, the key to creating an engaging Kahoot game is to make the questions and answer choices interesting, relevant, and challenging. You can add a mix of multiple-choice, true/false, or open-ended questions to keep the game varied and exciting.
Once you have finished adding questions and customizing your Kahoot game, it’s time to move on to the next step: customizing the Kahoot settings.
Step 4: Customizing the Kahoot settings
After creating your Kahoot game and adding questions, it’s important to customize the settings to ensure the best experience for your players. Here’s how you can customize the Kahoot settings:
- On the game editor page, click on the “Settings” option located at the top right corner of the screen.
- In the settings menu, you will find various options to customize your game. These include:
- Game Options: Here, you can choose how players join the game and interact with each question. You can enable features like “Ghost Mode” and “Randomized Order” to add more excitement.
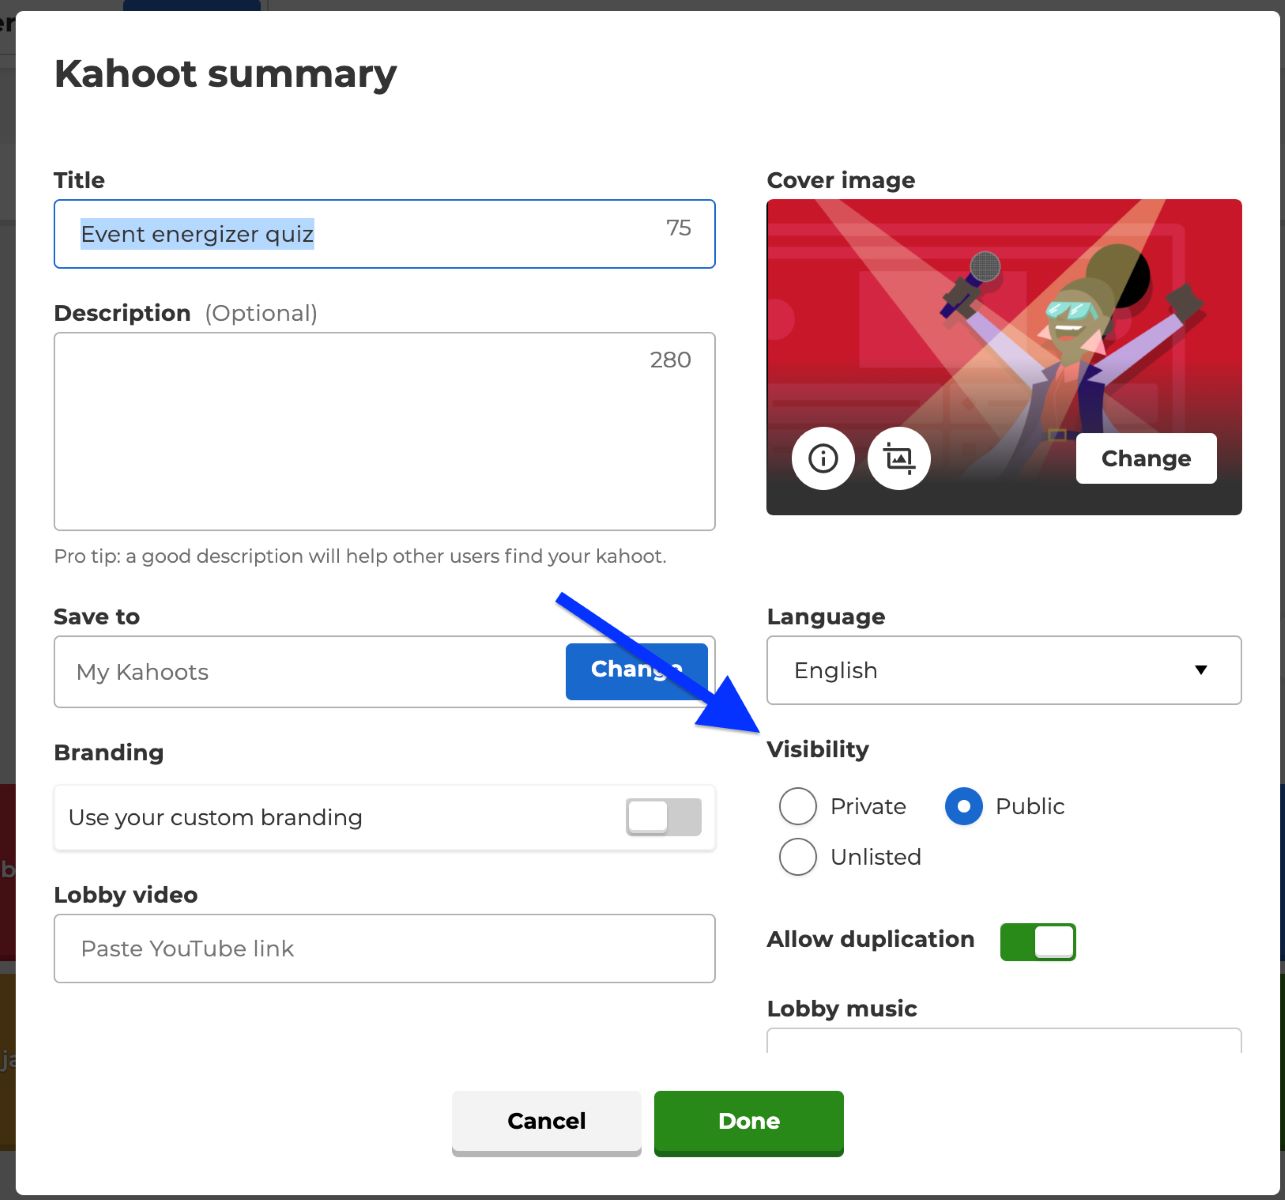
- Player Access: Select whether you want to make the game public or private. To make it public, choose the “Public” option. If you want to restrict the access to specific players, choose the “Invite-only” option and share the game PIN with them.
- Advanced: This section allows you to adjust additional settings like question time limit, display time between questions, and the ability to toggle audio on or off.
- Kahoot Cover: Customize the cover image and background color of your Kahoot game to make it visually appealing.
- Once you have customized the settings to your liking, click on the “Save” button to apply the changes.
Customizing the Kahoot settings allows you to tailor the game to your specific needs and preferences. Whether you want to create a fast-paced competition or a more relaxed learning experience, adjusting the settings can help you achieve that.
Now that you have customized the Kahoot settings, the next step is to make your Kahoot game public. Continue reading to learn how you can do it in the next section.
Step 5: Making the Kahoot game public
Now that you have created and customized your Kahoot game, it’s time to make it public and share it with others. Follow these steps to make your Kahoot game accessible to everyone:
- On the game editor page, click on the “Save & Exit” button located at the top right corner of the screen. This will save your progress and take you back to your Kahoot dashboard.
- From your Kahoot dashboard, locate the game you want to make public and click on the three-dot menu icon next to it.
- In the menu that appears, select the “Share” option. This will open a popup window with various sharing options.
- Under the “Share your kahoot” section, you will see a unique URL for your game. This URL can be shared with others to allow them to play your Kahoot game.
- You can copy the URL and share it through various channels, such as email, messaging apps, social media platforms, or by simply sharing it in a classroom or meeting.
By making your Kahoot game public, you are extending its reach and giving others the opportunity to enjoy and learn from it. Whether you want to share it with your students, colleagues, friends, or a broader audience, the sharing options in Kahoot make it easy to spread the fun.
It’s important to note that once your Kahoot game is public, anyone with the game’s URL can access and play it. This can be a great way to engage a larger audience, collaborate with others, or challenge friends and family members to test their knowledge.
Congratulations! You have successfully made your Kahoot game public on your Chromebook. Now, sit back, relax, and watch as others join and enjoy the game you created.
Conclusion
Congratulations! You have successfully learned how to make a Kahoot game public on a Chromebook. By following the step-by-step instructions in this guide, you can now share your Kahoot game with a wider audience, allowing others to join in the fun and engage in interactive learning.
We started by accessing Kahoot on the Chromebook, ensuring that you were connected to the internet and logged into your Kahoot account. Next, we navigated to the Kahoot Creator page, where you could create and customize your own Kahoot game.
After creating the game, we walked you through the process of customizing the game settings, such as player access, game options, and advanced settings. These options allow you to tailor the game to your specific preferences and needs.
Finally, we explored how to make your Kahoot game public by obtaining a unique game URL that can be shared with others. By sharing the URL through various channels, such as email, messaging apps, or social media, you can invite others to join and play your Kahoot game.
Making your Kahoot game public opens up exciting possibilities for collaboration, engagement, and knowledge sharing. Whether you’re a teacher looking to engage your students, a trainer wanting to conduct a virtual quiz event, or simply someone passionate about sharing knowledge, Kahoot provides a user-friendly platform to create and share interactive learning experiences.
So, grab your Chromebook, unleash your creativity, and start making your own public Kahoot games. With the power of technology and the fun and interactive nature of Kahoot, the possibilities are endless!