Overview
Creating and sharing Kahoots is a popular way for educators, students, and individuals alike to engage with interactive learning activities. By default, Kahoots are set to private, meaning they can only be accessed by the creator and shared with specific individuals. However, there may be instances where you want to change the privacy settings of a Kahoot and make it public for anyone to access and enjoy. In this guide, we will walk you through the steps to change a Kahoot to public and how to share it with others.
Whether you have a Kahoot that you want to make available to a wider audience or you simply want to explore and use public Kahoots created by others, this tutorial will equip you with the necessary knowledge to navigate the process easily.
Changing a Kahoot from private to public allows it to appear in the public search, making it accessible to Kahoot users worldwide. This opens up new possibilities for collaboration, knowledge sharing, and learning from a diverse range of Kahoots created by educators and enthusiasts around the globe.
By converting a Kahoot to public, you can contribute to the ever-growing library of educational content available on the Kahoot platform, while also benefiting from the vast collection of public Kahoots already shared by other users. The ability to create, modify, and share Kahoots is one of the key features that makes Kahoot a popular and dynamic learning tool.
Throughout this guide, we will demonstrate how to change the privacy settings of a Kahoot to public and provide guidance on how to customize and share your public Kahoot with others. So let’s dive in and explore the steps to transform your Kahoot into a vibrant, accessible, and engaging learning resource.
Step 1: Creating a Kahoot account
Before you can change the privacy settings of a Kahoot to public, you’ll need to have a Kahoot account. If you already have an account, feel free to skip to the next step.
To create a Kahoot account, follow these simple steps:
- Go to the Kahoot website by typing “kahoot.com” into your web browser’s address bar.
- On the Kahoot homepage, click on the “Sign up” button located at the top right corner of the screen.
- You will be presented with two options: “Teacher or student” and “Social”. Choose the option that best suits your needs. If you’re an educator or student, select “Teacher or student”. If you’re signing up for personal use, select “Social”.
- If you selected “Teacher or student”, you will be prompted to create an account using your email and password. Fill in the required information and click “Sign up” to create your account.
- If you selected “Social”, you have the option to sign up using your Google or Microsoft account. Click on the respective buttons and follow the prompts to complete the registration process.
- Once you’ve successfully created your Kahoot account, you will be redirected to your dashboard, where you can access and manage your Kahoots.
Having a Kahoot account is essential to create and manage your own Kahoots. It also provides access to the wide range of public Kahoots that you can use and customize for your educational and entertainment purposes.
With your Kahoot account now set up, you can proceed to the next step and start changing the privacy settings of your Kahoot to make it public.
Step 2: Accessing the Kahoot Creator
After creating your Kahoot account, the next step is to access the Kahoot Creator, where you can edit and modify your existing Kahoots, including changing their privacy settings to make them public. Follow these steps to access the Kahoot Creator:
- Log in to your Kahoot account using your registered email and password.
- Once logged in, you will be redirected to your dashboard, which displays an overview of your Kahoots, including your created Kahoots, any Kahoots shared with you, and your favorite Kahoots.
- To create a new Kahoot, click on the “Create” button located in the top navigation bar. If you already have a Kahoot that you want to make public, you can skip this step and proceed directly to accessing your existing Kahoots.
- If you clicked on “Create”, you will be presented with three options: “Quiz”, “Survey”, or “Discussion”. Choose the desired type of Kahoot you want to create and follow the prompts to add questions, answers, and other relevant details to your Kahoot.
- If you want to access an existing Kahoot, go back to your dashboard and locate the Kahoot you wish to make public. Click on the Kahoot to open it.
- Once you are in the editing interface of your Kahoot, you can customize the questions, answers, time limits, and other settings according to your preferences.
The Kahoot Creator provides a user-friendly interface that allows you to easily modify and personalize your Kahoots. You can add images, videos, and diagrams to enhance the visual experience, as well as adjust the difficulty level and points allocation to suit your intended audience.
With the Kahoot Creator at your disposal, you now have the power to change the privacy settings of your Kahoot and transform it into a public resource accessible to users worldwide. Read on to learn how to change the privacy settings of your Kahoot and make it available to a wider audience.
Step 3: Opening the desired Kahoot
Once you have accessed the Kahoot Creator and are ready to change the privacy settings of your Kahoot, you need to open the specific Kahoot that you want to make public. Follow these steps to open your desired Kahoot:
- From your dashboard or the Kahoot Creator interface, locate the Kahoot you wish to make public. This could be a Kahoot that you have just created or an existing Kahoot that you have previously saved.
- Click on the title or the thumbnail image of the Kahoot to open it in the editing interface.
- Once you have opened the Kahoot, you will see the various sections and components that make up the Kahoot, such as the questions, answers, answer options, and additional settings.
- Take a moment to review the content of your Kahoot and ensure that it is complete and ready for public access. You can make any necessary modifications or edits before proceeding to change the privacy settings.
By opening your desired Kahoot, you have gained direct access to all the elements that make up your Kahoot and can now proceed with modifying the privacy settings to make it public. The next step will guide you through the process of changing the privacy settings.
Step 4: Editing the Kahoot settings
Before changing the privacy settings of your Kahoot, it’s important to ensure that all the other settings related to your Kahoot are configured to your liking. In this step, we will discuss how to edit the various settings of your Kahoot:
- From the editing interface of your Kahoot, navigate to the settings section. This is usually located on the sidebar or on the top navigation bar, depending on the version of the Kahoot Creator.
- Click on the settings section to expand it and reveal the different options available for customization.
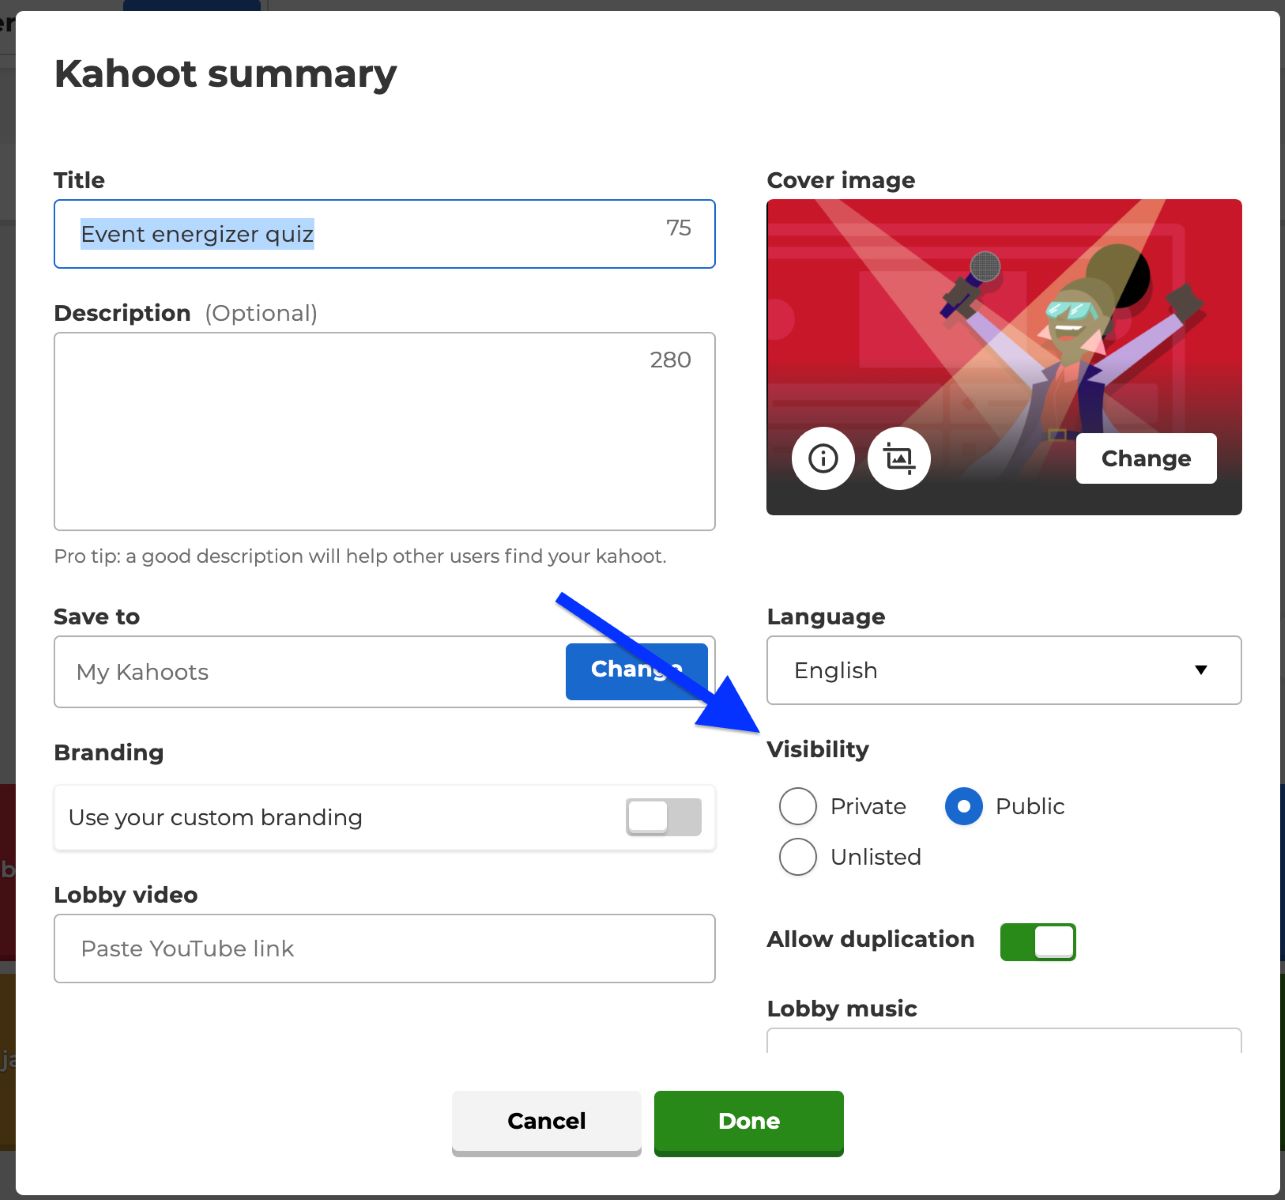
- Review each setting option and make necessary adjustments. These settings may include the title of the Kahoot, description, language, visibility, time limits, and more.
- Customize the settings according to your preferences and the specific requirements of your Kahoot.
- Remember to save your changes after editing the settings to ensure that the modifications are applied successfully.
Editing the settings of your Kahoot allows you to personalize it and customize it to suit your specific needs. You can make adjustments to the title and description to make it more appealing and informative, select the appropriate language to cater to your target audience, set time limits to create a sense of urgency, and more.
Take your time to review each setting and make the necessary modifications before moving on to the next step, where we will discuss how to change the privacy settings to make your Kahoot public.
Step 5: Changing the privacy settings to public
Once you have reviewed and edited the settings of your Kahoot, it’s time to change the privacy settings to make it public. Follow these steps to change the privacy settings:
- From the settings section of your Kahoot, locate the privacy or visibility setting. This setting determines who can access your Kahoot.
- Click on the privacy or visibility setting to open the available options.
- Select the “Public” option to change the privacy settings to public. This ensures that your Kahoot can be accessed by anyone, including those who are not logged in to their Kahoot accounts.
- Review the other privacy options available, such as “Private” or “Only me,” if you wish to change the privacy settings back to a more restricted mode in the future.
- Save your changes to apply the public setting to your Kahoot.
Changing the privacy settings to public allows your Kahoot to be discovered by other users and featured in the public search results on the Kahoot platform. This opens up the opportunity for collaboration, sharing, and engagement with a wider audience.
It’s important to note that changing the privacy settings to public means that anyone can access your Kahoot and use it for their own purposes. While this can lead to incredible opportunities for learning and interaction, it’s essential to ensure that you have reviewed your Kahoot and made any necessary modifications to ensure the accuracy and appropriateness of the content.
Now that you have successfully changed the privacy settings of your Kahoot to public, you can proceed to the next step, where we will guide you on how to save your changes.
Step 6: Saving the changes
After making modifications to your Kahoot’s privacy settings, it’s important to save the changes to ensure that they are applied successfully. Follow these steps to save your changes:
- Locate the “Save” or “Update” button within the settings or editing interface of your Kahoot. This button is typically located at the bottom or on the sidebar.
- Click on the “Save” or “Update” button to initiate the saving process.
- Wait for a confirmation message or notification that your changes have been saved.
Saving the changes ensures that the new privacy settings, as well as any other modifications you have made to your Kahoot, are preserved and applied for future use. It also allows you to access and share your public Kahoot with others.
Make sure to wait for the confirmation message before exiting the editing interface or proceeding to the next steps. This ensures that your changes have been successfully saved and applied to your Kahoot.
Once the changes have been saved, you can move on to the final step, where we will guide you on how to share your public Kahoot with others.
Step 7: Sharing your public Kahoot
Now that you have successfully changed your Kahoot’s privacy settings to public and saved your changes, it’s time to share your public Kahoot with others. Follow these steps to share your Kahoot:
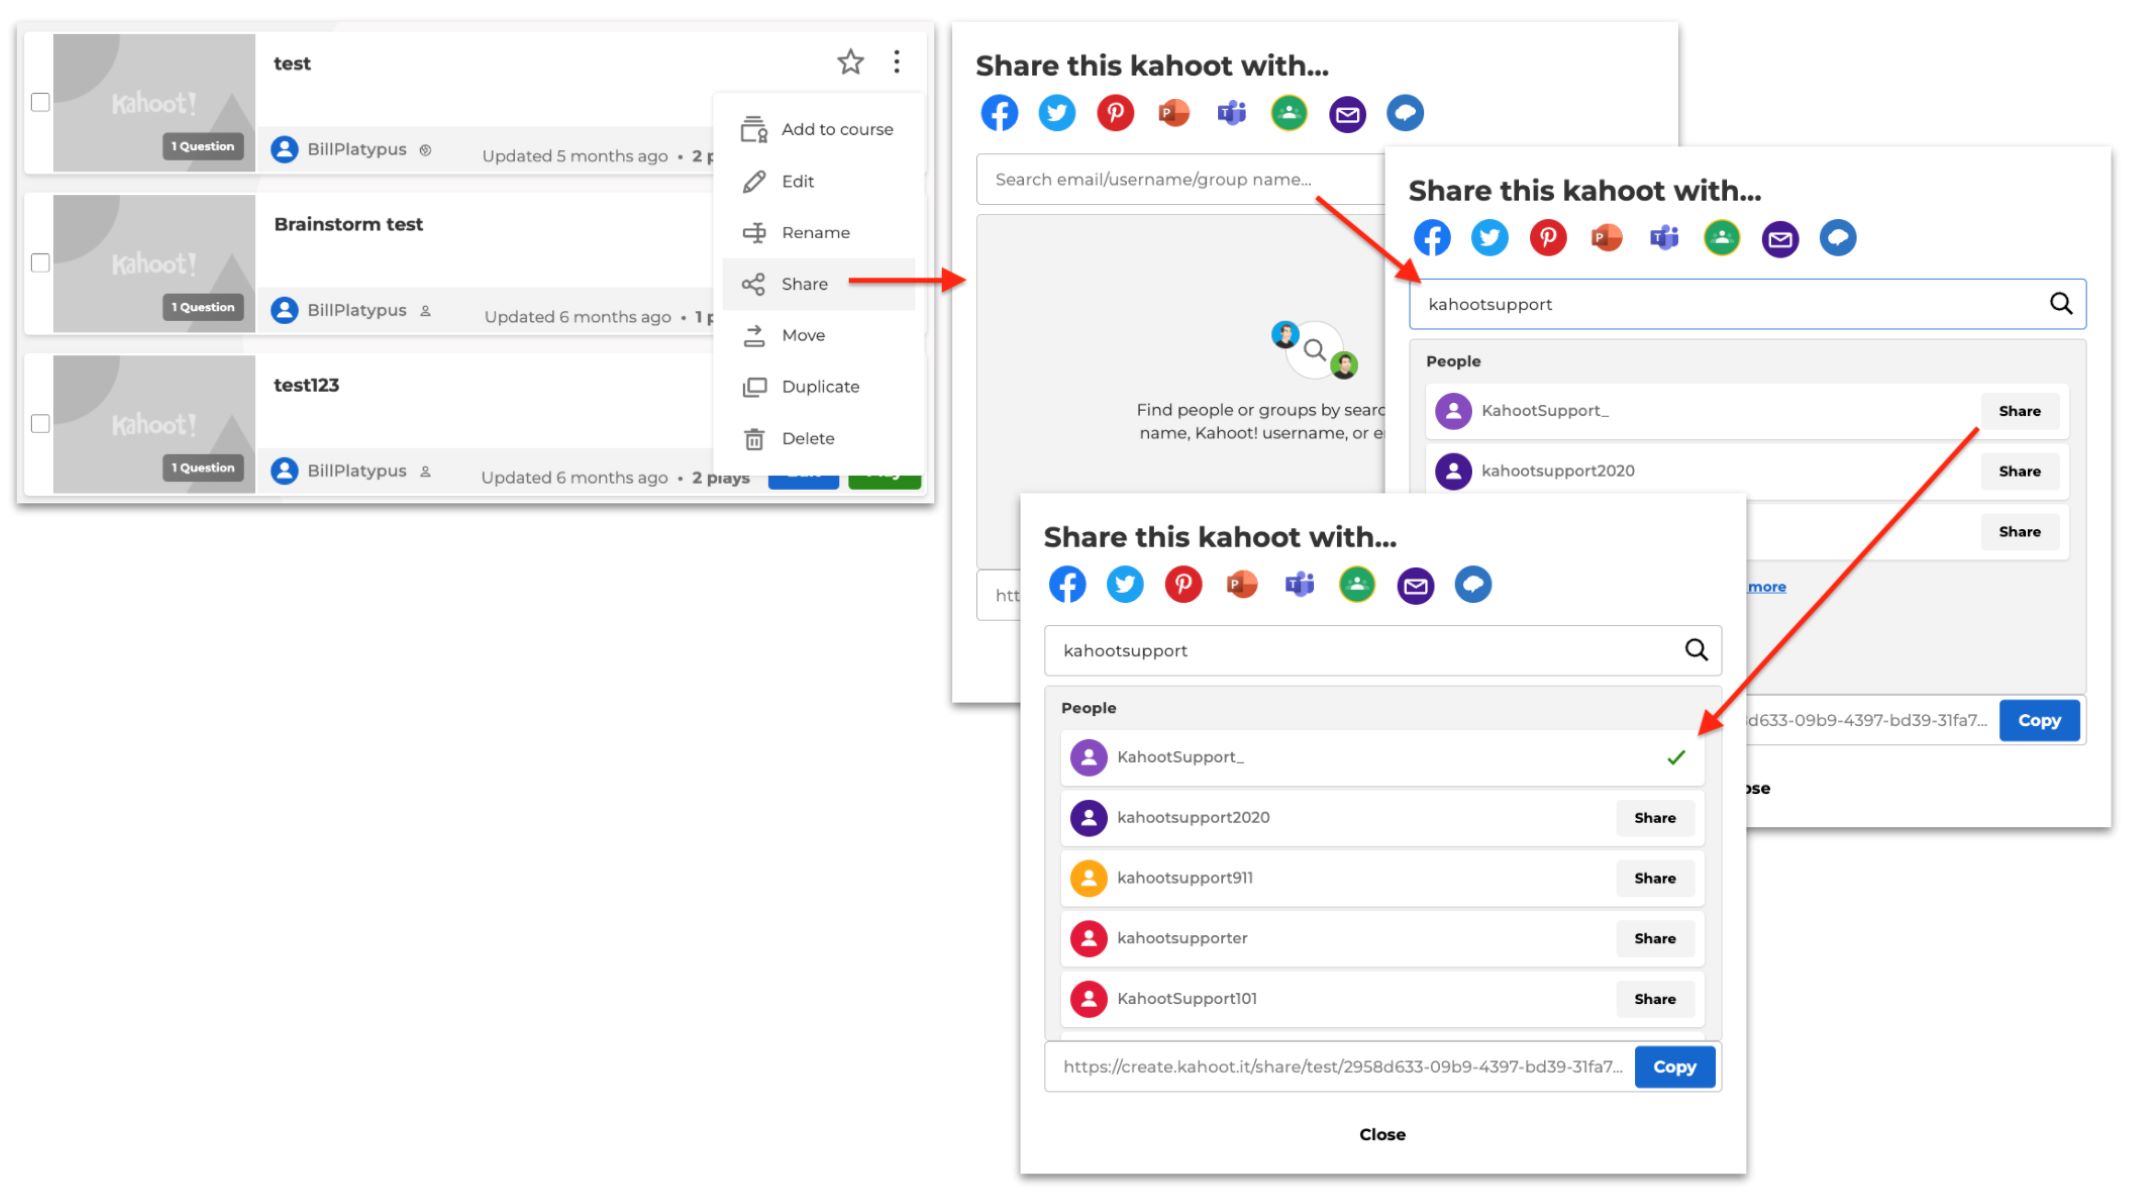
- From the editing interface or the dashboard of your Kahoot, locate the sharing options or buttons.
- Click on the sharing options to explore the various methods of sharing your Kahoot.
- Some common sharing options may include email, social media platforms, direct links, and embedding the Kahoot on websites or blogs.
- Select the sharing method that is most convenient for you or aligns with your intended audience.
- Follow the prompts or instructions provided within each sharing method to complete the sharing process.
- Ensure that you provide clear instructions or information on how others can access and engage with your public Kahoot.
Sharing your public Kahoot allows others to access and enjoy the interactive learning activities you have created. By sharing your Kahoot, you contribute to the collaborative and dynamic nature of the Kahoot platform, where educators and individuals worldwide can benefit from and engage with the shared content.
Remember to promote your public Kahoot through various channels such as email, social media, educational forums, or by embedding it on your website or blog. This helps to increase its visibility and reach a wider audience, making your public Kahoot a valuable learning resource.
Celebrate your accomplishment of creating and sharing a public Kahoot, and watch as others engage with and appreciate the content you have created!
Conclusion
Changing a Kahoot to public and sharing it with others opens up a world of possibilities for collaborative learning and knowledge sharing. In this guide, we have walked you through the step-by-step process of making your Kahoot public, allowing it to be accessed and enjoyed by a wider audience.
We began by creating a Kahoot account and accessing the Kahoot Creator. From there, we opened the desired Kahoot and edited its settings to ensure it was ready for public access. Then, we changed the privacy settings to make the Kahoot public and saved our changes.
Finally, we explored the various methods for sharing the public Kahoot with others, such as email, social media platforms, direct links, and embedding it on websites or blogs. By following these steps, you can effectively share your public Kahoot and contribute to the growing community of educators and learners on the Kahoot platform.
Remember, when creating and sharing a public Kahoot, it’s important to review and modify the content to ensure its accuracy and appropriateness. Additionally, consider promoting your public Kahoot through various channels to increase its visibility and reach.
Now that you have the knowledge and tools to make a Kahoot public, embrace the opportunity to engage with a global audience, collaborate with other educators, and foster a love for interactive learning. Start creating and sharing your public Kahoots, and watch as the impact ripples throughout the educational community.