How to set gigabyte motherboard fan speed in the BIOS
To reduce PC noise or improve cooling, the most direct way to adjust gigabyte motherboard fan speed is through the BIOS Smart Fan utility. This built-in tool lets you control case fan RPMs with presets or a custom curve, all without installing extra software. Here’s how to do it step by step.
Step 1: Enter the BIOS
Restart your computer and immediately press the Del or F2 key repeatedly as soon as the Gigabyte logo appears on screen. Timing is critical, start pressing the key within the first second or two of boot, and keep pressing until the BIOS setup screen loads. If you miss it, simply restart and try again.
Step 2: Find the Smart Fan settings
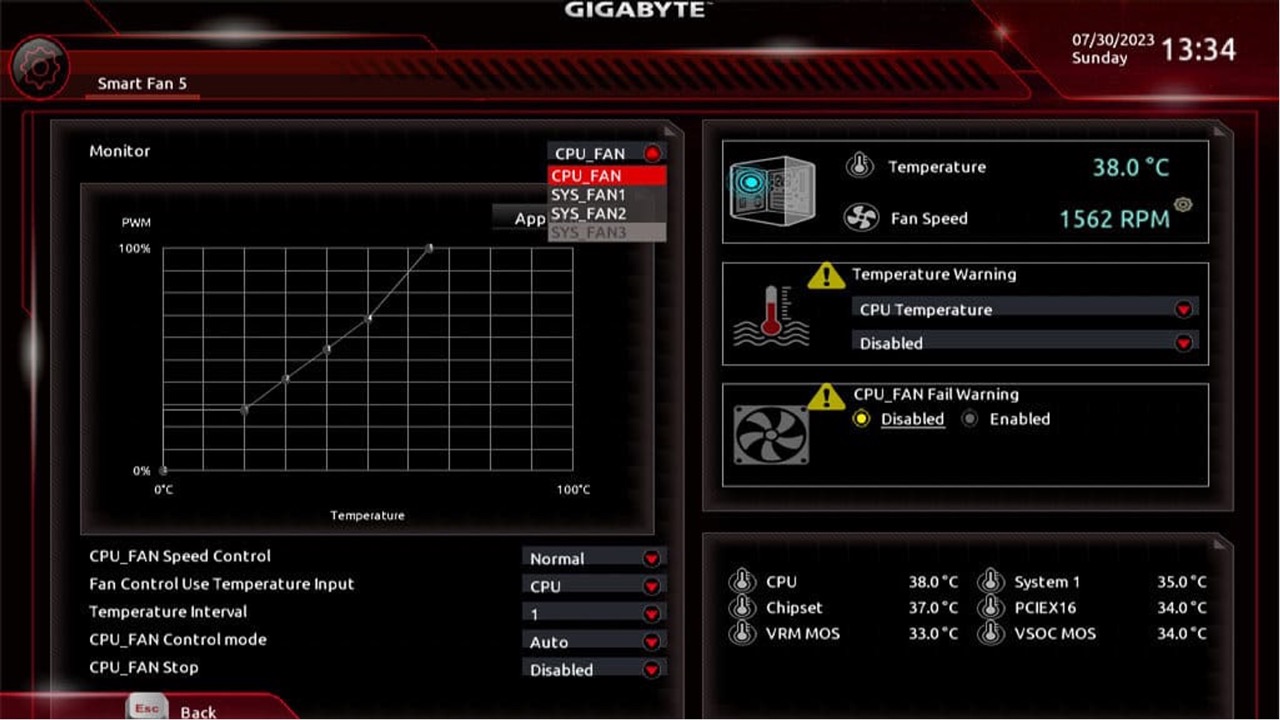
Once inside the BIOS, use the arrow keys to navigate to the Hardware Monitor or PC Health Status tab, the exact name varies by motherboard model. Look for a submenu labeled Smart Fan or Fan Control. Inside, you’ll see a list of fan headers (e.g., SYS_FAN1, SYS_FAN2). Select the header where your case fan is connected, then press Enter to open its settings.
Step 3: Choose a preset or manual fan curve
In the Smart Fan menu, you’ll find two main options. The first is a set of preset modes, Silent, Normal, Turbo, or Full Speed, which automatically adjust fan RPMs based on temperature. For most users, Normal offers a good balance between cooling and noise. The second option is Manual Mode, which lets you drag nodes on a graph. The vertical axis represents fan speed (RPM %), and the horizontal axis represents temperature. Set a low RPM at idle temperatures and a higher RPM as temperatures rise. This gives you precise control over when your fans spin up or stay quiet.
Step 4: Save and exit
After making your changes, press F10 to open the Save & Exit menu, select Save Changes and Exit, and confirm. Your computer will reboot with the new fan settings applied. After booting back into Windows, monitor your CPU and GPU temperatures under load using a tool like HWMonitor or Core Temp. If temps climb too high, go back into the BIOS and raise the fan curve; if noise is still an issue, lower it.
Using Gigabyte Control Center in Windows
If you prefer not to reboot into the BIOS, Gigabyte provides Windows-based software called Gigabyte Control Center (GCC) or System Information Viewer (SIV). After installing GCC, open it, go to the Smart Fan or Fan Control section, and you can adjust fan profiles, set custom curves, or switch between presets directly from your desktop. This is especially handy for quickly testing different settings without restarting. Note that the CONTROL CENTER activated by [Fn] + [ESC] is for specific Gigabyte laptop models, it is not the standard method for desktop motherboards.
Understanding advanced Smart Fan features
Beyond presets and manual curves, Smart Fan includes a Fan Stop feature that allows supported fans to completely stop spinning when temperatures drop below a set threshold, ideal for near-silent idle operation. Additionally, modern Gigabyte motherboards come with Hybrid Fan Headers that automatically detect whether a connected fan uses PWM (4-pin) or Voltage/DC (3-pin) mode and configure themselves accordingly, so you don’t have to worry about jumper settings. Finally, each fan header (except the CPU fan) can be assigned to a different thermal sensor input, such as the motherboard chipset, VRM, or system temperature, so you can tie a case fan to the component that actually generates the most heat in your build. This level of customization lets you minimize dust on PC case fans by running them only when needed, which also reduces noise and extends fan lifespan.
\nRelated reading: How To Enable TPM 2.0 On Gigabyte Motherboard and How To Enable Secure Boot On Gigabyte Motherboard.