Introduction
Welcome to our guide on how to enable TPM 2.0 on a Gigabyte motherboard. TPM, which stands for Trusted Platform Module, is a specialized chip that enhances the security of your computer system. By enabling TPM 2.0, you can take advantage of advanced security features, such as secure boot and device encryption. This ensures that your data and system are protected from unauthorized access.
Having a Gigabyte motherboard gives you the opportunity to harness the benefits of TPM 2.0. However, the process of enabling TPM 2.0 may vary depending on your motherboard model and BIOS version. This guide will provide a step-by-step approach to help you through the process. Whether you are a beginner or an experienced user, we have you covered!
In this guide, we will walk you through the necessary steps to enable TPM 2.0 on your Gigabyte motherboard. We will begin by checking if your motherboard supports TPM 2.0, and then proceed to update the BIOS to the latest version. We will then dive into accessing the BIOS settings and enabling TPM 2.0. Finally, we will guide you on how to verify that TPM 2.0 has been successfully activated.
Before we proceed, it’s important to note that enabling TPM 2.0 might involve making changes to the BIOS settings, which can affect the overall functionality of your system. Therefore, it is crucial to follow the steps carefully and ensure that you have a complete backup of your important files before proceeding with any changes.
Now that we have covered the basics, let’s move on to the first step: checking if your Gigabyte motherboard supports TPM 2.0.
Why TPM 2.0 is important
Trusted Platform Module (TPM) 2.0 is an essential feature for modern computer systems, offering enhanced security and protection against various threats. Let’s explore why TPM 2.0 is important and how it can benefit you.
Secure Boot: One of the key advantages of TPM 2.0 is its ability to secure the boot process. By enabling TPM 2.0, you can ensure that only trusted and verified software is loaded during the system boot-up. This prevents malicious software or firmware from compromising the integrity of your system and ensures a trustworthy start-up experience.
Device Encryption: TPM 2.0 enables hardware-based encryption, allowing you to safeguard your data with ease. By encrypting your hard drive using TPM 2.0, even if your device falls into the wrong hands, your data remains protected and inaccessible to unauthorized users. This provides an additional layer of security and peace of mind, particularly for sensitive information such as financial records or private documents.
Windows Hello: Windows Hello is a feature that uses TPM 2.0 to provide secure and convenient biometric authentication methods, such as fingerprint recognition or facial recognition. With TPM 2.0, you can unlock your Windows device quickly and securely without relying solely on traditional passwords. This eliminates the risk of password breaches or unauthorized access to your account.
Platform Trust: TPM 2.0 establishes a root of trust for your system, ensuring that the platform remains trustworthy and secure. It helps protect against attacks such as malware injections, unauthorized firmware modifications, or tampering with critical system components. This not only safeguards your system, but it also ensures the integrity of your data and applications.
Enterprise Security Compliance: Many organizations require TPM 2.0 as part of their security compliance standards. By enabling TPM 2.0, you can meet these requirements and ensure that your system is aligned with industry best practices. This is particularly important for businesses dealing with sensitive customer data or confidential information.
Overall, TPM 2.0 plays a vital role in securing your system, protecting your data, and providing a robust foundation for trusted computing. Whether you are a home user or a business professional, enabling TPM 2.0 on your Gigabyte motherboard is a crucial step towards enhancing the security and trustworthiness of your computer system.
Step 1: Check if your Gigabyte motherboard supports TPM 2.0
Before you proceed with enabling TPM 2.0 on your Gigabyte motherboard, it’s important to ensure that your motherboard supports this feature. Here’s how you can check:
- Identify your motherboard model: Locate the model number of your Gigabyte motherboard. The model number is usually printed on the motherboard itself or can be found in the product documentation or packaging.
- Visit the Gigabyte website: Access the official Gigabyte website (www.gigabyte.com) and navigate to the Support or Downloads section.
- Enter your motherboard model: Use the search function on the website and enter your motherboard model number. This will lead you to the product page of your specific motherboard.
- Check the specifications: Once you’re on the product page, look for the specifications section. Here, you should find information about the supported hardware features of your motherboard, including TPM.
- Verify TPM 2.0 support: Look for any mention of TPM or Trusted Platform Module in the specifications list. Make sure that your motherboard supports TPM 2.0, as earlier versions of TPM may not offer the same level of security and features.
If you find that your Gigabyte motherboard supports TPM 2.0 in the specifications, then you’re good to go! You can proceed with the next steps to enable TPM 2.0. However, if your motherboard does not support TPM 2.0, you may need to consider alternative security measures or explore options for upgrading your motherboard to a model that does support TPM 2.0.
Checking the compatibility of your motherboard with TPM 2.0 is an important initial step to ensure a successful enablement process. By confirming the support of TPM 2.0 on your Gigabyte motherboard, you can proceed with confidence and unlock the advanced security features offered by this technology.
Step 2: Update BIOS to the latest version
Updating the BIOS (Basic Input/Output System) to the latest version is crucial before enabling TPM 2.0 on your Gigabyte motherboard. BIOS updates often include bug fixes, performance improvements, and compatibility enhancements that can facilitate the smooth operation of TPM 2.0.
Here’s how you can update your BIOS to the latest version:
- Identify your motherboard model: Just like in the previous step, locate the model number of your Gigabyte motherboard. You can find it on the motherboard itself or in the product documentation.
- Visit the Gigabyte website: Go to the official Gigabyte website and navigate to the Support or Downloads section.
- Enter your motherboard model: Use the search function on the website and enter your motherboard model number. This will take you to the product page of your specific motherboard.
- Locate the BIOS updates: On the product page, find the section dedicated to BIOS updates. Gigabyte provides the latest BIOS updates for each motherboard model, which you can download.
- Download the appropriate BIOS update: Look for the most recent BIOS update for your motherboard and download the corresponding file. Make sure to select the correct operating system.
- Back up your important data: Before proceeding with the BIOS update, it’s important to create a backup of your important files and documents. This is a precautionary measure in case anything goes wrong during the update process.
- Run the BIOS update utility: Once you have downloaded the BIOS update file, run the executable file and follow the on-screen instructions to install the update. During the process, make sure you do not interrupt the update or turn off your computer.
- Restart your computer: After the BIOS update is completed successfully, restart your computer to apply the changes.
- Verify the BIOS version: Once your computer restarts, enter the BIOS settings by pressing the designated key (usually Del or F2) during the boot-up process. Check the BIOS version to confirm that the update was successful.
Updating the BIOS to the latest version ensures that you have the necessary firmware enhancements and compatibility improvements for enabling TPM 2.0. It’s an important step in preparing your Gigabyte motherboard for the implementation of TPM 2.0 and maximizing its benefits.
Step 3: Access BIOS settings
Before you can enable TPM 2.0 on your Gigabyte motherboard, you need to access the BIOS (Basic Input/Output System) settings. The BIOS is a firmware interface that allows you to configure various hardware settings of your computer.
Here’s how you can access the BIOS settings:
- Restart your computer: Start by restarting your computer. During the boot-up process, you will need to access the BIOS settings, so be prepared to act quickly.
- Enter the BIOS key: On most Gigabyte motherboards, you can enter the BIOS settings by pressing the “Delete” key or “F2” key. However, the specific key may vary depending on your motherboard model. Look for a prompt or message on your screen during the boot-up process that indicates the key to press.
- Press the BIOS key: Once you’ve identified the correct key, press it quickly and repeatedly until you enter the BIOS settings. Timing is crucial, so make sure to press the key as soon as you see the prompt or message.
- Navigate the BIOS interface: Once you’ve successfully entered the BIOS settings, you’ll see a graphical or text-based interface. Use the arrow keys on your keyboard to navigate through the different options and menus.
- Familiarize yourself with the BIOS: Take some time to explore the BIOS settings and understand the layout and options available to you. This will come in handy when you need to enable TPM 2.0 and make any necessary configuration changes.
It is important to note that accessing the BIOS settings may differ slightly depending on your motherboard model. Therefore, always refer to your motherboard’s manual or the Gigabyte website for specific instructions on accessing the BIOS. In case you’re unsure or unable to access the BIOS settings, consult the documentation provided with your motherboard or seek assistance from Gigabyte support.
By accessing the BIOS settings successfully, you’re one step closer to enabling TPM 2.0 on your Gigabyte motherboard. The BIOS interface allows you to make important configuration changes, including enabling TPM 2.0, which we will cover in the next step.
Step 4: Enable TPM 2.0 in BIOS
Now that you have successfully accessed the BIOS settings, it’s time to enable TPM 2.0 on your Gigabyte motherboard. Enabling TPM 2.0 will activate the Trusted Platform Module, providing advanced security features and enhancing the overall protection of your system.
Follow these steps to enable TPM 2.0 in the BIOS:
- Navigate to the Security or Advanced tab: In the BIOS settings, look for a tab that is labeled “Security” or “Advanced.” The location and naming may vary depending on your motherboard model.
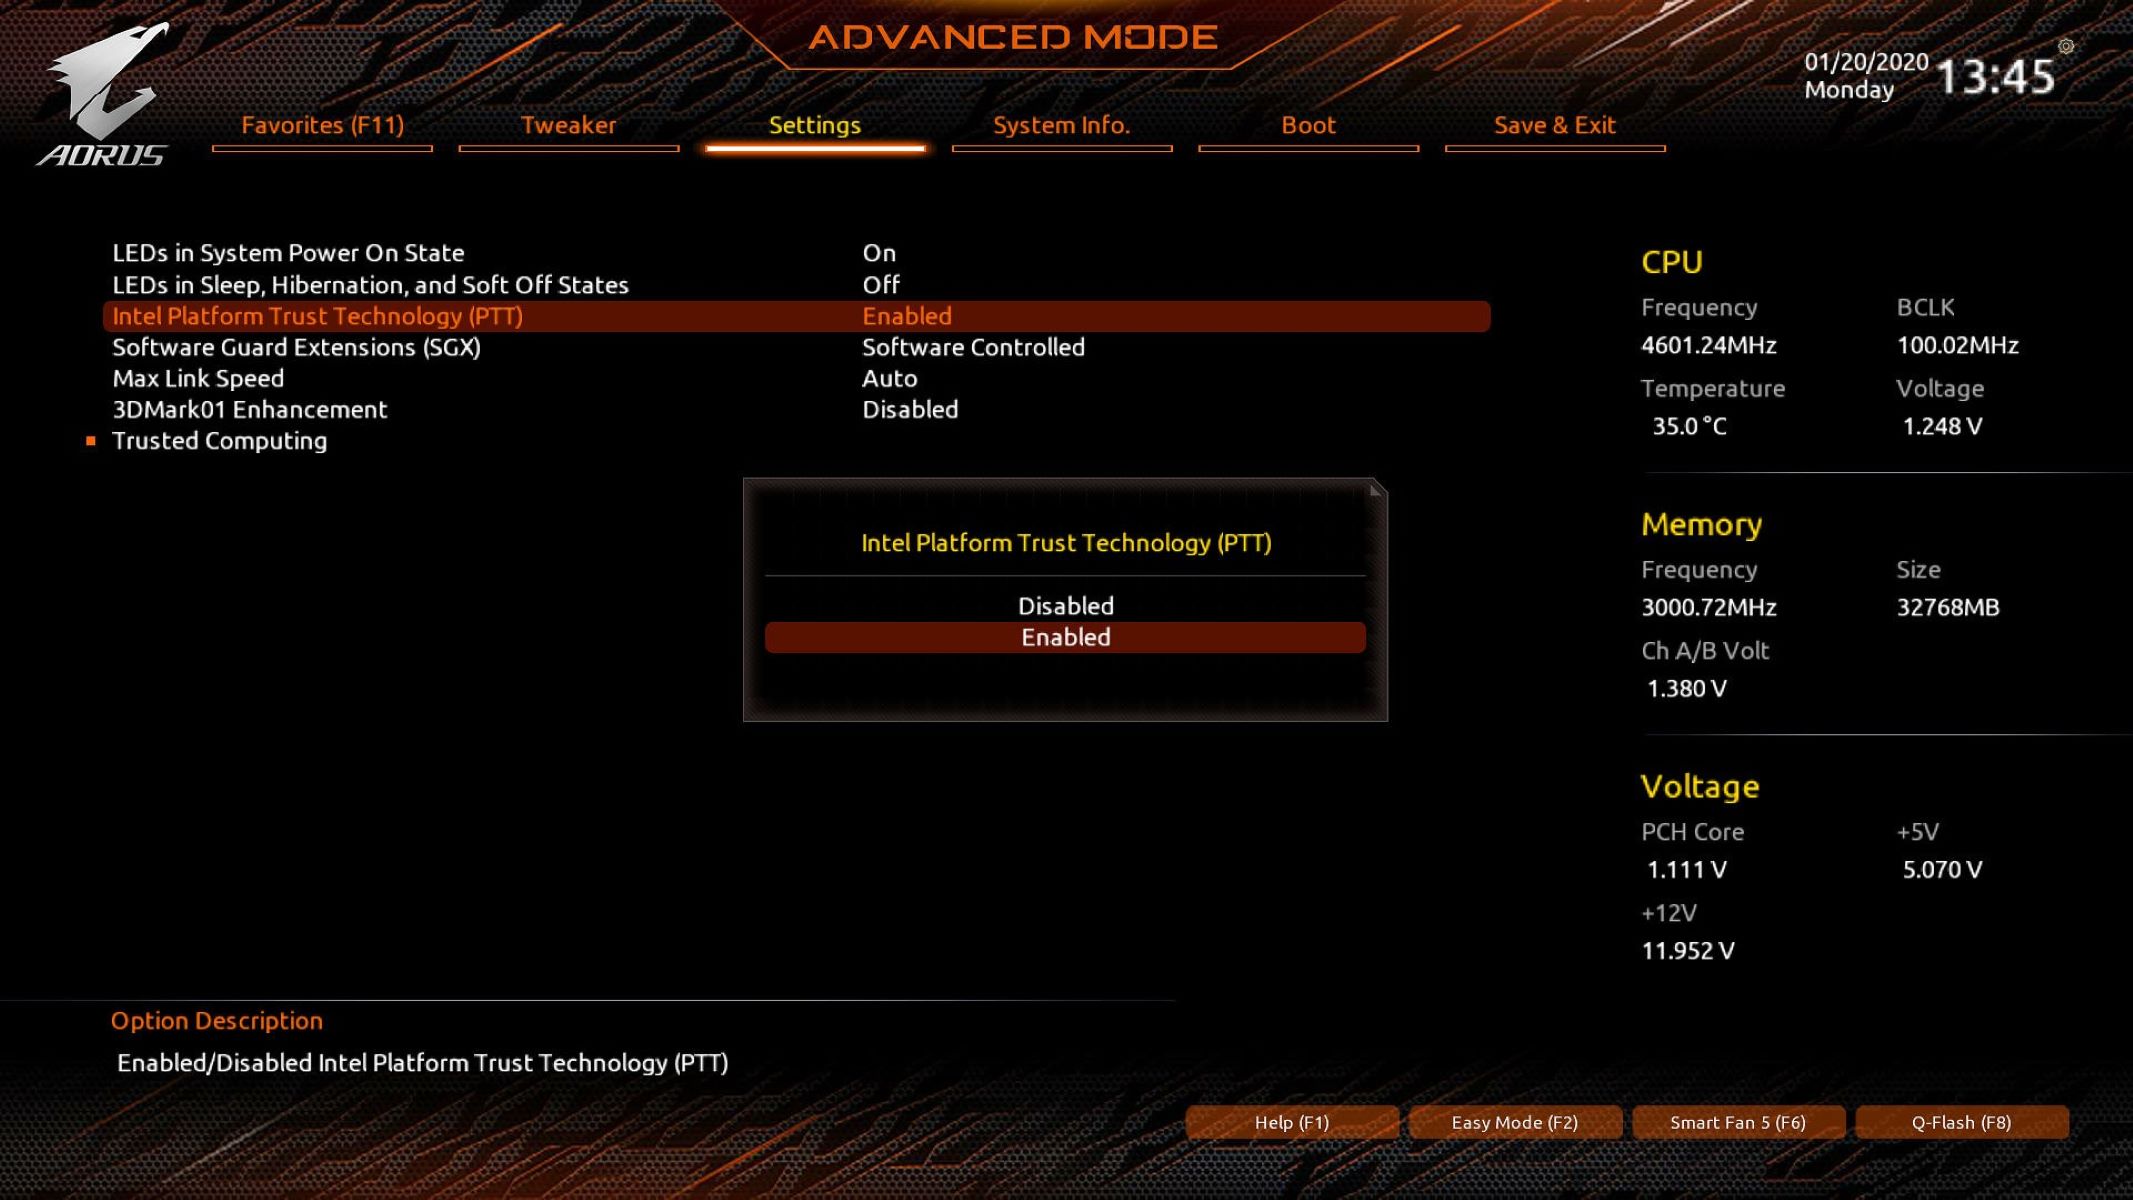
- Find the TPM settings: Within the Security or Advanced tab, locate the TPM settings. It may be listed as “TPM Configuration,” “Security Device Support,” or something similar.
- Enable TPM support: Once you’ve found the TPM settings, enable TPM support by selecting the appropriate option. This will vary depending on the BIOS interface, but it usually involves choosing “Enabled” or “Enable TPM.”
- Save your changes: After enabling TPM support, save your changes and exit the BIOS settings. Look for an option such as “Save and Exit” or “Exit and Save Changes.”
It’s worth mentioning that some Gigabyte motherboards may require additional steps to enable TPM 2.0. Refer to your motherboard’s manual or the Gigabyte website for specific instructions if you encounter any difficulties or if the options mentioned above are not available in your BIOS settings.
Once you have successfully enabled TPM 2.0 in the BIOS, you’re ready to move on to the next step, which involves saving the changes and exiting the BIOS settings.
Enabling TPM 2.0 in the BIOS is a crucial step in harnessing the security benefits it offers. By activating the Trusted Platform Module on your Gigabyte motherboard, you can take advantage of advanced security features that protect your system and sensitive data from unauthorized access.
Step 5: Save changes and exit BIOS
After enabling TPM 2.0 in the BIOS settings of your Gigabyte motherboard, you need to save the changes and exit the BIOS. This step ensures that your system recognizes the enabled TPM and applies the necessary configurations.
Follow these steps to save the changes and exit the BIOS:
- Review your changes: Before you save and exit the BIOS, take a moment to review the changes you made. Ensure that TPM 2.0 support is enabled and any other related settings are configured correctly.
- Save your changes: In the BIOS settings, look for an option to save your changes. This is commonly labeled as “Save and Exit,” “Exit and Save Changes,” or something similar. Select this option to save the changes you made.
- Confirm the changes: Some BIOS interfaces may prompt you to confirm the changes before saving. If this is the case, select “Yes” or “OK” to confirm the changes.
- Exit the BIOS: After saving the changes, look for an option to exit the BIOS settings. This is usually labeled as “Exit,” “Exit BIOS,” or “Exit Setup.” Select this option to exit the BIOS interface.
- Reboot your computer: Once you have exited the BIOS, your computer will restart. Allow it to complete the restart process so that the changes take effect.
During the restart, your system will recognize the enabled TPM 2.0 and adjust the necessary configurations accordingly. This ensures that the TPM is ready for use and provides the enhanced security features it offers.
It’s important to note that after saving the changes and exiting the BIOS, it’s advisable to keep a record of the settings you modified. This can be helpful in troubleshooting or reverting any changes if needed in the future.
Now that you have successfully saved the changes and exited the BIOS, you’re ready to proceed to the next step, which involves verifying the activation of TPM 2.0 on your Gigabyte motherboard.
Step 6: Verify TPM 2.0 activation
After enabling TPM 2.0 and saving the changes in the BIOS settings of your Gigabyte motherboard, it is important to verify that the TPM has been successfully activated. Verifying TPM 2.0 activation ensures that your system is ready to utilize the enhanced security features provided by the Trusted Platform Module.
Follow these steps to verify the activation of TPM 2.0:
- Reboot your computer: Begin by restarting your computer to allow the changes made in the BIOS settings to take effect.
- Enter the BIOS settings: During the boot-up process, enter the BIOS settings by pressing the designated key (usually Delete or F2). This will allow you to access the BIOS interface once again.
- Navigate to the TPM settings: Within the BIOS, locate the TPM settings. Depending on your motherboard model, it may be listed as “TPM Configuration” or something similar.
- Verify TPM status: In the TPM settings, check the status of TPM. It should indicate that TPM is “Enabled” or “Activated”. Additionally, you may find information about the firmware version or other related details.
- Save and exit BIOS: If the TPM status is correctly displayed as enabled or activated, save the changes in the BIOS settings and exit the interface as you did in the previous step.
- Operating System check: Once your computer restarts, log in to your operating system and check if it detects the presence of TPM 2.0. Operating systems such as Windows® may have built-in tools or utilities that allow you to verify TPM activation.
- TPM Management Console: If available, access the TPM Management Console in your operating system to ensure that the TPM is active, and check its firmware version and other settings if necessary.
By verifying the activation of TPM 2.0, you can confirm that the Trusted Platform Module is fully operational and ready to provide the advanced security features it offers. If you encounter any difficulties in verifying TPM activation or if the activation is not successful, refer to your motherboard’s manual or seek assistance from Gigabyte support for further guidance.
Once you have confirmed the activation of TPM 2.0, you can rest assured knowing that your Gigabyte motherboard is equipped with enhanced security features to protect your system and sensitive data against unauthorized access.
Conclusion
Congratulations! You have successfully enabled TPM 2.0 on your Gigabyte motherboard. By following the step-by-step process outlined in this guide, you have unlocked advanced security features that will enhance the protection and integrity of your computer system.
TPM 2.0 offers a range of benefits, including secure boot, device encryption, Windows Hello, platform trust, and compliance with enterprise security standards. These features provide peace of mind, especially when it comes to safeguarding sensitive data and securing your system against unauthorized access.
Remember to periodically check for BIOS updates to ensure that your motherboard remains up to date with the latest enhancements and security patches. This will ensure that your TPM 2.0 continues to function optimally and provide the highest level of security for your system.
If you encounter any issues or need further assistance, consider reaching out to Gigabyte support or referring to their documentation and resources. They will be able to provide you with specific guidance and help address any concerns you may have.
Thank you for following this guide on how to enable TPM 2.0 on a Gigabyte motherboard. By taking the necessary steps to activate TPM 2.0, you have taken an important stride towards strengthening the security of your computer system. Enjoy the enhanced protection and peace of mind that TPM 2.0 provides!