Introduction
Welcome to this comprehensive guide on how to enter the BIOS (Basic Input/Output System) on an MSI Gaming Laptop. The BIOS is a crucial component of your laptop, as it contains the settings and configurations that dictate how your hardware and software interact. Accessing the BIOS allows you to make important changes or updates, such as adjusting the boot order, enabling or disabling components, or overclocking your CPU.
While the BIOS may seem like a daunting and technical aspect of your laptop, it is actually quite simple to access and navigate. In this guide, we will walk you through the step-by-step process of entering the BIOS on your MSI Gaming Laptop, using different methods depending on your laptop model. Whether you need to change a specific setting, update your BIOS version, or troubleshoot a hardware issue, this guide will provide you with the necessary instructions.
Before we dive into the details, it is important to note that entering the BIOS may vary slightly depending on the specific model of your MSI Gaming Laptop. Therefore, we have outlined different methods that are commonly used. Be sure to identify your laptop model and follow the corresponding method to successfully access the BIOS.
Now, let’s get started and learn how to enter the BIOS on your MSI Gaming Laptop, so you can take full control of your system and optimize it to meet your specific needs.
Why do you need to enter BIOS on MSI Gaming Laptop?
The BIOS is a critical component of your MSI Gaming Laptop, and accessing it can bring several benefits and opportunities for customization. Here are some key reasons why you may need to enter the BIOS:
1. Hardware Configuration: The BIOS allows you to configure various hardware settings on your laptop. You can adjust the boot order, enable or disable specific components such as USB ports or network interfaces, and even overclock your CPU for enhanced performance. By accessing the BIOS, you have the power to optimize your hardware to suit your specific needs and preferences.
2. BIOS Updates: Manufacturers often release BIOS updates that provide bug fixes, security patches, and performance improvements. By entering the BIOS, you can check for and install the latest updates to ensure that your MSI Gaming Laptop is running smoothly and efficiently. Keeping your BIOS up to date can also enhance compatibility with new hardware or software.
3. Troubleshooting: If you are experiencing issues with your laptop, the BIOS can be a useful tool to diagnose and troubleshoot the problem. For example, you can check system temperatures, monitor fan speeds, or reset the BIOS settings to default values to resolve stability issues. Accessing the BIOS gives you a deeper level of control over your system, making it easier to identify and resolve any issues that may arise.
4. Security: The BIOS provides important security features that protect your laptop from unauthorized access. By entering the BIOS, you can set up a password to restrict access to the system, preventing unauthorized users from tampering with your settings or gaining access to your data. This can be particularly useful if you use your MSI Gaming Laptop for work or store sensitive information on it.
5. Advanced Configuration: The BIOS also offers advanced configuration options that are not available in the operating system. You can adjust memory timings, enable virtualization for running virtual machines, or modify power management settings to optimize battery life. These advanced options allow you to fine-tune your laptop for specific tasks or performance requirements.
Overall, accessing the BIOS on your MSI Gaming Laptop gives you greater control and flexibility over your system. It empowers you to customize hardware settings, update firmware, troubleshoot issues, enhance security, and optimize performance. By familiarizing yourself with the BIOS and its capabilities, you can harness its full potential to make your gaming experience even more enjoyable and tailored to your preferences.
Step-by-Step Guide to Enter BIOS on MSI Gaming Laptop
Entering the BIOS on your MSI Gaming Laptop is a straightforward process that can be done using different methods. We will outline three commonly used methods below:
Method 1: Using the “Delete” Key
- Start your MSI Gaming Laptop or restart it if it is already powered on.
- As soon as the MSI logo appears on the screen, press the “Delete” key repeatedly. This key is commonly used to access the BIOS on MSI laptops, but it may vary depending on the specific model.
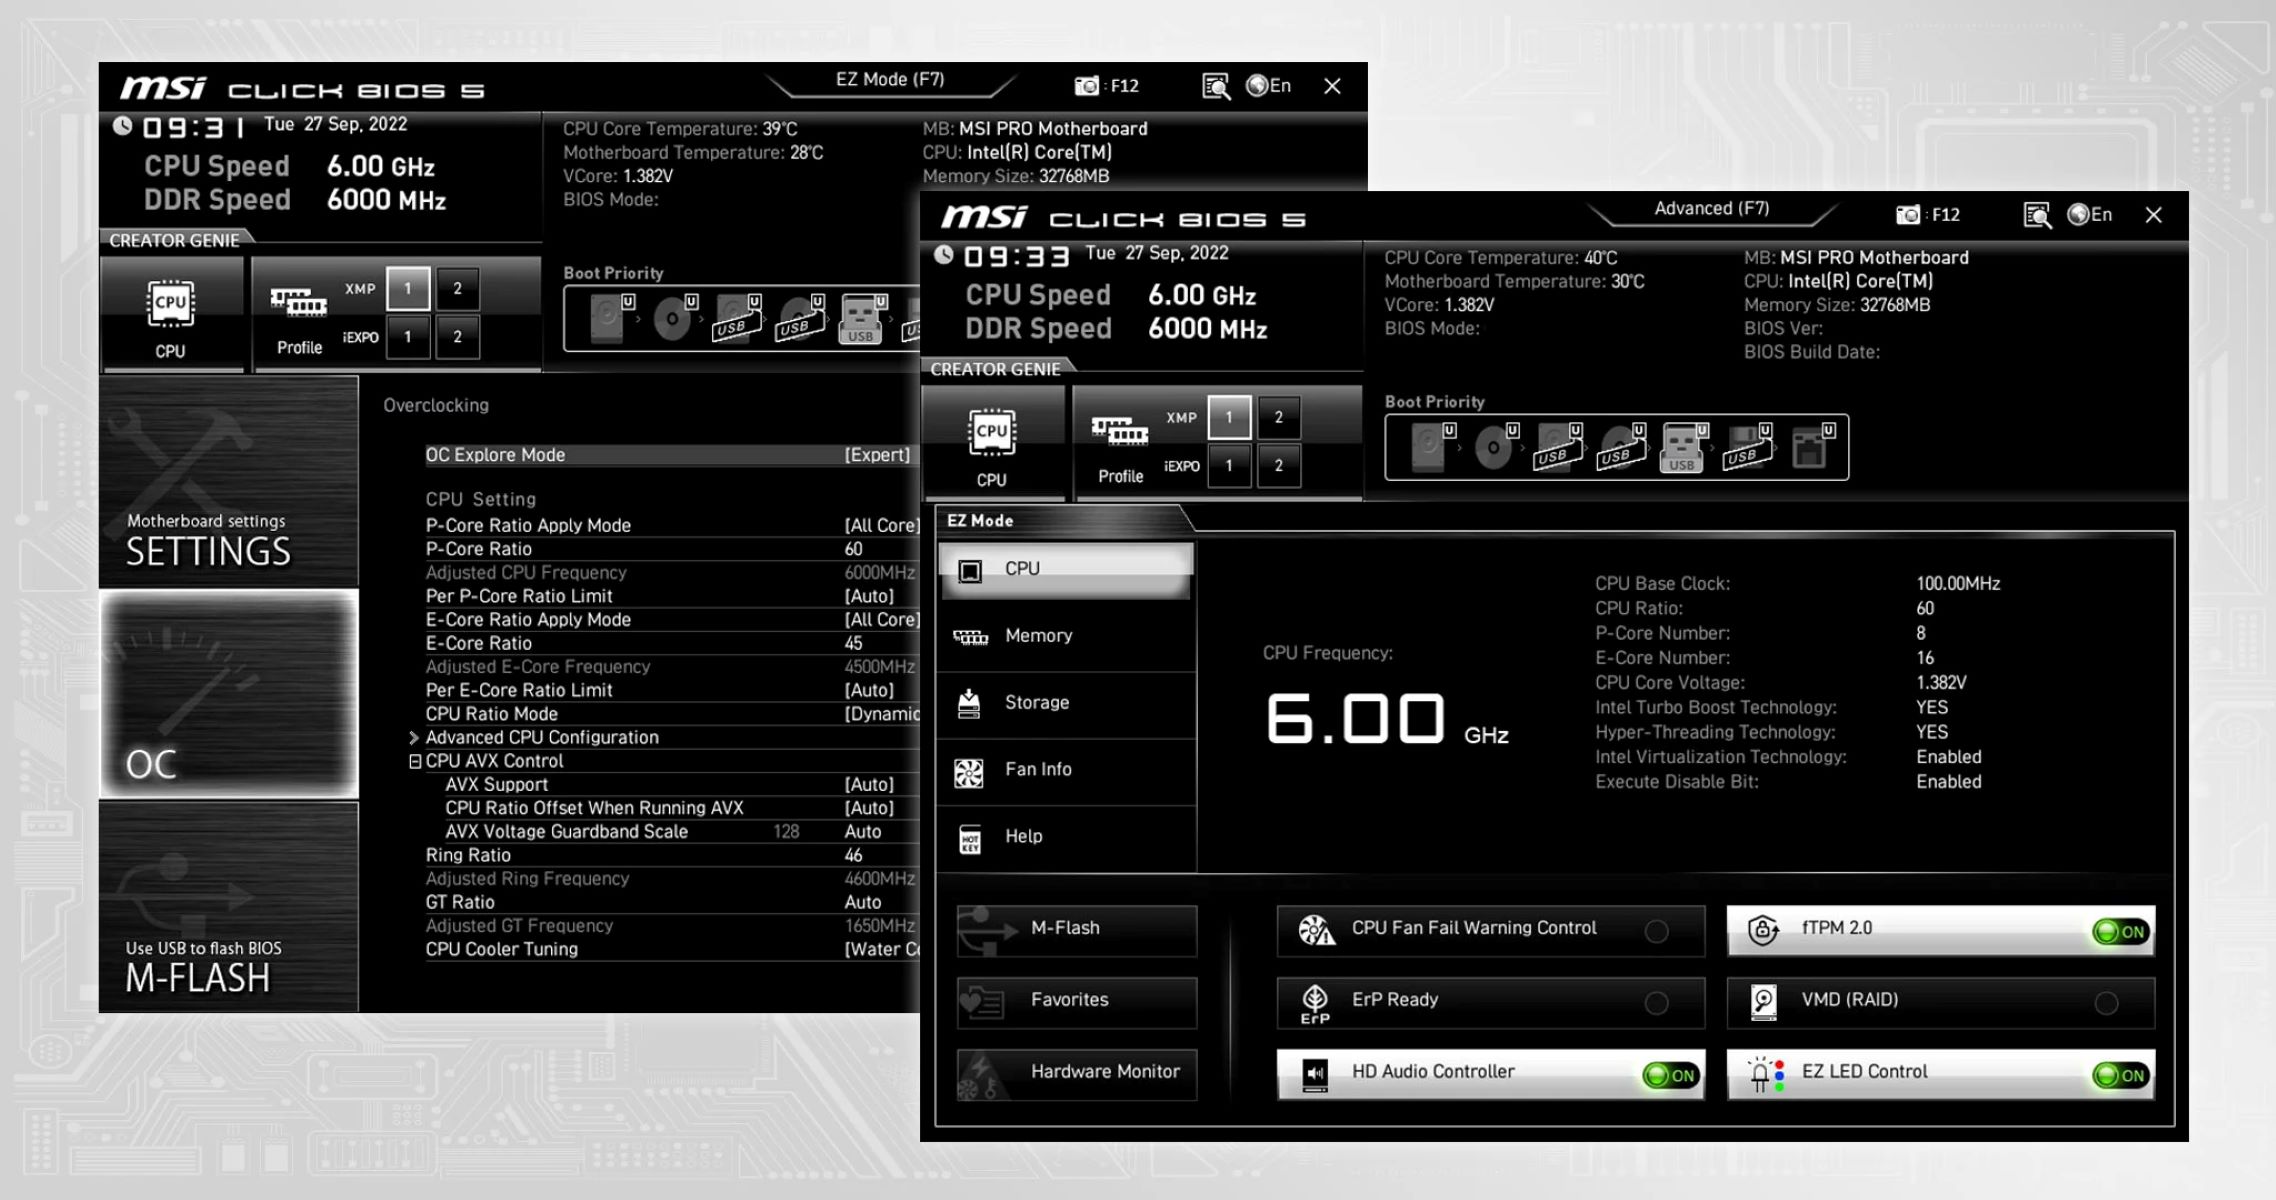
- You will be directed to the BIOS setup utility, where you can make the desired changes and adjustments. Use the arrow keys to navigate, and refer to the on-screen instructions for specific options.
- Once you have made the necessary modifications, save the changes and exit the BIOS. This option is usually located at the bottom of the screen, labeled as “Save and Exit” or something similar. Use the designated key or combination to save the changes and restart your laptop.
Method 2: Using the “F2” Key
- Start or restart your MSI Gaming Laptop.
- When the MSI logo appears, press the “F2” key repeatedly. This key is commonly used on MSI laptops to enter the BIOS, but keep in mind that it may vary depending on your laptop model.
- The BIOS setup utility will be displayed, allowing you to navigate and configure various settings. Use the arrow keys to move through the options and make the desired changes.
- After completing the necessary adjustments, save the changes and exit the BIOS. Look for the “Save and Exit” option or a similar label at the bottom of the screen. Follow the on-screen instructions to save the modifications and restart your laptop.
Method 3: Using the “F10” Key
- Power on or restart your MSI Gaming Laptop.
- As the MSI logo appears, press the “F10” key repeatedly. This key is commonly used on some MSI laptop models to access the BIOS.
- You will be taken to the BIOS setup utility, where you can navigate through the available options and configure settings according to your preferences.
- Once you have made the desired changes, save the modifications and exit the BIOS. Look for the “Save and Exit” option or a similar label at the bottom of the screen. Use the appropriate key or combination to save the changes and restart your laptop.
Remember, the specific key or combination to access the BIOS may vary depending on your MSI Gaming Laptop model. If none of the methods mentioned above work for your laptop, refer to the manufacturer’s documentation or visit their website for more information on accessing the BIOS.
By following these step-by-step instructions, you can effectively enter the BIOS on your MSI Gaming Laptop and gain access to its various settings and configurations. Take your time to explore the options and make the necessary adjustments to optimize your laptop’s performance and ensure an optimal gaming experience.
Method 1: Using the “Delete” Key
One of the most common methods to enter the BIOS on an MSI Gaming Laptop is by using the “Delete” key. This method allows you to access the BIOS setup utility quickly and easily. Follow the step-by-step instructions below to enter the BIOS using this method:
- Start your MSI Gaming Laptop or restart it if it is already powered on.
- As soon as the MSI logo appears on the screen, press the “Delete” key repeatedly. This key is commonly used to access the BIOS on MSI laptops, but it may vary depending on the specific model. If the “Delete” key does not work, try using the “F2” key (Method 2) or the “F10” key (Method 3).
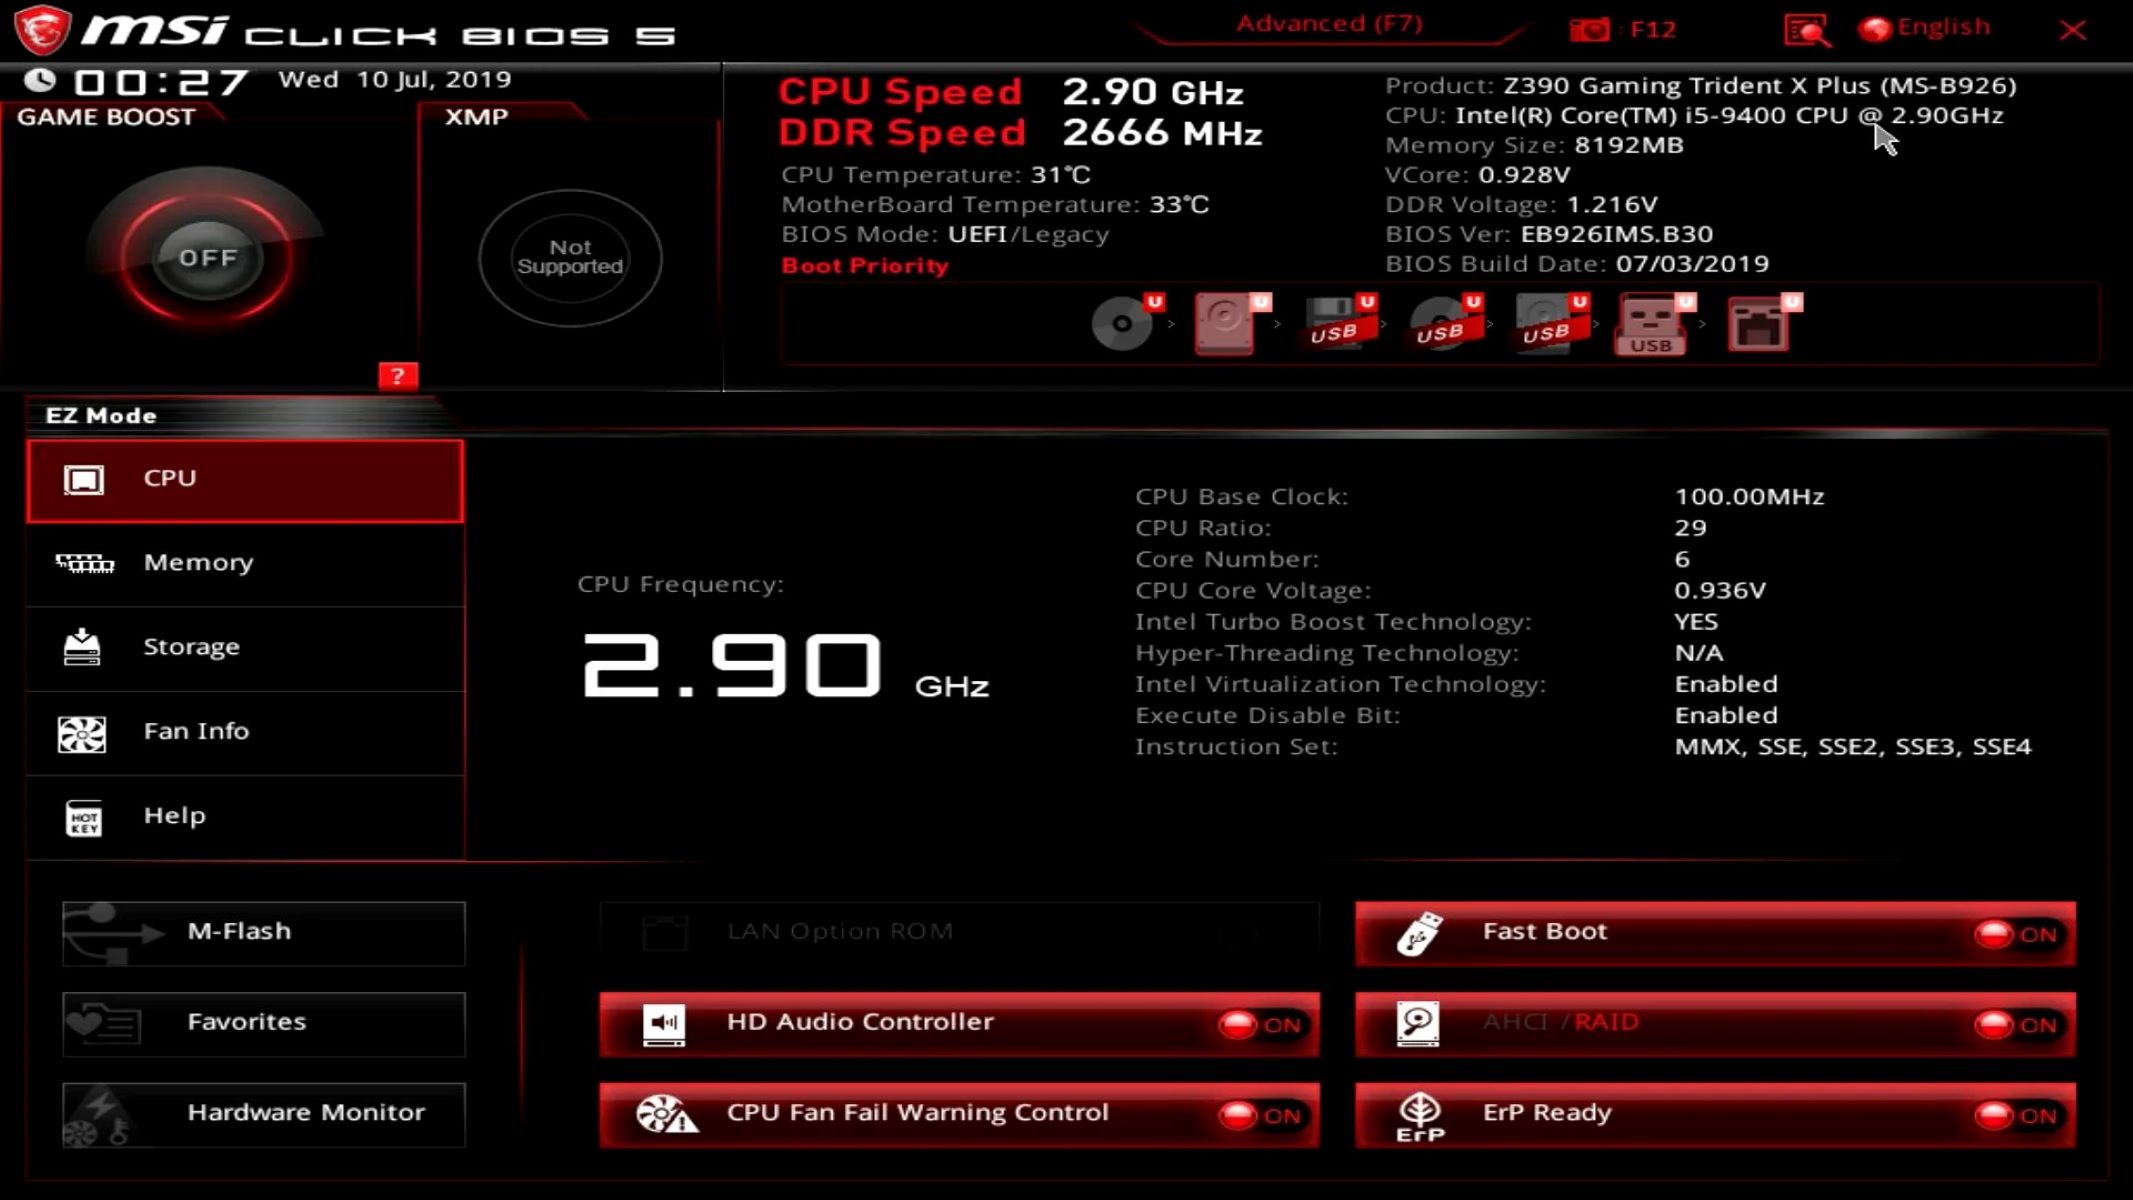
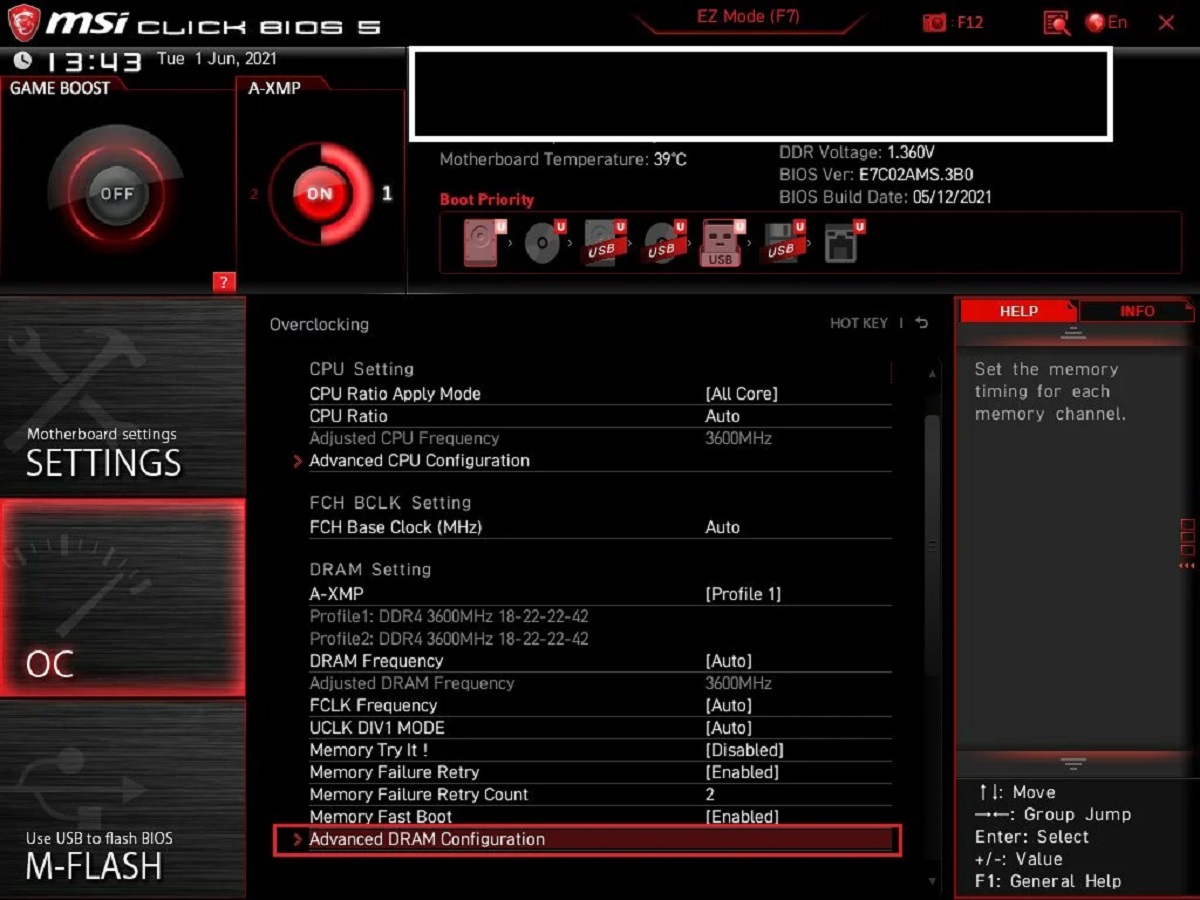
- You will be directed to the BIOS setup utility, where you can make the desired changes and adjustments. Use the arrow keys to navigate, and refer to the on-screen instructions for specific options.
- Take your time to explore the different settings available in the BIOS. You can modify hardware configurations, enable or disable specific components, adjust boot order, and more. Be cautious when making changes and ensure that you understand the impact of each modification.
- Once you have made the necessary modifications, it is essential to save the changes before exiting the BIOS. Look for the “Save and Exit” option at the bottom of the screen or in the menu. Use the designated key or combination (usually F10) to save the changes and restart your laptop.
Entering the BIOS using the “Delete” key is a straightforward process, but it’s important to note that the specific key to access the BIOS may vary depending on your MSI Gaming Laptop model. If the “Delete” key does not work, try using the “F2” key (Method 2) or the “F10” key (Method 3) as alternative options. Consult your laptop’s user manual or MSI’s official website for specific instructions tailored to your model.
By successfully entering the BIOS, you have unlocked the power to customize and optimize your MSI Gaming Laptop according to your preferences. From adjusting hardware settings to updating your BIOS version, the BIOS provides a range of options that allow you to enhance your gaming experience and ensure that your laptop performs to its full potential.
Method 2: Using the “F2” Key
Another commonly used method to enter the BIOS on an MSI Gaming Laptop is by using the “F2” key. This method provides a convenient way to access the BIOS setup utility and make necessary configurations. Follow the step-by-step instructions below to enter the BIOS using this method:
- Start or restart your MSI Gaming Laptop.
- When the MSI logo appears on the screen, press the “F2” key repeatedly. This key is commonly used on MSI laptops to enter the BIOS, but keep in mind that it may vary depending on your laptop model. If the “F2” key does not work, try using the “Delete” key (Method 1) or the “F10” key (Method 3) as alternative options.
- The BIOS setup utility will be displayed, allowing you to navigate and configure various settings. Use the arrow keys to move through the options and make the desired changes.
- Take your time to explore the different settings available in the BIOS. You can adjust hardware configurations, modify boot order, enable or disable specific components, and more. Be cautious when making changes and ensure that you understand the impact of each modification.
- After completing the necessary adjustments, it is crucial to save the changes before exiting the BIOS. Look for the “Save and Exit” option at the bottom of the screen or in the menu. Use the appropriate key or combination (usually F10) to save the changes and restart your laptop.
Using the “F2” key to enter the BIOS is a common practice on MSI Gaming Laptops. However, it’s important to note that the specific key to access the BIOS may vary depending on your laptop’s model. If the “F2” key does not work, try using the “Delete” key (Method 1) or the “F10” key (Method 3) as alternative options. Refer to your laptop’s user manual or check MSI’s official website for model-specific instructions.
By successfully accessing the BIOS, you gain control over important settings and configurations that can enhance your gaming experience. Whether you need to adjust hardware settings, update firmware, troubleshoot issues, or optimize performance, the BIOS provides a range of options that put you in command of your MSI Gaming Laptop.
Method 3: Using the “F10” Key
If the “Delete” key (Method 1) or the “F2” key (Method 2) does not work on your MSI Gaming Laptop, you can try using the “F10” key as an alternative method to enter the BIOS. This key is commonly used on certain MSI laptop models and provides a convenient way to access the BIOS setup utility. Follow the step-by-step instructions below to enter the BIOS using the “F10” key:
- Power on or restart your MSI Gaming Laptop.
- As the MSI logo appears on the screen, press the “F10” key repeatedly. This key is commonly used on some MSI laptop models to access the BIOS.
- You will be taken to the BIOS setup utility, where you can navigate through the available options and configure settings according to your preferences.
- Take your time to explore the different settings available in the BIOS. You can modify hardware configurations, enable or disable specific components, adjust boot order, and more. Familiarize yourself with the options and their potential impact on your laptop’s performance.
- Once you have made the desired changes, ensure that you save the modifications before exiting the BIOS. Look for the “Save and Exit” option at the bottom of the screen or in the menu. Use the appropriate key or combination (usually F10) to save the changes and restart your laptop.
Using the “F10” key as an alternative method to enter the BIOS provides a reliable option for specific MSI Gaming Laptop models. However, it’s important to note that the specific key to access the BIOS may vary depending on your laptop model. If the “F10” key does not work, try using the “Delete” key (Method 1) or the “F2” key (Method 2) as alternative options. Consult your laptop’s user manual or refer to MSI’s official website for model-specific instructions.
By successfully accessing the BIOS, you unlock a range of options that allow you to customize and optimize your MSI Gaming Laptop. Whether you need to configure hardware settings, update firmware, troubleshoot issues, or maximize performance, the BIOS provides valuable tools and settings to tailor your laptop to your specific needs.
Troubleshooting Common Issues
While entering the BIOS on your MSI Gaming Laptop is generally a straightforward process, you may encounter some common issues along the way. Here are a few troubleshooting tips to help you overcome these challenges:
1. Incorrect Key: If the key specified in the method does not work, try using the “Delete” key, “F2” key, or “F10” key as alternative options. The specific key to access the BIOS may vary depending on your laptop model, so refer to the manufacturer’s documentation or website for the correct key.
2. Timing: Make sure you press the designated key or key combination at the right time. Generally, it is recommended to start pressing the key as soon as the MSI logo appears on the screen. If you press it too early or too late, it may not register and you may not be able to enter the BIOS.
3. Fast Startup: If you have enabled the “Fast Startup” feature on your laptop, it may prevent you from entering the BIOS. To disable Fast Startup, go to “Control Panel” > “Power Options” > “Choose what the power buttons do” > “Change settings that are currently unavailable” and uncheck the “Turn on fast startup” option. Restart your laptop and try entering the BIOS again.
4. User Account Control: If you are using Windows, make sure you have administrative privileges to access the BIOS. If your user account does not have administrative rights, you may encounter an error or be unable to make changes in the BIOS setup utility. Ensure that you are logged in with an account that has administrative privileges.
5. BIOS Password: If you have set a BIOS password and have forgotten it, you may not be able to access the BIOS. In such cases, refer to your laptop’s user manual or contact MSI support for assistance in resetting the BIOS password.
6. Updated BIOS: If you have recently updated your laptop’s BIOS, the key to access the BIOS may have changed. Check the manufacturer’s documentation or website for the updated key to enter the BIOS.
If you’ve attempted these troubleshooting steps and are still unable to enter the BIOS, consider reaching out to MSI’s support or community forums for further assistance. They can provide specific guidance based on your laptop model and help resolve any issues you may be facing.
Remember that entering the BIOS allows you to make important changes to your MSI Gaming Laptop’s hardware settings and configurations. By troubleshooting and overcoming any obstacles to accessing the BIOS, you can take full control of your system and optimize it for a seamless and enjoyable gaming experience.
Conclusion
Entering the BIOS on your MSI Gaming Laptop is a crucial step in customizing and optimizing your system. By following the step-by-step methods outlined in this guide, you can easily access the BIOS and make important changes to improve performance, troubleshoot issues, and take control of your hardware configurations.
Whether you use the “Delete” key, “F2” key, or “F10” key, it’s important to remember that the specific key to enter the BIOS may vary depending on your MSI Gaming Laptop model. Be sure to consult your laptop’s user manual or visit the manufacturer’s website for model-specific instructions.
Once inside the BIOS, take the time to explore and familiarize yourself with the various settings and options available. You can adjust hardware configurations, enable or disable components, update firmware, troubleshoot issues, and more. However, exercise caution when making changes to ensure that you understand the impact of each modification.
If you encounter any issues while attempting to enter the BIOS, refer to the troubleshooting tips provided in this guide. Double-check the timing, disable Fast Startup, ensure administrative privileges, and consult MSI’s support or community forums for further assistance if needed.
By successfully accessing and navigating the BIOS, you have unlocked the potential to maximize your MSI Gaming Laptop’s performance and customize it to suit your specific needs. Whether you are a casual gamer or a professional, understanding and utilizing the BIOS can significantly enhance your gaming experience.
Now that you have a clear understanding of how to enter the BIOS on your MSI Gaming Laptop, take the next step and explore the various settings and options available. Use this newfound knowledge to optimize your system and enjoy the full potential of your MSI Gaming Laptop.