Introduction
The RAM (Random Access Memory) speed plays a crucial role in determining the overall performance of your computer. By changing the RAM speed in the MSI BIOS (Basic Input/Output System), you can optimize your system’s performance to better suit your needs, whether it’s for professional gaming, video editing, or other resource-intensive tasks. Modifying the RAM speed allows you to increase or decrease the frequency at which data is transferred between the RAM and the processor, leading to faster or more stable operation.
In this guide, we will walk you through the steps to change the RAM speed in the MSI BIOS. Please note that modifying the RAM speed requires a basic understanding of computer hardware and BIOS settings. It is important to proceed with caution and follow the instructions carefully to avoid any potential issues.
We will start by accessing the MSI BIOS and navigating to the advanced settings. Then, we will locate the memory settings and make the necessary adjustments to change the RAM speed. Finally, we will save the changes and exit the BIOS to apply the new settings to your system.
Before proceeding, it is recommended to consult your motherboard’s manual or manufacturer’s website for specific instructions related to your MSI motherboard model. Additionally, ensure that you have the latest BIOS version installed, as the location and options within the BIOS may vary slightly.
Step 1: Accessing the MSI BIOS
To change the RAM speed on your MSI motherboard, you will first need to access the BIOS. The BIOS is a firmware that runs on your motherboard and contains essential settings for your computer’s hardware.
Here’s how you can access the MSI BIOS:
1. Start by shutting down your computer completely. Ensure that it is powered off.
2. Press the power button to turn on your computer.
3. As the computer boots up, look for the prompt to enter the BIOS. This key could be different depending on your MSI motherboard model, but commonly used keys include Del, F2, F10, or Esc. Keep an eye on the screen during the boot-up process for any instructions or indications of which key to press.
4. Once you have identified the correct key, press it repeatedly while the computer is booting up. This will take you to the BIOS setup utility.
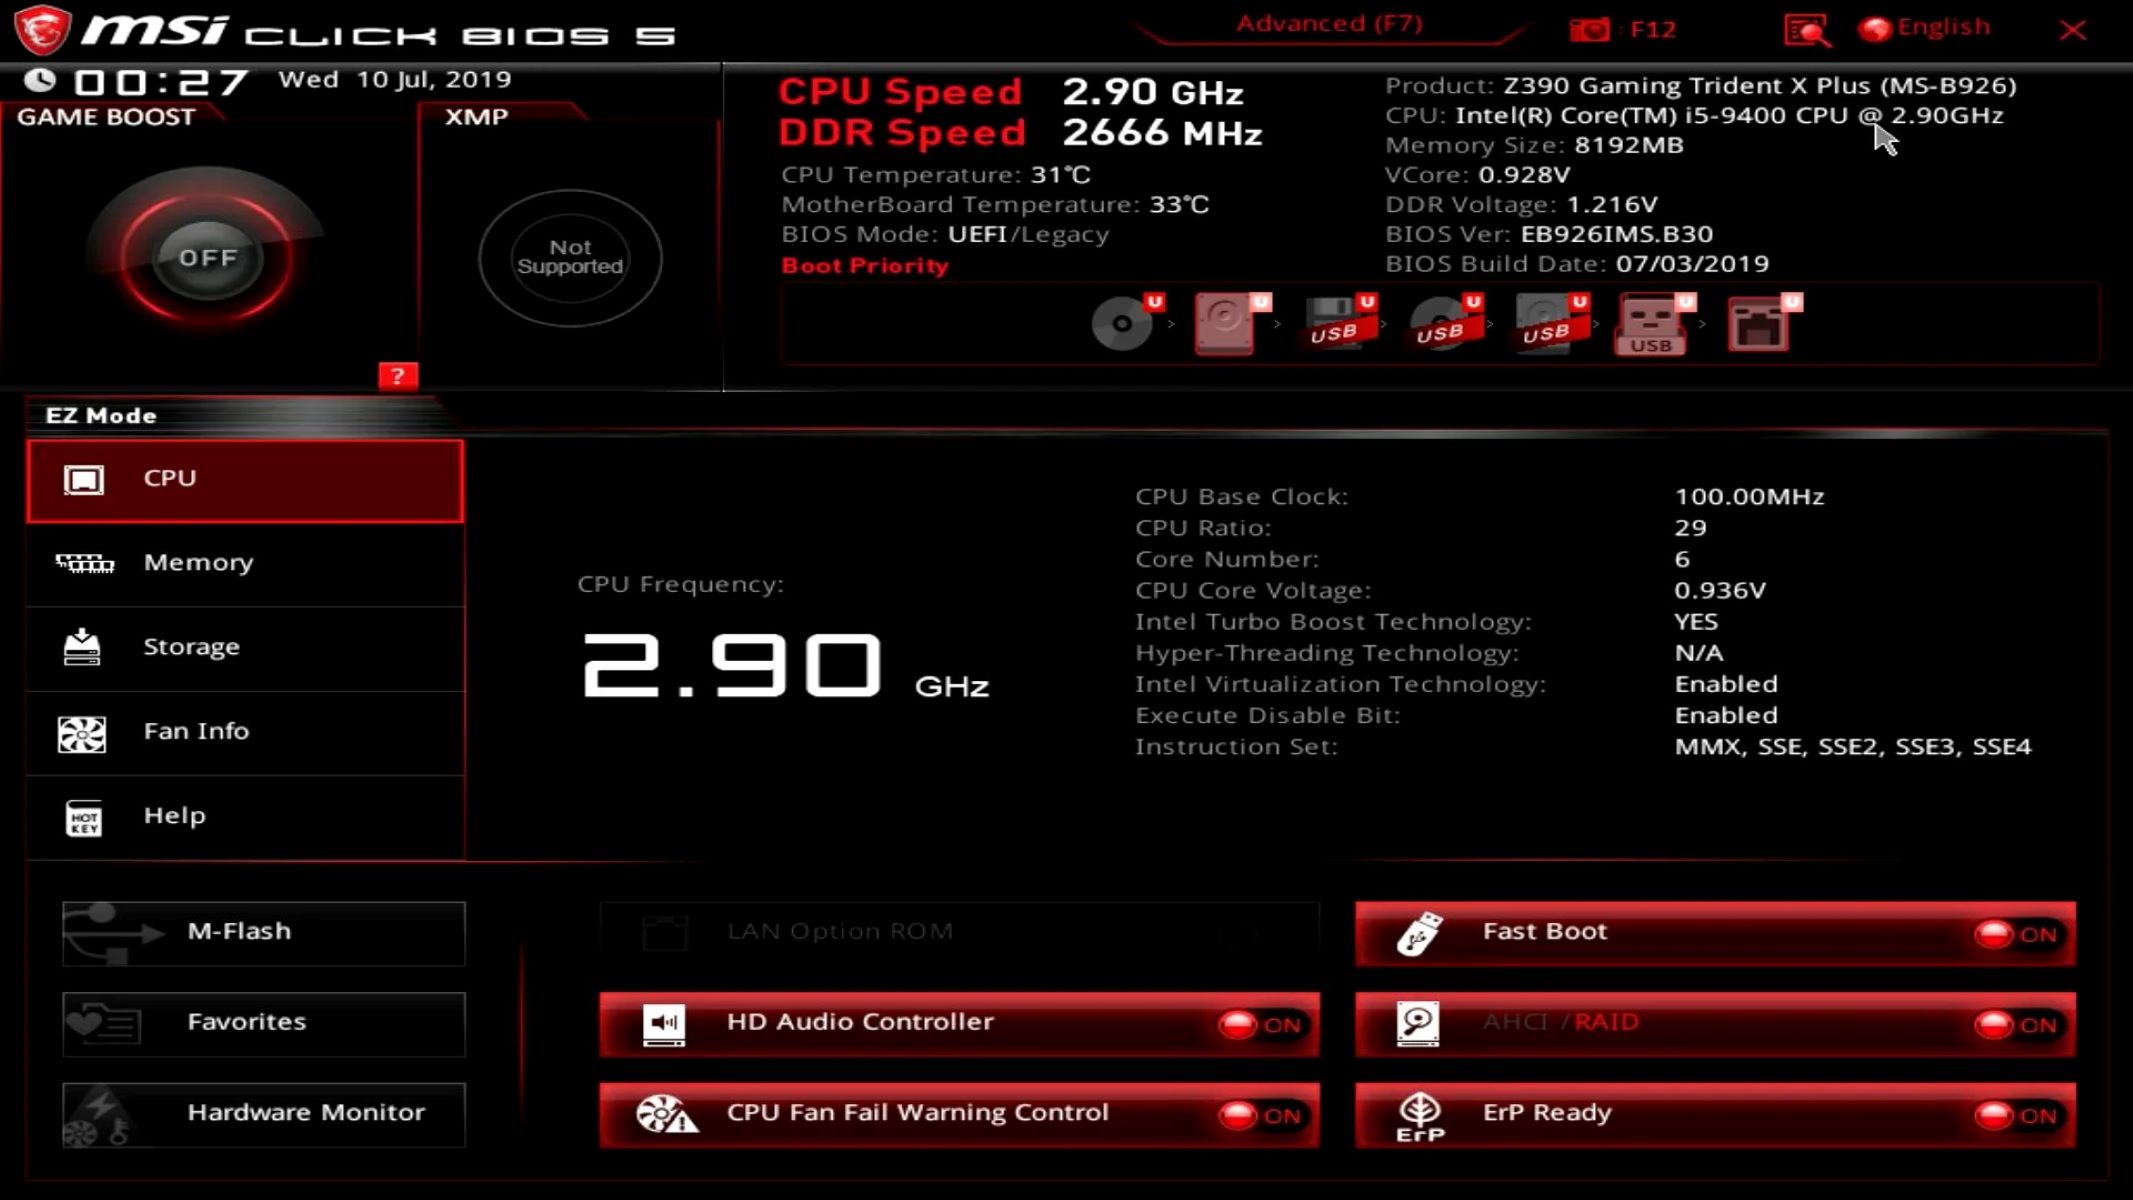
5. You should now see the MSI BIOS interface on your screen. Congratulations! You have successfully accessed the MSI BIOS and can now proceed to the next step.
It is important to note that accessing the BIOS may differ slightly depending on your motherboard manufacturer or specific model. For older MSI motherboard models, you may need to perform a different key combination or access the BIOS through alternative methods. Ensure that you consult your motherboard’s manual or the MSI website for accurate instructions.
Now that you have entered the MSI BIOS, you are ready to navigate to the advanced settings where you can change the RAM speed. Continue to the next section to learn how to do this.
Step 2: Navigating to the Advanced Settings
Once you have accessed the MSI BIOS, the next step is to navigate to the advanced settings section, where you can find the options to change the RAM speed. Follow the instructions below:
1. In the MSI BIOS interface, you will see a menu with various options. Use the arrow keys on your keyboard to navigate through the menu.
2. Look for a tab or tabbed menu labeled “Settings” or “Advanced”. The exact label may vary depending on your motherboard model.
3. Once you have located the “Settings” or “Advanced” tab, use the arrow keys to select it and press Enter to access the advanced settings.
4. Within the advanced settings, you may see multiple subcategories or menus. Look for options related to memory or RAM. These options may be labeled as “Memory”, “DRAM Settings”, or something similar.
5. Select the memory or RAM option and press Enter. This will open up the submenu where you can change the RAM speed.
It is important to note that the navigation process and the exact location of the advanced settings may vary depending on your specific MSI motherboard model. Some motherboards may have a different interface design or naming conventions for their BIOS options. If you are having trouble finding the advanced settings or memory options, consult your motherboard’s manual or the MSI website for more specific instructions.
Now that you have successfully navigated to the advanced settings section, you are ready to proceed to the next step: locating the memory settings.
Step 3: Locating the Memory Settings
Once you have entered the advanced settings section of the MSI BIOS, the next step is to locate the memory settings. These settings will allow you to change the RAM speed to optimize your system’s performance. Follow the steps below:
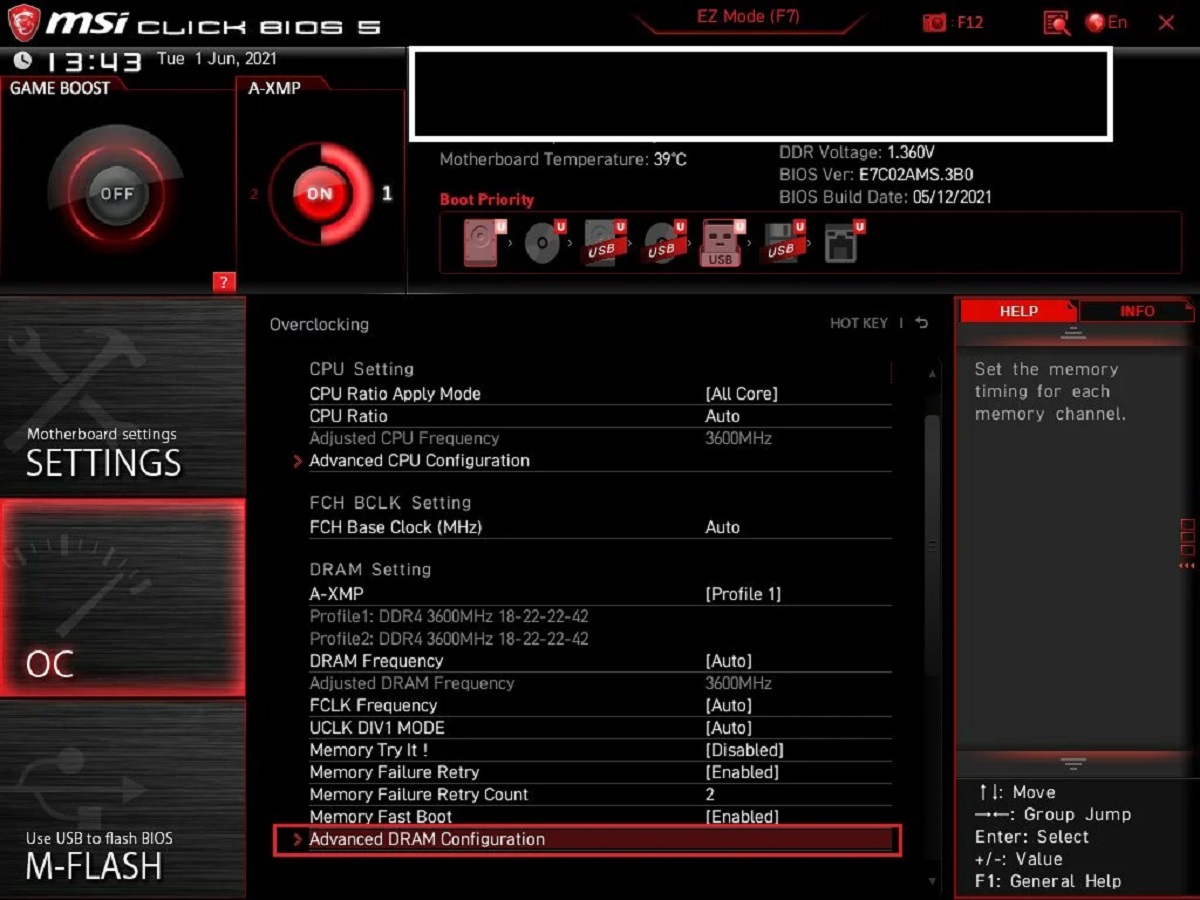
1. Within the advanced settings, look for a sub-menu or tab labeled “Memory” or “DRAM Settings”. This is where you will find the options related to your RAM.
2. Select the “Memory” or “DRAM Settings” option and press Enter to enter the memory settings submenu.
3. In the memory settings submenu, you will find various options related to your RAM. Look for an option that allows you to change the RAM speed or frequency. This option may be labeled as “DRAM Frequency”, “Memory Clock”, or something similar.
4. Select the option for changing the RAM speed and press Enter to access the available options.
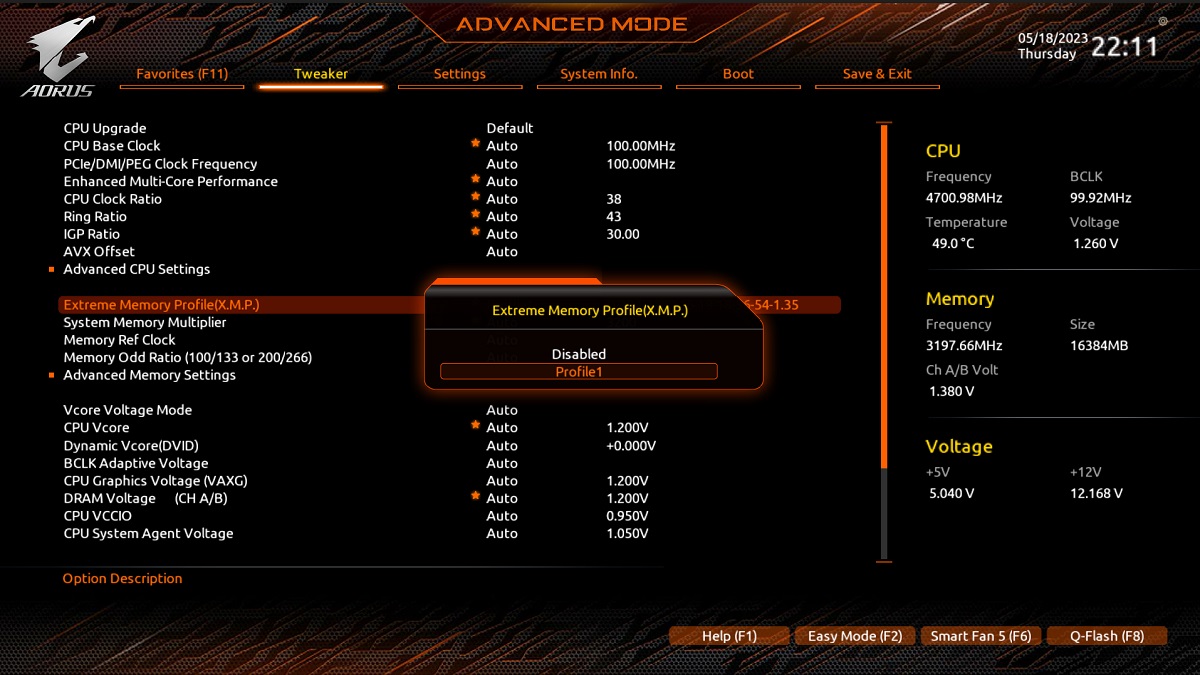
5. Depending on your MSI motherboard model, you may have different options for selecting the RAM speed. These options are usually presented as a list of predefined frequencies or multipliers. Select the desired RAM speed option that suits your requirements.
It is important to note that the available memory settings and their labels may vary depending on your MSI motherboard model. Some motherboards may offer more advanced options for fine-tuning the RAM speed, while others may provide a limited set of predefined frequencies. Refer to your motherboard’s manual or the MSI website for detailed information on the memory settings specific to your model.
Now that you have located the memory settings and accessed the options to change the RAM speed, you are ready to proceed to the next step: changing the RAM speed.
Step 4: Changing the RAM Speed
Once you have located the memory settings and accessed the options to change the RAM speed in the MSI BIOS, you can now proceed to modify the RAM speed settings. Follow the steps below:
1. With the memory settings submenu open, locate the option that allows you to change the RAM speed or frequency. This option may be labeled as “DRAM Frequency”, “Memory Clock”, or something similar.
2. Select the RAM speed option and press Enter to access the available options.
3. Depending on your MSI motherboard model, you may have different options for selecting the RAM speed. These options are usually presented as a list of predefined frequencies or multipliers. Use the arrow keys to navigate through the available options.
4. Select the desired RAM speed that you want to set for your system. Keep in mind that increasing the RAM speed may provide better performance, but it can also lead to instability if the RAM modules or other components cannot handle the higher frequency. Adjust the RAM speed based on your system’s capabilities and your specific requirements.
5. After selecting the desired RAM speed, save the changes. To do this, look for a key or menu option labeled “Save”, “Exit”, or “Apply Changes”. Select this option and press Enter to save the new RAM speed settings.
6. Before exiting the BIOS, ensure that you save any other changes you may have made in the advanced settings or other sections. Follow the on-screen prompts to save the changes and exit the BIOS.
It is important to note that changing the RAM speed can have a significant impact on your system’s stability and performance. If you experience any issues after modifying the RAM speed, such as system crashes or instability, it may be necessary to revert back to the default settings or experiment with different RAM speeds to find the optimal configuration for your system.
Congratulations! You have successfully changed the RAM speed in the MSI BIOS. The new RAM speed settings will now be applied to your system, enhancing its overall performance based on your chosen configuration.
Step 5: Saving and Exiting BIOS
After you have successfully changed the RAM speed in the MSI BIOS, the final step is to save the changes and exit the BIOS. This will ensure that the new RAM speed settings are applied to your system. Follow the instructions below:
1. Once you have finished modifying the RAM speed and any other settings in the BIOS, navigate to the “Save” or “Exit” option. This option is typically located in the main menu or at the bottom of the screen.
2. Select the “Save” or “Exit” option and press Enter to save the changes you made to the BIOS configuration.
3. In some cases, the BIOS may prompt you to confirm whether you want to save the changes. If prompted, select “Yes” or “Save Changes and Exit” to confirm your decision.
4. After saving the changes, the BIOS will exit and your computer will restart automatically.
5. As your computer boots up, it will load the new RAM speed settings that you have configured in the BIOS.
It is important to note that during the restart process, your computer may take slightly longer than usual to boot up as it adjusts to the new RAM speed settings. This is normal and should not cause any concern.
Once your computer has finished restarting, you can verify that the RAM speed changes have been applied by checking your computer’s system information or using third-party software designed to display hardware information. Confirm that the RAM is running at the desired speed that you have configured in the MSI BIOS.
Congratulations! You have successfully saved the changes and exited the BIOS with the new RAM speed settings in place. Enjoy your optimized system performance and experience the benefits of your adjusted RAM speed.
Conclusion
Changing the RAM speed in the MSI BIOS can significantly impact the performance of your computer. By following the step-by-step guide provided above, you have learned how to access the MSI BIOS, navigate to the advanced settings, locate the memory settings, change the RAM speed, and save the changes.
As you modify the RAM speed, it is essential to consider the capabilities of your system and ensure that you choose a stable and compatible frequency. Increasing the RAM speed can provide a boost in performance, but it may also lead to instability if not properly supported by your RAM modules or other hardware components.
Remember to consult your motherboard’s manual or the MSI website for specific instructions and information tailored to your motherboard model. It is also advisable to update your BIOS to the latest version to ensure compatibility and access to the most up-to-date options within the BIOS.
Overall, optimizing the RAM speed in the MSI BIOS is an advanced technique that can offer improvements in your system’s performance. However, it should be approached with caution and thorough understanding of your hardware capabilities. If you encounter any issues after modifying the RAM speed, consider reverting back to the default settings or seeking further assistance from technical support.
Now that you have the knowledge and confidence to change the RAM speed in the MSI BIOS, you can tailor your computer’s performance to meet your specific needs and maximize its capabilities. Enjoy the enhanced performance and improved user experience that comes with optimizing your RAM speed!