Introduction
Welcome to this guide on how to enter the BIOS on an MSI motherboard. Whether you are a tech enthusiast, a gamer, or a system administrator, knowing how to access and navigate the BIOS is essential to manage and optimize your computer’s hardware and settings. The BIOS (Basic Input/Output System) is a firmware that is embedded on the motherboard of a computer. It is responsible for initializing hardware components, detecting and configuring devices, and providing the operating system with information about the hardware environment.
Accessing the BIOS allows you to make changes to various settings such as boot order, device configuration, overclocking, and much more. However, finding the right key or combination of keys to enter the BIOS can be a little confusing, especially for those who are new to the world of PC customization. This guide will walk you through the different methods to enter the BIOS on an MSI motherboard, so you can unleash the full potential of your system.
Before we dive into the methods, it’s important to note that the exact steps may vary slightly depending on the specific MSI motherboard model and BIOS version you have. However, the general principles remain the same, so these methods should work for most MSI motherboards.
What is BIOS?
The BIOS, short for Basic Input/Output System, is a fundamental software component that is embedded on the motherboard of a computer. It is the first software that runs when you power on your computer, even before the operating system is loaded. The primary function of the BIOS is to initialize and test the computer hardware, ensuring that all components are functioning correctly and are properly connected.
During the boot process, the BIOS performs a series of tests called the Power-On Self-Test (POST), which checks the functionality of the CPU, memory, storage devices, and other hardware components. If the POST completes successfully, the BIOS then loads the operating system into the computer’s memory and hands over control to it.
In addition to hardware initialization, the BIOS also contains a variety of configuration settings that control how the computer operates. These settings include options for boot device order, processor speed, memory timings, and other system-specific parameters. By accessing the BIOS, users can modify these settings to customize their computer’s behavior and optimize performance.
Over the years, the BIOS has evolved and been replaced by newer standards such as UEFI (Unified Extensible Firmware Interface). UEFI offers more advanced features and a graphical interface, but the basic principles of the BIOS remain the same. For the purposes of this guide, we will refer to both traditional BIOS and UEFI settings as the BIOS.
It is important to note that making incorrect changes to the BIOS settings can have serious consequences and may even render your computer inoperable. Therefore, it is crucial to exercise caution and only modify settings if you understand their effects. As sempreise, you should make a note of any existing settings before making any changes so that you can revert them if necessary.
Why do you need to access BIOS?
Accessing the BIOS on your MSI motherboard provides you with essential control over your computer’s hardware and settings. Here are some reasons why you may need to access the BIOS:
Hardware Configuration: The BIOS allows you to configure hardware settings such as the boot device order, enabling or disabling specific devices, and adjusting memory timings. This is particularly useful when installing a new operating system, adding or removing hardware components, or troubleshooting hardware-related issues. By accessing the BIOS, you can ensure that your hardware is properly detected and configured.
Overclocking: If you are interested in squeezing out extra performance from your computer, accessing the BIOS is essential. It allows you to change CPU multiplier, voltage, and other settings to overclock your processor and RAM. Overclocking can boost your system’s performance in tasks that are CPU or memory-intensive. However, it should be done with caution and proper knowledge, as incorrect settings can cause system instability or damage to the hardware.
System Security: The BIOS also provides options to enhance system security. You can set a BIOS password to prevent unauthorized access to your computer’s settings and data. Additionally, you can enable features like Secure Boot, which verifies the integrity of the operating system during the boot process, protecting against malware and unauthorized software modifications.
Boot Device Selection: Accessing the BIOS allows you to specify the boot device order, determining which device the system should boot from. This is useful when you want to prioritize booting from a specific device, such as a USB drive or DVD, to install a new operating system or run diagnostics.
BIOS Updates: Manufacturers release BIOS updates to add new features, improve compatibility, and address security vulnerabilities. By accessing the BIOS, you can check for and install these updates to ensure that your system is up to date and functioning optimally.
Overall, accessing the BIOS gives you granular control over your computer’s hardware and settings, allowing you to tailor its behavior to your specific needs. Whether you want to configure hardware, overclock components, enhance security, or update the firmware, accessing the BIOS is essential for advanced system customization and management.
Different methods to enter BIOS on MSI Motherboard
Entering the BIOS on an MSI motherboard may vary depending on the specific model and BIOS version. Here are several methods you can try to access the BIOS:
- Using the Delete key: One common method to enter the BIOS on an MSI motherboard is by pressing the Delete key during the system boot-up process. As soon as you power on your computer, repeatedly press the Delete key until the BIOS setup screen appears. This method works for many MSI motherboards and is often the default key.
- Using the F2 key: Another commonly used method to access the BIOS on MSI motherboards is by pressing the F2 key. When you start your computer, continuously tap the F2 key until the BIOS screen appears. This method is frequently used on MSI laptops and some desktop models.
- Using the F12 key: On some MSI motherboards, you can access the BIOS by pressing the F12 key during startup. As soon as you power on your computer, repeatedly tap the F12 key until the BIOS menu appears. This method is often used in MSI gaming motherboards.
- Using the F8 key: Certain MSI motherboards allow you to enter the BIOS by pressing the F8 key. When you turn on your computer, press the F8 key at regular intervals until the BIOS setup screen shows up. This method is more common in older MSI motherboard models.
- Using the ESC key: Some MSI motherboards offer the option to access the BIOS by pressing the ESC key. As you boot up your computer, continuously press the ESC key until the BIOS setup screen loads. This method might not work on all MSI motherboards.
It’s important to note that the key or combination of keys to enter the BIOS may vary depending on the motherboard model and BIOS version. If none of the aforementioned methods work, refer to the motherboard’s manual or the MSI website for specific instructions.
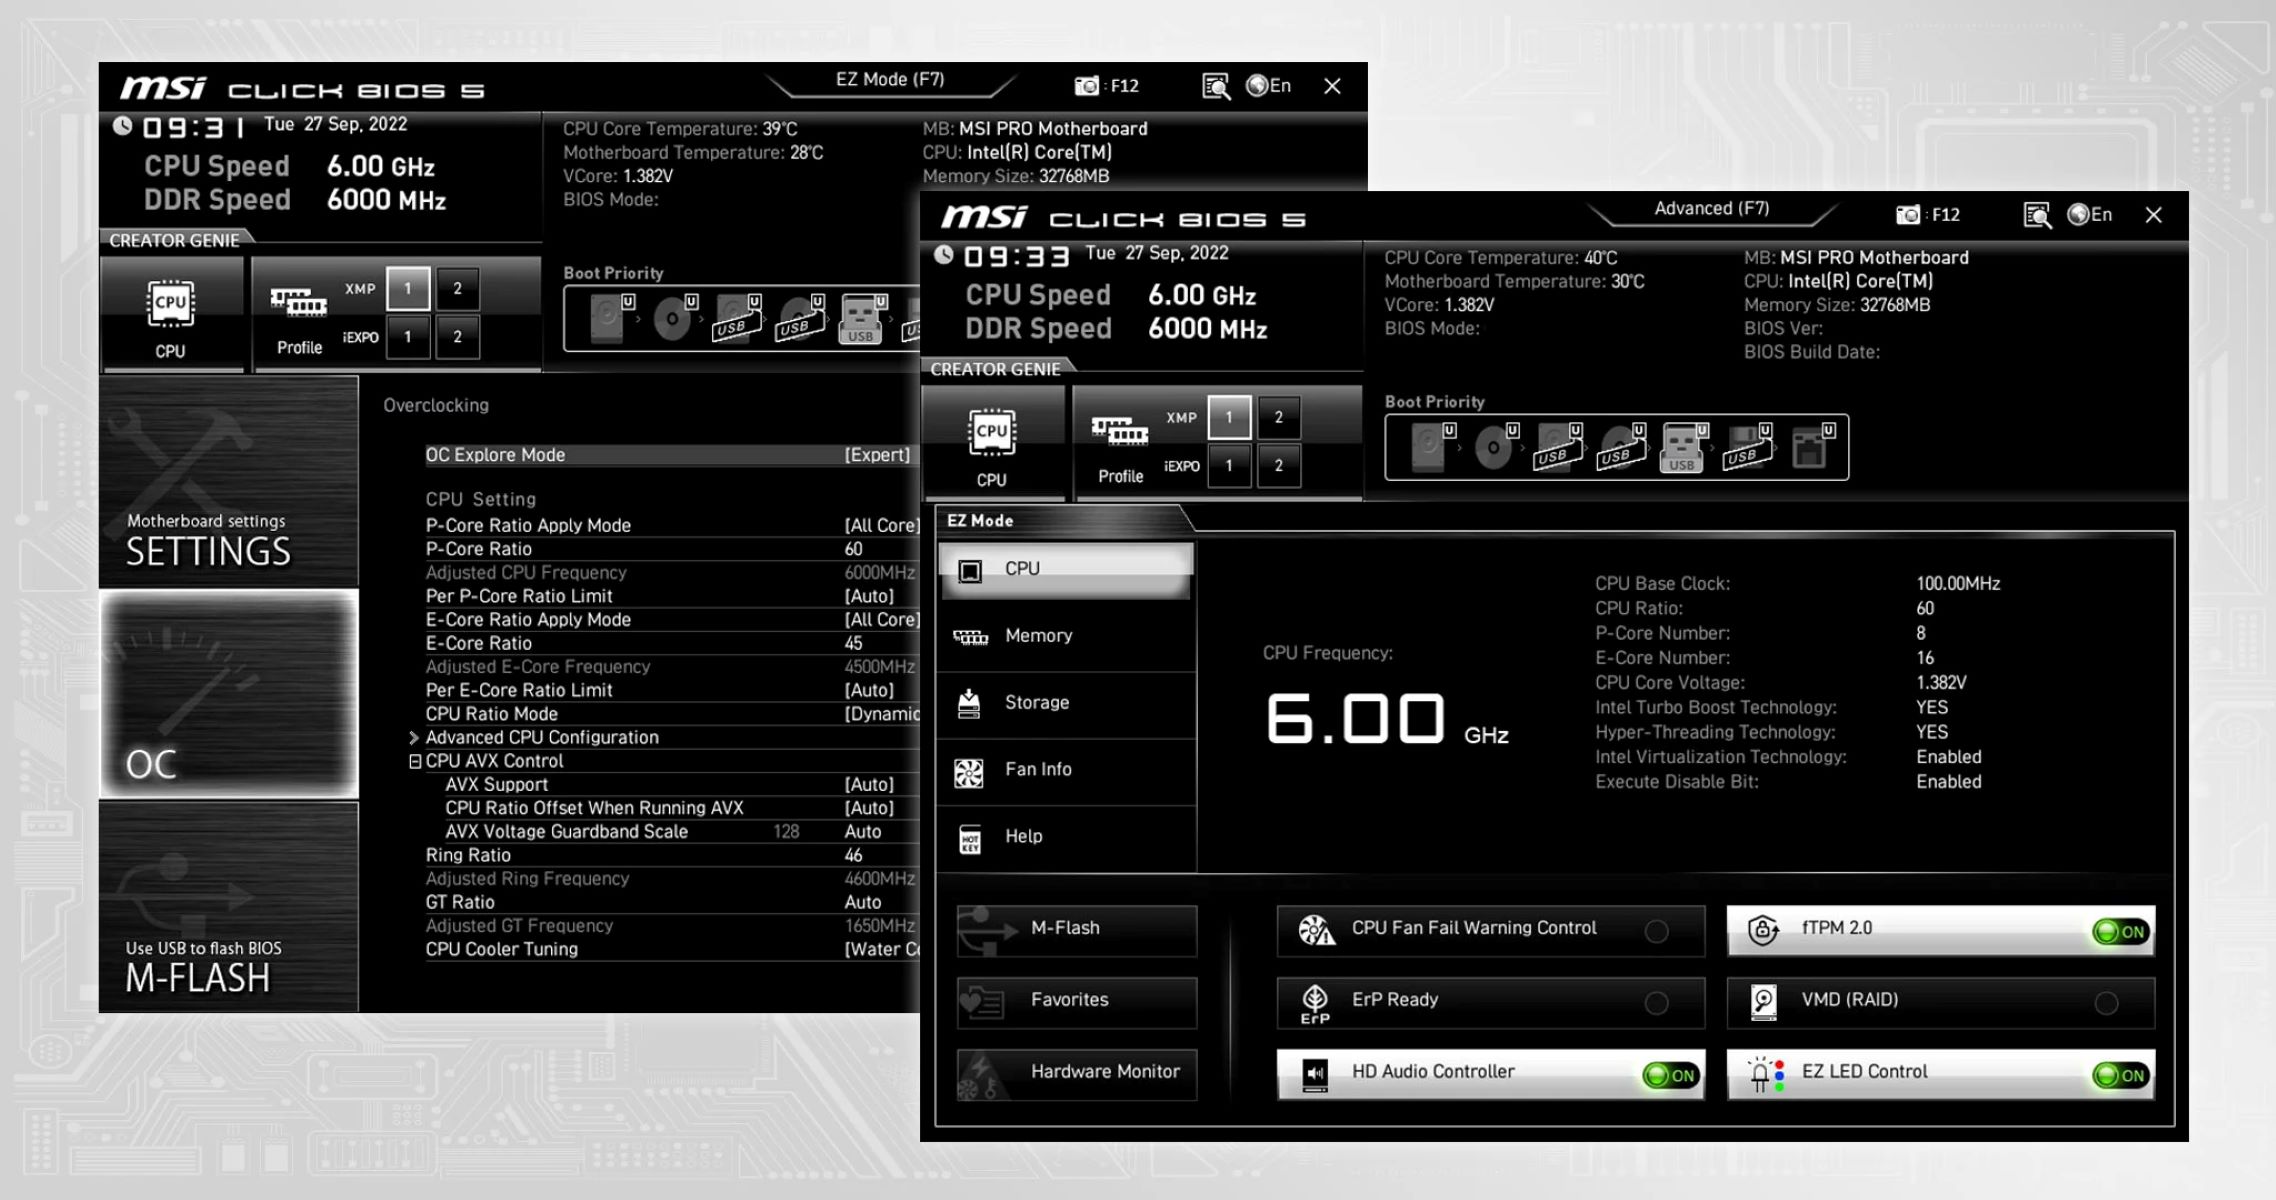
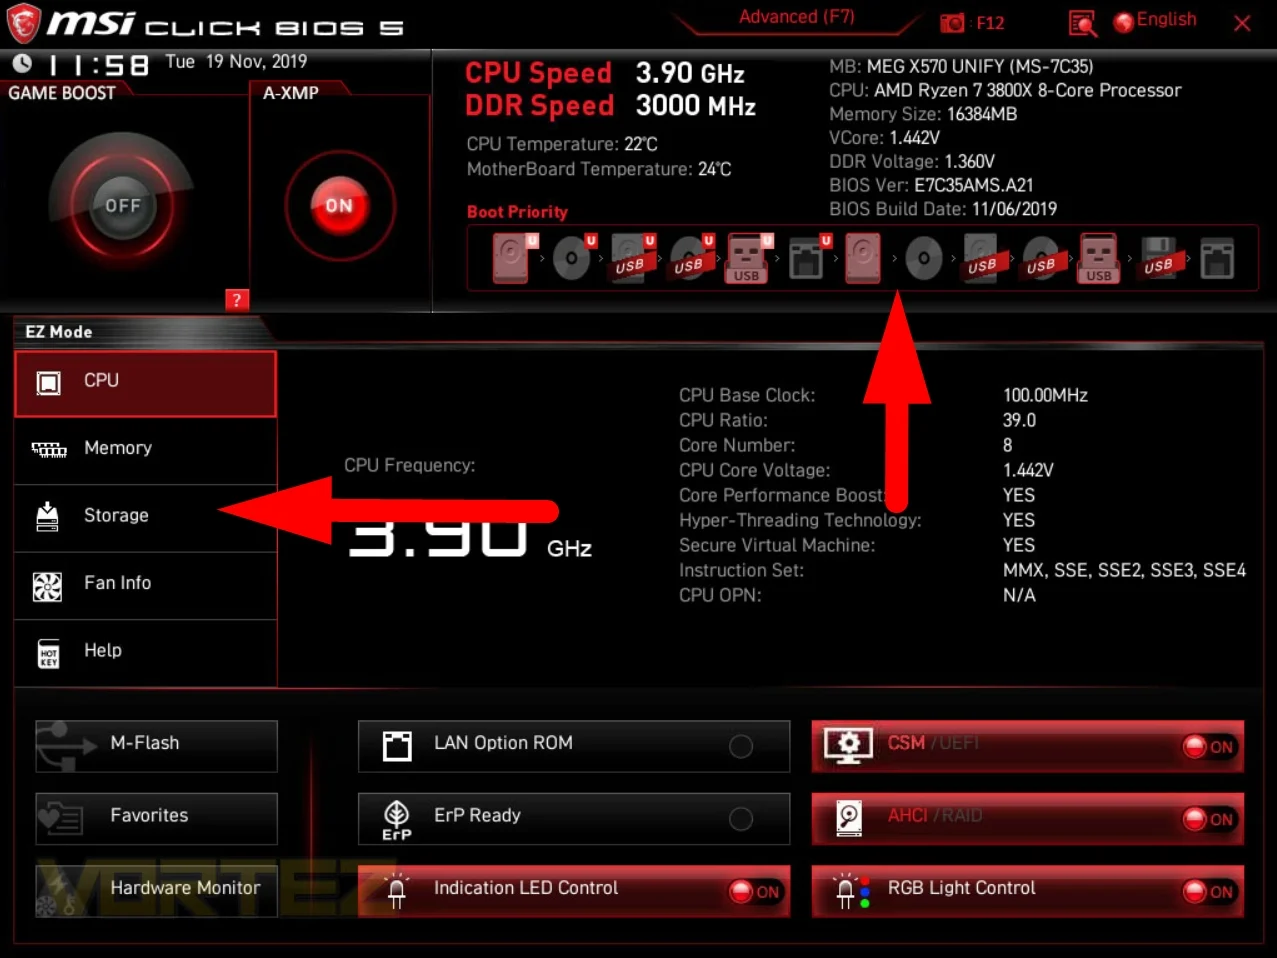
Once you successfully enter the BIOS, you can navigate through the various settings using the keyboard or mouse, depending on the BIOS version. Explore the different sections and options to configure hardware, adjust settings, and customize your system according to your needs.
Remember to save any changes you make before exiting the BIOS. This will ensure that the modified settings take effect when you restart your computer.
Now that you know the different methods to enter the BIOS on your MSI motherboard, you can easily access and configure your system’s settings to optimize its performance.
Method 1: Using the Delete key
One of the most common methods to enter the BIOS on an MSI motherboard is by using the Delete key. Follow these steps to access the BIOS using the Delete key:
- Restart your computer: Begin by restarting your computer. You can do this by clicking on the Start menu and selecting Restart, or by pressing the physical restart button on your computer’s case.
- Monitor the boot screen: As soon as your computer starts to boot up, pay close attention to the screen. Look for a brief message that indicates which key to press to enter the BIOS. On most MSI motherboards, this message will state “Press Delete key to enter BIOS” or something similar.
- Press the Delete key: Once you identify the key prompt on the screen, press the Delete key repeatedly. It’s important to press it multiple times, as sometimes the system may not register the input if pressed only once.
- Enter the BIOS: If you successfully entered the BIOS, you will be presented with the BIOS setup screen. Here, you can navigate through the different sections and options using the arrow keys on your keyboard.
- Make the desired changes: Explore the various settings and adjust them according to your needs. Remember to refer to your motherboard’s manual or documentation to understand the options and their effects before making any changes.
- Save and exit: Once you have made the necessary changes, save them by selecting the appropriate option in the BIOS menu. This will typically be a “Save and Exit” or “Exit and Save Changes” option. Confirm your selection, and the system will save the changes and restart.
Keep in mind that the exact steps and options may vary depending on your specific MSI motherboard model and BIOS version. If the Delete key method doesn’t work for your motherboard, try one of the other methods mentioned in this guide.
Accessing the BIOS using the Delete key allows you to configure different hardware settings and customize your system to better suit your needs. Take advantage of this opportunity to optimize your computer’s performance and ensure it is running at its best.
Method 2: Using the F2 key
Another common method to enter the BIOS on an MSI motherboard is by using the F2 key. Here’s how you can access the BIOS using the F2 key:
- Restart your computer: Start by restarting your computer. You can do this by clicking on the Start menu and selecting Restart, or by pressing the physical restart button on your computer’s case.
- Monitor the boot screen: Pay close attention to the screen as your computer starts up. Look for a message that indicates which key to press to enter the BIOS. On most MSI motherboards, it will usually say “Press F2 key to enter BIOS” or something similar.
- Press the F2 key repeatedly: As soon as you see the key prompt on the screen, start pressing the F2 key repeatedly. Similar to using the Delete key method, it’s important to press it multiple times to ensure that the system recognizes the input.
- Access the BIOS: If you successfully entered the BIOS, you will be taken to the BIOS setup screen. Here, you can navigate through the various sections and options using the arrow keys on your keyboard.
- Make the desired changes: Once inside the BIOS, explore the different settings and adjust them as needed. Before making any changes, refer to your motherboard’s manual or documentation to understand the options and their effects.
- Save and exit: After making the necessary changes, save them by selecting the appropriate option in the BIOS menu. This is usually labeled as “Save and Exit” or “Exit and Save Changes.” Confirm your selection, and the system will save the changes and restart.
Remember that the exact steps may vary slightly depending on your specific MSI motherboard model and BIOS version. If the F2 key method doesn’t work for your motherboard, you can try one of the other methods mentioned in this guide.
Accessing the BIOS using the F2 key allows you to configure various hardware settings and customize your system to suit your preferences. Use this opportunity to optimize your computer’s performance and ensure it runs smoothly.
Method 3: Using the F12 key
On certain MSI motherboards, you can access the BIOS by using the F12 key. Follow these steps to enter the BIOS using the F12 key:
- Restart your computer: Begin by restarting your computer. You can do this by clicking on the Start menu and selecting Restart, or by pressing the physical restart button on your computer’s case.
- Monitor the boot screen: Keep a close eye on the screen as your computer starts up. Look for a message indicating which key to press to enter the BIOS. On MSI motherboards that support the F12 key method, it will typically display “Press F12 key to enter BIOS” or something similar.
- Press the F12 key repeatedly: As soon as you spot the key prompt on the screen, start pressing the F12 key repeatedly. Ensure that you press it multiple times to ensure that the system registers the input.
- Access the BIOS: If you successfully entered the BIOS, you will be taken to the BIOS setup screen. From there, you can navigate through the different sections and options using the arrow keys on your keyboard.
- Make the desired changes: Once inside the BIOS, explore the various settings and make the necessary adjustments based on your requirements. Refer to your motherboard’s manual or documentation for a better understanding of the available options and their effects.
- Save and exit: After making the desired changes, save them by selecting the appropriate option in the BIOS menu. Look for options like “Save and Exit” or “Exit and Save Changes.” Confirm your selection, and the system will save the modifications and restart.
Keep in mind that the exact steps may slightly vary depending on the specific model and BIOS version of your MSI motherboard. If the F12 key method doesn’t work for your motherboard, you can try one of the other methods mentioned earlier in this guide.
By utilizing the F12 key method to enter the BIOS on your MSI motherboard, you gain access to a plethora of hardware settings that allow for customization and optimization of your system. Take advantage of this opportunity to fine-tune your computer’s performance and make it work exactly the way you want it to.
Method 4: Using the F8 key
In some cases, you can access the BIOS on your MSI motherboard by using the F8 key. Here is how you can enter the BIOS using the F8 key:
- Restart your computer: Start by restarting your computer. You can do this by clicking on the Start menu and selecting Restart, or by pressing the physical restart button on your computer’s case.
- Monitor the boot screen: Watch the screen as your computer starts up. Look for a message that indicates which key to press to enter the BIOS. On certain MSI motherboards, you may see a prompt like “Press F8 key to enter BIOS” or something similar.
- Press the F8 key repeatedly: As soon as you see the key prompt on the screen, begin pressing the F8 key repeatedly. Make sure to press it multiple times to ensure that the system recognizes the input.
- Access the BIOS: If you were successful in entering the BIOS, you will be taken to the BIOS setup screen. From there, you can navigate through the available sections and options using the arrow keys on your keyboard.
- Make the desired changes: Once inside the BIOS, explore the various settings and make any necessary adjustments based on your requirements. It is crucial to refer to your motherboard’s manual or documentation to understand the available options and their effects before making changes.
- Save and exit: After making the desired changes, save them by selecting the appropriate option in the BIOS menu. This option is often labeled “Save and Exit” or “Exit and Save Changes.” Confirm your selection, and the system will save the modifications and restart.
Keep in mind that the specific steps may slightly vary depending on your MSI motherboard model and BIOS version. If the F8 key method does not work for your motherboard, you can try one of the other methods mentioned earlier in this guide.
By utilizing the F8 key method to access the BIOS on your MSI motherboard, you can customize various hardware settings and optimize your system for better performance. Take advantage of this opportunity to fine-tune your computer and ensure it meets your specific requirements.
Method 5: Using the ESC key
In certain cases, you can access the BIOS on your MSI motherboard by using the ESC key. Follow the steps below to enter the BIOS using the ESC key:
- Restart your computer: Begin by restarting your computer. You can do this by clicking on the Start menu and selecting Restart, or by pressing the physical restart button on your computer’s case.
- Monitor the boot screen: Pay close attention to the screen as your computer starts up. Look for a message that indicates which key to press to enter the BIOS. On some MSI motherboards, you may see a prompt such as “Press ESC key to enter BIOS” or something similar.
- Press the ESC key repeatedly: Once you spot the key prompt on the screen, start pressing the ESC key repeatedly. Ensure that you press it multiple times to ensure that the system recognizes the input.
- Enter the BIOS: If you successfully entered the BIOS, you will be taken to the BIOS setup screen. From here, you can navigate through the various sections and options using the arrow keys on your keyboard.
- Make the desired changes: Within the BIOS, explore the different settings and make any necessary adjustments based on your requirements. It is important to consult your motherboard’s manual or documentation to understand the available options and their effects before making any changes.
- Save and exit: After making the desired changes, save them by selecting the appropriate option in the BIOS menu. Look for options like “Save and Exit” or “Exit and Save Changes.” Confirm your selection, and the system will save the changes and restart.
Please note that the exact steps may vary slightly depending on the specific model and BIOS version of your MSI motherboard. If the ESC key method does not work for your motherboard, refer to the manufacturer’s instructions or try one of the other methods mentioned earlier in this guide.
By utilizing the ESC key method to enter the BIOS on your MSI motherboard, you gain access to a range of hardware settings that can be customized and optimized according to your preferences. Take advantage of this opportunity to fine-tune your computer’s performance and tailor it to your specific needs.
Conclusion
Accessing the BIOS on your MSI motherboard is essential for managing and optimizing your computer’s hardware and settings. Whether you want to configure hardware, overclock components, enhance security, or update the firmware, entering the BIOS gives you the power to customize your system to your specific needs.
In this guide, we covered five different methods to enter the BIOS on an MSI motherboard:
- Using the Delete key
- Using the F2 key
- Using the F12 key
- Using the F8 key
- Using the ESC key
By following the steps outlined for each method, you should be able to successfully access the BIOS on your MSI motherboard and make the necessary adjustments. However, it is important to note that the specific steps may vary slightly depending on your motherboard model and BIOS version.
Remember to exercise caution when making changes in the BIOS, as incorrect settings can lead to stability issues or damage to your hardware. It’s always a good practice to refer to your motherboard’s manual or documentation before modifying any settings.
Now that you have learned how to enter the BIOS on an MSI motherboard, you can take control of your system’s hardware configuration, overclocking, boot device selection, and system security. Make use of the customization options available to optimize your system’s performance and ensure it runs smoothly.
Make sure to save any changes you make in the BIOS before exiting, as this will ensure that the modified settings take effect on the next system startup. Enjoy exploring the BIOS and unlocking the full potential of your MSI motherboard!