Introduction
In today’s fast-paced digital age, having a solid-state drive (SSD) can significantly boost your computer’s performance. Compared to traditional hard disk drives (HDDs), SSDs offer faster data transfer speeds, quicker boot times, and improved overall system responsiveness. That’s why enabling your SSD in the BIOS (Basic Input/Output System) is crucial to fully take advantage of its benefits.
The BIOS is a firmware that allows you to configure and control various hardware settings on your computer. By accessing the BIOS, you can change the boot order, manage device configurations, and enable or disable specific components, including your SSD. However, the process of enabling an SSD in the BIOS will vary depending on your motherboard manufacturer and BIOS version. In this guide, we will focus on enabling the SSD in the BIOS for MSI motherboards.
MSI, a popular manufacturer of motherboards and other computer components, provides a user-friendly BIOS interface that makes it relatively easy to enable the SSD. Whether you’re setting up a new system or upgrading your existing one, following the steps outlined in this guide will help you ensure that your MSI motherboard recognizes and utilizes your SSD to its fullest potential.
Step 1: Accessing the BIOS
To begin the process of enabling your SSD in the BIOS of your MSI motherboard, you first need to access the BIOS settings. Follow these steps to access the BIOS:
- Start or restart your computer. As it boots up, you will see the MSI logo or a blank screen.
- While the computer is starting, press the designated key to enter the BIOS. The specific key may vary depending on your MSI motherboard model, but common keys include Del, F2, F10, or Esc. Refer to your motherboard’s manual or the MSI website for the exact key to press.
- Once you press the correct key, the BIOS setup utility will launch, displaying a menu or interface with various options.
- Now, you have successfully accessed the BIOS, and you are ready to move on to the next step: navigating to the storage configuration.
It’s important to note that accessing the BIOS may differ slightly depending on your computer’s model or manufacturer. However, the general process remains the same. If you’re unsure about which key to press or are encountering any difficulties, refer to your motherboard’s manual or consult the MSI website for specific instructions related to your motherboard model.
Step 2: Navigating to the Storage Configuration
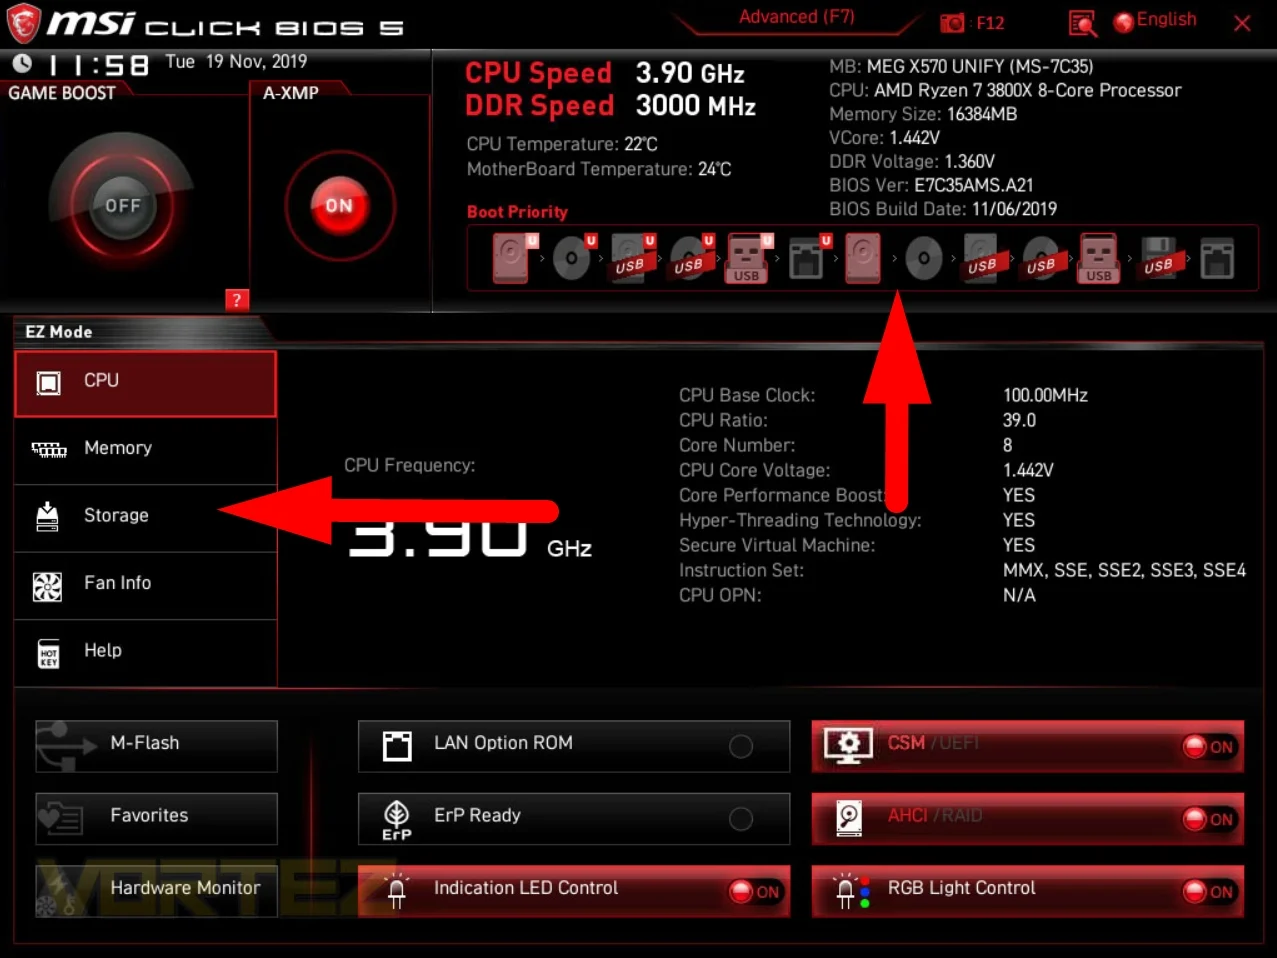
After successfully accessing the BIOS, you will need to navigate to the storage configuration section to enable your SSD. Here’s how you can do it:
- Look for the “Settings” or “Advanced” tab in the BIOS menu. The location and naming may vary depending on your specific MSI motherboard model.
- Within the “Settings” or “Advanced” tab, locate and select the “Storage” or “Storage Configuration” option. This option may also be under the “Peripheral” or “Integrated Peripherals” section.
- Once you’ve selected the “Storage” or “Storage Configuration” option, you will see a list of available storage devices, including your SSD.
- If your SSD is not detected, check your connections to ensure it is properly connected to the motherboard and power supply. If necessary, consult your SSD’s manual for installation instructions.
- If your SSD is detected but not enabled, you will need to select the SSD and proceed to the next step to enable it.
It’s worth noting that the BIOS interface can vary depending on the motherboard model and BIOS version you are using. The steps provided above are general guidelines, and the actual interface and options may differ slightly. Refer to your motherboard’s manual or the MSI website for more specific instructions related to your motherboard model.
Step 3: Enabling the SSD
Once you have located your SSD in the storage configuration settings of the BIOS, the next step is to enable it. Follow these steps to enable your SSD:
- Select the SSD from the list of storage devices in the storage configuration menu.
- Depending on your BIOS version and motherboard model, you may have different options to enable the SSD. Look for options like “Enable,” “Activate,” or “Set as Boot Device.” Select the appropriate option to enable the SSD.
- Some BIOS systems may require you to set the SSD as the primary boot device. If this option is available, choose the SSD as the primary boot device to ensure that the system boots from the SSD.
- Once you have enabled the SSD and made any necessary configurations, save your changes and exit the BIOS settings. Typically, you can do this by navigating to the “Save & Exit” or similar option and selecting it. Confirm the changes to save the BIOS settings.
Enabling the SSD in the BIOS ensures that your MSI motherboard recognizes and utilizes the SSD as part of your system configuration. This allows you to take full advantage of the improved performance and speed that an SSD offers over traditional hard disk drives.
Remember, the exact steps and options in your BIOS may vary depending on your MSI motherboard model and BIOS version. Always refer to the motherboard’s manual or the MSI website for specific instructions related to your motherboard.
Step 4: Saving and Exiting the BIOS
After enabling your SSD and making any necessary configurations, it’s important to save your changes and exit the BIOS settings. Follow these steps to complete the process:
- In the BIOS menu, navigate to the “Save & Exit” or a similar option. This option is usually located at the bottom or top-right corner of the screen.
- Select the “Save & Exit” option to save the changes you made to the BIOS settings.
- If prompted, confirm your selection to save and exit the BIOS.
- The computer will now restart with the updated BIOS settings in effect.
It’s crucial to save your changes before exiting the BIOS to ensure that the SSD is properly recognized and configured by your MSI motherboard. Without saving the changes, the BIOS will revert to its previous settings, and your SSD may not be enabled.
Once your computer has restarted, the SSD will be ready to use. You can now enjoy the benefits of improved performance, faster boot times, and enhanced overall system responsiveness. Your operating system and applications will now run smoother and faster, enhancing your overall computing experience.
Remember, different MSI motherboard models and BIOS versions may have slight variations in the BIOS interface and options. Always refer to the motherboard’s manual or the MSI website for specific instructions related to your motherboard model.
Conclusion
Enabling your SSD in the BIOS of your MSI motherboard is a crucial step to optimize your computer’s performance. SSDs offer faster data transfer speeds, quicker boot times, and improved overall system responsiveness. By following the steps outlined in this guide, you can ensure that your MSI motherboard recognizes and utilizes your SSD to its fullest potential.
Accessing the BIOS, navigating to the storage configuration, and enabling the SSD are straightforward processes, with slight variations depending on your specific MSI motherboard model and BIOS version. Remember to consult your motherboard’s manual or the MSI website for specific instructions tailored to your motherboard model.
Once enabled, your SSD will significantly enhance your computing experience. Whether you are setting up a new system or upgrading an existing one, enabling the SSD ensures that your operating system and applications run smoother and faster.
It’s important to note that enabling the SSD in the BIOS is just one part of the overall SSD optimization process. To further maximize your SSD’s performance, consider updating your SSD’s firmware, installing the latest drivers, and properly managing your storage space.
In conclusion, by following the steps outlined in this guide, you can successfully enable your SSD in the BIOS of your MSI motherboard. Embrace the speed and performance improvements that an SSD brings to your computer and enjoy a smoother, more responsive computing experience.