Introduction
Welcome to this comprehensive guide on how to format an M.2 SSD in BIOS. If you’re a tech enthusiast or a computer user looking to upgrade your storage capabilities, you’ve probably come across the term M.2 SSD. These compact and high-performance solid-state drives have gained popularity in recent years due to their lightning-fast speeds and small form factor.
Formatting an M.2 SSD in BIOS may seem like a daunting task, especially if you’re unfamiliar with the procedure. However, with the right guidance, formatting an M.2 SSD in BIOS can be a straightforward process that allows you to prepare the drive for use or resolve any existing issues.
In this guide, we will walk you through the steps involved in formatting an M.2 SSD in BIOS. We’ll cover everything from accessing the BIOS menu to identifying the M.2 SSD and performing the formatting process. Whether you’re using an Asus motherboard or another brand, the general principles and steps discussed here can be applied to most systems.
Before we delve into the details, it’s important to note that formatting an M.2 SSD will erase all data on the drive. Therefore, make sure to back up any important files beforehand to prevent data loss. Additionally, formatting the M.2 SSD in BIOS is not the same as formatting a regular hard drive or SSD through the operating system. This procedure specifically focuses on formatting an M.2 SSD using the BIOS interface.
Now that we’ve set the stage, let’s proceed to the next section and understand what exactly an M.2 SSD is and why you might need to format it in BIOS.
What is an M.2 SSD?
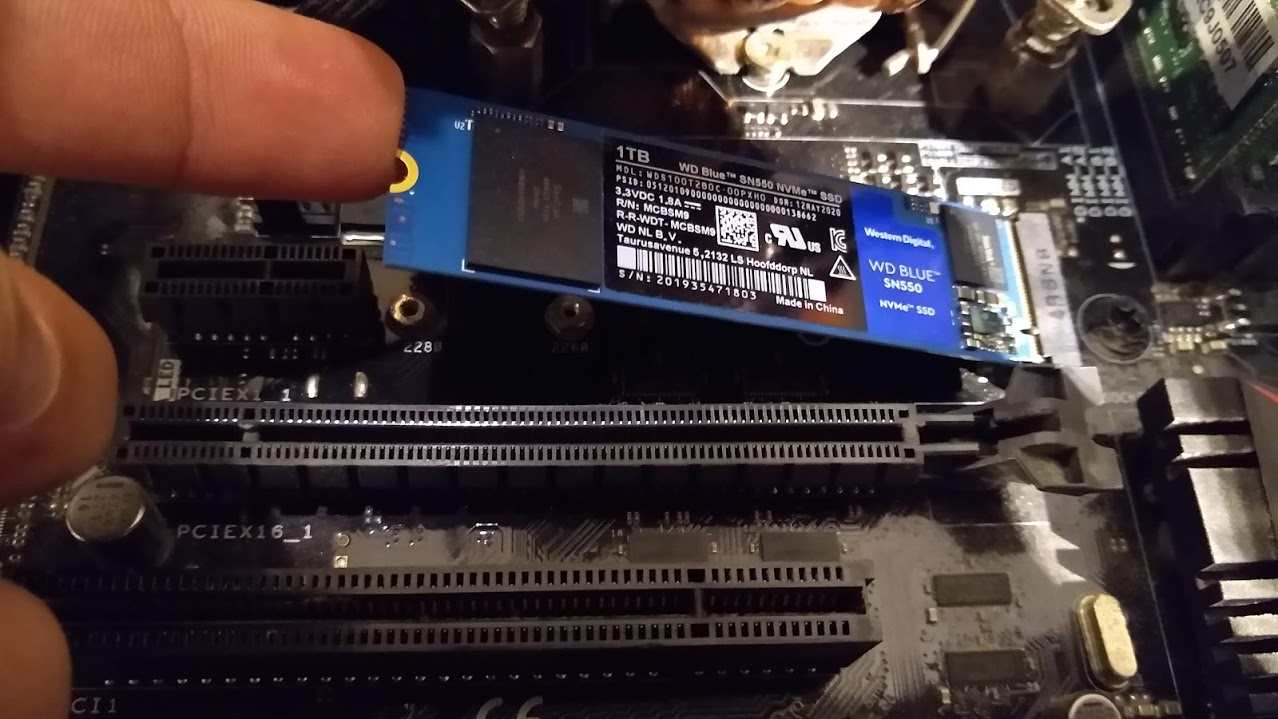
An M.2 SSD, also known as Next Generation Form Factor (NGFF), is a solid-state drive that has become increasingly popular in the world of computer storage. It is a small, rectangular-shaped device that connects directly to the motherboard of a computer. M.2 SSDs utilize flash memory technology, similar to traditional SSDs, but they are much smaller in size and offer faster performance.
The M.2 form factor was introduced as a replacement for the older mSATA standard. One of the key advantages of M.2 SSDs is their compact size, which enables them to fit into smaller devices such as laptops, ultrabooks, and small form factor desktops. They are also commonly used in high-performance gaming rigs and workstations due to their speed and efficiency.
M.2 SSDs come in different lengths and widths, represented by various key configurations. The most common key configurations are “B+M” and “M” keys. These keys determine the type of interface and the supported functionality of the M.2 SSD.
One of the significant advantages of M.2 SSDs is their ability to deliver lightning-fast data transfer speeds. They utilize the NVMe (Non-Volatile Memory Express) protocol, which is specifically designed for modern SSDs. NVMe allows for faster communication between the M.2 SSD and the computer, resulting in improved overall system performance, reduced boot times, and faster application loading.
M.2 SSDs also provide higher storage capacities than older generation SSDs, with options ranging from 128GB to 2TB or even more. This makes them ideal for users who require ample storage for their operating system, applications, and data files.
In addition to their speed and compact size, M.2 SSDs offer improved energy efficiency and a longer lifespan compared to traditional hard drives. With no moving parts, SSDs are less prone to mechanical failures, ensuring reliable performance and increased durability.
Now that you have a better understanding of what an M.2 SSD is, let’s explore the reasons why you might need to format it in the BIOS in the next section.
Why Would You Need to Format an M.2 SSD in BIOS?
There are several reasons why you might need to format an M.2 SSD in BIOS. Let’s explore some of the common scenarios where formatting becomes necessary:
1. New M.2 SSD: When you purchase a brand-new M.2 SSD, it usually comes unformatted. Formatting the drive in BIOS is the first step to prepare it for use. This involves creating the necessary file system and partitioning the drive to ensure compatibility with your operating system.
2. Reinstalling Operating System: If you’re reinstalling your operating system, formatting the M.2 SSD might be required. This ensures a fresh start by erasing any previous data and configurations on the drive. It also helps resolve any potential compatibility issues that may arise during the installation process.
3. Resolving Drive Errors: Over time, M.2 SSDs can develop issues due to file system corruption or hardware conflicts. Formatting the drive in BIOS can help resolve such errors and restore the SSD to its optimal performance. This process erases all data and resets the drive to its default settings.
4. Upgrading Firmware: Firmware updates for M.2 SSDs occasionally become available to address bugs, improve performance, or add new features. In some cases, firmware updates require the drive to be formatted before installing the new firmware. This ensures a clean installation and reduces the risk of errors or compatibility issues.
It’s important to note that formatting an M.2 SSD in BIOS will permanently delete all data on the drive. Therefore, it’s crucial to back up any important files before proceeding with the formatting process.
Now that we understand why formatting an M.2 SSD in BIOS might be necessary, we can move on to the next section, where we’ll discuss the preparations you should make before formatting.
Preparing for the M.2 SSD Format
Before diving into the process of formatting your M.2 SSD in BIOS, it is essential to make a few preparations to ensure a smooth and successful format:
1. Backup Important Data: As mentioned earlier, formatting the M.2 SSD will erase all data on the drive. Therefore, it’s crucial to back up any important files, documents, or media that you want to preserve. You can create a backup on an external storage device or use cloud storage services for added convenience and security.
2. Gather Necessary Tools: To format your M.2 SSD in BIOS, you will need access to a computer with an M.2 SSD slot and a compatible motherboard. Ensure that your computer is powered off and disconnected from the power source before proceeding.
3. Update Motherboard BIOS (Optional): It is advisable to update your motherboard’s BIOS to the latest firmware version before formatting the M.2 SSD. Check the manufacturer’s website for firmware updates specific to your motherboard model. Updating the BIOS can improve compatibility, stability, and performance.
4. Prepare a Bootable USB Drive (Optional): In some cases, you might need to create a bootable USB drive with the necessary firmware update or operating system installation files. This step is typically required when performing a clean installation or updating the firmware of your M.2 SSD. You can use tools like Rufus or the Windows Media Creation Tool to create a bootable USB drive.
5. Read the Motherboard Manual: It is highly recommended to consult your motherboard’s manual for specific instructions on accessing the BIOS and formatting an M.2 SSD. Different motherboards may have slightly different BIOS settings and options. The manual will provide you with step-by-step guidance tailored to your particular motherboard model.
By following these preparatory steps, you’ll be well-equipped and organized for the M.2 SSD formatting process. Next, we’ll dive into how to access the BIOS on your computer in the following section.
Accessing the BIOS
In order to format your M.2 SSD, you need to access the BIOS (Basic Input/Output System), which is a firmware interface present in your computer’s motherboard. The BIOS enables you to configure various settings and perform critical operations such as formatting drives. Here’s how you can access the BIOS:
1. Power off your computer completely. Make sure it is not in sleep or hibernate mode.
2. Depending on your computer, you will need to press a specific key or combination of keys to enter the BIOS. The most common keys to access the BIOS are Del, F1, F2, F10, or Esc. Consult your computer’s documentation or motherboard manual to determine the correct key(s) for your specific model.
3. Once you know the key(s) to access the BIOS, power on your computer and immediately start pressing the designated key(s) repeatedly. Be attentive during the boot process, as there is usually a brief window of opportunity to enter the BIOS. If you miss it, you can restart the computer and try again.
4. If done correctly, you will enter the BIOS setup utility, which may have a different appearance depending on the motherboard manufacturer. The BIOS setup utility often has multiple tabs or sections that allow you to configure various settings.
5. It’s worth noting that some manufacturers have implemented a fast boot feature that skips or shortens the time period allowing you to enter the BIOS. If you find that you’re unable to access the BIOS even after pressing the designated key(s), consult your motherboard manual or do a quick internet search to find the specific steps for your computer model.
By following these steps, you should be able to access the BIOS on your computer. In the next section, we will discuss how to navigate the BIOS menu to find the M.2 SSD and proceed with the formatting process.
Navigating the BIOS Menu
Once you have successfully accessed the BIOS, you will be greeted with a menu or interface where you can configure various settings. Navigating the BIOS menu can be overwhelming if you’re not familiar with its layout. Here are some general steps to help you navigate the BIOS menu:
1. Familiarize Yourself with the BIOS Interface: Take a moment to familiarize yourself with the BIOS interface. It may consist of a series of tabs, menus, and submenus. Different motherboard manufacturers have different BIOS layouts, so the appearance may vary. However, the overall navigation principles remain similar.
2. Use Arrow Keys: Most BIOS interfaces allow you to navigate using the arrow keys on your keyboard. Use the up and down arrows to move between different options or menu items. The right arrow key is often used to enter submenus or expand options, while the left arrow key is used to go back or collapse options.
3. Pay Attention to On-Screen Instructions: Some BIOS interfaces provide on-screen instructions or navigation hints to guide you. These instructions may include specific key combinations or instructions for accessing different sections of the BIOS. Take note of these prompts as they can help you navigate more efficiently.
4. Refer to the Manual: If you’re unsure about a specific setting or option within the BIOS, refer to your motherboard’s manual. The manual provides detailed information about each BIOS section and can help you understand the purpose and functionality of various settings.
5. Locate the Storage or Drives Section: Look for a section in the BIOS menu that relates to storage devices or drives. This is where you will typically find the M.2 SSD listed. The exact name or location of this section may vary, but it is usually labeled as “Storage,” “Drives,” or “SATA Configuration.”
6. Identify the M.2 SSD: Within the storage or drives section, you should be able to locate the M.2 SSD. It may be listed by its manufacturer name or a generic label depending on the BIOS. Take note of the M.2 SSD’s identifier or name, as you will need it to perform the formatting process later on.
By following these navigation tips, you will be able to confidently navigate the BIOS menu and locate the M.2 SSD. In the next section, we will explore the steps involved in formatting the M.2 SSD.
Identifying the M.2 SSD
Before proceeding with the formatting process, it is crucial to properly identify the M.2 SSD within the BIOS. This step ensures that you select the correct drive for formatting and avoid accidentally formatting the wrong storage device. Here’s how you can identify the M.2 SSD in the BIOS:
1. Locate the Storage or Drives Section: As mentioned earlier, navigate to the storage or drives section in the BIOS menu. This is where you will find the M.2 SSD listed among other storage devices connected to your motherboard.
2. Look for Device Descriptions: The M.2 SSD might be listed with either its manufacturer’s name or a generic label. Scan through the list of devices available in the storage section and look for any descriptions that indicate the presence of an M.2 SSD. Common names might include an abbreviation like “M.2” or “NGFF” along with the manufacturer’s name or a specific model number.
3. Check the Capacity: Another way to identify the M.2 SSD is by verifying its storage capacity. Most BIOS interfaces display the capacity of each storage device next to their respective names. Cross-reference the capacity of the M.2 SSD with its physical specifications to confirm that you have located the correct device.
4. Confirm with the User Manual: If you are unsure about the exact identification of the M.2 SSD within the BIOS, consult your motherboard’s user manual. The manual should provide detailed information on how the M.2 SSD is listed in the BIOS, enabling you to accurately identify the drive.
5. Take Note of Identifier or Name: Once you have successfully identified the M.2 SSD, make a note of its identifier or name. This will be required in the next steps of the formatting process to ensure that you select the correct drive and avoid any unintended data loss.
By carefully identifying the M.2 SSD within the BIOS, you will be prepared to proceed with the formatting process confidently. In the following section, we will discuss the steps involved in formatting the M.2 SSD.
Formatting the M.2 SSD
Now that you have identified the correct M.2 SSD in the BIOS, it’s time to proceed with the formatting process. Follow these steps to format the M.2 SSD in BIOS:
1. Select the M.2 SSD: Using the arrow keys, navigate to the storage or drives section in the BIOS where the M.2 SSD is listed. Once you have located the M.2 SSD, select it by highlighting its name or identifier.
2. Access the Formatting Options: With the M.2 SSD selected, look for the formatting options within the BIOS menu. The options may be located in a sub-menu or listed alongside other drive-related settings. Common options include “Format Drive,” “Initialize Drive,” or “Erase Data.”
3. Choose the Format Type: Depending on the BIOS and motherboard manufacturer, you may have different format types available. The most common formats are “Quick Format” and “Full Format.” Quick Format only erases the file system and directory structure, while a full format performs a more thorough erase by checking for bad sectors and overwriting the entire drive.
4. Confirm the Formatting Process: Once you have selected the format type, the BIOS will prompt you to confirm the formatting process. Double-check that you have selected the correct M.2 SSD and that you have backed up any important data. Formatting will erase all data on the drive and cannot be undone, so proceed with caution.
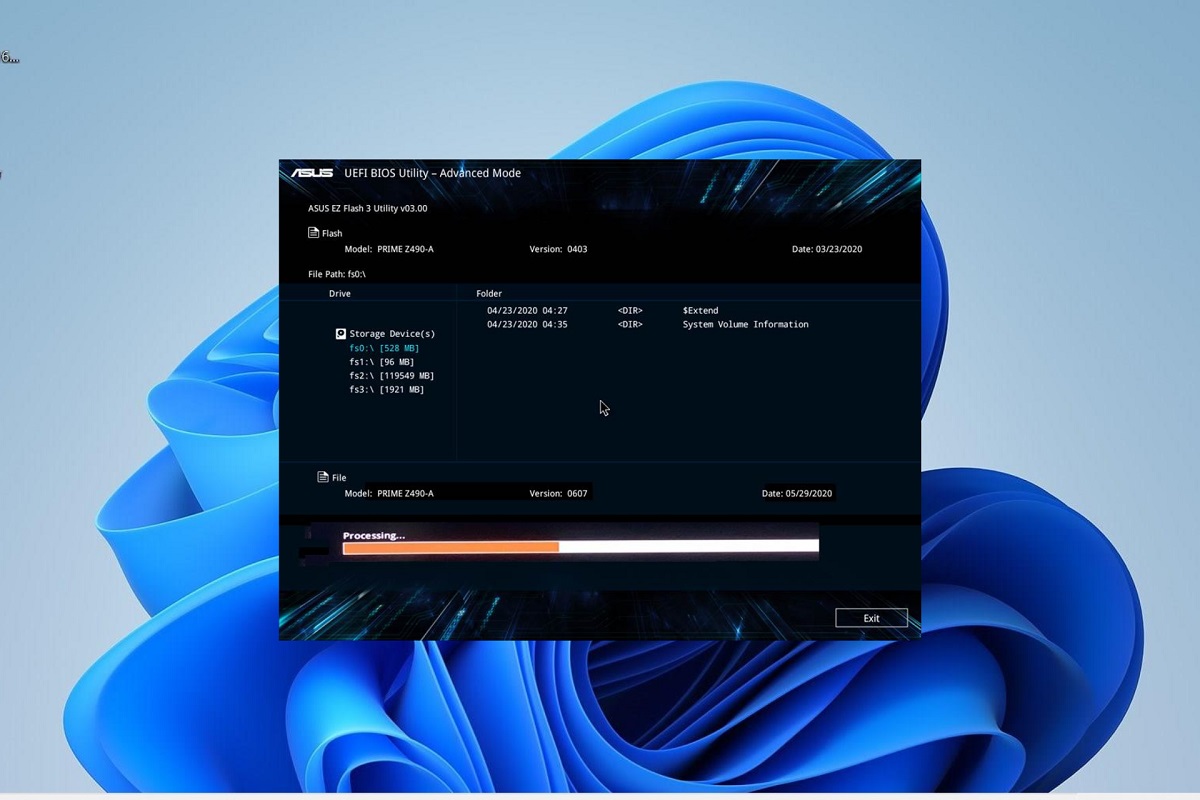
5. Start the Formatting Process: After confirming the formatting process, initiate the format by selecting the “Start” or “Format” option. The BIOS will begin the formatting procedure, and depending on the size and format type, it may take several minutes to complete.
6. Wait for Completion: Once the formatting process is underway, wait for it to complete. The BIOS will typically display a progress bar or status indicator to show the formatting progress. Avoid interrupting the process or powering off the computer, as this could lead to data loss or drive corruption.
7. Verify the Format: After the formatting process has finished, the BIOS may display a confirmation message. Take a moment to ensure that the M.2 SSD has been successfully formatted. You can also verify the format by checking the drive’s capacity, which should reflect the total available space after the format.
With these steps, you can successfully format your M.2 SSD in the BIOS. Now, let’s move on to the final section where we wrap up the formatting process and conclude this guide.
Finalizing the Format
After formatting the M.2 SSD in the BIOS, there are a few final steps to ensure that the format is complete and ready for use:
1. Exit the BIOS: Once the formatting process is complete, you can exit the BIOS setup utility. Look for an option to “Exit” or “Save and Exit” in the BIOS menu. Select the option and confirm your choice to exit the BIOS.
2. Boot into the Operating System: After exiting the BIOS, your computer should proceed to boot into the operating system. If you had previously installed an operating system on the M.2 SSD, it should now start up as usual. If you formatted the drive as part of a clean installation, follow the prompt to install the operating system using the preferred method.
3. Install Device Drivers (if necessary): In some cases, you may need to install specific device drivers for the M.2 SSD to ensure optimal performance. Check the manufacturer’s website or the documentation that comes with your M.2 SSD for any necessary drivers. Install these drivers on your operating system to ensure full compatibility and functionality.
4. Restore Backed-Up Data: If you backed up your data before formatting the M.2 SSD, now is the time to restore your files. Use your preferred method of restoring data, such as copying files from the backup device or downloading them from cloud storage. Be mindful not to overwrite any system files or important configurations during the restoration process.
5. Test the M.2 SSD: Finally, test the M.2 SSD to ensure that it is functioning correctly after the format. You can run performance tests, transfer files, and use various applications that rely on the M.2 SSD for storage. If you notice any issues or abnormalities, double-check the BIOS settings and device drivers to ensure proper configuration.
With these final steps, you have successfully finalized the format of your M.2 SSD. Enjoy the improved performance and storage capabilities that come with your newly formatted drive.
Remember, formatting should be approached with caution, as it erases all data on the drive. It’s essential to back up your important files and ensure that you have selected the correct drive before proceeding with the formatting process.
Thank you for following this guide on how to format an M.2 SSD in BIOS. We hope this information has been helpful in your storage endeavors. If you have any further questions or need assistance, consult the manufacturer’s documentation or seek support from a qualified professional.
Conclusion
In conclusion, formatting an M.2 SSD in BIOS is an essential process for preparing a new drive, resolving errors, or reinstalling the operating system. By accessing the BIOS menu and navigating the settings, you can easily locate and format the M.2 SSD.
We began by introducing what an M.2 SSD is and why it has become a popular choice for storage. Understanding the advantages and capabilities of M.2 SSDs sets the foundation for the formatting process.
We then discussed the various scenarios where formatting an M.2 SSD in BIOS becomes necessary. Whether you’re starting with a new drive, resolving errors, or upgrading firmware, formatting ensures optimal performance and compatibility.
Preparations are crucial before embarking on the formatting process. Backing up important data, updating the motherboard BIOS, and preparing a bootable USB drive (if necessary) are all steps that contribute to a successful format.
Accessing the BIOS is the next step, where you learned how to enter the BIOS menu and navigate its interface. Identifying the M.2 SSD within the BIOS was emphasized as a critical step to avoid formatting the wrong drive.
With the M.2 SSD properly identified, the process of formatting was explained step-by-step. Choosing the format type, confirming the process, and waiting for completion were all important stages to ensure a successful format.
After finalizing the format, we discussed the last steps, such as exiting the BIOS, booting into the operating system, installing device drivers (if needed), and restoring backed-up data. Testing the M.2 SSD was also highlighted to ensure it functions optimally.
With all of these steps completed, you are now equipped with the knowledge and guidance to format an M.2 SSD in BIOS confidently.
Remember, always exercise caution during the formatting process to avoid data loss or unintended drive formatting. Keep backups of your important files and follow the instructions provided by your motherboard manufacturer.
We hope this guide has been informative and helpful in your journey of formatting an M.2 SSD in BIOS. Should you have any further questions or require additional support, consult the manufacturer’s documentation or seek assistance from a professional.