Introduction
Welcome to this guide on how to format a new SATA solid-state drive (SSD) with an old mSATA card in the Dell Latitude E7440 laptop. While the E7440 is equipped with an mSATA slot, it is possible to utilize this slot to install and format a SATA SSD.
Before we delve into the step-by-step process of formatting the new SATA SSD, let’s briefly understand what an mSATA card and a SATA SSD are.
An mSATA card, also known as a Mini-SATA, is a small form factor solid-state drive that was widely used in laptops and other compact devices a few years ago. It typically offers smaller storage capacities compared to the standard SATA SSD but is still capable of significantly boosting the performance of your device.
On the other hand, a SATA SSD is a solid-state drive that connects to your computer’s motherboard via a Serial ATA (SATA) interface. It offers larger storage capacities and faster read and write speeds compared to its mSATA counterpart.
Now that we have a basic understanding of mSATA cards and SATA SSDs, let’s proceed with the step-by-step guide to format a new SATA SSD using an old mSATA card in the Dell Latitude E7440 laptop.
What is an mSATA Card and SATA SSD?
An mSATA card, also known as a Mini-SATA, is a small form factor solid-state drive that was widely used in laptops and other compact devices a few years ago. It is a miniature version of the standard SATA SSD and typically comes in a size of 30mm x 50mm. Despite its smaller size, the mSATA card offers impressive performance and can greatly enhance the speed and responsiveness of your device.
On the other hand, a SATA SSD is a solid-state drive that connects to your computer’s motherboard via a Serial ATA (SATA) interface. It is a newer storage technology that has gained popularity due to its significant advantages over traditional hard drives. A SATA SSD consists of NAND flash memory chips, a controller, and a SATA connector. It offers larger storage capacities, faster data transfer speeds, and improved reliability compared to traditional hard drives.
Compared to mSATA cards, SATA SSDs offer greater flexibility in terms of storage capacity choices and are compatible with a wide range of devices, including laptops, desktops, and gaming consoles. Additionally, SATA SSDs are commonly available in standard form factors, such as 2.5-inch and M.2, making them more accessible for users looking to upgrade their storage capabilities.
Both mSATA cards and SATA SSDs use solid-state technology, which means they have no moving parts. This results in numerous benefits, such as faster boot times, quicker application launches, and overall improved system performance. The absence of moving parts also makes them more durable and resistant to physical shocks, vibrations, and temperature fluctuations, ensuring your data remains safe and secure.
While mSATA cards were prevalent in the past, their usage has declined in recent years, with SATA SSDs now dominating the market. Nevertheless, if you have an old mSATA slot in your laptop or device, it is still possible to repurpose it for a SATA SSD. This guide will walk you through the process of formatting a new SATA SSD using your old mSATA card in a Dell Latitude E7440 laptop.
Step 1: Check Compatibility Between mSATA Card and SATA SSD
Before proceeding with the installation and formatting process, it is crucial to ensure that your mSATA card and SATA SSD are compatible with each other. This will prevent any potential issues or compatibility conflicts later on.
Firstly, check the specifications of your mSATA card and SATA SSD. Confirm that the form factor and physical dimensions of the mSATA card align with the size of your SATA SSD. Generally, mSATA cards come in a standard size of 30mm x 50mm, while SATA SSDs are available in various form factors, such as 2.5-inch or M.2, so make sure they can be physically connected.
Next, verify that the interface of your mSATA card and SATA SSD match. The mSATA card typically uses a mini SATA interface, while the SATA SSD connects via a standard SATA interface. Ensure that both devices have the corresponding interface to establish a proper connection.
It is also necessary to check the storage capacity supported by your mSATA card and SATA SSD. While mSATA cards usually offer smaller storage capacities, the SATA SSD can range from a few hundred gigabytes to several terabytes. Ensure that the SATA SSD’s capacity aligns with your storage needs.
Furthermore, confirm the speed compatibility between the mSATA card and SATA SSD. SATA SSDs generally offer faster read and write speeds compared to mSATA cards. While the mSATA interface has a theoretical maximum speed of 6Gbps (gigabits per second), it is essential to check if your mSATA card and SATA SSD support similar or compatible speeds to optimize performance.
It is crucial to consult the manufacturer’s specifications and documentation of both the mSATA card and SATA SSD to verify compatibility. If necessary, you can also reach out to customer support for assistance in ensuring that your mSATA card and SATA SSD are compatible for this installation and formatting process.
Once you have confirmed compatibility between your mSATA card and SATA SSD, you can move on to the next step of preparing your Dell Latitude E7440 for installation.
Step 2: Prepare the Dell Latitude E7440 for Installation
Before installing the new SATA SSD into the mSATA card, you need to prepare your Dell Latitude E7440 laptop for the installation process. Follow these steps to ensure a smooth and hassle-free installation:
- Power off the laptop: Start by shutting down your Dell Latitude E7440 laptop completely. Ensure that all power sources, including the battery and AC adapter, are disconnected.
- Ground yourself: To protect sensitive electronics from static electricity, it is essential to ground yourself properly before handling any hardware components. You can do this by wearing an anti-static wristband or by touching a grounded metal surface like the laptop’s chassis.
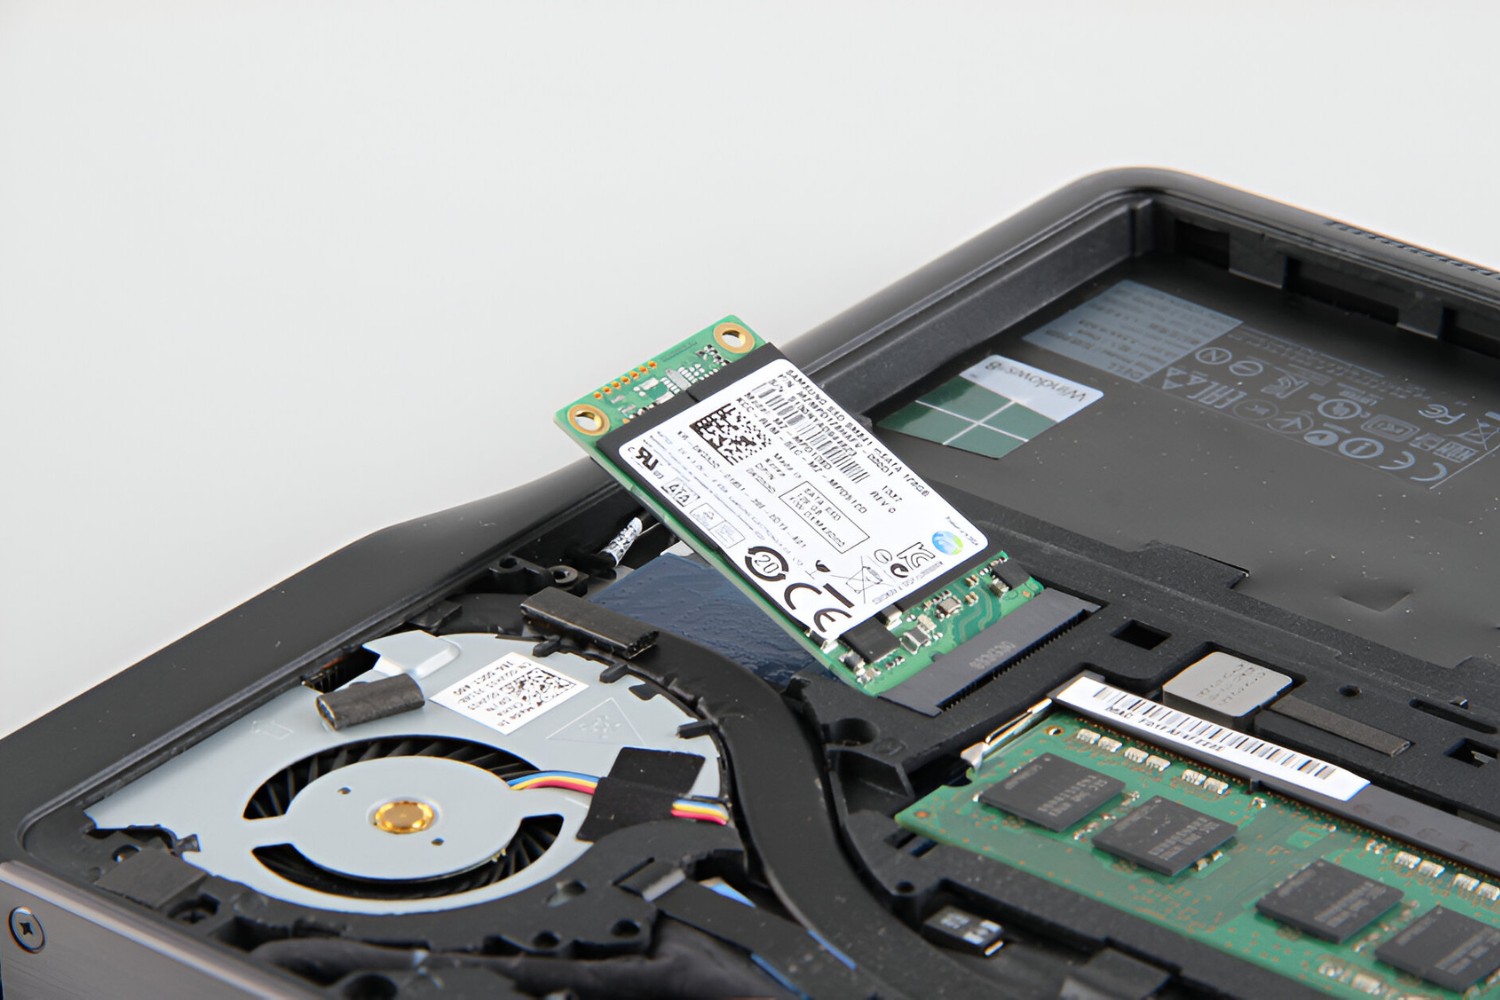
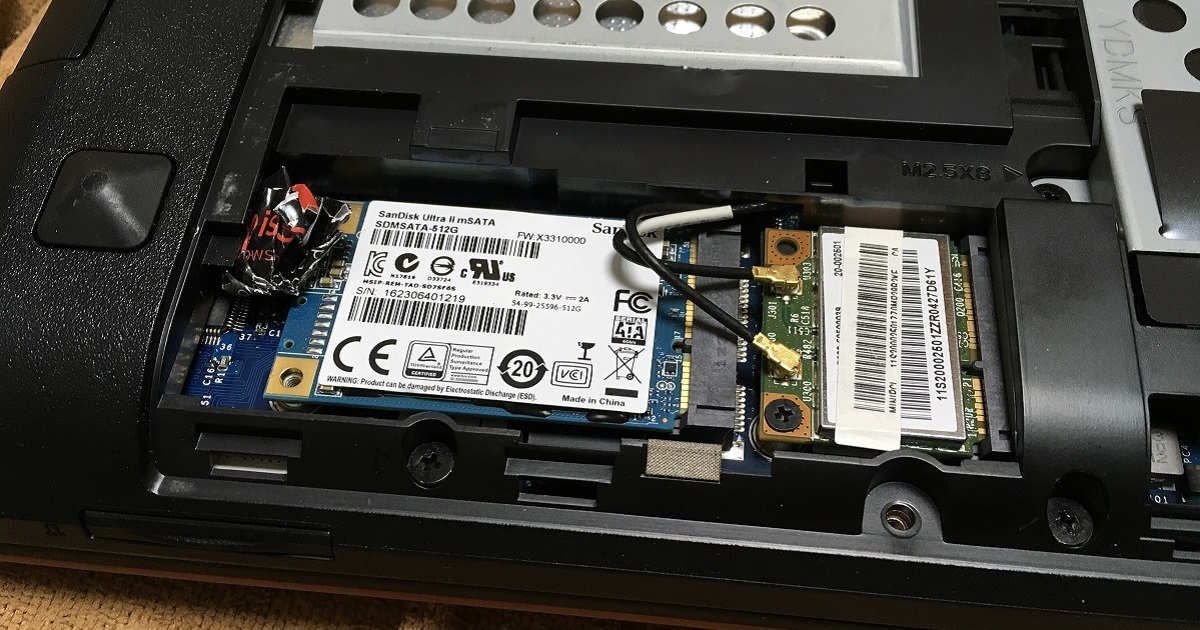
- Locate the mSATA slot: The mSATA slot in the Dell Latitude E7440 is typically located underneath the keyboard or bottom panel. Refer to your laptop’s user manual for the exact location. In most cases, you may need to unscrew and remove a panel or disassemble the keyboard to access the mSATA slot.
- Prepare necessary tools: Gather the required tools for the installation, including a small Phillips-head screwdriver, a plastic pry tool (if needed), and any additional screws that may be required to secure the mSATA card and SATA SSD.
- Clean the installation area: Before inserting the mSATA card and SATA SSD, make sure to clean the mSATA slot and the surrounding area inside the laptop. Remove any dust, debris, or obstructions that may hinder the proper installation.
- Keep screws and components organized: As you disassemble the laptop and prepare for installation, keep track of all screws and components. Consider using a small tray or container to store various screws separately, ensuring that you can easily find and reassemble them correctly later on.
By following these steps, you will properly prepare your Dell Latitude E7440 for the installation of the SATA SSD using the mSATA card. Once the laptop is fully prepared, you can proceed to the next step of actually installing the SATA SSD onto the mSATA card.
Step 3: Install the SATA SSD into the mSATA Card
Now that your Dell Latitude E7440 is prepared, it’s time to install the SATA SSD onto the mSATA card. Follow these steps for a successful installation:
- Locate the mSATA card: Identify the mSATA card slot on your Dell Latitude E7440. It is usually a small slot with a connector that matches the mSATA card.
- Insert the mSATA card: Gently insert the mSATA card into the slot, ensuring that the connector aligns correctly with the slot. Apply even pressure and make sure the card is fully inserted and secured in place.
- Secure the mSATA card: Depending on the design of your laptop, there may be screws or clips that secure the mSATA card. If necessary, use the provided screws or clips to secure the mSATA card firmly in place.
- Prepare the SATA SSD: Remove the SATA SSD from its packaging and take note of its orientation. SATA SSDs typically have a connector on one side and components on the other. Ensure that the connector side is facing up for proper installation.
- Connect the SATA SSD: With the mSATA card securely installed, locate the SATA SSD connector on the card. Align the SATA SSD connector with the slot on the mSATA card and gently slide it into place. Apply even pressure to ensure a proper and secure connection.
- Secure the SATA SSD: Once the SATA SSD is connected to the mSATA card, secure it in place using the provided screws or clips, if applicable. This will ensure that the SATA SSD remains firmly attached to the mSATA card.
By following these steps, you will successfully install the SATA SSD onto the mSATA card in your Dell Latitude E7440. With the hardware installed, you can now proceed to the next step of inserting the mSATA card into the laptop and formatting the newly installed SATA SSD.
Step 4: Insert the mSATA Card into the Dell Latitude E7440
With the SATA SSD securely installed onto the mSATA card, it’s time to insert the mSATA card into the Dell Latitude E7440 laptop. Follow these steps to ensure a proper insertion:
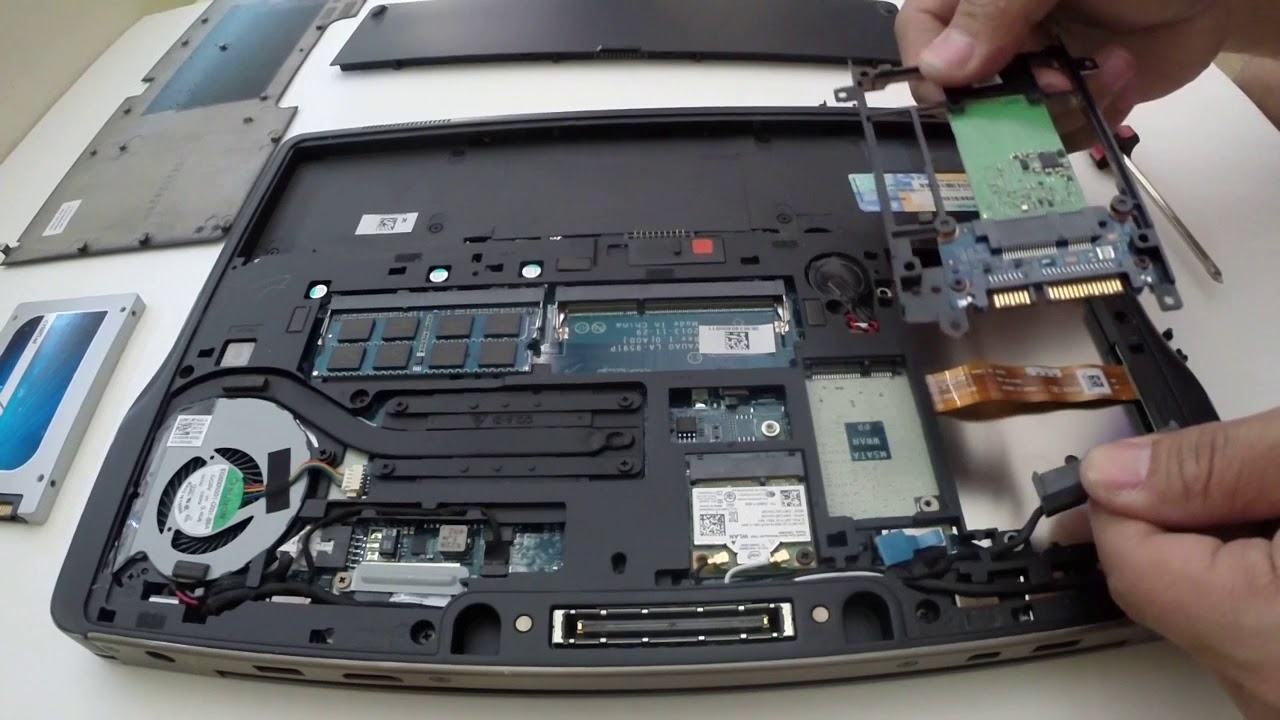
- Locate the mSATA slot: Identify the mSATA slot on your Dell Latitude E7440. It is usually located underneath the keyboard or bottom panel, depending on the laptop’s design. Refer to the user manual or online documentation for precise location details.
- Remove any obstructions: If there are any panels or components blocking access to the mSATA slot, gently remove or unscrew them following the instructions provided by the manufacturer.
- Align the mSATA card: Orient the mSATA card so that the connector aligns with the mSATA slot. Carefully slide the mSATA card into the slot, applying gentle pressure to ensure proper alignment and connection.
- Secure the mSATA card: If your laptop requires screws or clips to secure the mSATA card in place, use the provided materials to fasten it securely. This will prevent any movement or disconnection during normal usage.
- Reassemble any removed components: If you had to remove any panels or components to access the mSATA slot, be sure to reassemble them properly. Follow the manufacturer’s instructions to ensure everything is secured and connected correctly.
- Double-check connections: Before proceeding, double-check that the mSATA card is securely inserted into the mSATA slot. Additionally, ensure that the SATA SSD is firmly connected to the mSATA card. This will avoid any potential issues during power-up or data transfer.
With the mSATA card securely inserted into the Dell Latitude E7440 laptop, you are now ready to power on the device and proceed to the next step of entering the BIOS.
Step 5: Power On the Dell Latitude E7440 and Enter BIOS
Now that the mSATA card with the SATA SSD is properly installed in your Dell Latitude E7440, it’s time to power on the laptop and enter the BIOS settings. Follow these steps to access the BIOS:
- Connect the power source: Ensure that your Dell Latitude E7440 is connected to a power source, either through the AC adapter or a fully charged battery.
- Press the power button: Turn on your laptop by pressing the power button. You should see the manufacturer’s logo or the Dell logo appear on the screen.
- Enter the BIOS: The BIOS access key may vary depending on your laptop’s manufacturer. For Dell Latitude E7440, repeatedly press the F2 key as soon as the Dell logo appears on the screen. This will bring you to the BIOS setup utility.
- Navigate the BIOS: Once in the BIOS setup utility, use the arrow keys on your keyboard to navigate through the different BIOS settings and options.
- Locate the SATA configuration: Look for a section related to storage or SATA configuration in the BIOS menu. The exact name and location may vary, but it typically includes options such as “SATA Configuration” or “Storage Configuration.”
- Configure the SATA settings: Within the SATA configuration section, check if the BIOS recognizes the new SATA SSD. Ensure that the SATA mode is set to AHCI (Advanced Host Controller Interface) for optimal performance. If necessary, make any necessary changes or adjustments to the SATA configuration.
- Save and exit: Once you have made the necessary changes, navigate to the exit option in the BIOS menu. Select the option to save and exit the BIOS settings. This will prompt the laptop to restart.
Once your Dell Latitude E7440 laptop restarts, it will recognize the new SATA SSD and the changes you made in the BIOS. Now, you can move on to the final step of formatting the new SATA SSD using the mSATA card in your laptop.
Step 6: Format the New SATA SSD using the mSATA Card
With the Dell Latitude E7440 powered on and the BIOS settings configured, you can now proceed to format the new SATA SSD using the mSATA card. Follow these steps to format the SSD:
- Access the operating system: After restarting the laptop, allow the operating system to load. Depending on your setup, this could be Windows, macOS, or Linux.
- Open Disk Management: In Windows, you can access Disk Management by right-clicking the Start menu and selecting “Disk Management” from the options. This will display a list of all available storage devices.
- Identify the new SATA SSD: Look for the new SATA SSD in the list of storage devices. It should be labeled as an unallocated or unformatted drive.
- Initiate the formatting process: Right-click on the unallocated space of the new SATA SSD and select the option to “Format” or “New Simple Volume.” Follow the on-screen prompts to specify the desired file system, allocation unit size, and volume label. Keep the default settings unless you have specific requirements.
- Start formatting the SSD: Confirm the formatting options and click on the “Format” button to start the formatting process. This may take a few moments to complete, depending on the size of the SSD.
- Wait for the formatting to complete: Allow the formatting process to complete uninterrupted. Once finished, the new SATA SSD will be formatted and ready for use.
- Verify the newly formatted drive: After formatting, the new SATA SSD should appear as a formatted drive in Disk Management or your chosen operating system’s file explorer.
Congratulations! You have successfully formatted the new SATA SSD using the mSATA card in your Dell Latitude E7440. The drive is now ready to be used for storage, operating system installation, or any other purpose you had in mind.
Conclusion
Formatting a new SATA SSD with an old mSATA card in the Dell Latitude E7440 laptop is a straightforward process, provided that you follow the steps outlined in this guide. By checking compatibility, preparing the laptop, installing the SATA SSD, inserting the mSATA card, accessing the BIOS, and formatting the drive, you can successfully upgrade your storage and enhance your laptop’s performance.
Keep in mind that proper compatibility between the mSATA card and SATA SSD is essential to ensure a seamless installation process. Verify the physical dimensions, interface, storage capacity, and speed compatibility before proceeding with the installation.
Throughout the installation process, remember to handle the hardware components with care, properly secure the mSATA card and SATA SSD, and follow all manufacturer’s instructions. Take the necessary precautions to prevent damage to the laptop or the components.
Once the installation is complete and the SATA SSD is formatted, you can enjoy the benefits of faster boot times, improved application responsiveness, and increased storage capacity. The Dell Latitude E7440 will experience a significant boost in performance and usability.
If you encounter any difficulties or have questions during the process, consult the Dell Latitude E7440 user manual, seek guidance from the manufacturer, or reach out to technical support for assistance.
By following the step-by-step instructions in this guide, you have successfully formatted your new SATA SSD using an old mSATA card in the Dell Latitude E7440 laptop. Enjoy your enhanced storage capabilities and the improved performance it brings!