Introduction
Welcome to this guide on how to enter BIOS on an Asus motherboard. As a computer user, you may have heard the term “BIOS” thrown around but might not be entirely clear on what it is or why it’s important. In this article, we will provide you with a brief overview of BIOS and explain why accessing it is necessary at times.
BIOS, which stands for Basic Input/Output System, is a firmware that is embedded on computer motherboards. It is essentially a set of software instructions that controls the communication between the operating system, hardware, and firmware. BIOS provides a low-level interface between the hardware and software, allowing them to work together seamlessly.
There are several reasons why you may need to access the BIOS on your Asus motherboard. One of the primary reasons is to adjust or configure hardware settings. The BIOS allows you to modify settings such as boot order, RAM timings, overclocking options, and more. By accessing the BIOS, you can optimize your system’s performance and troubleshoot compatibility issues.
Additionally, entering the BIOS may be necessary when installing a new operating system or updating the current one. Some operating system installations require specific BIOS settings to be enabled or disabled. Moreover, accessing the BIOS can be helpful when troubleshooting hardware problems or resetting certain parameters.
Note: The specific key or combination of keys required to enter the BIOS may vary depending on the Asus motherboard model and BIOS version. We will outline multiple methods that are commonly used for accessing the BIOS on Asus motherboards.
What is BIOS?
Before diving into the various methods of entering the BIOS on an Asus motherboard, let’s take a closer look at what BIOS actually is. As mentioned earlier, BIOS stands for Basic Input/Output System. It is a piece of firmware that is stored on a chip on the computer’s motherboard.
The primary function of BIOS is to initialize and test the computer hardware during the startup process. It performs a series of power-on self-tests (POST) to ensure that all hardware components are functioning correctly. If any issues are detected, BIOS will display relevant error messages or beep codes to help diagnose the problem.
Once the hardware initialization is complete, BIOS hands over control to the operating system. However, even after the operating system takes over, BIOS continues to run in the background, ready to provide system-level functions when needed.
In addition to hardware initialization, BIOS provides a platform for configuring and modifying various settings of the computer. These settings can include boot options, device boot priority, CPU and RAM settings, and more. The BIOS settings can be accessed and modified directly from the BIOS interface.
Over the years, BIOS has evolved in terms of capabilities and user interface. The traditional BIOS has now been largely replaced by a more advanced system called Unified Extensible Firmware Interface (UEFI). UEFI offers a more modern and graphical user interface, making it easier to navigate and configure the system settings.
It’s important to note that incorrectly modifying BIOS settings can cause system instability or even prevent the computer from booting. Therefore, it’s recommended to proceed with caution and only make changes if you are familiar with the BIOS settings and their consequences.
In the next sections, we will explore different methods for entering the BIOS on an Asus motherboard. These methods may vary slightly depending on your specific motherboard model, so it’s always a good idea to consult your motherboard’s manual for detailed instructions.
Why do you need to enter BIOS?
Entering the BIOS on your Asus motherboard may be necessary for a variety of reasons. Whether you’re a regular computer user, a hardware enthusiast, or a system administrator, accessing the BIOS can provide you with valuable configuration and troubleshooting options. Here are some common scenarios where entering the BIOS is beneficial:
Hardware Configuration: The BIOS allows you to configure various hardware settings, such as boot order, RAM timings, CPU settings, and more. By accessing the BIOS, you can optimize these settings to ensure better performance and stability. For example, you may want to prioritize booting from a specific hard drive or USB device instead of the default option.
Overclocking: If you’re into overclocking your hardware to squeeze out extra performance, the BIOS is the place to do it. Overclocking involves increasing the clock speeds of your CPU, memory, and graphics card beyond their stock settings. This can result in noticeable performance improvements, but it also requires careful tweaking and monitoring to avoid overheating or system instability.
System Diagnostics and Troubleshooting: The BIOS provides valuable diagnostic information about your computer’s hardware. By accessing the BIOS, you can run built-in diagnostic tests to check for any hardware issues or errors. This can help you pinpoint the source of any problems you may be experiencing. Additionally, some advanced BIOS options allow you to reset or clear CMOS (Complementary Metal-Oxide-Semiconductor) settings if you encounter certain compatibility or configuration issues.
Operating System Installation and Updates: When installing a new operating system or updating your current one, you may need to access the BIOS to modify specific settings. For example, some operating system installations require you to enable or disable features such as Secure Boot or Legacy Boot. By accessing the BIOS, you can ensure that the correct settings are in place for a smooth installation or update process.
Security Management: The BIOS also offers various security options that can help protect your system from unauthorized access. You can set up BIOS passwords, enable secure boot options, and manage other security features to enhance the overall security of your system.
By entering the BIOS, you gain access to a plethora of customization and diagnostic options that can help you optimize your system’s performance, troubleshoot hardware problems, and ensure compatibility with the software you’re using. It’s important to remember that making changes in the BIOS should be done cautiously and with a good understanding of the implications. Improper settings may result in system instability or failure to boot.
In the following sections, we will discuss different methods to enter the BIOS on an Asus motherboard, so you can get started with adjusting settings and exploring the available options.
How to Enter BIOS on Asus Motherboard
Entering the BIOS on an Asus motherboard is a straightforward process. However, the specific key or combination of keys to access the BIOS may vary depending on your motherboard model and BIOS version. We will outline multiple methods that are commonly used to enter the BIOS on Asus motherboards:
- Method 1: Using the “Delete” key: This is the most common method for accessing the BIOS. Restart your computer and repeatedly press the “Delete” key as soon as the Asus logo appears on the screen. This should bring you directly into the BIOS interface.
- Method 2: Using the “F2” key: On some Asus motherboards, the “F2” key is used instead of the “Delete” key to enter the BIOS. Restart your computer and press the “F2” key repeatedly until you enter the BIOS.
- Method 3: Using the “Esc” key: Another alternative method is to press the “Esc” key while the Asus logo is displayed during startup. This may bring up a boot menu that offers the option to enter the BIOS.
- Method 4: Using the “F10” key: Some Asus motherboards use the “F10” key to access the BIOS. Restart your computer and continually press the “F10” key until the BIOS interface appears.
- Method 5: Using the Windows “Advanced Startup” menu: If your computer is already running Windows 10, you can access the BIOS through the “Advanced Startup” menu. Press the “Windows” key, click on the “Power” button, and then hold down the “Shift” key while selecting “Restart”. This will bring up the “Advanced Startup” menu, where you can click on “Troubleshoot” > “Advanced options” > “UEFI Firmware Settings” to enter the BIOS.
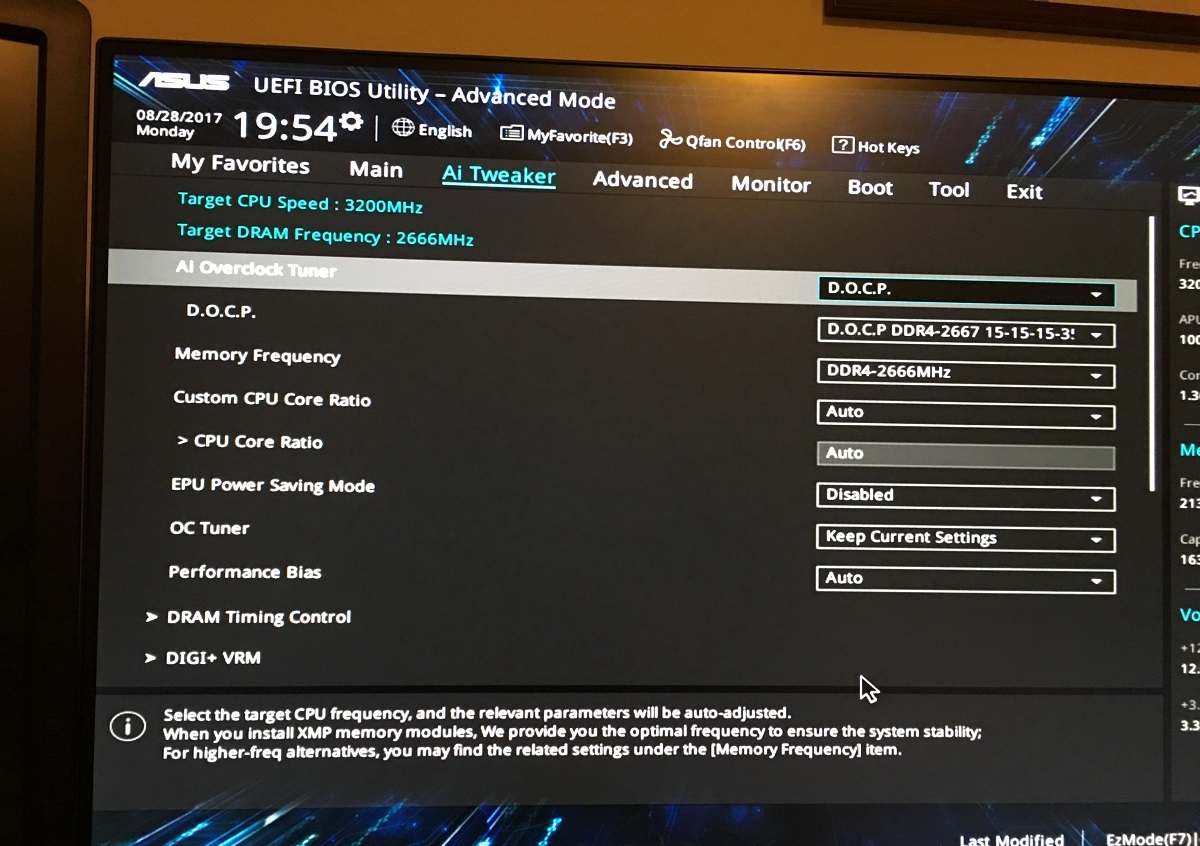
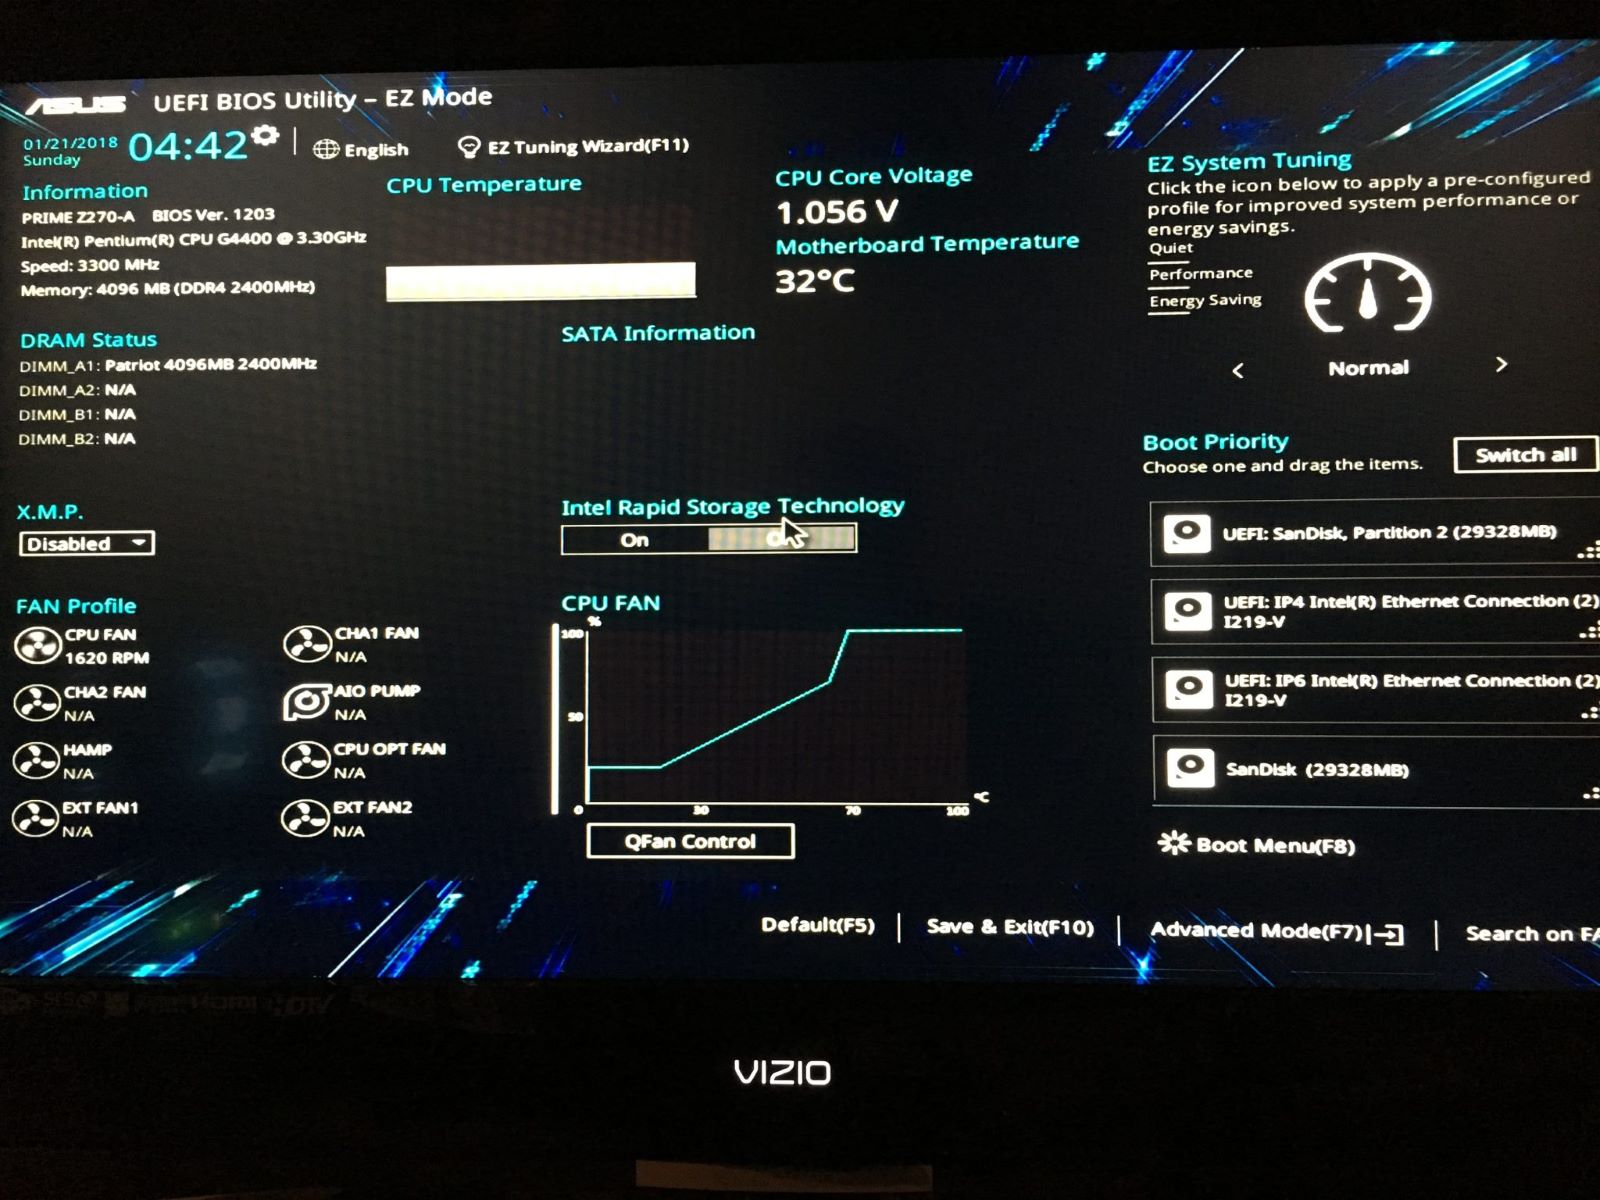
Once you successfully enter the BIOS, you’ll be presented with a menu-driven interface that allows you to navigate through the various settings and options. Use the arrow keys on your keyboard to move between different sections and options. The specific options available in the BIOS may vary depending on your motherboard model and BIOS version.
Remember to exercise caution when making changes in the BIOS, as incorrect settings can have adverse effects on your system. Use the provided documentation or online resources to familiarize yourself with the BIOS options and their implications before making any modifications.
Now that you know how to access the BIOS on an Asus motherboard, you can explore the wide range of configuration options available. Adjust settings, tweak performance, troubleshoot issues, and customize your system to suit your needs.
Method 1: Using the “Delete” key
The first method for entering the BIOS on an Asus motherboard is by using the “Delete” key. This method is the most commonly used and works on a majority of Asus motherboards. Here’s how you can do it:
- Step 1: Start by turning on or restarting your computer. As soon as the Asus logo appears on the screen, start pressing the “Delete” key repeatedly. The key can usually be found in the top-right or bottom-right corner of your keyboard.
- Step 2: Keep pressing the “Delete” key until you enter the BIOS. Make sure to press the key multiple times and at a steady pace during the startup process. Sometimes, the system might not recognize the key input if you press it too quickly or too slowly.
- Step 3: If successful, you will be greeted by the BIOS interface, which is typically a menu-driven system displayed on your screen. Use the arrow keys on your keyboard to navigate through the various options and settings available in the BIOS.
- Step 4: Once you have made any necessary changes or adjustments to the BIOS settings, save your changes and exit the BIOS. The specific option for saving and exiting the BIOS may vary, but it is usually labeled as “Save & Exit” or something similar.
This method allows you to access the BIOS directly by pressing the “Delete” key during the startup process. It’s important to note that the key might be different on certain Asus motherboard models, so if the “Delete” key doesn’t work, you can try the alternate methods mentioned in this guide.
Entering the BIOS using the “Delete” key provides you with the opportunity to configure various hardware settings, adjust boot options, overclock your system, and perform other customization tasks. It’s essential to exercise caution while making changes in the BIOS and ensure that you have a good understanding of the implications of each setting.
Now that you know the first method for entering the BIOS on an Asus motherboard, you can try it out and explore the extensive range of options available. Remember to consult your motherboard’s manual or Asus’ official documentation for more specific instructions related to your particular model.
Method 2: Using the “F2” key
If the “Delete” key method doesn’t work for your Asus motherboard, you can try using the “F2” key instead. Some Asus motherboards utilize the “F2” key as the shortcut to access the BIOS. Here’s how you can enter the BIOS using the “F2” key:
- Step 1: Start by turning on or restarting your computer. As the Asus logo appears on the screen, start pressing the “F2” key repeatedly. The key is usually located in the top-left or top-right corner of your keyboard, depending on the model.
- Step 2: Continuously press the “F2” key until you successfully enter the BIOS. It may take a few attempts or some time to recognize the key input, so be patient and keep pressing the key at a steady pace.
- Step 3: Once you’ve entered the BIOS, you’ll see a menu-driven interface that allows you to navigate through different settings and options. Use the arrow keys on your keyboard to move between various sections and options within the BIOS.
- Step 4: After making any necessary changes or adjustments to the BIOS settings, save your changes and exit the BIOS. Look for the option to save and exit, which is typically labeled as “Save & Exit” or a similar phrase.
Using the “F2” key is an alternate method for accessing the BIOS on Asus motherboards. If the “Delete” key method doesn’t work for your specific model, give this method a try. Remember that the key you need to press may vary, so consult your motherboard’s manual or Asus’ official documentation to ensure you’re using the correct key.
Once you successfully enter the BIOS using the “F2” key, you’ll have access to various hardware and system settings that you can configure according to your needs. These settings may include boot options, performance adjustments, CPU and RAM settings, and more. Make sure to be cautious and understand the implications of each change you make.
Now that you’re familiar with the second method for entering the BIOS on an Asus motherboard, you can give it a try. Explore the BIOS interface, customize your system’s settings, and optimize its performance to suit your requirements. Refer to your motherboard’s manual for any specific instructions related to your model if needed.
Method 3: Using the “Esc” key
If the “Delete” key and “F2” key methods don’t work for accessing the BIOS on your Asus motherboard, you can try using the “Esc” key. In some cases, pressing the “Esc” key during startup can bring up a boot menu that includes the option to enter the BIOS. Here’s how you can use the “Esc” key to access the BIOS:
- Step 1: Start by turning on or restarting your computer. As the Asus logo appears on the screen, press the “Esc” key. The key is usually located in the top-left corner of your keyboard, but it may vary based on your specific model.
- Step 2: Keep pressing the “Esc” key until a boot menu is displayed on the screen. This menu should offer you various options, including the option to enter the BIOS.
- Step 3: Navigate to the option that allows you to access the BIOS. Sometimes, it may be labeled as “BIOS Setup,” “UEFI Setup,” or a similar term. You can use the arrow keys to highlight the desired option, and then press the “Enter” key to enter the BIOS.
- Step 4: Once you’re in the BIOS interface, you can navigate through the different settings and options using the arrow keys on your keyboard. Make any necessary changes or adjustments to the BIOS settings and save your changes before exiting.
The “Esc” key method provides an alternative way to enter the BIOS on Asus motherboards when the other methods don’t work. It brings up a boot menu that includes the option to access the BIOS setup. Remember that the key you need to press may vary, so consult your motherboard’s manual or Asus’ official documentation for the specific key for accessing the boot menu on your model.
By successfully entering the BIOS using the “Esc” key, you gain control over important system settings. You can modify hardware configurations, adjust boot options, fine-tune performance, and more. Take caution while making changes in the BIOS and ensure that you have a good understanding of the impact of each setting.
Now that you’re familiar with the third method for entering the BIOS on an Asus motherboard, you can give it a try. Explore the BIOS interface, make any necessary adjustments, and customize your system according to your requirements. Refer to your motherboard’s manual or Asus’ official documentation for any specific instructions related to your model if needed.
Method 4: Using the “F10” key
If the previous methods of accessing the BIOS on your Asus motherboard didn’t work, you can try using the “F10” key. While less common than the “Delete” or “F2” keys, the “F10” key is used on certain Asus motherboard models to enter the BIOS. Follow the steps below to use the “F10” key method:
- Step 1: Start by turning on or restarting your computer. As the Asus logo appears on the screen, begin pressing the “F10” key repeatedly. The key is typically located on the top row of your keyboard and may have “BIOS” or “Setup” printed on it.
- Step 2: Continue pressing the “F10” key until you enter the BIOS. You may need to press the key multiple times or hold it down for a moment before it recognizes the input.
- Step 3: Once you successfully enter the BIOS, you’ll be presented with a menu-driven interface. This interface allows you to navigate through different options and settings within the BIOS. Use the arrow keys on your keyboard to move between sections and options.
- Step 4: After making any necessary changes or adjustments, save your changes and exit the BIOS. Look for the option to save and exit, typically labeled as “Save & Exit” or similar phrasing.
Using the “F10” key is an alternative method for accessing the BIOS on certain Asus motherboard models. If the previously mentioned methods didn’t work for your specific motherboard, the “F10” key could be the solution you need.
By successfully entering the BIOS using the “F10” key, you’ll have access to various hardware and system settings. This includes options such as boot preferences, hardware configurations, and CPU settings, among others. As always, exercise caution when modifying the BIOS settings and make sure you understand the potential consequences of your changes.
Now that you’re familiar with the fourth method for entering the BIOS on an Asus motherboard, give it a try. Explore the BIOS interface, make any necessary adjustments according to your needs, and optimize your system to achieve the desired performance. If needed, consult your motherboard’s manual or Asus’ official documentation for specific instructions related to your particular model.
Method 5: Using the Windows “Advanced Startup” menu
If the previous methods haven’t worked for accessing the BIOS on your Asus motherboard, you can try using the Windows “Advanced Startup” menu. This method is particularly useful if your computer is already running Windows 10. Here’s how to enter the BIOS using the “Advanced Startup” menu:
- Step 1: With your computer powered on, click on the “Start” button in the bottom-left corner of the screen, or press the “Windows” key on your keyboard. From the Start menu, click on the “Power” button.
- Step 2: While holding down the “Shift” key on your keyboard, click on the “Restart” button. This will initiate a special reboot process that takes you to the “Advanced Startup” menu.
- Step 3: Once the “Advanced Startup” menu appears, click on the “Troubleshoot” option.
- Step 4: In the Troubleshoot menu, click on “Advanced options.”
- Step 5: Finally, click on “UEFI Firmware Settings” or a similar option to enter the BIOS.
After following these steps, your computer should restart and take you directly into the BIOS interface. From there, you can navigate through different settings and options using the arrow keys on your keyboard. Remember to save any changes you make before exiting the BIOS.
The advantage of using the Windows “Advanced Startup” menu to access the BIOS is that it provides a convenient method for those who are already using Windows 10. By accessing the BIOS through this menu, you can avoid the need to rely on specific key combinations during startup.
Remember that the availability of the “Advanced Startup” menu and the specific wording of options may vary slightly depending on your Windows 10 version and any customizations made by the manufacturer. If you’re unable to locate the “UEFI Firmware Settings” option, refer to your computer’s documentation or the manufacturer’s support website for more specific instructions.
Now that you’re aware of the fifth method for entering the BIOS on an Asus motherboard, give it a try. Use the “Advanced Startup” menu of Windows 10 to navigate directly to the BIOS interface and access the various settings and options available to you.
Conclusion
Entering the BIOS on an Asus motherboard is a necessary step for configuring hardware settings, adjusting system preferences, and troubleshooting issues. Through this guide, we have explored five different methods for accessing the BIOS: using the “Delete” key, the “F2” key, the “Esc” key, the “F10” key, and the Windows “Advanced Startup” menu.
Depending on your specific motherboard model and BIOS version, one of these methods should allow you to access the BIOS and explore the range of settings and options available. While the “Delete” key is the most common method, it’s important to consult your motherboard’s manual or the manufacturer’s documentation to determine the correct key or key combination for your particular model.
Once you’ve successfully entered the BIOS, you can configure hardware settings, adjust boot options, fine-tune performance parameters, and explore various other customization options. However, exercise caution when making changes in the BIOS, as incorrect settings can lead to system instability or failure to boot. Consult documentation or online resources for guidance on specific settings and their implications.
Remember that BIOS interfaces can vary depending on your motherboard’s manufacturer and BIOS version. The options and settings available to you may differ, but the fundamental functions remain the same. Take your time to familiarize yourself with the BIOS interface and its navigation before making any modifications.
Now that you have learned how to enter the BIOS on an Asus motherboard using different methods, you can confidently customize your system, optimize performance, and troubleshoot any hardware issues that may arise. Enjoy the flexibility and control that accessing the BIOS provides and make the most out of your Asus motherboard.