Introduction
Welcome to our guide on how to change RAM speed on MSI BIOS. The speed at which your RAM operates can greatly impact the overall performance of your computer system. By adjusting the RAM speed, you can potentially improve the responsiveness and efficiency of your PC, especially during resource-intensive tasks such as gaming or video editing.
MSI, a well-known brand in the computer hardware industry, provides a user-friendly BIOS (Basic Input/Output System) interface that allows you to tweak various settings, including the speed of your RAM. Whether you’re looking to overclock your RAM for maximum performance or simply want to adjust it to the manufacturer’s recommended settings, this guide will walk you through the process step by step.
Before we dive into the details of changing RAM speed on MSI BIOS, it’s important to understand what RAM speed means and how it can impact your computer’s performance. RAM speed, also known as memory clock speed, refers to the rate at which data can be read from or written to your computer’s RAM modules. It is measured in megahertz (MHz) and determines how quickly your system can access and transfer data in and out of the RAM.
The higher the RAM speed, the faster your computer can retrieve information from the RAM, resulting in smoother multitasking, faster application loading times, and improved overall system performance. However, it’s important to note that not all RAM modules support higher speeds, and increasing the speed beyond the manufacturer’s specifications can potentially cause stability issues or system crashes.
Now that we have a basic understanding of RAM speed and its significance, let’s proceed to the next section, where we’ll check the current RAM speed of your MSI system.
Understanding RAM Speed
RAM speed, also known as memory clock speed, is a crucial factor when it comes to the performance of your computer system. It refers to the rate at which data is accessed and transferred to and from your RAM modules. The speed of your RAM is measured in megahertz (MHz) and determines how quickly data can be read from or written to the RAM.
A higher RAM speed results in faster data transfer, enabling your system to retrieve information from the RAM more quickly. This can significantly improve the responsiveness and speed of various tasks, such as running multiple applications simultaneously, rendering graphics or videos, or loading large files.
It’s important to note that RAM speed works in conjunction with other components of your computer system, such as the CPU and motherboard. For optimal performance, all these components need to be compatible and work together harmoniously. If one component, such as the RAM, operates at a significantly higher speed than the others, it may create a bottleneck and limit the overall performance gain.
When purchasing RAM for your system, you’ll come across different speed ratings, such as DDR4-3200 or DDR3-1866. These ratings indicate the maximum transfer rate that the RAM module can achieve. It’s worth noting that the actual speed at which your RAM runs will depend on several factors, including the capabilities of your motherboard and BIOS settings.
It’s essential to consider the limitations of your system when determining the optimal RAM speed. While higher RAM speeds may offer improved performance, it’s crucial to ensure that your motherboard and other components are capable of supporting those speeds. Some motherboards or processors may have specific speed limitations, so it’s essential to check the specifications of your system before attempting to adjust the RAM speed.
It’s also important to remember that increasing the RAM speed beyond the manufacturer’s specifications can be risky. Overclocking the RAM may lead to stability issues or system crashes. Therefore, it’s advisable to refer to the manufacturer’s guidelines or your system’s documentation before making any adjustments to the RAM speed in your BIOS.
Now that we have a better understanding of RAM speed and its impact on system performance, let’s proceed to the next section, where we’ll check the current RAM speed of your MSI system.
Checking the Current RAM Speed
Before making any changes to the RAM speed, it’s important to determine the current speed at which your RAM is running. This will help you understand the baseline and make informed decisions when adjusting the speed in the MSI BIOS.
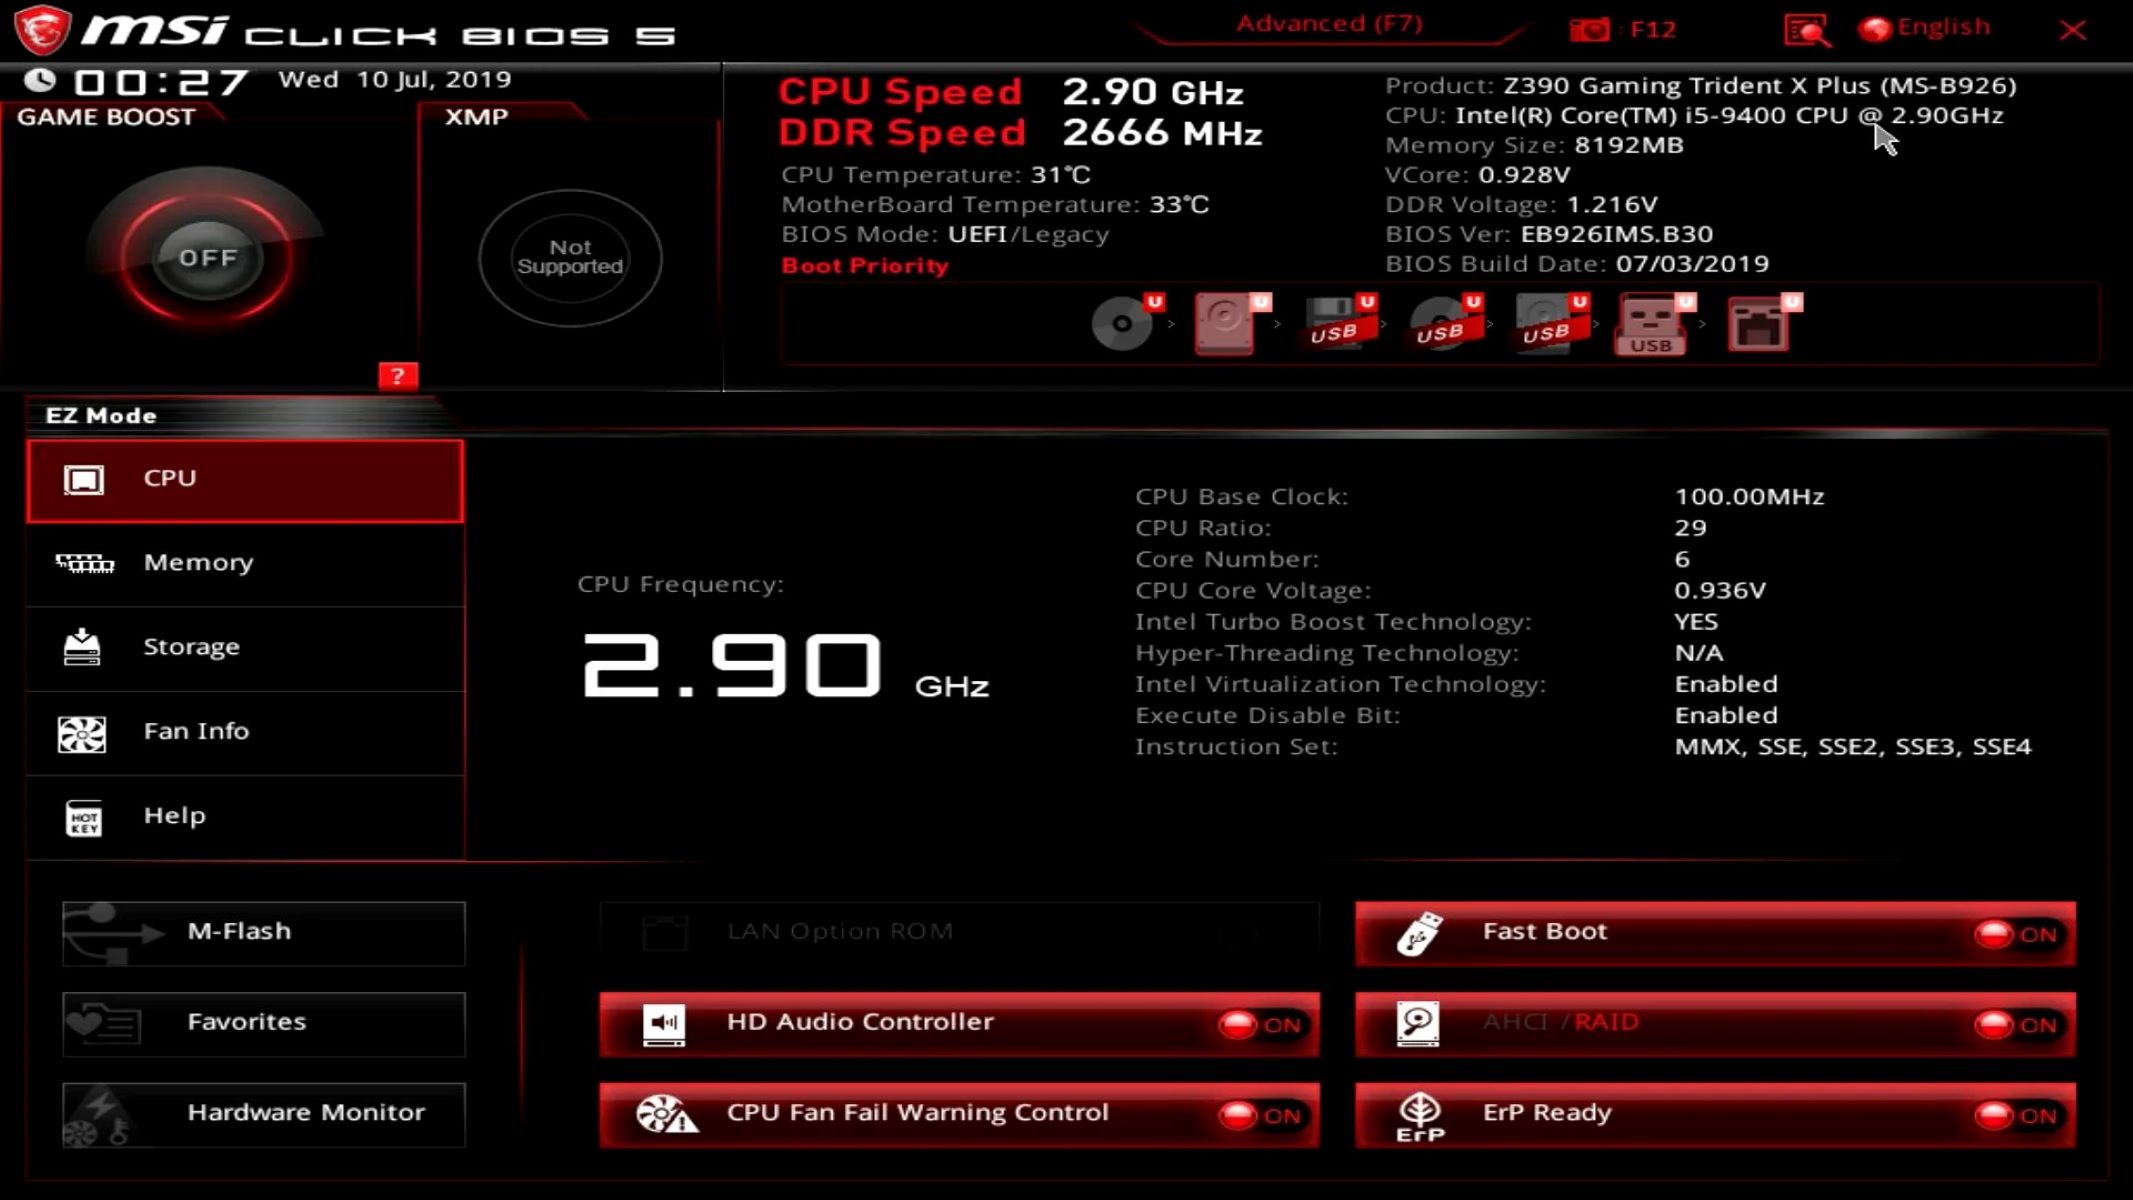
To check the current RAM speed on your MSI system, we’ll make use of third-party software called CPU-Z. CPU-Z is a reliable and widely-used application that provides detailed information about various hardware components in your computer.
Follow these steps to check the current RAM speed:
- First, go to the CPU-Z website (www.cpuid.com) and download the latest version of the software.
- Once downloaded, open CPU-Z and navigate to the “Memory” tab.
- Under the “Frequency” section, you’ll find the current speed at which your RAM is running. It will be displayed in MHz.
Take note of the current RAM speed and compare it to the specifications of your RAM module to ensure that it’s running at the expected speed. If you’re unsure about the specifications, you can refer to the documentation that came with your RAM or visit the manufacturer’s website for more information.
Alternatively, you can also check the RAM speed in the Windows operating system. Follow these steps:
- Press the “Windows” key + “R” on your keyboard to open the Run dialog box.
- Type “msinfo32” in the dialog box and press Enter.
- In the System Information window, navigate to “Components” > “Memory” and look for the “Speed” field. This will indicate the current RAM speed.
Once you have determined the current RAM speed, you can proceed to the next section, where we’ll guide you on how to access the MSI BIOS to adjust the RAM speed.
Accessing the MSI BIOS
To change the RAM speed on your MSI motherboard, you need to access the BIOS (Basic Input/Output System) settings. The BIOS is a firmware that allows you to configure hardware settings and perform system-level optimizations.
Here’s how you can access the MSI BIOS:
- Restart your computer.
- During the boot-up process, press the “Delete” key repeatedly until the BIOS setup utility appears on the screen. Note that some MSI motherboards may require a different key, such as F2 or F10, to access the BIOS. Consult your motherboard’s documentation if the “Delete” key doesn’t work.
- Once you’re in the BIOS setup utility, you’ll be able to navigate through the different settings using the arrow keys on your keyboard.
It’s important to be cautious when navigating the BIOS settings, as making incorrect changes can affect the stability and functionality of your computer. Stick to the specific settings we’ll outline in the upcoming sections to ensure a smooth and successful adjustment of the RAM speed.
In some cases, your MSI motherboard may also offer an alternative method to access the BIOS settings. You may need to refer to your motherboard’s documentation or visit MSI’s official website for detailed instructions tailored to your specific model.
With the knowledge of how to access the MSI BIOS, let’s move on to the next section where we’ll guide you through navigating the MSI BIOS interface.
Navigating the MSI BIOS Interface
Once you’ve accessed the MSI BIOS settings on your computer, you’ll be greeted with a user-friendly interface that allows you to customize various hardware configurations. Navigating the BIOS interface requires understanding the menu structure and using the appropriate keys on your keyboard.
Here’s a step-by-step guide to help you navigate the MSI BIOS interface:
- Use the arrow keys on your keyboard to navigate through the different menu options. The available menus may vary depending on your specific motherboard model and BIOS version.
- Press the “Enter” key to select a menu or sub-menu.
- Use the arrow keys to navigate through the options within a menu or sub-menu.
- Press the “Enter” key to select a specific option.
- Some MSI BIOS versions may also allow you to use the mouse for navigation. If your system supports mouse input, you can move the cursor and click on the desired options.
- To go back to the previous menu or exit the BIOS settings, look for an option usually labeled “Exit” or “Save & Exit.” Press the designated key, typically “Esc” or “F10,” to save the changes and exit the BIOS interface.
It’s worth mentioning that the layout and options in the MSI BIOS interface may vary depending on your motherboard model and BIOS version. Make sure to refer to your motherboard’s documentation for specific instructions or consult the MSI website for more information.
Now that you’re familiar with the basics of navigating the MSI BIOS interface, let’s move on to the next section where we’ll explore how to locate the RAM speed settings.
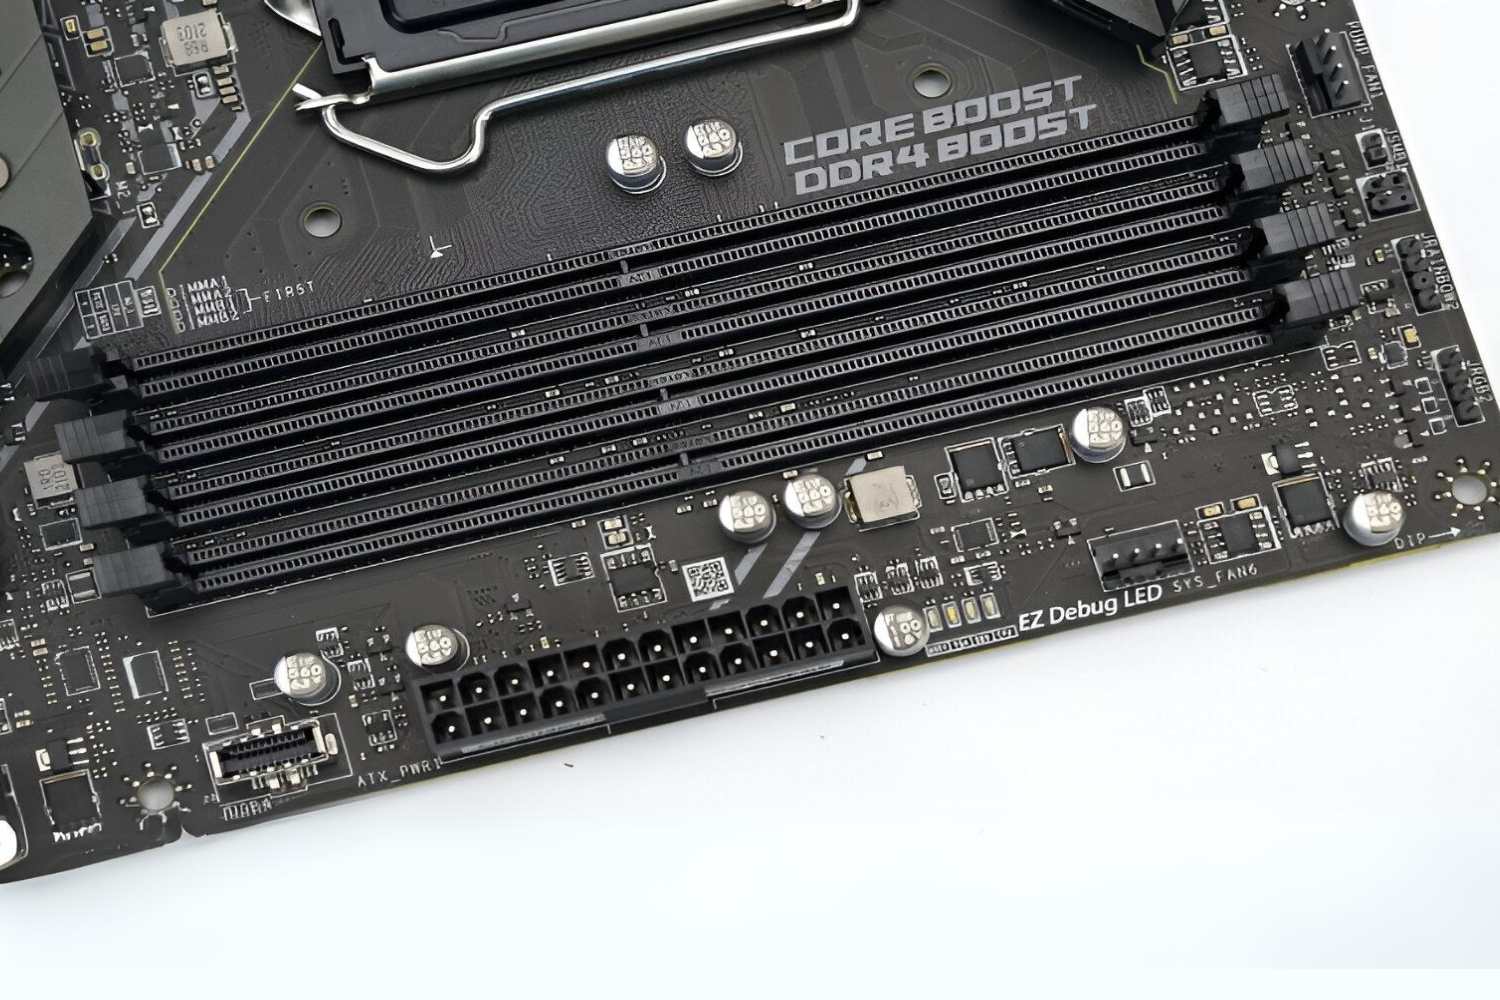
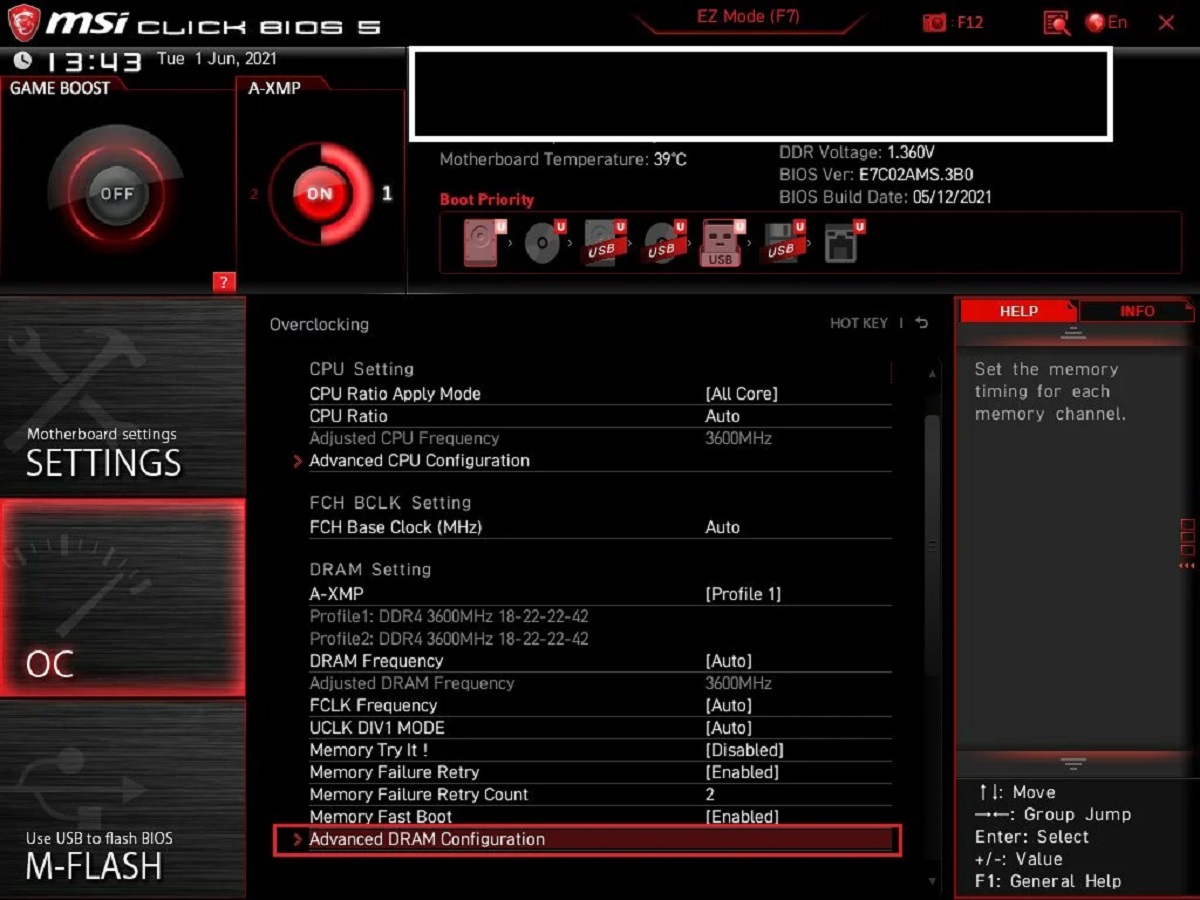
Locating the RAM Speed Settings
Once inside the MSI BIOS interface, you’ll need to locate the specific settings that control the RAM speed. These settings may be found in different menus depending on your motherboard model and BIOS version. We’ll guide you through the general process of finding the RAM speed settings:
- Using the arrow keys on your keyboard, navigate through the main menu options. Look for a menu labeled “Advanced” or “Settings.” This menu typically contains more detailed options for configuring various hardware settings.
- Select the “Advanced” or “Settings” menu and press “Enter.”
- Within the “Advanced” or “Settings” menu, look for a sub-menu related to “Memory” or “DRAM Configuration.” Different BIOS interfaces may use slightly different terminology.
- Highlight the “Memory” or “DRAM Configuration” sub-menu and press “Enter.”
- Now, within the “Memory” or “DRAM Configuration” sub-menu, you should see the RAM speed settings. They may be labeled as “Memory Frequency,” “DRAM Frequency,” or something similar.
Use the arrow keys to navigate through the available RAM speed options. Depending on your motherboard and BIOS, you may have a selection of predefined RAM speed profiles or the ability to manually enter a specific speed.
It’s important to note that not all MSI motherboards offer the same level of customization for RAM speed settings. Some motherboards may have limited options, only allowing you to choose from a few predefined speeds. In such cases, you may need to refer to your motherboard’s documentation or check the MSI website for any available BIOS updates that could potentially unlock more advanced RAM speed settings.
With the RAM speed settings identified, you’re ready to move on to the next section, where we’ll guide you through adjusting the RAM speed to your desired preference.
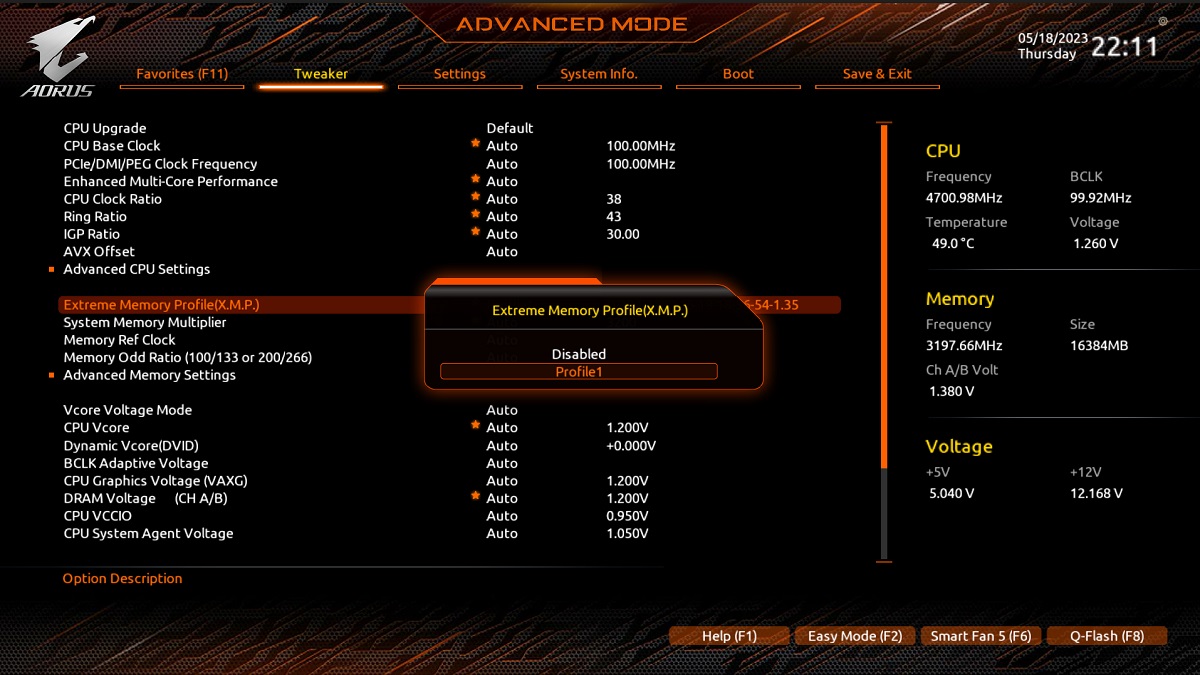
Adjusting the RAM Speed
Now that you’ve located the RAM speed settings in the MSI BIOS, it’s time to adjust the speed according to your preference. Depending on your motherboard and BIOS version, you may have different options for adjusting the RAM speed:
- If your BIOS offers predefined RAM speed profiles, you can choose the profile that matches your desired speed. These profiles are often labeled with frequency values, such as DDR4-3200 or DDR3-1866. Select the desired profile using the arrow keys and press “Enter” to apply the changes.
- If you have the option to manually enter a specific RAM speed, highlight the corresponding setting and press “Enter.” You’ll be prompted to enter the desired RAM speed. Use the arrow keys or the numeric keypad to input the value, and then press “Enter” to save the changes.
- Some MSI BIOS versions may also provide additional settings, such as memory timings or voltage adjustments, that can further fine-tune the RAM performance. However, it’s important to exercise caution when modifying these settings, as improper adjustments can lead to system instability. Only make changes that you fully understand or have researched thoroughly.
After adjusting the RAM speed, take a moment to review the changes before proceeding. Ensure that you’ve chosen the correct speed and that you haven’t modified any other settings unintentionally.
Once you’re satisfied with the RAM speed adjustments, it’s time to save the changes and exit the BIOS settings. Proceed to the next section to learn how to save the modified settings and verify the new RAM speed.
Saving the Changes
After adjusting the RAM speed in the MSI BIOS, it’s crucial to save the changes before exiting the BIOS settings. Saving the changes ensures that the modified RAM speed will be applied during system startup. Here’s how you can save the changes in the BIOS:
- Navigate to the “Exit” or “Save & Exit” menu using the arrow keys. This menu is typically located at the top or bottom of the BIOS interface.
- Select the “Save Changes and Exit” option and press “Enter.” Some BIOS versions may have a slightly different wording, such as “Save Changes and Reset” or “Apply Settings and Exit.”
- Confirm the saving of the changes by selecting “Yes” or “OK” when prompted. This step ensures that the modified RAM speed is saved and applied upon system restart.
- The system will then reboot, and the new RAM speed settings will take effect.
Once the system has restarted, you can proceed to the final section of this guide to verify the new RAM speed.
Remember that any changes made in the BIOS settings can have a significant impact on your system’s stability and performance. It’s essential to be cautious and only modify settings that you understand and have researched thoroughly. If you encounter any issues after changing the RAM speed, you can always revert to the default settings or consult MSI’s support resources for assistance.
Now that you’ve saved the changes to the RAM speed, let’s move on to the last section where we’ll guide you in verifying the new RAM speed.
Verifying the New RAM Speed
After adjusting and saving the RAM speed settings in the MSI BIOS, it’s important to verify that the changes have been applied successfully. Verifying the new RAM speed allows you to ensure that your system is running at the desired frequency and can help you confirm the effectiveness of your adjustments. Here’s how you can verify the new RAM speed:
- Once your system has restarted and booted up, log in to your operating system.
- Download and install CPU-Z, a software utility that provides detailed information about your computer’s hardware components.
- Launch CPU-Z and navigate to the “Memory” tab.
- Under the “Frequency” section, you should see the new RAM speed displayed in megahertz (MHz).
- Compare the displayed RAM speed with the desired speed you set in the MSI BIOS. If they match, it means that your system is operating at the intended RAM speed.
Additionally, you can also use other system monitoring tools or benchmarking software to confirm that the new RAM speed is reflected in your system’s performance. Running memory-intensive tasks or benchmarks can help assess the impact of the adjusted RAM speed on overall system responsiveness and efficiency.
If you encounter any issues or unexpected behavior after changing the RAM speed, it’s advisable to double-check the BIOS settings and verify that the changes were saved correctly. If necessary, revert to the default settings or consult MSI’s support resources for further guidance.
With the new RAM speed successfully verified, you can now enjoy the potential performance improvements and optimized system responsiveness that comes with the adjusted RAM speed.
Now that you’ve completed the process of changing and verifying the RAM speed on your MSI BIOS, you’re equipped with the knowledge to optimize the performance of your computer system.
Conclusion
Congratulations! You have successfully learned how to change the RAM speed on an MSI BIOS. By adjusting the RAM speed, you have the ability to optimize the performance of your computer system and enhance its overall responsiveness.
In this guide, we started by understanding the importance of RAM speed and its impact on system performance. We then walked through the process of checking the current RAM speed using third-party software like CPU-Z or through the Windows operating system.
Next, we discussed how to access the MSI BIOS and navigate its user-friendly interface. We guided you on locating the RAM speed settings within the BIOS and adjusting them to your desired specifications.
To ensure that the changes are applied during system startup, we emphasized the significance of saving the modified RAM speed settings in the BIOS. We also highlighted the importance of caution when modifying any BIOS settings and recommended referring to the motherboard’s documentation for specific instructions.
Finally, we concluded by guiding you through verifying the new RAM speed using tools like CPU-Z and checking for any improvements in system performance.
Remember, whenever making changes to your BIOS or system settings, it’s crucial to be cautious, do thorough research, and understand the implications of your adjustments. If you encounter any issues or are unsure about certain settings, it’s always best to seek guidance from official support channels or professional assistance.
We hope that this guide has provided you with the information and steps needed to change the RAM speed on an MSI BIOS effectively. Optimize your system’s performance and enjoy smoother multitasking, faster application loading times, and improved overall performance!