Introduction
When it comes to computer performance, RAM (Random Access Memory) plays a crucial role. RAM is the temporary storage space that your computer uses to store data that it needs to access quickly. The speed of your RAM can directly impact the overall speed and responsiveness of your computer. Therefore, it’s important to know how to check RAM speed to determine if your system is performing optimally.
Checking RAM speed can also be helpful when you’re planning to upgrade your computer’s memory. By knowing the current RAM speed, you can ensure that you purchase compatible and faster RAM modules for better performance.
In this article, we will provide step-by-step instructions on how to check RAM speed on different operating systems: Windows, macOS, and Linux. We will also discuss how to interpret the RAM speed results and factors that can affect RAM speed. Additionally, we will provide some useful tips to improve RAM speed.
Whether you’re a computer enthusiast, a gamer, or simply looking to optimize your computer’s performance, understanding RAM speed and knowing how to check it will give you valuable insights into your system’s capabilities.
What is RAM and Why is its Speed Important?
RAM, or Random Access Memory, is a fundamental component of every computer system. It serves as the temporary storage space where data is stored for quick and easy access by the processor. Unlike the long-term storage provided by your hard drive or solid-state drive, RAM is volatile, meaning it loses all data when the computer is powered off.
The speed of RAM refers to how quickly it can retrieve and transmit data. It is typically measured in megahertz (MHz) or gigahertz (GHz). The higher the speed, the faster the data can be accessed, resulting in better overall system performance.
The speed of RAM is important for several reasons. Firstly, it affects how quickly your computer can execute tasks. When you open an application, the data it requires is loaded from the storage drive into RAM. The processor then accesses this data in RAM to perform computations and execute the program. Faster RAM speed ensures that the data is readily available, reducing the time it takes to open programs and increasing the overall responsiveness of your system.
In addition to application performance, RAM speed also plays a critical role in multitasking. If you frequently work with multiple programs or browser tabs open simultaneously, having faster RAM will allow your computer to switch between tasks more quickly and efficiently.
RAM speed is particularly important for tasks that involve large amounts of data, such as video editing, graphic design, gaming, or running virtual machines. These tasks require the computer to quickly access and process large files. Faster RAM speed ensures smooth and uninterrupted performance during resource-intensive activities.
Furthermore, RAM speed can impact gaming performance. Many modern games rely heavily on RAM to store and access game assets, textures, and other data in real-time. Faster RAM speed can reduce loading times and improve overall gameplay by providing a seamless experience without lag or stuttering.
In summary, RAM plays a vital role in the performance of your computer system, and its speed directly affects how quickly and efficiently your computer can execute tasks and handle data. Whether you use your computer for everyday tasks, professional work, or gaming, having faster RAM speed can greatly enhance the overall user experience.
Checking RAM Speed on Windows
Checking the RAM speed on a Windows computer is a straightforward process. You can easily find this information using the built-in Task Manager utility. Here’s how:
Step 1: Open the Task Manager
To open the Task Manager, you can either right-click on the taskbar and select “Task Manager” from the context menu or press Ctrl+Shift+Esc on your keyboard.
Step 2: Go to the Performance Tab
In the Task Manager window, navigate to the “Performance” tab. This tab displays real-time performance data of your computer, including the CPU, memory, disk usage, and network activity.
Step 3: Check the RAM Speed
Within the Performance tab, select the “Memory” option from the left-hand menu. Here, you will find detailed information about your computer’s memory.
Look for the “Speed” entry, which indicates the frequency at which your RAM is running. The value will be displayed in megahertz (MHz). This represents the speed of your RAM modules.
Once you have checked the RAM speed, you can compare it to the specifications of your RAM modules or consult the manufacturer’s website for the expected speed.
Additionally, if you have multiple RAM modules installed in your computer, the Task Manager will also display information about the total memory capacity, the slots used, and the type of RAM you have installed.
By following these steps, you can quickly determine the speed of your RAM on a Windows computer. This information can be invaluable when troubleshooting performance issues, upgrading your RAM, or optimizing your system for better performance.
Step 1: Open the Task Manager
Opening the Task Manager is the first step in checking the RAM speed on a Windows computer. The Task Manager is a built-in utility that provides real-time metrics and performance data for various components of your system. Here’s how you can open the Task Manager:
To open the Task Manager, there are several methods you can choose from:
- Method 1: Right-click on the taskbar
- Method 2: Use keyboard shortcuts
- Method 3: Use the Start Menu
Start by right-clicking on the taskbar at the bottom of your screen. A context menu will appear with several options. From the menu, click on “Task Manager” to open the utility.
You can also use keyboard shortcuts to open the Task Manager. Simply press the following keys simultaneously: Ctrl+Shift+Esc. This will instantly launch the Task Manager.
If you prefer using the Start Menu, click on the “Start” button located at the bottom-left corner of your screen. In the search bar, type “Task Manager” and select the Task Manager application from the search results.
Regardless of the method you choose, opening the Task Manager will provide you with a wealth of information about your system’s performance, including the RAM speed.
The Task Manager not only allows you to check the RAM speed but also provides insights into other performance metrics such as CPU usage, disk activity, network usage, and more. It is a powerful tool for monitoring and troubleshooting your computer’s performance.
Once you have successfully opened the Task Manager, you can proceed to the next step to check the RAM speed and gather important information about your computer’s memory.
Step 2: Go to the Performance Tab
After opening the Task Manager on your Windows computer, the next step to check the RAM speed is to navigate to the Performance tab. The Performance tab provides detailed information about your system’s performance metrics, including memory usage and RAM speed. Here’s how you can access the Performance tab:
1. In the Task Manager window, you will see several tabs at the top. Click on the “Performance” tab to switch to the performance monitoring section.
2. The Performance tab will display real-time graphs and information related to system performance. It provides an overview of various components, including CPU, memory, disk, and network.
3. Within the Performance tab, you will notice a sidebar on the left-hand side displaying different categories such as CPU, Memory, Disk, Ethernet, and more. To check the RAM speed, click on the “Memory” option from the sidebar.
4. Clicking on the “Memory” option will populate the main window area of the Performance tab with detailed information about your computer’s memory usage and performance.
By accessing the Performance tab and specifically selecting the Memory category, you gain access to relevant data regarding your system’s RAM speed and usage.
It’s worth noting that the Performance tab offers more advanced features for monitoring your system’s performance. You can analyze resource usage, view historical data, and even customize the view to display specific metrics that you’re interested in. Exploring the Performance tab can provide valuable insights into your computer’s overall performance.
Once you have reached the Performance tab and selected the Memory category, you are ready to proceed to the next step to check the RAM speed.
Step 3: Check the RAM Speed
After navigating to the Performance tab in the Task Manager on your Windows computer and selecting the Memory category, you can now proceed to check the RAM speed. Here’s how:
1. Within the Memory section, look for the “Speed” entry. The Speed entry represents the current speed at which your RAM is running. It is typically displayed in megahertz (MHz).
2. The value displayed will indicate the frequency or speed of your RAM modules. For example, if it shows “1600 MHz,” it means your RAM is running at a speed of 1600 megahertz.
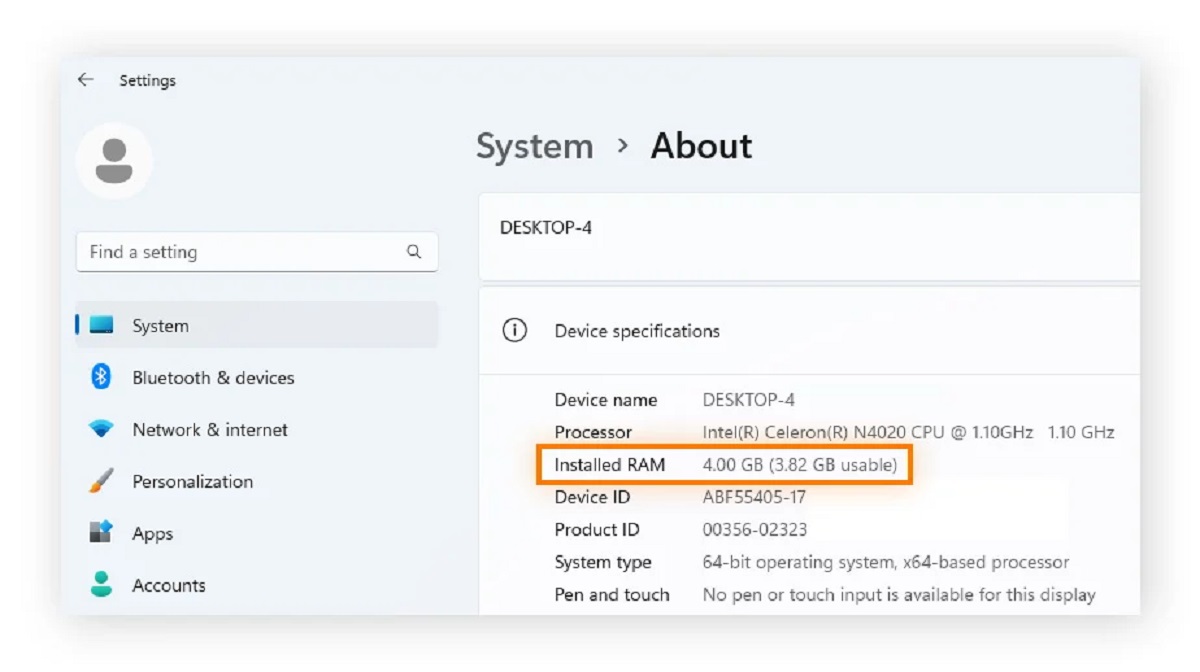
3. In addition to the RAM speed, you can also find other useful information such as the current memory usage, the total amount of memory installed, and the number of slots used.
Checking the RAM speed in the Task Manager allows you to verify the current speed of your RAM modules. It provides essential information for troubleshooting performance issues, determining compatibility when upgrading RAM, or assessing the overall efficiency of your system.
It’s important to note that the RAM speed displayed in the Task Manager represents the operating speed of your memory modules. If you have recently upgraded your RAM or modified other settings related to memory, the displayed speed should reflect the latest configuration.
Comparing the displayed RAM speed with the specifications of your RAM modules or consulting the manufacturer’s documentation can help you ensure that your RAM is running at its intended speed.
By following these steps, you can easily check the RAM speed of your Windows computer using the Task Manager. Understanding the RAM speed of your system allows you to make informed decisions regarding memory upgrades or troubleshooting any performance-related issues.
Checking RAM Speed on macOS
If you’re using a macOS computer, checking the RAM speed is a simple process. macOS provides a built-in utility called “About This Mac” that displays detailed system information, including the RAM speed. Here’s how you can check the RAM speed on macOS:
Step 1: Open the Apple Menu
Start by clicking on the Apple menu located on the top-left corner of your screen. A dropdown menu will appear with various options.
Step 2: Click on “About This Mac”
In the dropdown menu, click on “About This Mac.” This will open a window displaying general information about your macOS system, including the version of macOS, processor details, and memory information.
Step 3: Check the RAM Speed
In the “About This Mac” window, click on the “Memory” tab. Here, you will find detailed information about your RAM, including the total memory capacity, the number of memory slots, and the speed of your RAM modules.
The RAM speed, displayed in megahertz (MHz), can be found under the “Memory” section. It represents the current operating speed of your RAM modules.
Knowing the RAM speed is crucial when upgrading or troubleshooting memory issues on your macOS computer. You can compare the displayed RAM speed with the specifications of your RAM modules or refer to the manufacturer’s documentation to ensure that your memory is running at its intended speed.
Aside from checking the RAM speed, the “About This Mac” window also provides additional information about your system’s memory, such as the type of memory installed, the number of memory slots available, and the status of the memory modules.
By following these steps, you can easily check the RAM speed on your macOS computer using the built-in “About This Mac” utility. Understanding your RAM speed is essential for optimizing performance and ensuring compatibility when upgrading your memory.
Step 1: Open the Apple Menu
Checking the RAM speed on a macOS computer is a straightforward process. The first step involves opening the Apple Menu, which allows you to access the system information and settings. Here’s how you can do it:
1. Click on the Apple icon
Locate the Apple icon on the top-left corner of the menu bar. It is the iconic Apple logo that represents the macOS system. Click on the Apple icon to open the drop-down menu, which provides access to various system features and settings.
2. Open the Apple Menu
In the drop-down menu, click on the “About This Mac” option. This will open a new window displaying detailed information about your macOS system, including the processor, memory, and other hardware specifications.
3. Access the Memory tab
In the “About This Mac” window, navigate to the “Memory” tab. Clicking on this tab will provide you with specific details about the RAM installed on your macOS computer.
The Apple Menu is a central location for accessing important system information and settings on macOS. By opening the Apple Menu, you can proceed to the next step to check the RAM speed of your macOS computer.
It’s worth mentioning that the Apple Menu offers additional functionality, enabling you to explore various options and settings to customize your macOS experience. It serves as a hub for accessing important features and applications, making it a convenient starting point for checking the RAM speed and other system information.
Once you have opened the Apple Menu, you can move on to the next step to continue the process of checking the RAM speed on your macOS computer.
Step 2: Click on “About This Mac”
After opening the Apple Menu on your macOS computer, the next step to check the RAM speed is to click on “About This Mac.” This built-in utility provides detailed information about your system, including the RAM speed. Here’s how to access it:
1. Open the Apple Menu
Start by clicking on the Apple icon located on the top-left corner of your screen. This will open the drop-down menu where you can access various system features and settings.
2. Click on “About This Mac”
In the drop-down menu, you will see the option “About This Mac.” Click on it to open the “About This Mac” window.
The “About This Mac” window provides an overview of your macOS system, including details about the processor, memory, storage, and more.
3. Check the RAM Speed
Within the “About This Mac” window, you will notice multiple tabs at the top. Click on the “Memory” tab to view specific information about your system’s memory.
Under the “Memory” tab, you will find details about the total memory capacity, the memory type, and the speed of your RAM modules. The RAM speed is typically displayed in megahertz (MHz).
By clicking on “About This Mac” and navigating to the “Memory” tab, you can easily check the RAM speed of your macOS computer.
In addition to the RAM speed, the “About This Mac” window provides other valuable information about your system’s memory, such as the number of memory slots used, the type of memory modules installed, and the memory technology that your Mac supports.
Checking the RAM speed using the “About This Mac” utility allows you to gather essential information for troubleshooting, upgrading, or optimizing your macOS system’s performance.
Once you have clicked on “About This Mac” and accessed the Memory tab, you’re ready to move on to the next step in checking the RAM speed on your macOS computer.
Step 3: Check the RAM Speed
After clicking on “About This Mac” and navigating to the Memory tab on your macOS computer, you can now proceed to check the RAM speed. Here’s how:
1. Locate the RAM Speed
Under the “Memory” tab, you will find detailed information about your Mac’s memory. Look for the entry labeled “Memory Speed” or “Speed.” This value represents the current speed at which your RAM is running, typically measured in megahertz (MHz).
2. Note the RAM Speed
Take note of the RAM speed displayed. This value indicates the frequency or speed at which your RAM modules are operating. For example, if it shows “1600 MHz,” it means your RAM is running at a speed of 1600 megahertz.
3. Compare with Specifications
You can compare the displayed RAM speed with the specifications of your RAM modules or refer to the manufacturer’s documentation to ensure that your memory is running at its intended speed. This comparison is helpful when upgrading or troubleshooting memory-related issues.
The “About This Mac” utility provides additional insights into your system’s memory, such as the type of memory installed, the number of memory slots used, and the maximum memory supported by your Mac. This information can be valuable when considering memory upgrades or assessing system compatibility.
By following these steps, you can easily check the RAM speed of your macOS computer using the “About This Mac” utility. Understanding your RAM speed allows you to make informed decisions regarding memory upgrades, troubleshoot performance-related issues or ensure that your memory is operating at its optimal speed.
Now that you have checked the RAM speed, you can proceed with other optimizations or troubleshooting steps to enhance the performance of your macOS system.
Checking RAM Speed on Linux
If you are using a Linux-based operating system, there are several methods you can use to check the RAM speed. Here, we will discuss one commonly used method using the command-line interface. Follow the steps below to check the RAM speed on Linux:
Step 1: Open the Terminal
To start, open the Terminal application on your Linux system. You can usually find it in the Utilities or Accessories folder of your application menu, or you can use the shortcut Ctrl+Alt+T.
Step 2: Type and Run the Command
In the Terminal, type the following command and press Enter:
sudo dmidecode --type 17 | grep -A3 "Memory Device" | grep "Speed"
This command uses the “dmidecode” utility to retrieve information about your system’s memory devices and then filters the output to display the RAM speed.
Step 3: Check the RAM Speed
After running the command, the Terminal will display the RAM speed of your Linux system. The speed value will be shown in megahertz (MHz), indicating the frequency or speed at which your RAM modules are running.
By following these steps, you can easily check the RAM speed on your Linux system using the Terminal. This method allows you to gather essential information about your system’s memory performance.
Keep in mind that there are other tools and utilities available for checking hardware information on Linux, such as “lshw” or graphical system information tools like “Hardinfo” or “Sysinfo.” These tools provide a more detailed view of your system’s hardware components, including RAM speed, capacity, and other attributes.
Now that you know how to check the RAM speed on Linux, you can utilize this information for troubleshooting, performance optimizations, or when considering memory upgrades for your Linux-based system.
Step 1: Open the Terminal
To check the RAM speed on a Linux-based operating system, you’ll need to access the Terminal, which provides a command-line interface for executing commands and retrieving system information. Follow these steps to open the Terminal:
1. Locate the Terminal
Depending on the Linux distribution you are using, the Terminal can typically be found in the Applications menu, under the Accessories or Utilities category. Alternatively, you can use the keyboard shortcut Ctrl+Alt+T to open the Terminal directly.
2. Launch the Terminal
Click on the Terminal icon or press the associated keyboard shortcut to open the Terminal window on your Linux system. A black or white window with a command prompt will appear, indicating that you can start entering commands.
3. Resize and Customize the Terminal (Optional)
By default, the Terminal window may appear in a specific size or with a particular color scheme. You can resize the Terminal window by dragging its edges to make it more comfortable to work with. Additionally, you can customize the appearance, font, and colors of the Terminal through the preferences or options menu.
The Terminal provides a powerful platform to interact with your Linux system. It allows you to execute various commands and retrieve information about hardware, software, and system configurations, including the RAM speed.
Once you have successfully opened the Terminal, you can proceed to the next step to check the RAM speed on your Linux-based operating system.
Step 2: Type and Run the Command
After opening the Terminal on your Linux-based operating system, the next step to check the RAM speed is to type and run a specific command. This command will retrieve the necessary information about your system’s memory. Follow these steps:
1. Type the Command
In the Terminal window, enter the following command:
sudo dmidecode --type 17 | grep -A3 "Memory Device" | grep "Speed"
This command utilizes the “dmidecode” utility, which retrieves system information, and extracts details related to the memory devices installed on your Linux system.
2. Run the Command
After typing the command, press Enter to execute it. The Terminal will process the command and provide the output.
The command retrieves information specific to memory devices (RAM modules) by using filters to narrow down the output to the RAM speed only.
Running this command allows you to obtain the RAM speed, which is an essential parameter for assessing the performance and capabilities of your Linux system’s memory.
It’s important to note that since the command uses sudo, you may be prompted to enter your password before the command can be executed, depending on the system configuration.
By following these steps and running the command in the Terminal, you will retrieve the RAM speed of your Linux system.
With the RAM speed information in hand, you can analyze and compare it with the specifications of your RAM modules or refer to the manufacturer’s documentation to ensure that the memory is running at its intended speed.
Now that you have completed this step, you can move on to the next step to check the RAM speed on your Linux-based operating system.
Step 3: Check the RAM Speed
After running the command in the Terminal on your Linux-based operating system, you can now proceed to check the RAM speed. Follow these steps:
1. Examine the Terminal Output
After executing the command, the Terminal will display the output directly below the command line. Look for the line that contains the RAM speed information.
2. Identify the RAM Speed Value
The RAM speed value is typically displayed alongside other information related to memory devices. It is often labeled as “Speed.” The value represents the frequency or speed at which your RAM modules are operating and is usually measured in megahertz (MHz).
3. Note the RAM Speed Value
Take note of the RAM speed value displayed in the Terminal. This value will help you assess the performance and capabilities of your Linux system’s memory.
By checking the RAM speed, you gain valuable insights into the operating performance of your memory modules. This information is useful for troubleshooting issues, determining compatibility when upgrading RAM, or optimizing your system for better performance.
Keep in mind that other details related to your system’s memory may also be displayed in the Terminal output, such as memory size, type, or other related specifications. Reviewing these details can provide a more comprehensive understanding of your Linux system’s memory configuration.
With the RAM speed information at hand, you can compare it against the specifications of your RAM modules or consult the manufacturer’s documentation to ensure that your memory is operating at its intended speed and performance.
By following these steps and checking the RAM speed in the Terminal, you can effectively gather critical information about your Linux-based operating system’s memory performance.
Now that you have successfully checked the RAM speed, you can proceed with further optimizations or troubleshooting steps to enhance the overall performance of your Linux system.
How to Interpret RAM Speed Results
Interpreting the RAM speed results is essential to understand the performance and capabilities of your computer’s memory. Here are some key factors to consider when interpreting RAM speed results:
1. Megahertz (MHz) value:
The RAM speed is typically measured in megahertz (MHz) and represents the frequency at which the RAM modules can operate. Higher MHz values indicate faster RAM speed, which allows for quicker data access and transfer.
2. Manufacturer’s specifications:
Compare the RAM speed results with the manufacturer’s specifications for your specific RAM modules. The manufacturer’s specifications will provide the intended operating speed and supported frequencies of the RAM modules.
3. Compatibility:
Ensure that the RAM speed is compatible with your motherboard and other hardware components. Some systems may have limitations on supported RAM speeds, and using RAM modules beyond the supported speeds may lead to instability or performance issues.
4. Utilization and performance:
Consider the tasks and applications that you typically use on your computer. Higher RAM speeds can provide better performance, especially for memory-intensive tasks like gaming, video editing, or running virtual machines.
5. Balance with other system components:
Remember that while RAM speed is important, it’s just one component that contributes to overall system performance. Ensure a balance between the RAM speed and the processing power of your CPU, the responsiveness of your storage drive, and other system components.
6. Upgrade considerations:
If your current RAM speed falls short of your performance requirements, you might consider upgrading to RAM modules with faster speeds. However, keep in mind that the improvement in performance will depend on other factors, such as the tasks you perform and the rest of your system’s capabilities.
Interpreting RAM speed results allows you to gauge the performance and capabilities of your computer’s memory. By understanding the RAM speed and its implications, you can make informed decisions about optimizations, upgrades, and troubleshooting related to your computer’s memory.
Factors That Affect RAM Speed
Several factors influence the speed and performance of RAM (Random Access Memory) in a computer system. Understanding these factors can help you optimize your system’s memory performance. Here are some key factors that affect RAM speed:
1. RAM Generation:
The generation of RAM technology being used can greatly impact the speed. Newer generations, such as DDR4 or DDR5, tend to have faster data transfer rates and higher bandwidth compared to older generations like DDR3.
2. Clock Speed:
The clock speed, measured in megahertz (MHz), determines the rate at which the RAM can transfer and process data. Higher clock speeds result in faster RAM performance, allowing for quicker access to data stored in memory.
3. Memory Channels:
The number of memory channels being utilized affects RAM speed. Dual-channel or quad-channel memory configurations provide increased bandwidth and faster data transfer rates compared to single-channel configurations.
4. Latency:
RAM latency refers to the time it takes for the RAM to respond to a request for data. Lower latency indicates faster response times and better overall performance. Latency is represented by a series of four numbers, such as 9-9-9-24, with lower values indicating faster performance.
5. Overclocking:
Overclocking RAM involves pushing the memory beyond its default specifications to achieve higher clock speeds. This can result in faster RAM performance but may require careful monitoring and adjustments to ensure system stability.
6. Memory Controller and Motherboard Design:
The quality and efficiency of the memory controller on the CPU and the motherboard’s design can influence RAM speed. Higher-quality memory controllers and well-designed motherboards can better facilitate fast data transfer and reduce potential bottlenecks.
7. Operating System and Software Optimization:
The efficiency of the operating system and the software being used can impact RAM speed. Optimized software and a well-maintained operating system can ensure that RAM resources are utilized effectively, enhancing overall performance.
8. Other System Components:
Other components such as the processor (CPU) and storage drive (HDD or SSD) can indirectly affect RAM speed. A powerful CPU and fast storage drive allow for quicker data processing and retrieval, complementing the speed of the RAM.
These factors collectively contribute to the overall performance and speed of RAM in a computer system. Analyzing these factors helps in identifying potential bottlenecks and implementing optimizations to maximize the efficiency of your system’s memory.
Tips to Improve RAM Speed
Optimizing your RAM (Random Access Memory) speed can enhance the overall performance of your computer system. Here are some tips to help improve RAM speed:
1. Upgrade to Faster RAM:
Consider upgrading to RAM modules with higher clock speeds and lower latency. Faster RAM can provide a significant boost in data transfer rates and overall system performance.
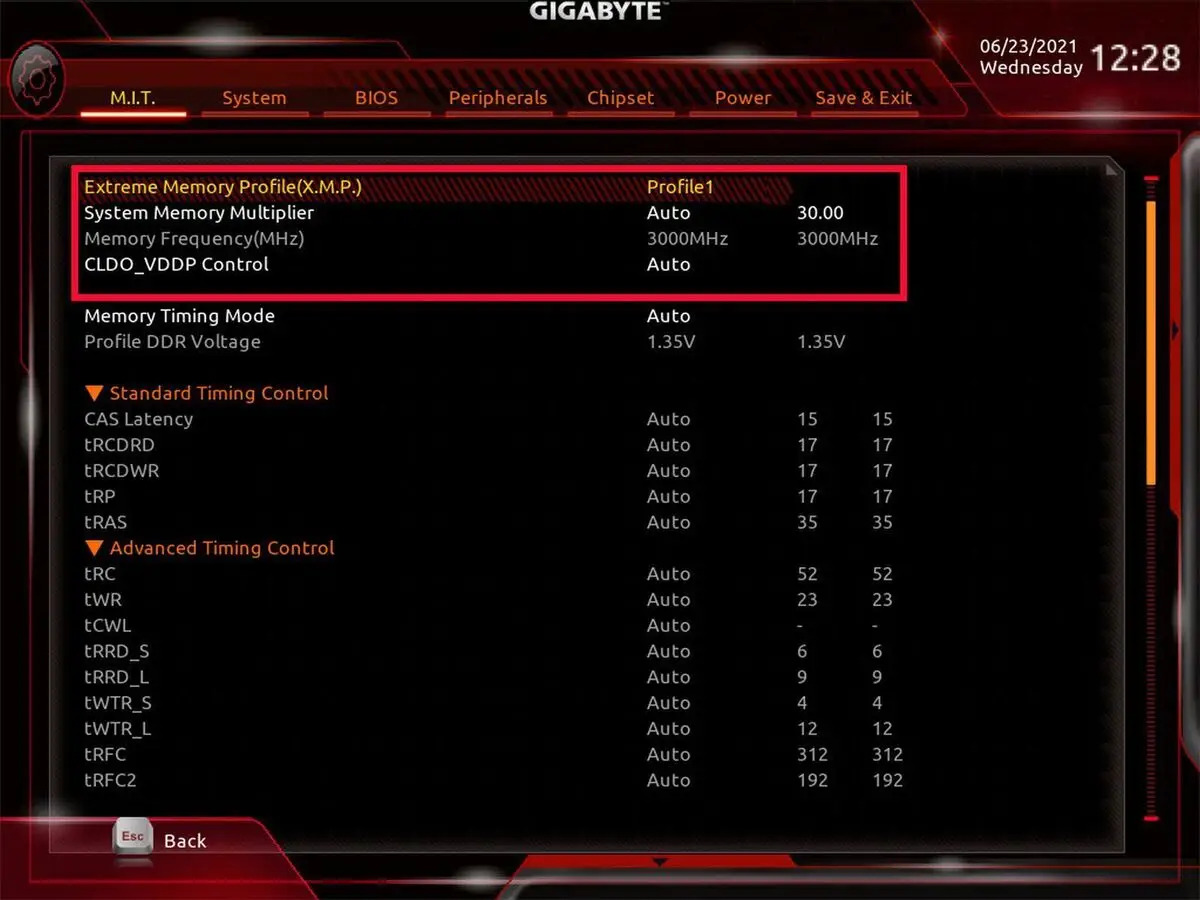
2. Enable XMP/DOCP Profiles:
If your motherboard and RAM support it, enable XMP (Extreme Memory Profile) on Intel systems or DOCP (Direct Overclock Profile) on AMD systems. These profiles automatically adjust RAM settings to their optimal specifications, maximizing performance.
3. Ensure Proper RAM Configuration:
Make sure your RAM modules are correctly installed in their corresponding slots according to your motherboard’s specifications. Utilizing the correct memory channels and configurations can improve data transfer rates.
4. Keep RAM Modules Cool:
Overheating can impact RAM performance. Ensure adequate ventilation and cooling in the computer case to prevent heat buildup around the RAM modules.
5. Close Unnecessary Background Applications:
Closing unnecessary applications running in the background frees up valuable RAM resources. This allows your system to allocate more memory to the applications you are actively using, improving overall performance.
6. Update Operating System and Drivers:
Keeping your operating system and drivers up to date ensures that you have the latest performance enhancements, bug fixes, and compatibility improvements. This can positively impact RAM performance.
7. Perform Regular System Maintenance:
Regularly clean up temporary files, perform disk cleanup, and defragment your hard drive. This helps optimize system resources and improve the efficiency of your RAM.
8. Avoid Memory-Intensive Tasks:
Avoid running memory-intensive tasks concurrently, as this can strain your RAM and slow down performance. Prioritize essential tasks and allocate sufficient memory resources accordingly.
9. Monitor Resource Usage:
Use system monitoring tools to keep track of your RAM usage. By identifying applications or processes that consume excessive memory, you can take necessary actions to optimize resource allocation.
10. Consider SSD Upgrade:
Upgrading your storage drive to a solid-state drive (SSD) can improve overall system performance and reduce dependency on RAM for storage-related tasks, resulting in a smoother multitasking experience.
By implementing these tips, you can enhance the speed and efficiency of your RAM, leading to improved system responsiveness and overall performance.
Conclusion
Checking and understanding the RAM speed is crucial for optimizing the performance of your computer system. By following the steps outlined in this article, you can easily check the RAM speed on Windows, macOS, and Linux-based operating systems. This information allows you to make informed decisions when troubleshooting, upgrading, or optimizing your system’s memory.
RAM speed directly impacts the overall speed, responsiveness, and multitasking capabilities of your computer. Faster RAM speed results in quicker data access and transfer, improving application loading times and overall system performance.
When interpreting RAM speed results, consider factors such as clock speed, latency, memory channels, and compatibility with your hardware. These factors influence the speed and performance of your RAM and play a role in determining the overall efficiency of your system.
To improve RAM speed, consider upgrading to faster RAM modules, enabling XMP/DOCP profiles, ensuring proper RAM configuration, and keeping the modules cool. Additionally, closing unnecessary background applications, performing regular system maintenance, and avoiding memory-intensive tasks can contribute to better RAM performance.
Remember, RAM speed is just one component of a well-functioning computer system. It is essential to maintain a balance between RAM, CPU, storage, and other system components to achieve optimal performance.
By following the tips and understanding the factors that affect RAM speed, you can optimize your system’s memory performance and ensure a smooth and efficient computing experience.