Understanding RAM Speed and BIOS
When it comes to optimizing the performance of your computer, one crucial factor to consider is the speed of your RAM (Random Access Memory). RAM speed directly affects how quickly your computer can access and store data, making it an essential component for smooth and efficient operation.
The BIOS (Basic Input/Output System) is a firmware interface that allows you to configure various hardware settings on your computer. One of the settings you can adjust in the BIOS is the RAM speed. By adjusting the RAM speed in the BIOS, you can potentially improve your computer’s overall performance.
RAM speed is measured in megahertz (MHz) and refers to the frequency at which data can be read from or written to the RAM module. The higher the RAM speed, the faster your computer can retrieve and process data, resulting in better overall performance. Conversely, lower RAM speeds can lead to slower system responsiveness and slower loading times for applications.
It’s important to note that not all computer systems allow for manual adjustment of RAM speed in the BIOS. Some systems have locked settings that cannot be modified, while others offer limited options for customization. Before attempting to change the RAM speed, it’s advisable to check your computer’s manufacturer’s documentation or website to determine if this option is available.
Furthermore, it’s crucial to understand that increasing the RAM speed beyond the specifications recommended by the RAM manufacturer or exceeding the capabilities of your hardware can lead to system instability and potential damage. It’s essential to proceed with caution and follow the guidelines provided by your computer manufacturer and RAM manufacturer.
Now that you have a basic understanding of RAM speed and the role of the BIOS in adjusting it, let’s proceed to the next section to learn how to access the BIOS and locate the RAM speed settings.
Step 1: Accessing the BIOS
In order to change the RAM speed in the BIOS, you first need to access the BIOS interface. Here’s how you can do it:
- 1. Restart your computer: Start by restarting your computer. You can either click on the Windows Start menu and select “Restart” or press the physical restart button on your computer if available.
- 2. Enter the BIOS: While the computer is rebooting, pay attention to the initial startup screen. Look for a message that prompts you to press a specific key to enter the BIOS setup. This key can vary depending on your computer’s manufacturer. Common keys for accessing the BIOS include F2, F10, Delete, or Esc. Press the indicated key promptly to enter the BIOS setup.
- 3. BIOS setup key not shown? If you don’t see any prompt indicating the key to enter the BIOS setup, try pressing the F2 or Delete key repeatedly during the startup process. Additionally, you can consult your computer’s manual or the manufacturer’s website for the specific key to access the BIOS on your particular model.
Once you successfully enter the BIOS setup, you’ll gain access to a range of settings that you can customize, including the RAM speed settings. However, it’s important to note that the BIOS interface can differ depending on your computer’s manufacturer and model. Therefore, the steps for locating the RAM speed settings may vary. Follow the next section to learn how to locate the RAM speed settings within the BIOS interface of your computer.
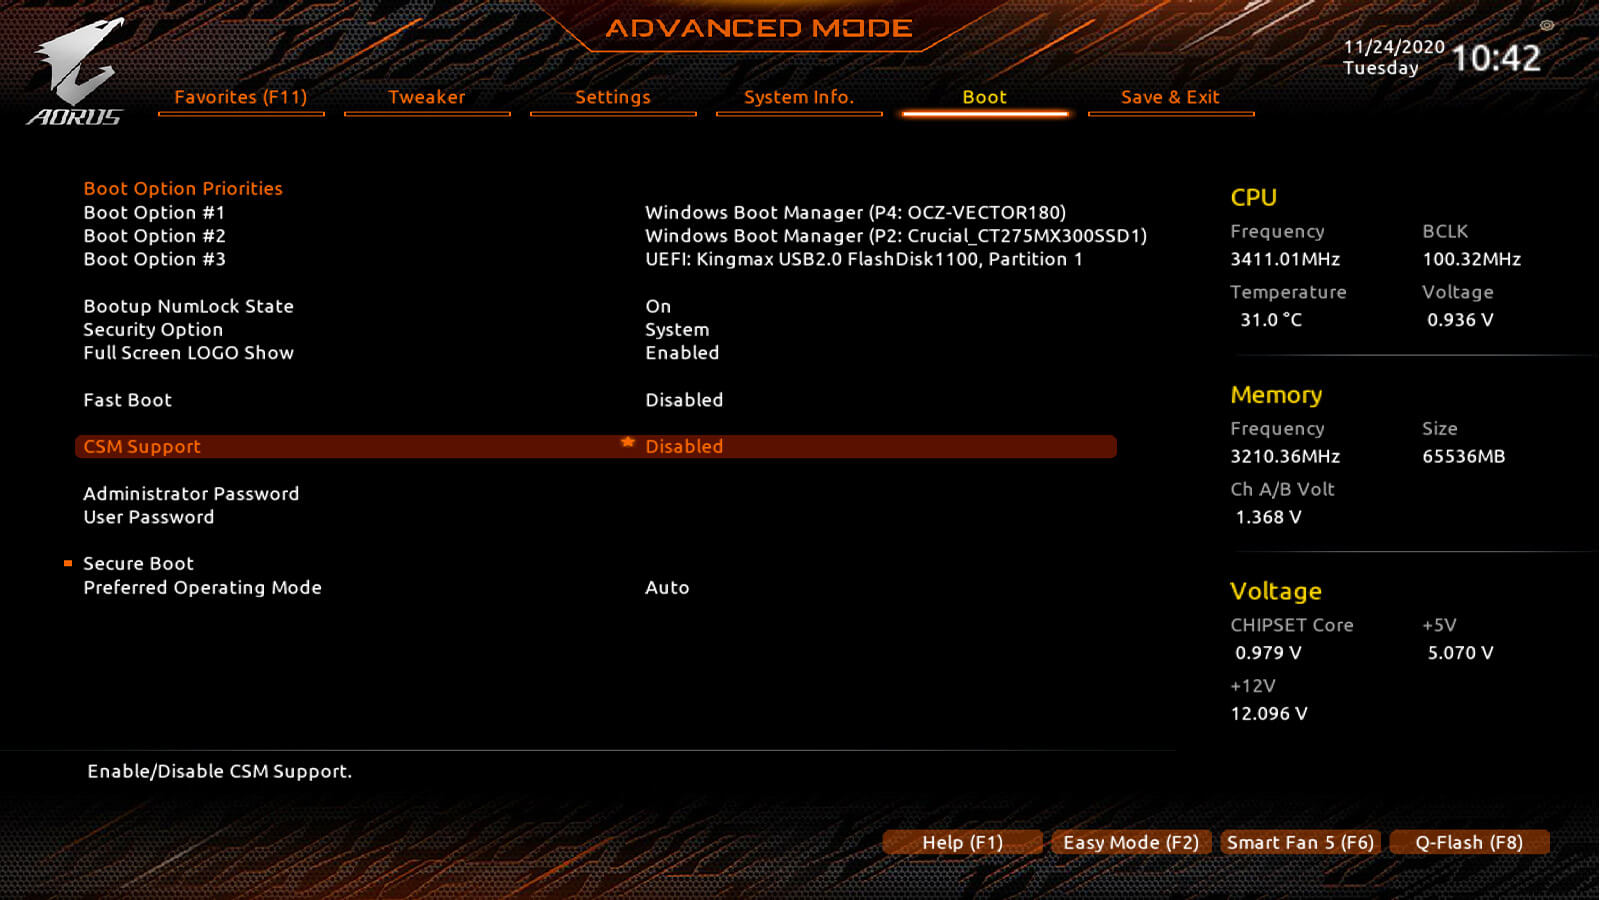
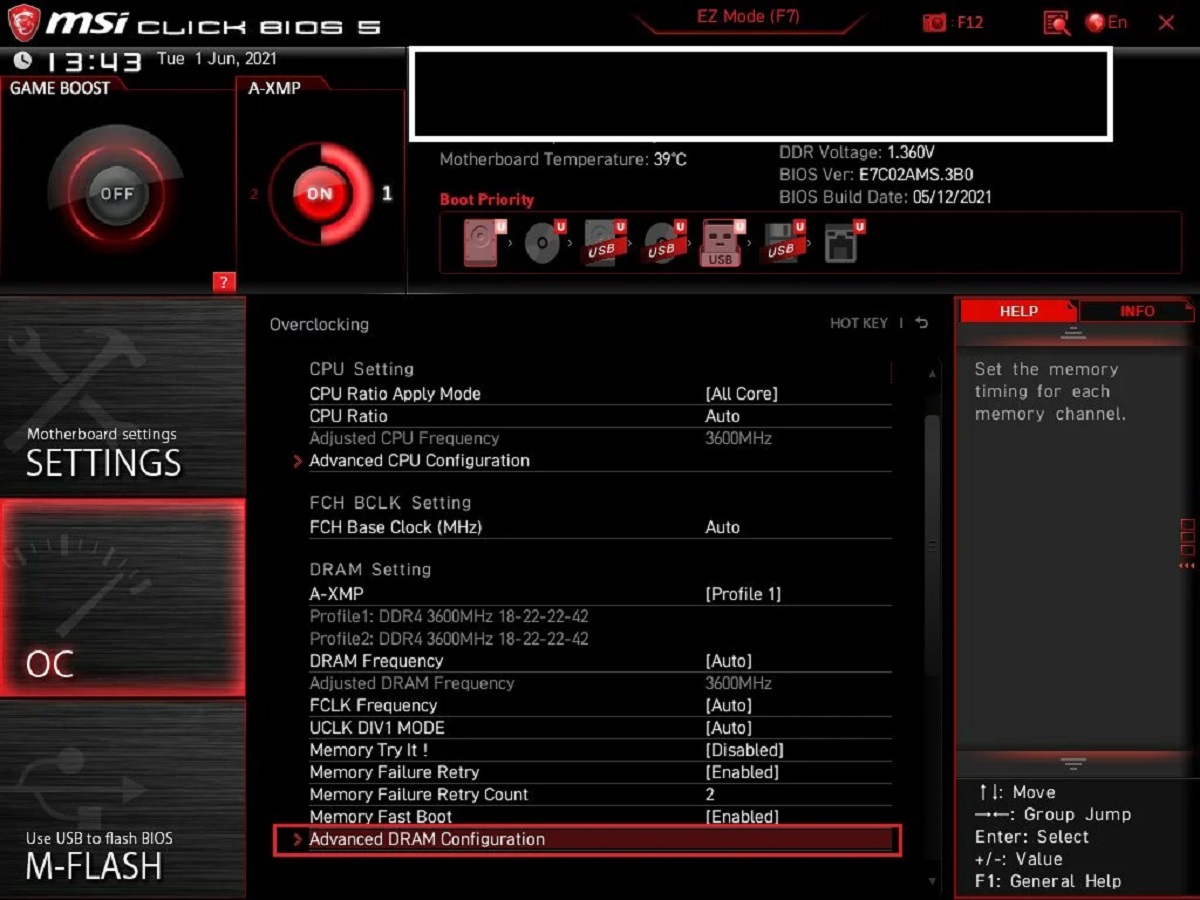
Step 2: Locating the RAM Speed Settings
Once you have entered the BIOS setup, you will need to locate the RAM speed settings. Here’s how you can find them:
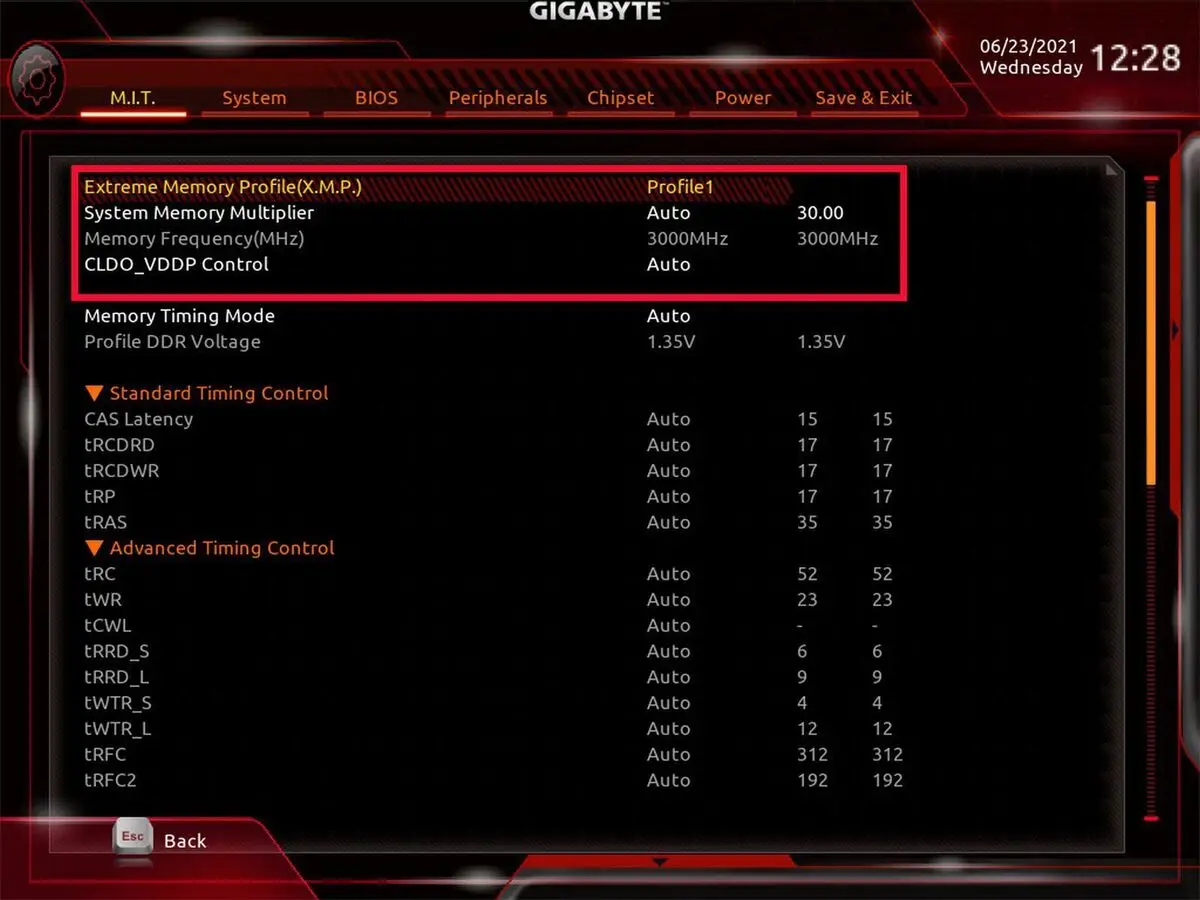
- 1. Navigate through the BIOS interface: Use the arrow keys on your keyboard to navigate through the various options and menus within the BIOS interface. Look for a section related to memory or RAM settings, which may be labeled as “Memory,” “RAM Configuration,” or something similar.
- 2. Expand the memory settings: Once you have found the memory or RAM section, press Enter or a designated key to access the sub-menu or expand the settings. This sub-menu typically lists all the relevant memory-related options.
- 3. Locate the RAM speed settings: Within the memory settings, you should be able to find an option labeled “RAM Speed,” “Memory Clock,” or similar. Selecting this option will allow you to view and modify the current RAM speed settings.
It’s important to note that the naming and organization of options in the BIOS interface can vary across different computer manufacturers. If you’re having trouble locating the RAM speed settings, refer to your computer’s manual or the manufacturer’s website for specific instructions related to your model.
Once you have successfully located the RAM speed settings, you’re ready to proceed to the next step and make changes to the RAM speed. In the following section, we’ll discuss how to change the RAM speed within the BIOS interface.
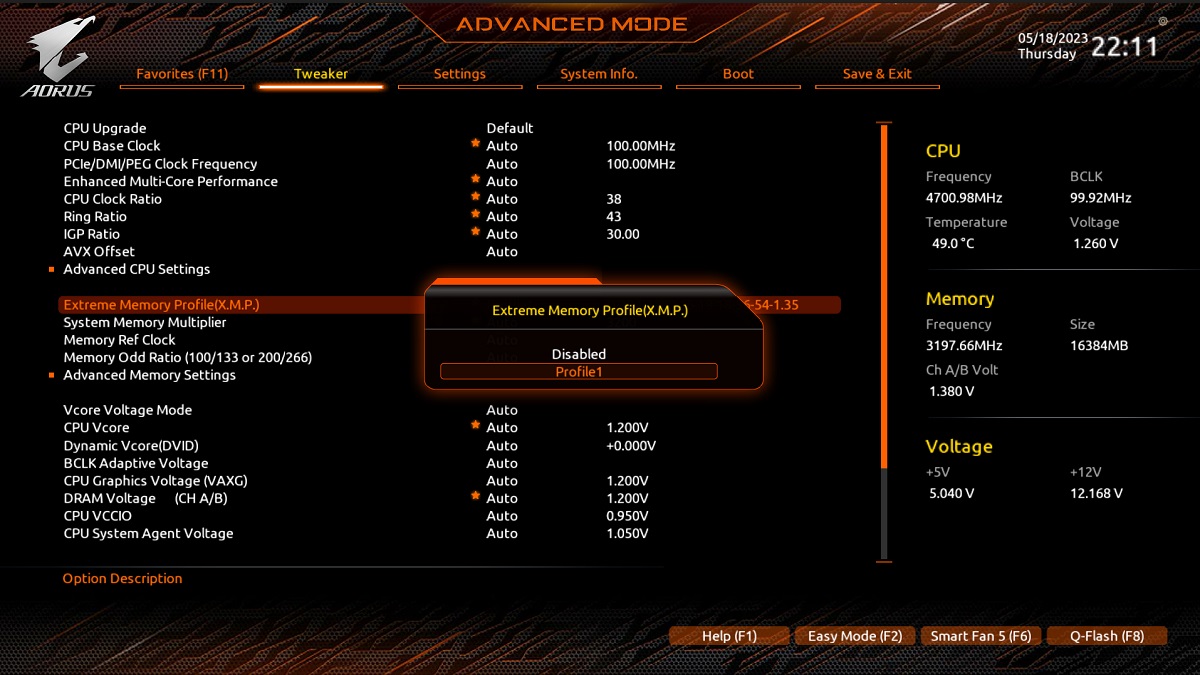
Step 3: Changing the RAM Speed
Now that you have located the RAM speed settings within the BIOS interface, it’s time to make changes to the RAM speed. Here’s what you need to do:
- 1. Select the RAM speed option: Using the arrow keys, navigate to the RAM speed option within the memory settings. Once selected, you should see the current RAM speed displayed.
- 2. Modify the RAM speed: Depending on your BIOS interface, you may have different options to change the RAM speed. Some BIOS interfaces allow you to select from a range of predefined speeds, while others provide the option to manually enter a specific speed. Note that the available RAM speed options may be limited to those supported by your RAM modules and motherboard.
- 3. Choose the desired RAM speed: To change the RAM speed, use the arrow keys or the “+” and “-” keys to select your desired speed. Make sure to refer to your RAM manufacturer’s specifications to ensure you are selecting a supported and stable speed.
It’s important to exercise caution when changing the RAM speed. Setting it too high can lead to system instability and potential damage. If you are unsure about the appropriate RAM speed, it is recommended to leave it at the default setting or consult with an expert.
Once you have made the necessary changes to the RAM speed, you’re ready to save the settings and exit the BIOS interface. Read the next section to learn how to do this successfully.
Step 4: Saving and Exiting the BIOS
After you have made changes to the RAM speed within the BIOS interface, it’s important to save the settings and exit the BIOS properly. Here’s what you need to do:
- 1. Save the changes: Look for an option that allows you to save the changes you have made. This option may be labeled as “Save and Exit,” “Apply Changes,” or something similar. Press the designated key or follow the on-screen instructions to save the settings.
- 2. Exit the BIOS: Next, you will need to exit the BIOS interface. Look for an option to exit the BIOS, which may be labeled as “Exit,” “Exit Setup,” or similar. Press the indicated key or follow the on-screen instructions to exit the BIOS.
- 3. Confirm the changes: As you exit the BIOS, you may be prompted to confirm your changes. Make sure to select the option to save the changes and exit the BIOS.
Once you have successfully saved the changes and exited the BIOS, your computer will reboot with the new RAM speed settings. It may take a moment for the changes to take effect. To verify the RAM speed change, proceed to the next section.
It’s worth noting that some systems may require additional steps or have different options for saving and exiting the BIOS. Refer to your computer’s manual or the manufacturer’s website for specific instructions related to your system.
With the RAM speed changes saved and the BIOS exited, you’re almost done. The next and final step is to verify the RAM speed change to ensure that it has been applied successfully.
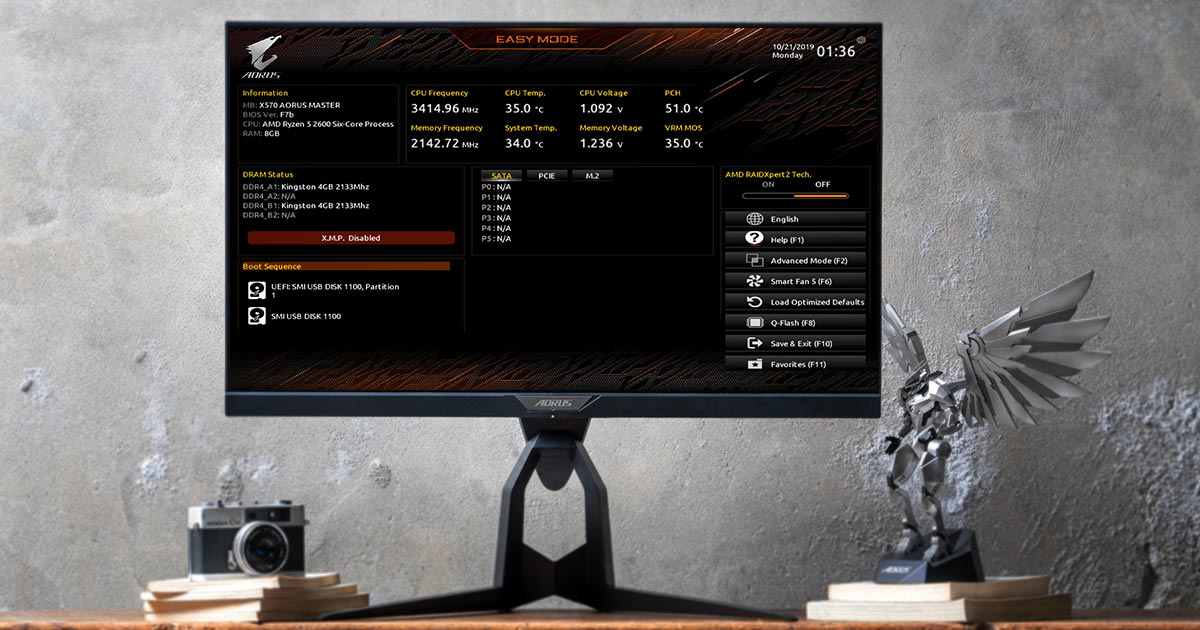
Step 5: Verifying the RAM Speed Change
After changing the RAM speed in the BIOS and saving the settings, it’s essential to verify whether the RAM speed change has been applied successfully. Here’s how you can do it:
- 1. Boot up your computer: After exiting the BIOS and allowing your computer to reboot, let it fully start up. You can log in to your operating system as usual.
- 2. Check the RAM speed: Once your computer is up and running, there are different methods to check the RAM speed. You can use third-party software, such as CPU-Z or Speccy, to view the RAM speed information. These tools provide detailed system information, including RAM specifications.
- 3. Windows Task Manager: Another way to check the RAM speed is by using the Windows Task Manager. Right-click on the taskbar and select “Task Manager” from the context menu. In the Task Manager window, navigate to the “Performance” tab and select “Memory” in the left sidebar. The “Speed” field displays the current RAM speed.
Ensure that the displayed RAM speed matches the changes you made in the BIOS. If the speed is correct, congratulations! You have successfully changed the RAM speed. Enjoy the potential performance enhancements that come with it.
If the RAM speed hasn’t changed or doesn’t match your desired setting, you may need to repeat the steps and double-check the changes made in the BIOS. Make sure to save and exit the BIOS correctly to ensure the new RAM speed takes effect.
Remember, changing the RAM speed incorrectly or beyond the capabilities of your hardware can cause system instability. If you experience any issues or are unsure about the appropriate RAM speed for your system, it’s recommended to seek professional advice or consult your computer’s manufacturer.
By following these steps and verifying the RAM speed change, you have taken an important step towards optimizing your computer’s performance. Enjoy the improved speed and responsiveness!