Introduction
Welcome to this guide on how to change the RAM speed in BIOS. If you’re a computer enthusiast looking to optimize your system’s performance or a gamer seeking smoother gameplay, adjusting your RAM speed can make a significant difference. In this article, we will delve into the concept of RAM speed, explain why you might want to change it, and provide you with a comprehensive step-by-step guide to do so effortlessly in your computer’s BIOS settings.
RAM, which stands for Random Access Memory, is an essential component of your computer that stores data for quick access by the processor. The speed at which your RAM operates is measured in megahertz (MHz). It determines how quickly your computer can retrieve and process data, thereby influencing the overall performance and responsiveness of your system.
Changing the RAM speed in BIOS allows you to fine-tune your system’s performance according to your specific needs. By increasing the RAM speed, you can potentially achieve faster data transfer rates, shorter loading times, and better multitasking capabilities. Conversely, reducing the RAM speed may help improve system stability or compatibility with certain applications or hardware configurations.
Before jumping into the process of changing RAM speed in BIOS, it is crucial to take some precautions. Changing the RAM speed involves altering certain settings in the BIOS, which can have a direct impact on your system’s stability if not done correctly. It is essential to understand that overclocking or manipulating the RAM speed beyond its recommended specifications carries some inherent risks. Therefore, it is advisable to ensure that you have a stable power supply, adequate cooling, and a thorough understanding of your system’s capabilities before attempting any changes.
In the following sections, we will walk you through a step-by-step guide on how to change the RAM speed in BIOS. We’ll provide clear instructions and explanations to help you navigate the process with confidence. So, let’s get started and unlock the potential of your RAM speed in BIOS.
What is RAM Speed?
RAM speed refers to the frequency at which your computer’s RAM modules operate. It is measured in megahertz (MHz) and determines how quickly data is transferred to and from the RAM. The faster the RAM speed, the quicker your computer can access and process data, leading to improved system performance.
When you run applications or tasks on your computer, they rely on the RAM to store and retrieve data quickly. The RAM acts as a temporary storage space, allowing the processor to access data rapidly, rather than retrieving it from the slower hard drive or solid-state drive (SSD). The speed at which the RAM can deliver data to the processor directly affects the overall speed and responsiveness of your system.
RAM speed is often associated with the term “clock speed.” The clock speed, measured in MHz, determines how many times the RAM module can send or receive data in one second. For example, a RAM module with a speed of 3200 MHz can execute 3.2 billion cycles per second.
It’s important to note that RAM speed is not the same as RAM capacity. RAM capacity refers to the amount of data that can be stored in the RAM module, while RAM speed refers to the rate at which the data can be accessed and processed. Both factors play a crucial role in determining your system’s overall performance.
The standard and most common RAM speeds available today are DDR4 modules with speeds ranging from 2133 MHz to 3200 MHz or higher. However, it’s worth noting that not all systems or motherboards support the highest RAM speeds. Always consult your motherboard’s manual or manufacturer’s website to ensure compatibility before purchasing high-speed RAM modules.
In summary, RAM speed directly affects the performance of your computer. Opting for higher RAM speeds can lead to faster data transfer rates, shorter program loading times, and improved multitasking capabilities. However, it’s essential to make sure your system and motherboard support the desired RAM speed before making any upgrades or changes.
Why Change RAM Speed in BIOS?
Changing the RAM speed in BIOS can offer several benefits and optimizations for your computer system. Here are some of the main reasons why you might consider adjusting the RAM speed:
1. Improved Performance: Increasing the RAM speed can lead to faster data transfer rates, allowing your system to access and process data more quickly. This translates into better overall performance, especially in tasks that are memory-intensive, such as video editing, gaming, or running virtual machines.
2. Enhanced Gaming Experience: Gamers often seek to maximize their system’s performance to achieve smooth gameplay with minimal lag. By increasing the RAM speed, you can reduce the loading times and ensure faster data delivery to the processor, resulting in improved frame rates and a more immersive gaming experience.
3. Optimized Multitasking: If you regularly engage in multitasking, such as running multiple applications simultaneously or working with large datasets, increasing the RAM speed can significantly improve your system’s multitasking capabilities. It allows for faster data retrieval and management, minimizing delays and slowdowns when switching between tasks.
4. Compatibility and Stability: In some cases, certain applications or hardware configurations may require specific RAM speeds for optimal performance. By adjusting the RAM speed in BIOS, you can ensure better compatibility with such applications or hardware, reducing potential issues and improving system stability.
5. Overclocking Possibilities: For advanced users and enthusiasts, changing the RAM speed in BIOS opens up the possibility of overclocking. Overclocking involves pushing your RAM modules beyond their stock speed to attain even higher performance levels. However, it is crucial to note that this should be done with caution, as it can introduce instability and potentially void warranties.
Remember that while increasing the RAM speed offers potential benefits, it may not always yield noticeable improvements depending on your specific system configuration and usage patterns. It is recommended to assess your requirements and understand the limitations of your hardware before making any changes. Additionally, ensure that your power supply and cooling capabilities are adequate to support the increased RAM speed to avoid any potential issues or instability.
In the following sections, we will guide you through the process of changing the RAM speed in BIOS, providing you with clear instructions and precautions to help you achieve the desired optimization safely and effectively.
Precautions before Changing RAM Speed
Before diving into the process of changing the RAM speed in BIOS, it is crucial to take some precautions to ensure a smooth and safe experience. Here are some important steps to consider before making any changes:
1. Research and Compatibility: It is essential to research your computer’s specifications and consult your motherboard’s manual or manufacturer’s website to determine the supported RAM speeds. Different motherboards may have varying capabilities and limitations when it comes to RAM speed. Make sure the RAM modules you are using or planning to upgrade to are compatible with your motherboard and its specific speed requirements.
2. Backup Your Data: Whenever you make changes to your computer’s BIOS settings, there is a small risk of data loss or system instability. It is always recommended to back up your important files and documents before making any adjustments, just as a precautionary measure.
3. Understand the RAM Specifications: Familiarize yourself with the specific specifications of your RAM modules, such as their voltage requirements, timings, and recommended operating speeds. This information can usually be found on the RAM manufacturer’s website or the product packaging. Having a clear understanding of these specifications will help you make informed decisions when adjusting the RAM speed in BIOS.
4. Ensure Stable Power Supply: Changing the RAM speed can potentially put additional strain on your system’s power supply. It is crucial to ensure that your power supply unit (PSU) can handle the increased power requirements. Using an underpowered PSU can result in system instability or crashes. If necessary, consider upgrading your PSU to a higher wattage to provide a stable power source for your system.
5. Proper Cooling: Higher RAM speeds can generate more heat, particularly when overclocking. Ensure that your computer’s cooling system, including the CPU cooler and system fans, is adequate to dissipate the additional heat effectively. Proper cooling is crucial for maintaining stable system temperatures and preventing overheating-related issues.
6. Take Small Steps: When adjusting the RAM speed, it is advisable to make small incremental changes instead of jumping to the highest possible speed right away. Gradually increase the speed and test the stability of your system after each adjustment. This gradual approach allows you to identify any issues that may arise and ensures you can revert to stable settings if necessary.
By following these precautions, you can minimize the risks and potential issues associated with changing the RAM speed in BIOS. Taking the time to understand your system’s capabilities and ensuring proper backup, compatibility, power supply, and cooling will help ensure a smooth and successful RAM speed adjustment process.
Step by Step Guide to Change RAM Speed in BIOS
Changing the RAM speed in BIOS requires accessing the BIOS settings of your computer. Here’s a step-by-step guide to help you navigate through the process:
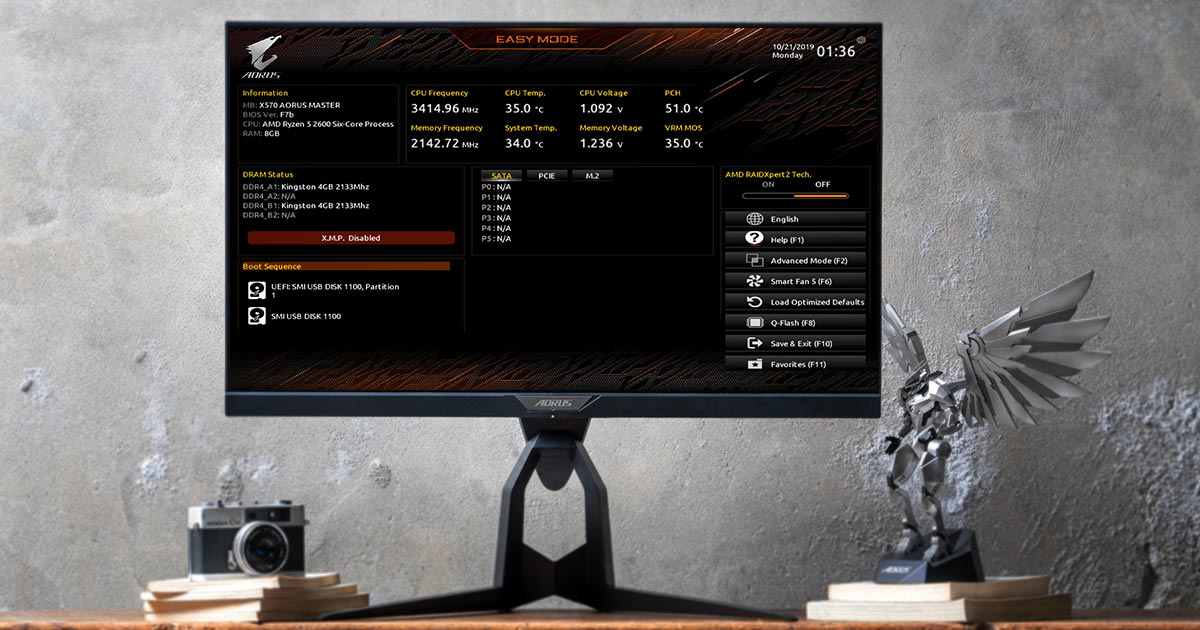
Step 1: Restart your computer and access the BIOS:
Start by restarting your computer. During the boot-up process, look for a prompt or key combination (usually displayed on the screen) to access the BIOS settings. This key can vary depending on your computer’s manufacturer, but it is often the Del, F2, or F12 key. Press the designated key to enter the BIOS setup.
Step 2: Navigate to the RAM settings:
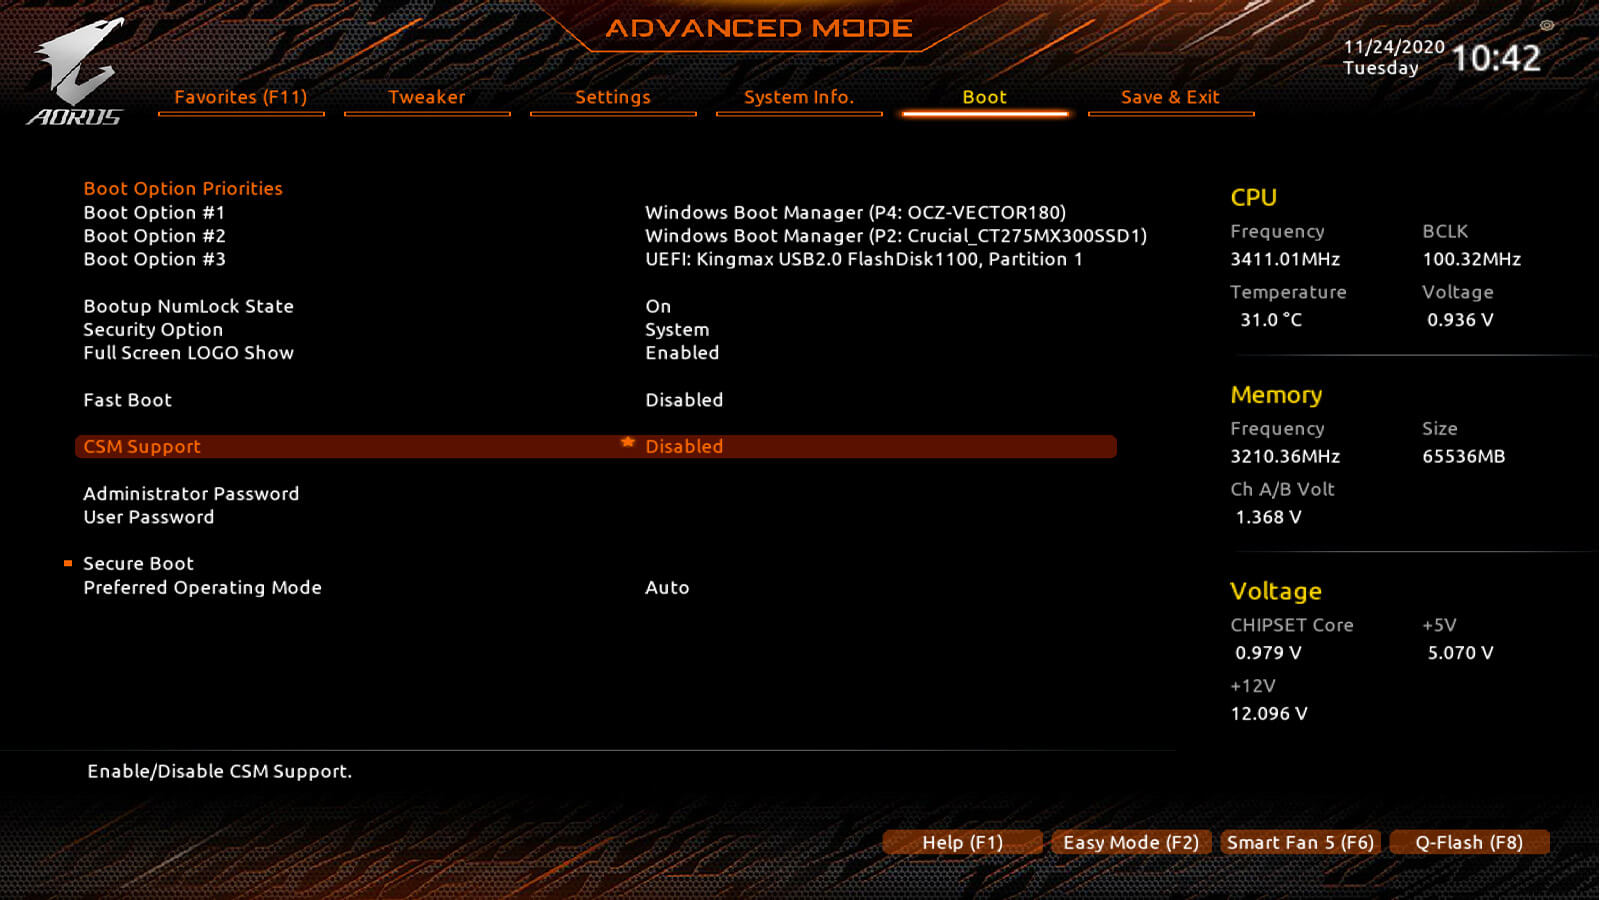
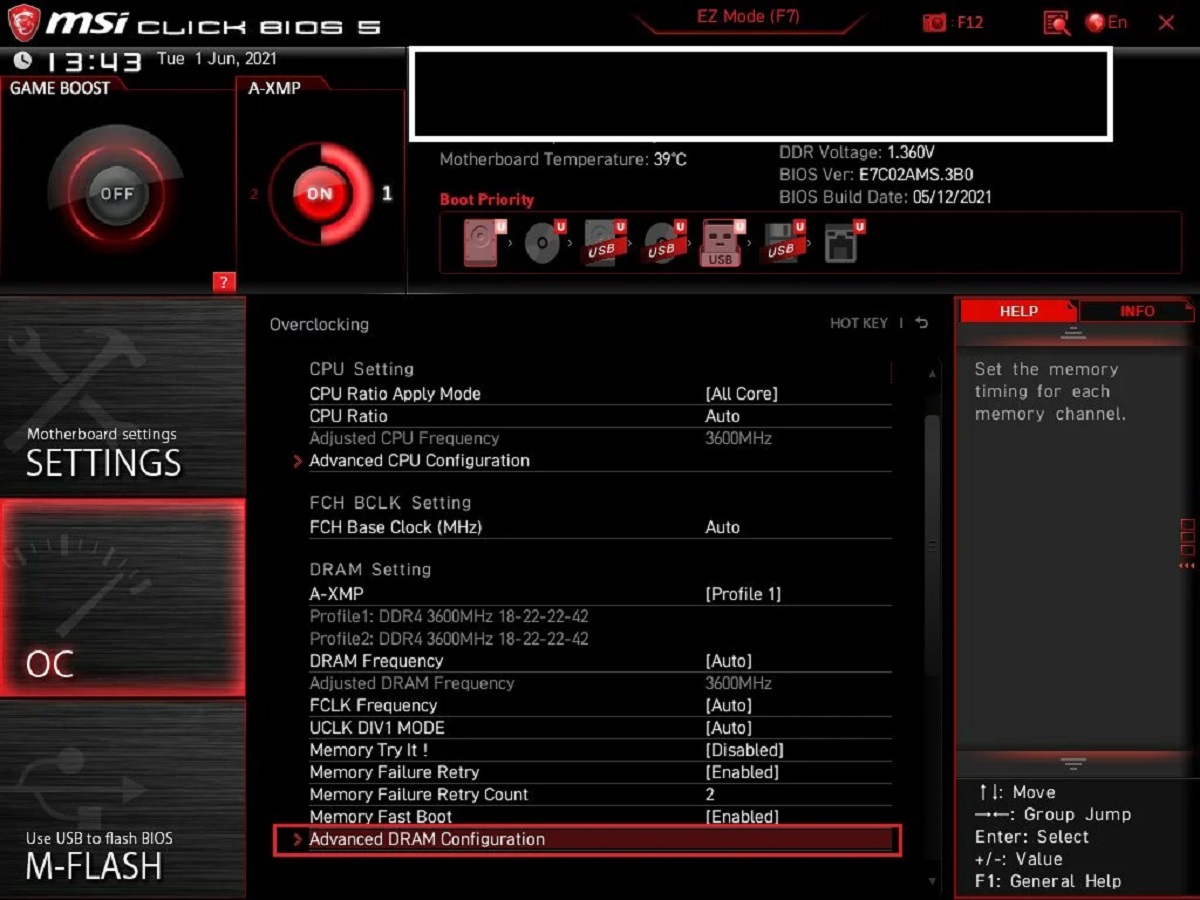
Once you are in the BIOS setup, use the arrow keys to navigate through the different options and menus. Look for a section related to memory or RAM settings. The exact location of this section may vary depending on your BIOS version and motherboard manufacturer.
Step 3: Locate the RAM speed setting:
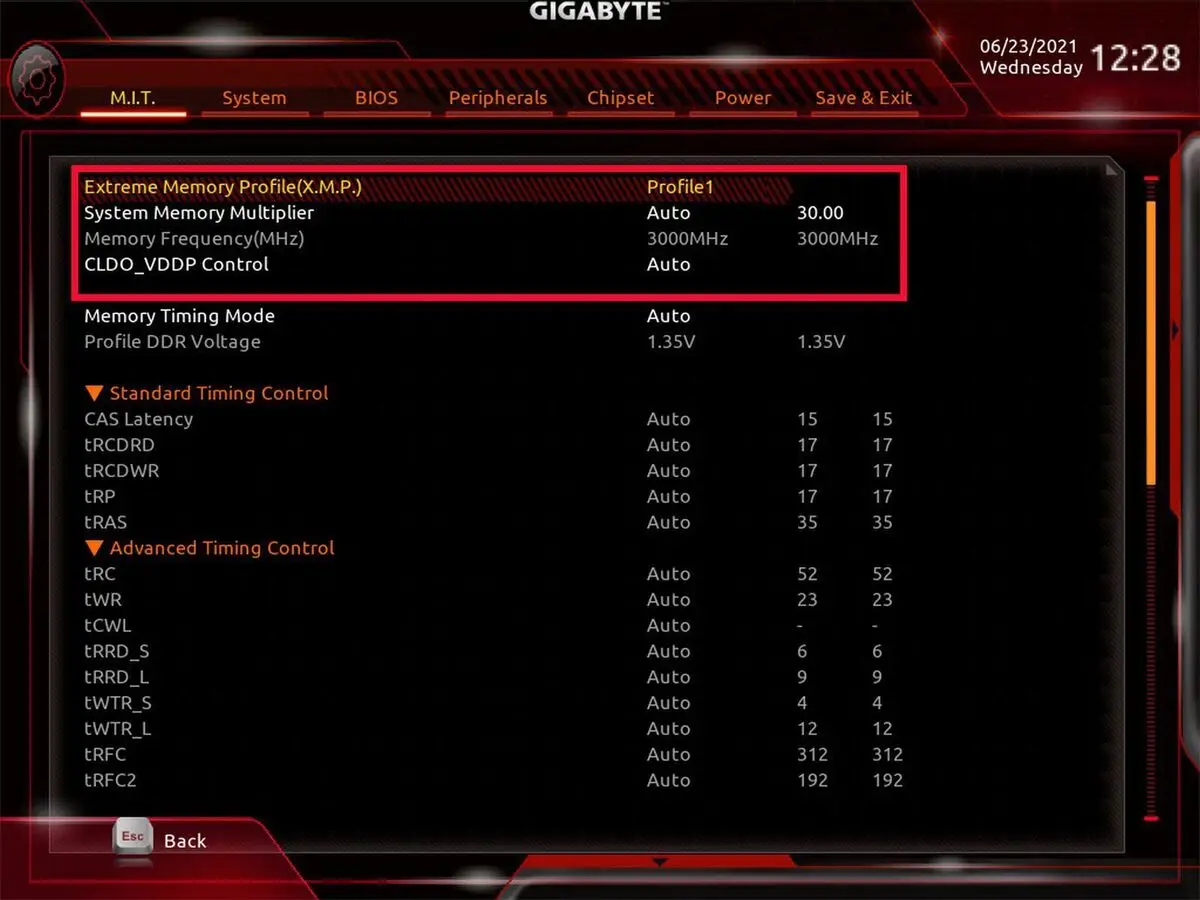
Within the RAM settings section, look for an option that allows you to change the RAM speed. It may be labeled as “Memory Clock,” “DRAM Frequency,” or similar. Select this option to access the available RAM speed options.
Step 4: Choose the desired RAM speed:
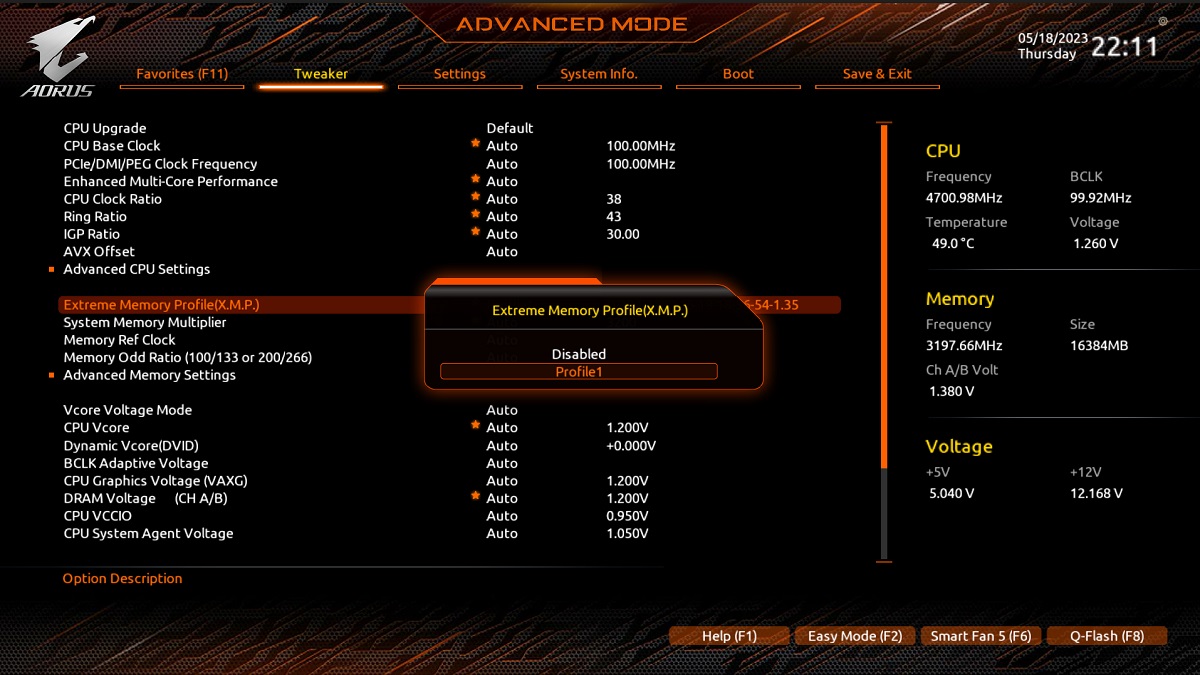
Once you have accessed the RAM speed options, you will typically see a list of available speeds or a dropdown menu. Depending on your system and the RAM modules you have installed, you may have various speed options to choose from. Select the desired RAM speed that you want to set for your system. Take note that it is recommended to select a speed within the supported range of your RAM modules and motherboard specifications.
Step 5: Save and exit:
After selecting the desired RAM speed, navigate to the exit or save settings menu within the BIOS. Select the option to save your changes and exit the BIOS. Your computer will then reboot, applying the new RAM speed settings.
Step 6: Test the stability of your system:
Once your computer has restarted, you should test the stability of your system with the new RAM speed settings. Run various applications and tasks, including ones that are memory-intensive, to ensure that your system remains stable without any issues. If you encounter crashes, errors, or instability, it may indicate that the selected RAM speed is not compatible with your system. In such cases, you can revert to the previous RAM speed or adjust it to a lower, more stable setting.
It’s important to remember that changing RAM speed involves some trial and error, as the stability and compatibility of your system can vary depending on the specific components and configurations. Take your time, monitor the performance and stability of your system after each change, and make adjustments as needed to achieve the desired balance between speed and stability.
Conclusion
Changing the RAM speed in BIOS can be a powerful tool to optimize your system’s performance and enhance your computing experience. By increasing the RAM speed, you can achieve faster data transfer rates, shorter loading times, and improved multitasking capabilities. However, it is important to approach this process with caution and take the necessary precautions to ensure a smooth and safe adjustment.
Before changing the RAM speed, it is crucial to research your computer’s specifications, understand the compatibility of your RAM modules and motherboard, and familiarize yourself with the specific requirements and limitations of your hardware. Additionally, backing up your data, ensuring a stable power supply, and maintaining proper cooling are essential steps to prevent any potential issues or instability.
Once you have taken these precautions, following a step-by-step guide to navigate the BIOS settings allows you to adjust the RAM speed to your desired setting. However, it is important to test the stability of your system after each change and be prepared to revert to previous settings or adjust the speed if any issues arise.
Remember that changing the RAM speed is just one aspect of optimizing your computer’s performance. System responsiveness also depends on other factors, such as the CPU, storage drives, and overall system configuration. It is advisable to assess your specific needs and requirements to determine the optimal balance between RAM speed and other performance-enhancing factors.
In conclusion, changing the RAM speed in BIOS can unlock the true potential of your system and provide a noticeable improvement in performance. By following the precautions outlined in this guide and understanding your hardware’s capabilities, you can safely make adjustments and enjoy a faster and more efficient computing experience.