Introduction
The speed of your RAM (Random Access Memory) plays a crucial role in the overall performance of your computer. Increasing the RAM speed can result in faster data transfer and improved system responsiveness. If you are a Gigabyte motherboard user, you can easily change the RAM speed through the BIOS (Basic Input/Output System) settings. Although it may sound daunting for some, changing the RAM speed in Gigabyte BIOS is a simple and straightforward process that anyone can do.
In this guide, we will take you through the step-by-step process of changing the RAM speed in the Gigabyte BIOS. Whether you want to overclock your RAM for better performance or simply adjust it to match the specifications of your RAM modules, we’ve got you covered. Before we begin, it’s important to note that altering the RAM speed should be done with caution, as it may void your warranty or cause stability issues if not done correctly.
So, if you’re ready to take control of your RAM speed and optimize your computer’s performance, let’s dive into the world of Gigabyte BIOS and learn how to change RAM speed effortlessly.
Step 1: Accessing the Gigabyte BIOS
Before we can start changing the RAM speed, we need to access the Gigabyte BIOS settings. Follow these steps to access the BIOS on your Gigabyte motherboard:
1. Restart your computer. As soon as the computer starts booting, repeatedly press the “Delete” key (or the key specified by your motherboard manufacturer) to enter the BIOS setup.
2. If the “Delete” key doesn’t work, try pressing the “F2” key, “F10” key, or refer to your motherboard manual for the specific key combination.
3. After pressing the correct key, you will be taken to the BIOS main screen, where you can make changes to your hardware settings.
It’s important to note that the exact steps to access the Gigabyte BIOS may vary slightly depending on the motherboard model. Additionally, some Gigabyte motherboards offer a “Fast Boot” option, which may require you to disable it in order to access the BIOS.
Once you have successfully accessed the Gigabyte BIOS, you are ready to proceed to the next step and navigate through the BIOS menus to locate the RAM speed settings.
Step 2: Navigating the BIOS
After accessing the Gigabyte BIOS, you will need to navigate through the menus to find the RAM speed settings. Follow these steps to navigate the Gigabyte BIOS:
1. Use the arrow keys on your keyboard to navigate through the menus. The up and down arrow keys will allow you to move between different options, while the left and right arrow keys are used to navigate within a specific menu.
2. Pay attention to the different tabs and submenus in the BIOS interface. The layout may vary depending on your specific Gigabyte motherboard model, but you should be able to find a section related to “Advanced Settings,” “Overclocking,” or “Performance Settings.”
3. Look for a menu option that relates to memory settings. This could be named “Memory Configuration,” “DRAM Configuration,” or something similar.
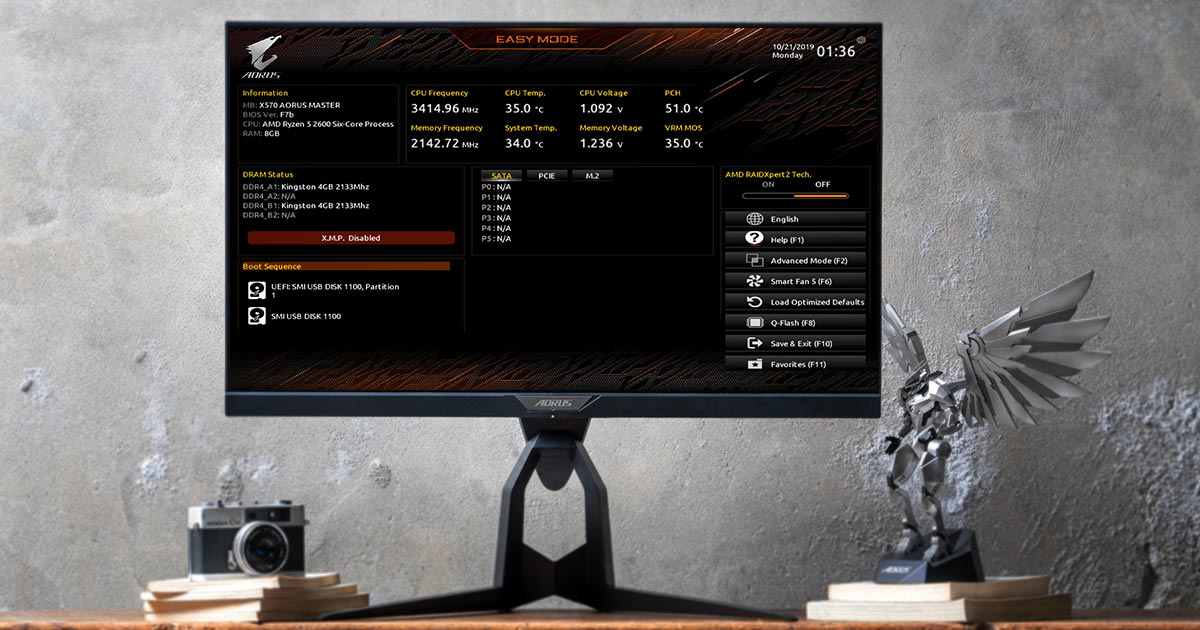
4. Once you have found the memory settings menu, you will likely see options related to the RAM speed, timings, and voltage. In some cases, the RAM speed may be listed as “Memory Clock” or “Memory Frequency.”
It’s important to remember that every Gigabyte BIOS may have a slightly different layout and menu structure. Additionally, some motherboards may have a simplified mode that hides certain advanced settings. If you cannot find the RAM speed settings, refer to your motherboard’s user manual or visit the Gigabyte website for specific instructions.
Now that you have successfully navigated through the BIOS menus, it’s time to locate and change the RAM speed settings. Proceed to the next step to learn how to make the necessary adjustments.
Step 3: Locating the RAM Speed Setting
Once you have navigated to the memory settings menu in the Gigabyte BIOS, you will need to locate the RAM speed setting. The process may vary slightly depending on the specific BIOS version, but the general steps are as follows:
1. Look for an option labeled “Memory Clock,” “Memory Frequency,” or simply “DRAM Frequency.” This is the setting that controls the speed of your RAM.
2. Depending on the BIOS version and motherboard model, the RAM speed may be displayed in megahertz (MHz) or given as a ratio in relation to the base clock speed of your motherboard. For example, you may see options like “800 MHz,” “1600 MHz,” or “1:1,” “1:2,” etc.
3. Take note of the current RAM speed setting, as you will need this information later when adjusting the speed.
If you are unsure about the correct RAM speed setting for your specific RAM modules, you can refer to the documentation that came with your RAM or visit the manufacturer’s website to find the recommended specifications.
It’s important to mention that some Gigabyte motherboards also offer XMP (Extreme Memory Profile) options. These profiles are preconfigured settings that allow for easy overclocking of your RAM to achieve higher speeds. If you want to use XMP, look for a setting labeled “XMP Profile” or similar, and select the desired profile to automatically adjust the RAM speed.
Now that you have located the RAM speed setting, let’s move on to the next step and learn how to change the RAM speed in the Gigabyte BIOS.
Step 4: Changing the RAM Speed
Now that you have found the RAM speed setting in the Gigabyte BIOS, you can proceed to change the speed according to your requirements. Here’s how you can do it:
1. Select the RAM speed setting by highlighting it with the arrow keys on your keyboard.
2. Press the Enter key to open the submenu or modify the value.
3. Depending on your BIOS version, you may be presented with a list of predefined RAM speed options or a numerical input field where you can manually enter the desired speed.
4. If there is a list of predefined options, choose the speed that matches your requirements or the specifications of your RAM modules. These options are usually listed in increments, allowing you to select a higher or lower speed.
5. If there is a numerical input field, use the arrow keys or the numeric keypad to input the desired RAM speed. Refer to your RAM module specifications to ensure you select a supported speed.
6. After selecting or entering the desired RAM speed, save the changes by following the on-screen prompts. This is typically done by pressing the F10 key or selecting the “Save and Exit” option.
It’s important to note that changing the RAM speed requires careful consideration. Overclocking the RAM beyond its rated speed can potentially cause system instability or other issues. If you are unsure about the appropriate speed to select, it’s best to stick with the recommended values or consult a knowledgeable professional.
Once you have successfully changed the RAM speed, proceed to the next step to save the changes and exit the Gigabyte BIOS.
Step 5: Saving and Exiting the BIOS
After you have changed the RAM speed in the Gigabyte BIOS, it’s important to save the changes and exit the BIOS properly. Here’s how you can do it:
1. Check if there is a “Save and Exit” option available in the BIOS menu. This option is typically located at the bottom or top of the screen or listed under a tab labeled “Exit” or “Save & Exit Setup.”
2. Highlight the “Save and Exit” option using the arrow keys and press Enter.
3. Confirm your selection when prompted to save the changes made to the BIOS settings.
4. Wait for the system to save the changes, which usually takes a few seconds.
5. Once the changes are saved, the computer will restart to apply the new RAM speed.
It’s important to note that during the reboot process, you should avoid interrupting the power supply or pressing any keys. Let the system complete the restart process naturally.
After the computer restarts, you can check if the RAM speed has been successfully changed. You can use third-party software, such as CPU-Z or HWiNFO, to verify the RAM speed. These tools display detailed system information, including the current RAM speed.
Congratulations! You have successfully changed the RAM speed in the Gigabyte BIOS. Enjoy the improved performance and responsiveness that a higher RAM speed can provide.
Conclusion
Changing the RAM speed in the Gigabyte BIOS is a straightforward process that can significantly impact your computer’s performance. By following the steps outlined in this guide, you can easily adjust the RAM speed to optimize your system’s responsiveness and data transfer rates.
Remember to exercise caution and only make changes within the recommended specifications of your RAM modules. Overclocking the RAM beyond its rated speed may lead to stability issues or even hardware damage. If you are unsure about the appropriate settings or the potential risks involved, it’s always best to seek guidance from an expert or stick with the recommended values.
It’s worth noting that changing the RAM speed is just one aspect of optimizing your computer’s performance. Other factors such as CPU, storage, and cooling also play a significant role. Therefore, consider a comprehensive approach to system optimization for the best results.
We hope this guide has provided you with the necessary information to confidently navigate the Gigabyte BIOS and change the RAM speed. By unlocking the full potential of your RAM, you can enhance your computer’s performance and enjoy a smoother computing experience.
Now that you have the knowledge, go ahead and experiment with different RAM speed settings to find the optimal configuration that suits your needs. Remember to always monitor your system’s stability and make adjustments accordingly.
Thank you for reading, and we wish you success in boosting your computer’s performance through the proper management of RAM speed in the Gigabyte BIOS.