Introduction
Welcome to the world of overclocking! If you’re a tech enthusiast looking to squeeze every ounce of performance out of your MSI motherboard, overclocking your RAM can be a game-changer. By increasing the RAM frequency, you can significantly boost your computer’s speed and improve multitasking capabilities.
However, before we dive deeper into the process, let’s first understand what overclocking actually means. In simple terms, overclocking refers to pushing your hardware beyond its default limits to achieve higher performance. When it comes to RAM, overclocking involves increasing the frequency at which it operates.
Overclocking RAM requires caution and careful attention to detail, as it can potentially lead to stability issues or even damage your hardware if not done properly. That’s why it’s essential to follow the necessary precautions and safety measures throughout the process. In this guide, we’ll walk you through the steps of overclocking your RAM on an MSI motherboard while ensuring the safety and stability of your system.
Before we proceed, it’s important to note that overclocking may void your warranty, so exercise caution and proceed at your own risk. It’s also recommended to have a basic understanding of your motherboard’s BIOS interface and settings. Now, let’s get started!
Understanding Overclocking
Before we jump into the nitty-gritty of overclocking your RAM on an MSI motherboard, let’s take a moment to understand the fundamentals of overclocking.
Overclocking involves increasing the frequency and voltage of a component, such as your RAM, to achieve higher performance. In the case of RAM overclocking, the goal is to increase the memory frequency beyond its default value. By doing so, you can unlock the full potential of your RAM modules, resulting in a faster and more responsive system.
When you purchase RAM, it typically comes with a rated frequency set by the manufacturer. This frequency represents the maximum speed at which the RAM is guaranteed to operate reliably. However, many RAM modules are capable of running at higher frequencies with some additional tweaking.
It’s important to note that not all RAM modules are created equal, and not all modules will overclock to the same extent. Some modules may have better overclocking potential due to higher-quality components or better manufacturing processes. Additionally, the motherboard’s chipset and BIOS will also play a significant role in determining how far you can push your RAM overclock.
RAM overclocking can offer several benefits, including improved system responsiveness, faster data transfer speeds, and smoother multitasking. However, there are some factors to consider before attempting to overclock your RAM:
- Cooling: Overclocking generates more heat, so ensuring your system has adequate cooling is crucial to prevent overheating.
- Voltage: Increasing the RAM frequency often requires increasing the voltage. However, higher voltage levels can lead to increased power consumption and heat generation.
- System Stability: Overclocking can potentially lead to system instability if not done correctly. Testing the stability of your overclocked RAM is essential to ensure reliable performance.
- Compatibility: RAM overclocking may not be compatible with all types of RAM modules or motherboard configurations. It’s important to check compatibility before attempting any modifications.
Now that we have a solid foundation on overclocking and its considerations, let’s move on to the next section, where we’ll discuss the precautions and safety measures you should take before overclocking your RAM on an MSI motherboard.
Precautions and Safety Measures
Before we embark on the journey of overclocking your RAM, it’s crucial to take the necessary precautions and safety measures to protect your hardware and ensure a smooth and stable overclocking experience. Let’s go over some essential steps:
Ensure proper cooling: Overclocking generates more heat, so it’s crucial to have adequate cooling in your system. Ensure that your CPU cooler is properly installed and functioning efficiently. Consider using additional case fans or even liquid cooling solutions if necessary.
Update your BIOS: Before attempting any overclocking, make sure your MSI motherboard’s BIOS is up to date. Manufacturers often release BIOS updates that improve system stability and add support for higher RAM frequencies. Visit the MSI website or check the motherboard’s support page for the latest BIOS version.
Backup your data: Prior to overclocking, it’s always wise to back up your important files and data. While overclocking RAM should not cause data loss, it’s better to be safe than sorry. Create a backup of your important files on an external storage device or using cloud-based storage solutions.
Take small steps: Overclocking is a gradual process. It’s best to take small steps and test for stability along the way. Making drastic changes to your RAM frequency or voltage can lead to instability or even damage your components. Start with conservative overclocking settings and gradually increase them as you test for stability.
Monitor temperatures: Throughout the overclocking process, keep a close eye on your system’s temperatures. Utilize software tools such as MSI Afterburner or HWMonitor to monitor the CPU and GPU temperatures, as well as the temperature of your RAM modules. If temperatures are reaching unsafe levels, reconsider your overclocking settings or invest in better cooling solutions.
Be patient and persistent: Overclocking requires patience and persistence. It may take several attempts to find the optimal settings for your RAM modules and achieve a stable overclock. Remember to test for stability after each adjustment and make incremental changes to your settings to prevent any abrupt system failures.
By following these precautions and safety measures, you can minimize the risks associated with overclocking and ensure a more successful and enjoyable experience. In the next section, we’ll delve into the step-by-step process of overclocking your RAM on an MSI motherboard.
Step 1: Enter BIOS Setup
The first step in overclocking your RAM on an MSI motherboard is to enter the BIOS setup. The BIOS (Basic Input/Output System) is a firmware that allows you to make low-level hardware configuration changes.
Here’s how you can access the BIOS setup:
- Reboot your computer or power it on if it’s currently off.
- During the boot process, you’ll see a specific key or combination of keys to press to enter the BIOS setup. Common keys include Del, F2, F10, or Esc. Consult your motherboard’s manual or the MSI website for the specific key for your motherboard model.
- Press the designated key repeatedly until the BIOS setup screen appears. This may take a few tries, so be patient.
Once you’ve successfully entered the BIOS setup, you’ll see a graphical interface or a text-based menu with various options and settings. It’s important to be cautious while navigating the BIOS as making incorrect changes can have unintended consequences.
In the next section, we’ll discuss the process of adjusting the RAM frequency and voltage in the BIOS setup to overclock your RAM on an MSI motherboard.
Step 2: Adjusting RAM Frequency and Voltage
Now that we’re in the BIOS setup, the next step is to adjust the RAM frequency and voltage settings to overclock your RAM on an MSI motherboard. Here’s a breakdown of the process:
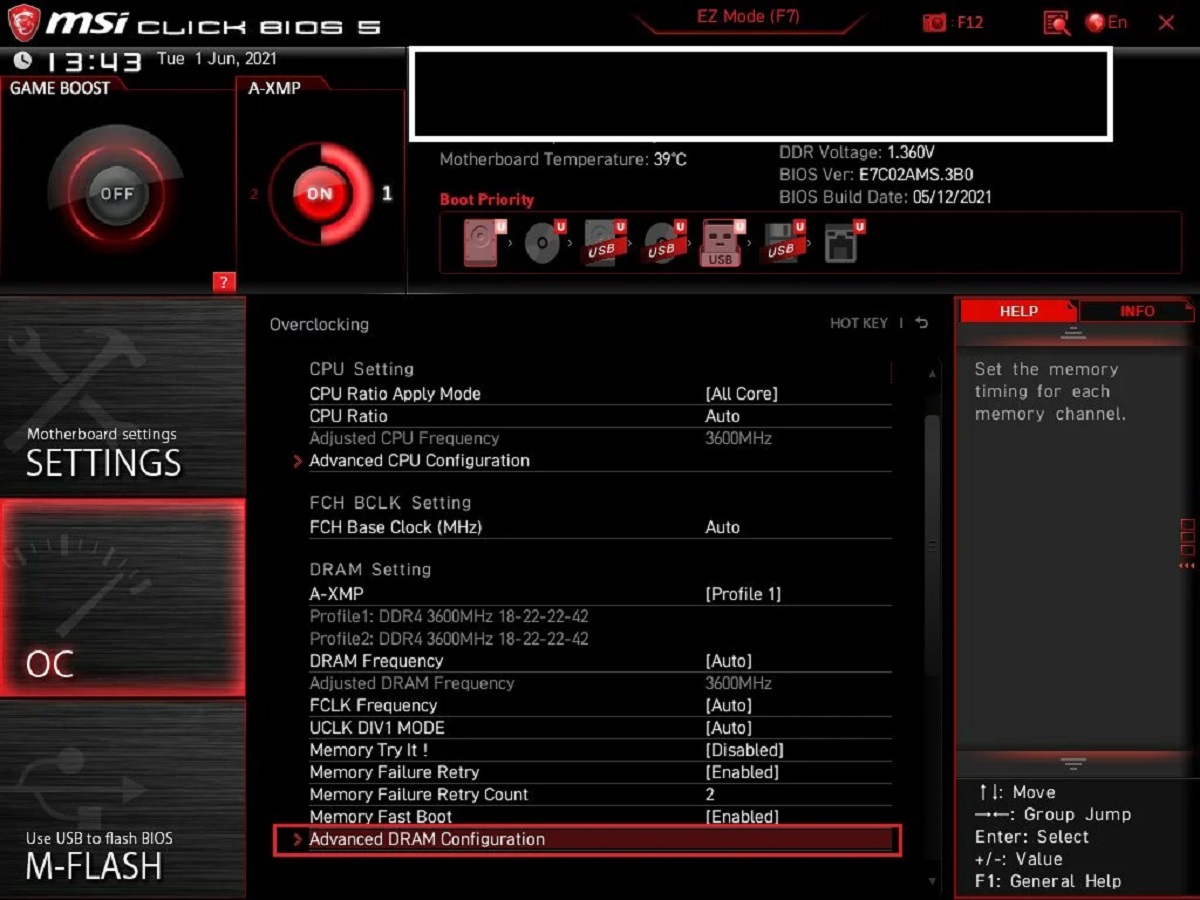
- Locate the “Overclocking” or “Frequency/Voltage” section in the BIOS setup. The exact location may vary depending on your motherboard model and BIOS version.
- Find the RAM frequency settings. The option may be labeled as “Memory Clock,” “RAM Frequency,” or similar. Select the option and modify the frequency value to the desired overclocked frequency. It’s recommended to start with a small increment, such as 200MHz, and test for stability before further increasing the frequency.
- Increase the RAM voltage if necessary. Higher RAM frequencies often require additional voltage to maintain stability. Look for options such as “DRAM Voltage” or “Memory Voltage” in the BIOS. Increase the voltage value in small increments, such as 0.05V, and test for stability after each adjustment. Be cautious not to exceed the manufacturer’s specified maximum voltage, as it may damage your RAM modules.
- Save your changes and exit the BIOS setup. Look for the option to save and exit, often labeled as “Save and Exit,” “Exit and Save Changes,” or similar. Confirm your selection to save the modified BIOS settings.
Once you’ve adjusted the RAM frequency and voltage settings, your MSI motherboard will restart, applying the changes you made. However, overclocking can sometimes result in instability, so it’s crucial to thoroughly test the stability of your overclocked RAM.
In the next section, we’ll discuss the process of testing the stability of your overclocked RAM and how to ensure reliable performance.
Step 3: Testing Stability
After adjusting the RAM frequency and voltage settings in the BIOS, the next step is to test the stability of your overclocked RAM on an MSI motherboard. Testing for stability is crucial to ensure that your system can handle the increased performance without encountering crashes or errors.
Here’s how you can test the stability of your overclocked RAM:
- Use a reliable stress-testing tool: There are various stress-testing tools available that can put your system under heavy load and test its stability. Popular options include Prime95, Memtest86, and AIDA64. Choose the tool that fits your requirements and run it to stress-test your system.
- Monitor for errors or instability: While running the stress test, keep an eye out for any errors, crashes, or system instability. Pay attention to any blue screen of death (BSOD) errors, application crashes, or system freezes. These are signs that your overclocked RAM is not stable.
- Monitor temperatures: As your system is under heavy load during the stress test, it’s important to monitor the temperatures of your CPU, GPU, and RAM. Use software tools such as MSI Afterburner or HWMonitor to monitor the temperatures. If temperatures reach unsafe levels, you may need to reconsider your overclocking settings or improve your cooling solutions.
- Run the stress test for an extended period: To ensure the stability of your overclocked RAM, it’s recommended to run the stress test for an extended period, ideally several hours or even overnight. This will give you a better indication of the long-term stability of your system.
- Observe for any errors or crashes: During the stress test, closely observe your system for any errors or crashes. If you encounter any issues, it’s an indication that your overclocked RAM is not stable. In such cases, you may need to revisit the BIOS settings and make adjustments to find a stable overclock.
By thoroughly testing the stability of your overclocked RAM, you can ensure that your system is running reliably and without any issues. In the next section, we’ll discuss the process of fine-tuning the overclocked settings for optimal performance.
Step 4: Fine-tuning the Overclock
Once you’ve tested the stability of your overclocked RAM and ensured that your system is running smoothly, you can proceed to fine-tune the overclocked settings for optimal performance on your MSI motherboard. Fine-tuning allows you to make adjustments to achieve the best balance between performance and stability.
Here are some tips for fine-tuning your overclocked RAM:
- Incrementally increase the frequency: If you’ve tested the stability of your overclocked RAM and it’s running without issues, you can consider gradually increasing the frequency further. Increase the frequency in small increments, such as 100-200MHz, and test for stability each time.
- Test for stability after each adjustment: After making any changes to the overclocked settings, it’s essential to retest for stability. Run the stress-testing tool for an extended period and monitor for any errors or instability. If you encounter any issues, revert to the previous stable settings.
- Adjust the voltage if needed: As you increase the frequency, your RAM modules may require higher voltage for stability. If you’re experiencing instability even after increasing the frequency, you can try incrementally raising the voltage. However, be cautious as excessive voltage can damage your RAM modules.
- Experiment with different timings: RAM timings, also known as latency timings, determine the efficiency of data transfer within your RAM modules. While overclocking, you can experiment with different timings to achieve the best performance. However, changing timings can be complex, so it’s recommended to consult resources specific to your RAM modules and MSI motherboard.
- Keep an eye on temperatures: Throughout the fine-tuning process, remember to monitor the temperatures of your CPU, GPU, and RAM. Higher frequencies or voltages can result in increased heat output. Ensure that your cooling setup can handle the additional heat to maintain stability and prevent any thermal throttling.
Remember, fine-tuning an overclock takes time and patience. It’s essential to test for stability after each adjustment and make incremental changes. Take note of the optimal settings that provide the best balance between performance and stability for your particular system.
Now that you’ve fine-tuned the overclocked settings for your RAM, it’s time to save your changes in the BIOS setup. We’ll cover that in the next section.
Step 5: Saving and Exiting BIOS
After fine-tuning the overclocked settings for your RAM on an MSI motherboard, it’s time to save your changes and exit the BIOS setup. Saving the changes ensures that your overclocked settings are applied every time you start your computer.
Here’s how you can save and exit the BIOS setup:
- Locate the option to save your settings. In most BIOS interfaces, you’ll find a “Save and Exit” option or something similar. It may be listed under a “Exit” or “Exit Setup” menu.
- Select the “Save and Exit” option by pressing the designated key or using the arrow keys to navigate and pressing Enter.
- Confirm your selection to save the changes. Depending on the BIOS interface, you may need to select “Save Changes and Exit” or a similar option. Again, follow the on-screen instructions or refer to your motherboard’s manual for the specific steps.
- Your computer will then proceed to restart with the new overclocked settings applied.
Once your computer restarts, it will boot up with the overclocked RAM settings. You can verify the new frequency and voltage settings in your operating system or by re-entering the BIOS setup if needed.
It’s important to note that overclocking is not without risks, and it may void your warranty. Keep an eye on your system for any signs of instability or crashes. If you encounter any issues, such as frequent crashes or errors, you may need to revisit the BIOS settings and adjust the overclocked settings accordingly.
Congratulations! You have successfully overclocked your RAM on an MSI motherboard. Enjoy the improved performance and responsiveness of your system.
Conclusion
Congratulations on completing the process of overclocking your RAM on an MSI motherboard! By increasing the RAM frequency and fine-tuning the settings, you’ve unlocked the potential for improved performance and responsiveness in your system.
Throughout this guide, we’ve discussed the fundamentals of overclocking, the precautions and safety measures to take, and the step-by-step process of overclocking your RAM. It’s important to remember that overclocking comes with risks, including potential instability or damage to your hardware. Always proceed with caution and take the necessary precautions to ensure the safety and stability of your system.
When overclocking, it’s crucial to monitor the temperatures of your CPU, GPU, and RAM to prevent overheating. Regularly stress-test your system and monitor for stability issues or errors. By doing so, you can find the optimal settings that provide the best balance between performance and stability.
We hope this guide has provided you with the knowledge and confidence to overclock your RAM on an MSI motherboard. Remember to consult your motherboard’s manual and the resources available specific to your RAM modules for more in-depth guidance.
Happy overclocking, and may your system deliver the enhanced performance you desire!