Introduction
The Basic Input/Output System, commonly known as BIOS, is a crucial component of your computer’s motherboard. It is responsible for initializing and controlling hardware devices during the boot process. Over time, BIOS firmware may be updated by the manufacturer to fix bugs, add new features, or improve system compatibility. Updating your BIOS ensures that your motherboard is running on the latest firmware, maximizing performance and stability. In this article, we will explore different methods to update the BIOS on an MSI motherboard.
Before diving into the various methods, it is important to understand the importance of keeping your BIOS up to date. BIOS updates often address security vulnerabilities, enhance system compatibility with new hardware, and improve overall system performance. Furthermore, they can also provide support for new technologies, such as faster RAM speeds or improved CPU microcode. Regularly updating your BIOS can help extend the lifespan of your motherboard and ensure a smooth computing experience.
While updating the BIOS may seem like a daunting task, modern motherboards, like those manufactured by MSI, provide user-friendly tools and utilities to simplify the process. It is crucial to follow the recommended procedures and take necessary precautions to avoid any potential issues or system malfunctions during the update. In the following sections, we will discuss the preparations you need to make before updating, as well as four different methods for updating the BIOS on your MSI motherboard.
Why should you update your BIOS?
Updating your BIOS may not be something that crosses your mind often, but it is important to understand the benefits it can bring to your computer system. Here are several reasons why you should consider updating your BIOS:
1. Improved system stability and performance: BIOS updates often include bug fixes and optimizations that can enhance the stability and performance of your system. By updating your BIOS, you can ensure that your computer is running smoothly and efficiently.
2. Support for new hardware: As technology advances, new hardware components and peripherals are introduced into the market. These new devices may require updated BIOS firmware to ensure they function properly. By updating your BIOS, you can ensure compatibility with the latest hardware and take advantage of new features and improvements.
3. Enhanced security: Manufacturers often release BIOS updates to address security vulnerabilities that have been discovered. By applying these updates, you can strengthen the security of your system, protect against potential threats, and keep your personal information safe.
4. Improved energy efficiency: Some BIOS updates include power management improvements that can help reduce energy consumption and extend the battery life of your laptop or mobile device. Updating your BIOS can have a positive impact on both your wallet and the environment.
5. Compatibility with newer operating systems: BIOS updates may be necessary to ensure compatibility with the latest operating systems. If you plan on upgrading your operating system, it is advisable to check for any available BIOS updates that may be required for a smooth transition.
6. Access to new features: BIOS updates can also introduce new features or options that were not available in previous versions. These features can range from improved overclocking capabilities to additional customization options, allowing you to enhance your computing experience.
Considering these benefits, it is important to keep your BIOS up to date. However, it is recommended to only update your BIOS when necessary and to follow the manufacturer’s instructions carefully to avoid any potential issues during the update process.
Preparations before updating BIOS
Prior to updating the BIOS on your MSI motherboard, it is essential to take certain precautions and make necessary preparations to ensure a smooth and successful update. Here are some important steps to consider:
1. Research and backup: Before proceeding with the BIOS update, it is crucial to research and gather information about the specific update you plan to install. Visit the MSI website or consult the motherboard’s user manual to find the correct BIOS version for your motherboard model. Additionally, it is highly recommended to back up your important files and documents before updating the BIOS, as a power failure or unexpected error during the update process could potentially lead to data loss.
2. Check for stability: Ensure that your computer is running smoothly and is stable before updating the BIOS. Address any software or hardware issues that may be present before proceeding with the update. Running a system check and performing necessary maintenance tasks can help prevent any potential complications during the update process.
3. Power supply and connection: It is important to ensure that your computer is connected to a reliable power source during the BIOS update. A sudden loss of power during the update can result in a corrupted BIOS and potentially render your motherboard unusable. Connect your computer to a stable power supply, preferably using an uninterruptible power supply (UPS), to protect against power fluctuations or outages.
4. Close unnecessary applications: Before initiating the BIOS update, close any unnecessary applications and processes running in the background. This will help free up system resources and minimize the risk of interference during the update process. A smooth and uninterrupted update is crucial to prevent any potential issues or errors.
5. Disable any overclocking: If you have overclocked your system, it is recommended to revert to the default settings before updating the BIOS. Overclocking can put additional stress on the system and may interfere with the update process. Resetting the system to its default settings helps ensure stability and compatibility during the update.
6. Follow the manufacturer’s instructions: Each motherboard manufacturer may have specific instructions for updating the BIOS on their products. It is important to carefully read and follow the manufacturer’s guidelines to avoid any unnecessary complications. Consult the motherboard’s user manual or visit the manufacturer’s website for detailed instructions on updating the BIOS on your particular MSI motherboard model.
By following these preparations, you can minimize the risk of encountering issues during the BIOS update process and ensure a smoother and safer update experience.
Method 1: Using MSI Live Update
MSI Live Update is a convenient and user-friendly utility provided by MSI that allows you to easily update the BIOS on your MSI motherboard. Follow these steps to update your BIOS using MSI Live Update:
Step 1: Download and install MSI Live Update: Visit the MSI website and navigate to the Downloads section. Search for MSI Live Update and download the latest version of the utility compatible with your motherboard model. Install the software on your computer by following the on-screen instructions.
Step 2: Launch MSI Live Update: Once the installation is complete, open the MSI Live Update application. It should be located in your Start menu or on your desktop, depending on where you chose to install it.
Step 3: Scan for updates: After launching the application, MSI Live Update will automatically scan your system to detect any available BIOS updates for your motherboard. Wait for the scan to complete, as this may take a few moments.
Step 4: Select and download the BIOS update: Once the scan is finished, MSI Live Update will display a list of available updates. Locate the BIOS update in the list and click on the “Download” button next to it. The utility will then download the necessary files onto your computer.
Step 5: Install the BIOS update: After the download is complete, MSI Live Update will prompt you to install the BIOS update. Click on the “Install” button and follow the on-screen instructions to proceed with the update process. It is important not to interrupt or power off your computer during this process, as it may lead to a corrupted BIOS.
Step 6: Reboot your computer: Once the update is complete, MSI Live Update will prompt you to restart your computer. Click on the “Restart now” button to reboot your system. After the restart, the updated BIOS will be in effect, providing you with the latest firmware for your MSI motherboard.
Using MSI Live Update simplifies the process of updating your BIOS by providing a user-friendly interface and automated scanning and installation. However, it is crucial to ensure a stable power supply and follow the manufacturer’s instructions to avoid any potential issues during the update process.
Method 2: Using MSI HQ USB BIOS Flash Tool
If you prefer a manual approach or MSI Live Update is not suitable for your situation, you can update your BIOS using the MSI HQ USB BIOS Flash Tool. Follow the steps below to update your BIOS using this method:
Step 1: Download and prepare the required files: Visit the MSI website and navigate to the Support section. Search for your motherboard model and locate the BIOS update file. Download the BIOS update file and extract it to a USB flash drive formatted in FAT32.
Step 2: Download MSI HQ USB BIOS Flash Tool: Search for the MSI HQ USB BIOS Flash Tool online and download the latest version of the utility. This tool enables you to flash the BIOS using a USB drive.
Step 3: Prepare the USB flash drive: Connect the USB flash drive containing the extracted BIOS update file to your computer. Make sure the USB flash drive is the only storage device connected to your computer. It is crucial to use a reliable and properly formatted USB flash drive to ensure a successful update.
Step 4: Launch MSI HQ USB BIOS Flash Tool: Run the MSI HQ USB BIOS Flash Tool as an administrator. The tool should detect the connected USB flash drive and display it in the list of available devices.
Step 5: Select and flash the BIOS: In the MSI HQ USB BIOS Flash Tool, select the USB flash drive containing the BIOS update file. Double-check that you have selected the correct device to avoid flashing the wrong BIOS. Then, click on the “Flash BIOS” button to initiate the flashing process. Follow the on-screen instructions and wait for the flash process to complete.
Step 6: Reboot your computer: After the BIOS has been successfully flashed, safely remove the USB flash drive from your computer. Restart your computer to apply the updated BIOS settings. During the reboot, the updated BIOS will take effect, providing you with the latest firmware for your MSI motherboard.
Using the MSI HQ USB BIOS Flash Tool gives you more control over the BIOS update process, allowing manual installation from a USB flash drive. However, it is essential to carefully follow the manufacturer’s instructions and avoid interrupting the process to prevent potential issues or a corrupted BIOS.
Method 3: Using a USB Flash Drive
If you prefer a more manual approach to update the BIOS on your MSI motherboard, you can use a USB flash drive. This method requires downloading the BIOS update file from the MSI website and creating a bootable USB flash drive. Follow the steps below to update your BIOS using a USB flash drive:
Step 1: Download the BIOS update: Visit the MSI website and navigate to the Support section. Search for your MSI motherboard model and locate the latest BIOS update file. Download the file to your computer.
Step 2: Format the USB flash drive: Connect a USB flash drive to your computer. It is important to use a properly formatted USB flash drive to avoid any issues during the update process. Format the USB drive to FAT32 or FAT file system.
Step 3: Copy the BIOS update file: Extract the downloaded BIOS update file and copy it to the root directory of the USB flash drive. Ensure that the file is named correctly and ends with the proper extension (.BIN or .ROM).
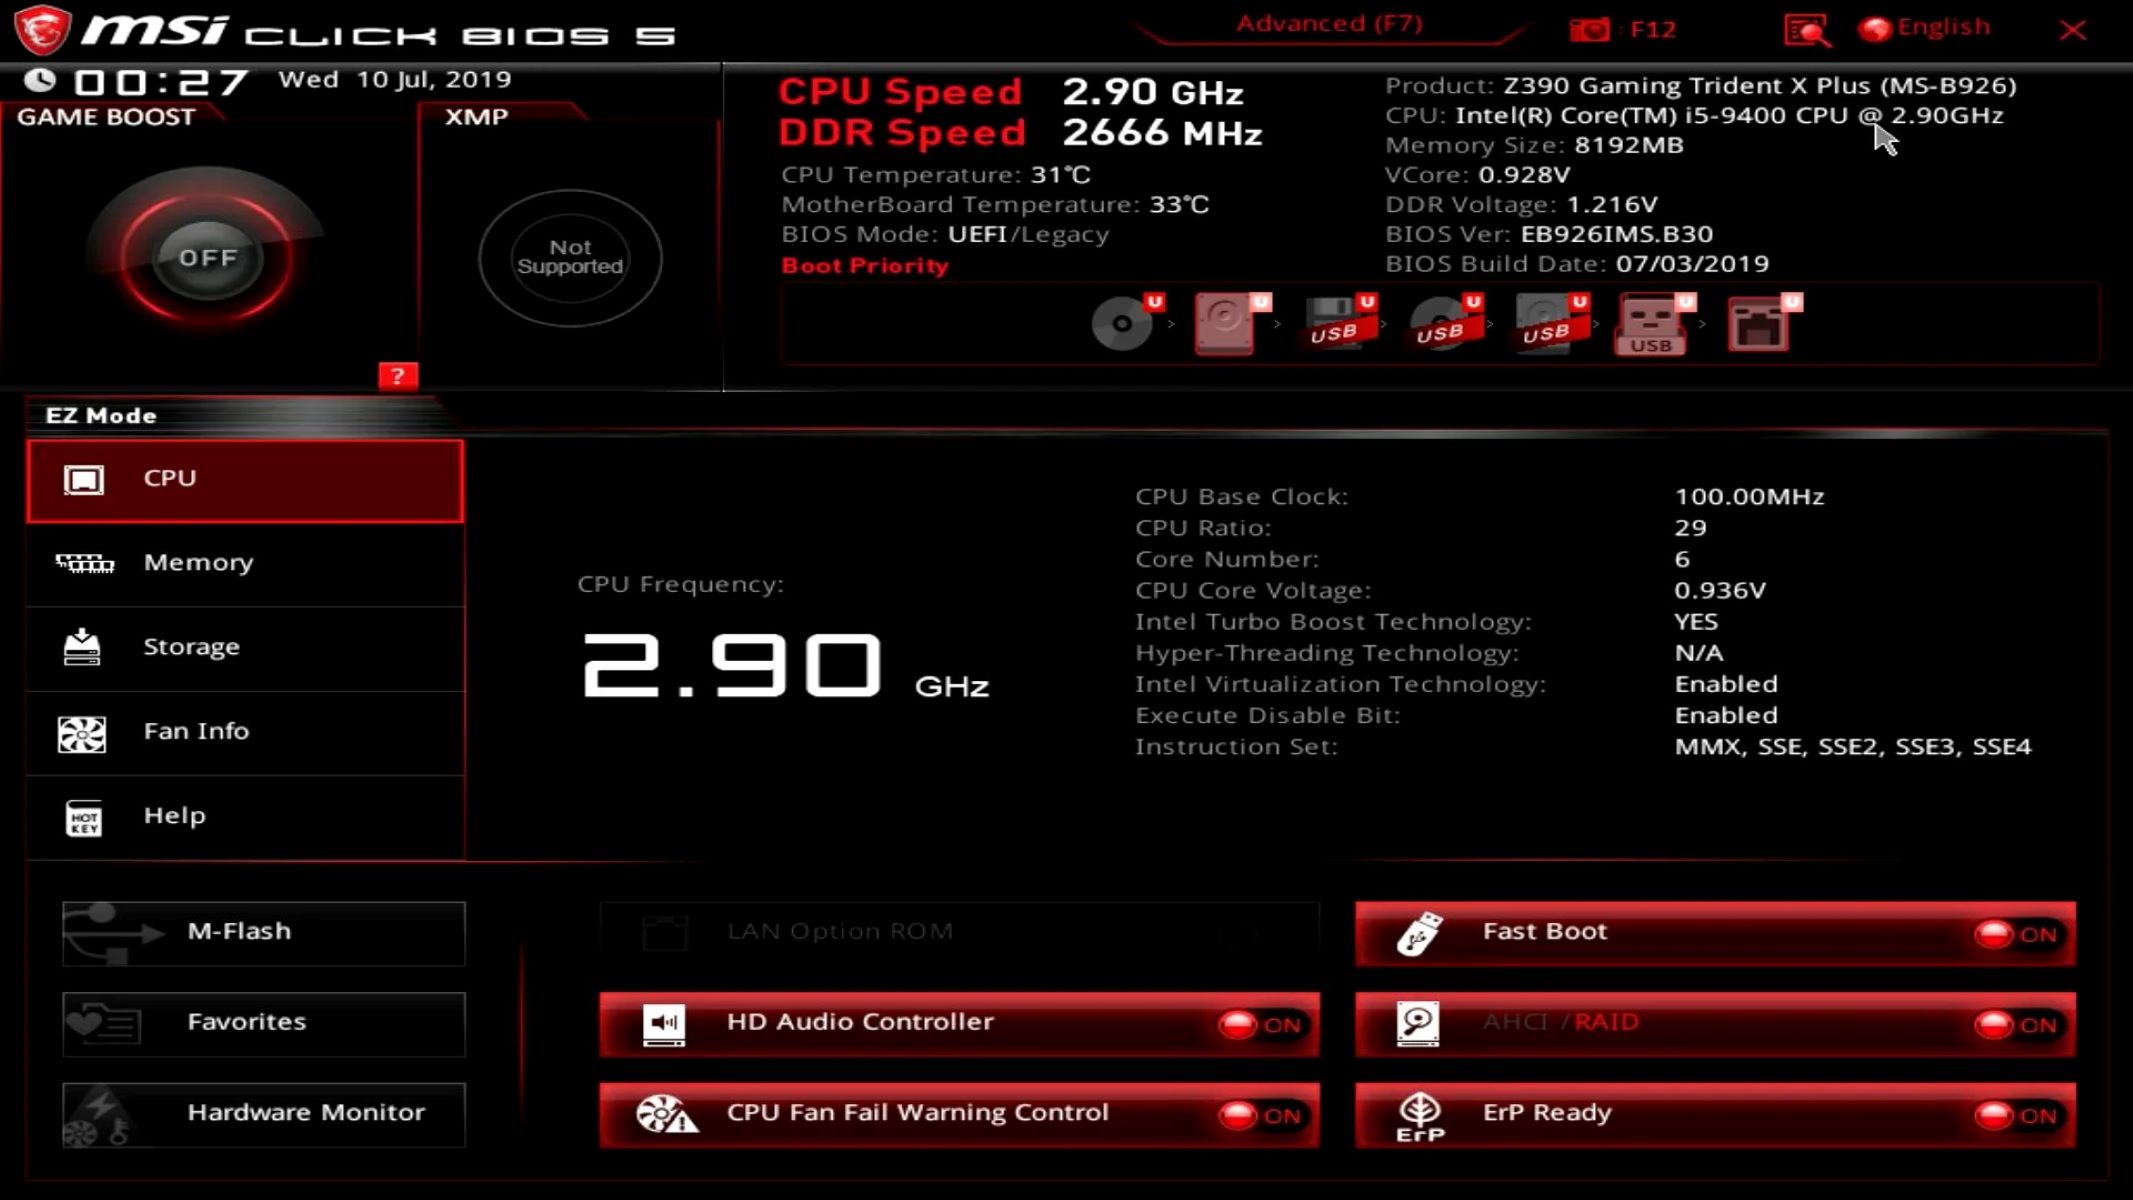
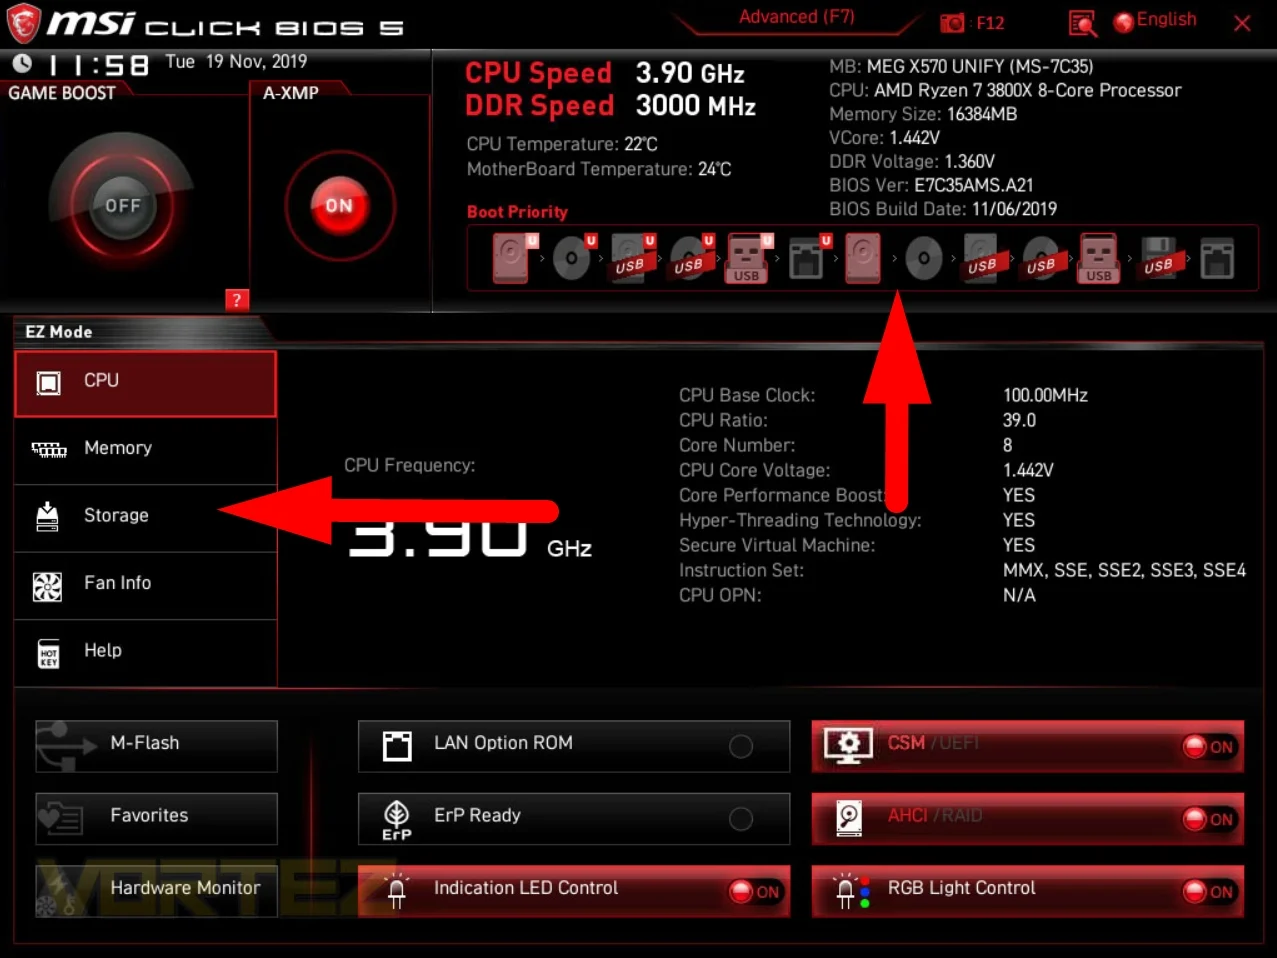
Step 4: Restart your computer and enter BIOS: Restart your computer and access the BIOS setup by pressing the appropriate key during the boot process. The key to access the BIOS may vary depending on your motherboard model (common keys include Del, F2, or F10). Consult your motherboard’s user manual or the MSI website for the specific key.
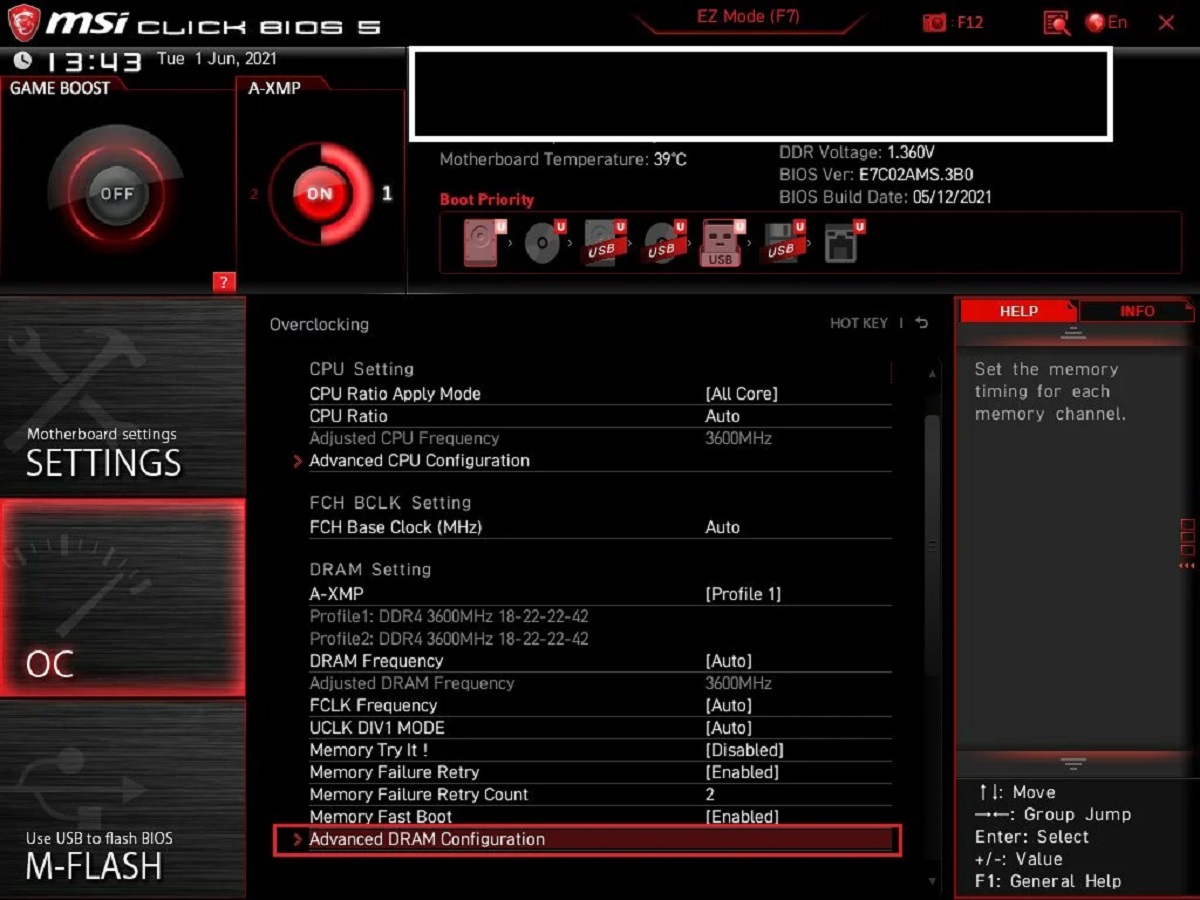
Step 5: Locate the “M-FLASH” or “BIOS Flashback” option: Inside the BIOS setup utility, navigate to the “M-FLASH” or “BIOS Flashback” section. This section allows you to update the BIOS using a USB flash drive.
Step 6: Select the USB flash drive and update the BIOS: Within the “M-FLASH” or “BIOS Flashback” section, select the option to update the BIOS from a USB flash drive. Follow the on-screen instructions to browse and select the BIOS update file on the USB drive. Confirm your selection and initiate the BIOS update process. It may take a few minutes to complete, and the computer may restart multiple times during the process.
Step 7: Verify BIOS update and configure BIOS settings: Once the update process is complete, restart your computer and enter the BIOS setup again. Verify that the BIOS has been successfully updated to the latest version. Additionally, you may need to reconfigure any customized BIOS settings that were previously applied.
Updating the BIOS using a USB flash drive gives you control over the update process and allows for offline updating. Make sure to follow the provided instructions carefully and avoid interrupting the update process to prevent any potential issues or corrupted BIOS.
Method 4: Using the MSI Official Website
If you prefer a direct method of updating the BIOS on your MSI motherboard, you can do so by visiting the official MSI website. This method involves manually downloading the latest BIOS update file and installing it using the provided utility or through the BIOS setup. Follow the steps below to update your BIOS using the MSI website:
Step 1: Visit the MSI website: Open your web browser and navigate to the official MSI website. Go to the Support section and search for your specific motherboard model.
Step 2: Locate the BIOS update: On the product page of your motherboard model, you will find the list of available drivers and BIOS updates. Locate and download the latest BIOS update file compatible with your motherboard.
Step 3: Extract and prepare the BIOS update file: Once the BIOS update file is downloaded, extract it to a location of your choice on your computer. It is recommended to create a separate folder to keep all the necessary files organized.
Step 4: Follow the manufacturer’s instructions: Before proceeding with the installation, carefully read the instructions provided by MSI. These instructions will guide you on how to install the BIOS update using either a utility provided by MSI or through the BIOS setup.
Step 5: Install the BIOS update: Depending on the method recommended by MSI, you will either run the BIOS update utility and select the extracted BIOS update file, or you will reboot your computer and enter the BIOS setup to initiate the update process from there.
Step 6: Wait for the update to complete: Once the installation process begins, it is crucial to let it complete without interruption. The update process may take a few minutes, and your computer may restart multiple times during the process. It is important not to power off your computer or disconnect any hardware during this time.
Step 7: Verify the BIOS update: After the update is completed, restart your computer and enter the BIOS setup to verify that the BIOS has been successfully updated to the latest version. It is also recommended to reconfigure any customized BIOS settings that were previously applied.
Updating the BIOS directly from the MSI official website ensures that you have the latest firmware for your motherboard. It is essential to carefully read and follow the provided instructions to avoid any potential issues or complications during the update process.
Troubleshooting Common BIOS Update Issues
While updating the BIOS on your MSI motherboard is usually a straightforward process, there may still be some common issues that you could encounter. Here are a few troubleshooting steps to help you overcome these issues:
1. Power failure during update: If your computer loses power or shuts down unexpectedly during the BIOS update process, it can result in a corrupted BIOS. To avoid this, ensure that your computer is connected to a stable power source, preferably using an uninterruptible power supply (UPS). If a power failure occurs during the update, you may need to contact MSI support for assistance in recovering or restoring the BIOS.
2. Incorrect BIOS version: It is crucial to download and install the correct BIOS update for your specific motherboard model. Using the wrong BIOS file can lead to compatibility issues and may damage your motherboard. Double-check the model and version of your motherboard before downloading and applying any BIOS updates.
3. Interrupting the update process: Interrupting the BIOS update process by shutting down the computer or disconnecting any hardware can cause irreversible damage to your motherboard. It is essential to let the update process complete without interruptions and follow the manufacturer’s instructions carefully.
4. Failed update or error messages: If you encounter any error messages or experience a failed update, restart your computer and try the update process again. If the issue persists, visit the MSI website or contact their customer support for further assistance. They may provide you with specific troubleshooting steps or recommend a different method for updating your BIOS.
5. Incompatibility with hardware or software: Sometimes, BIOS updates may introduce compatibility issues with certain hardware or software configurations. If you experience any compatibility issues after updating your BIOS, check for any available driver or firmware updates for your hardware components. Additionally, you can try resetting your BIOS to its default settings or contacting MSI support for further guidance.
6. System instability after the update: In some cases, a BIOS update may result in system instability or unexpected behavior. If you encounter such issues, you can try resetting your BIOS settings to default, clearing the CMOS (Complementary Metal-Oxide-Semiconductor), or contacting MSI support for assistance in resolving the issue.
Remember, updating the BIOS carries some inherent risks, and it should only be performed when necessary and with caution. If you are unsure or uncomfortable performing the update yourself, it is always recommended to seek professional assistance or contact MSI for guidance.
Conclusion
Updating the BIOS on your MSI motherboard is an important step to ensure optimal system performance, stability, and compatibility. Whether you choose to use MSI Live Update, the MSI HQ USB BIOS Flash Tool, a USB flash drive, or the MSI official website, it is crucial to prepare properly and follow the instructions provided by MSI to avoid any potential issues during the update process.
By updating your BIOS, you can benefit from bug fixes, improved hardware compatibility, enhanced security, and access to new features and optimizations. It is recommended to update the BIOS when necessary and to regularly check for updates to keep your system up to date.
However, remember that updating the BIOS carries some risks, and it should be done with caution. It is important to back up your important files, ensure a stable power supply, and follow the manufacturer’s instructions carefully. If you encounter any issues during or after the update, do not hesitate to seek assistance from MSI support or professional services.
Keeping your BIOS updated is one of the best practices for maintaining a healthy and efficient computer system. It can help extend the lifespan of your motherboard, enhance system performance, and ensure compatibility with new hardware and software advancements.
We hope this article has provided you with valuable insights and guidance on how to update the BIOS on your MSI motherboard. Remember to always research, prepare, and proceed with caution to achieve a successful and smooth update process.