Introduction
When it comes to optimizing the performance of your EVGA graphics card, ensuring that you have the latest BIOS version is crucial. The BIOS, or Basic Input/Output System, is software stored on your graphics card that controls its basic functions and settings.
Updating your EVGA graphics card BIOS can bring several benefits. It can improve compatibility with the latest software and games, fix bugs and glitches, and enhance overall performance. Keeping your BIOS up to date ensures that you are utilizing the full power of your graphics card and taking advantage of any new features or optimizations.
In this article, we will guide you through the process of updating the BIOS on your EVGA graphics card. We will cover everything from checking your current BIOS version to troubleshooting common issues that may arise during the update.
Before we begin, please note that updating your BIOS carries a certain level of risk. If not done correctly, it can lead to system instability or even render your graphics card unusable. Therefore, it is important to follow the instructions carefully and proceed with caution.
Now, let’s dive into the steps necessary to update your EVGA graphics card BIOS and unlock its full potential.
Why Update Your EVGA Graphics Card BIOS?
Updating the BIOS of your EVGA graphics card is important for several reasons. Let’s take a closer look at why keeping your BIOS up to date is essential for optimal performance:
1. Improved Compatibility: Graphics card manufacturers regularly release updates to ensure compatibility with the latest software and games. By updating your EVGA graphics card BIOS, you can minimize compatibility issues and enjoy a smoother gaming experience.
2. Bug Fixes and Enhancements: BIOS updates often include bug fixes and performance enhancements. Graphics card companies address known issues and release patches through BIOS updates, allowing you to take advantage of improved stability and performance.
3. Feature Unlocks: In some cases, BIOS updates can unlock additional features and functionalities on your graphics card. These updates could introduce new overclocking options, advanced power management settings, or improved control over RGB lighting, enabling you to customize your graphics card to your preferences.
4. Performance Optimization: GPU manufacturers are continually refining their graphics card designs to improve performance. BIOS updates may include optimizations that enhance the performance of your EVGA graphics card, making it run more efficiently and providing a boost in FPS for gaming or rendering tasks.
5. Security Patches: Like any software, the BIOS can also have security vulnerabilities. Graphics card companies take security seriously and release BIOS updates that patch any known vulnerabilities, protecting your system from potential exploits.
6. Long-Term Support: Updating your EVGA graphics card BIOS ensures that you receive ongoing support from the manufacturer. It demonstrates the commitment to improving their products and delivering a better user experience by providing regular updates and support to customers.
By regularly updating your EVGA graphics card BIOS, you can take advantage of these benefits, improving compatibility, stability, performance, and security. Now that you understand the importance of BIOS updates, let’s move on to the next step of checking your current BIOS version.
Checking Your Current BIOS Version
Before you proceed with updating the BIOS on your EVGA graphics card, it’s important to know which version you currently have. This information will help you determine if there is a newer version available and if an update is required.
Here are the steps to check your current BIOS version:
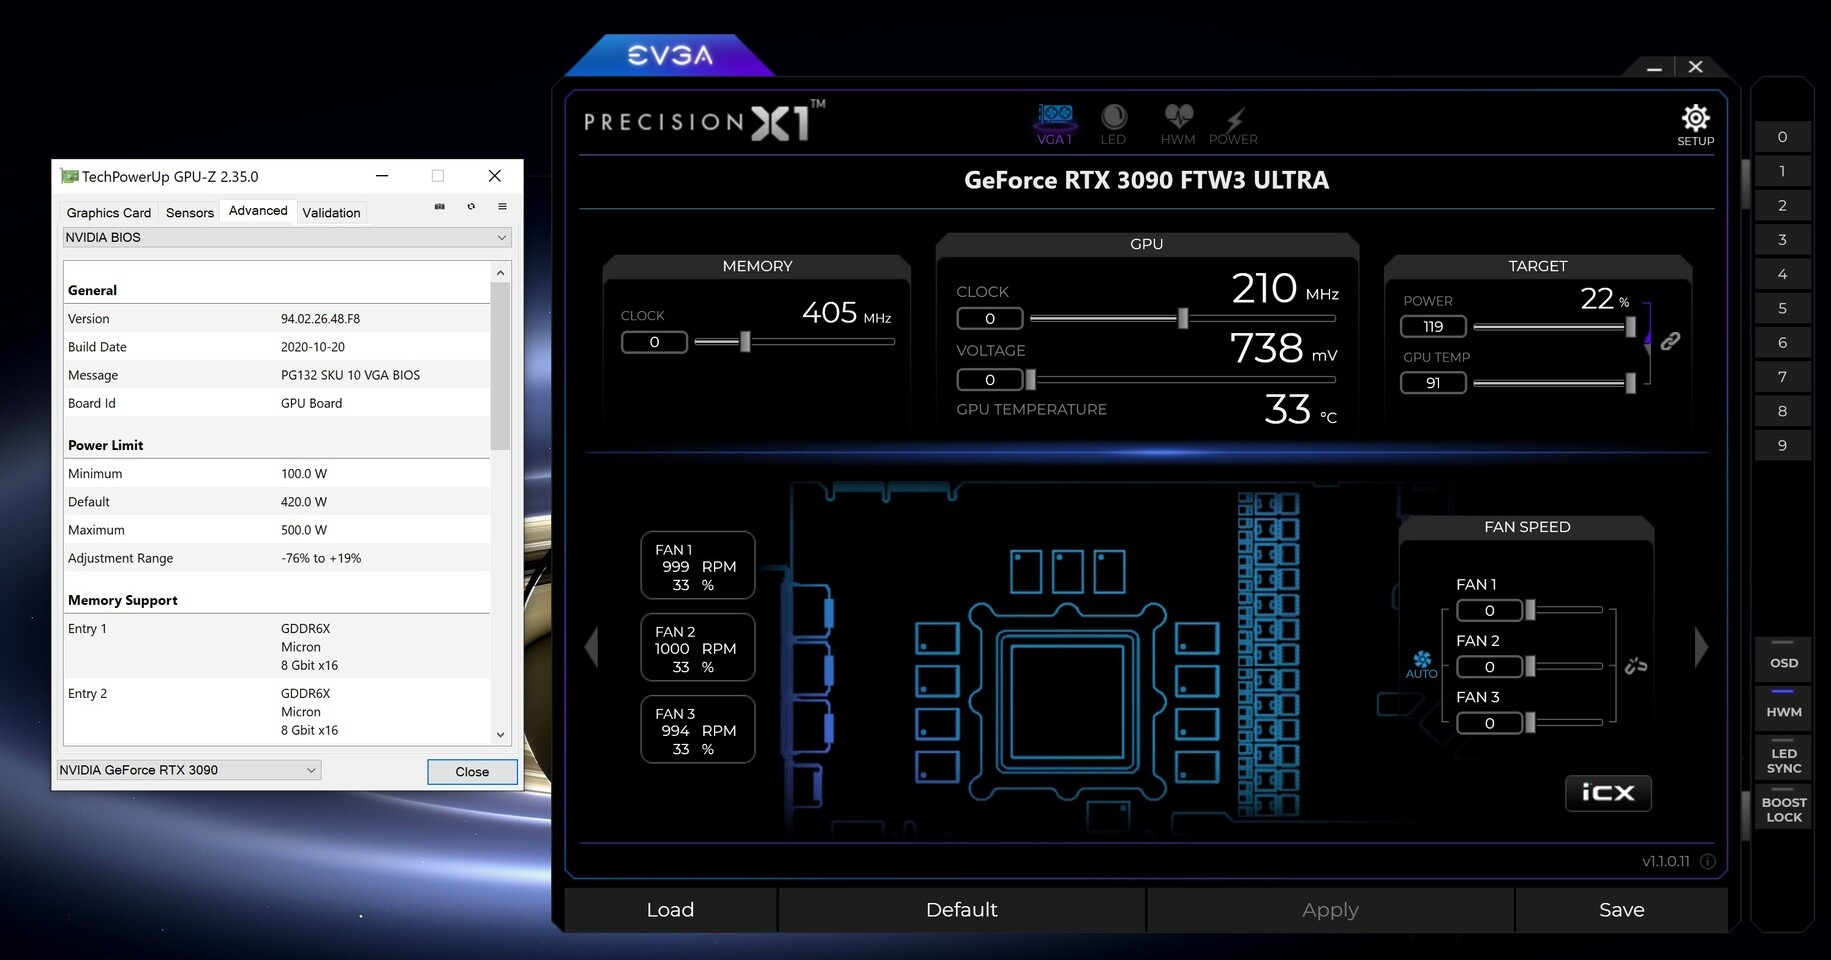
- Open EVGA Precision X1: EVGA Precision X1 is a software utility that allows you to monitor and adjust various settings on your graphics card. Open the application on your computer.
- Navigate to the Information Tab: In EVGA Precision X1, navigate to the “Information” tab. This tab provides detailed information about your graphics card, including the BIOS version.
- Locate the BIOS Version: Look for the entry that displays the BIOS version. It may be labeled as “VBIOS Version” or something similar. Take note of the current version number.
Alternatively, you can also check the BIOS version within the system BIOS itself. Restart your computer and enter the BIOS settings by pressing a specific key during boot-up (usually displayed on the screen). Inside the BIOS settings, navigate to the graphics card information page, where you should find the BIOS version listed.
Once you have identified your current BIOS version, you can compare it to the latest version available on the EVGA website. If a newer version exists, it is recommended to proceed with the BIOS update to benefit from the latest features, bug fixes, and performance enhancements.
Now that you have checked your current BIOS version, it’s time to download the latest BIOS update from the EVGA website. We will guide you through this process in the next section.
Downloading the Latest BIOS Update
Once you have checked your current BIOS version, the next step is to download the latest BIOS update for your EVGA graphics card. EVGA provides these updates on their official website, ensuring you have access to the most up-to-date software for your graphics card.
Here is how you can download the latest BIOS update:
- Visit the EVGA Website: Open your web browser and navigate to the EVGA website (www.evga.com).
- Go to the Drivers & Support Section: Locate the “Drivers & Support” tab on the EVGA website and click on it. This will take you to the drivers and support page for EVGA products.
- Select Your Graphics Card: In the product dropdown menu, select your EVGA graphics card model. This will filter the available downloads specifically for your card.
- Choose the BIOS Category: Within the downloads section, locate the BIOS category or subcategory. Click on it to display the available BIOS updates for your graphics card.
- Download the Latest BIOS Update: Look for the latest BIOS update listed for your graphics card model. Ensure that it matches or is higher than your current BIOS version. Click on the download button to start the download process.
While downloading the BIOS update from the EVGA website, make sure to save it to a location on your computer or an external storage device, such as a USB drive, for easy access during the update process.
It’s worth noting that EVGA provides comprehensive instructions and documentation for each BIOS update. We recommend reviewing these materials to ensure you have a clear understanding of the update process and any prerequisites or considerations specific to your graphics card model.
In the next section, we will cover the steps required to create a bootable USB drive, which will be used to update the BIOS on your EVGA graphics card. Let’s continue.
Creating a Bootable USB Drive
Before you can update the BIOS on your EVGA graphics card, you will need to create a bootable USB drive. This will serve as a means to flash the new BIOS onto your graphics card.
Follow these steps to create a bootable USB drive:
- Format the USB Drive: Connect your USB drive to your computer and ensure it is empty. Open the File Explorer (Windows) or Finder (Mac) and right-click on the USB drive. Select the option to format the drive, choosing the FAT32 file system.
- Download and Extract the BIOS Update Files: Locate the BIOS update file that you downloaded from the EVGA website. Extract the contents of the ZIP file, ensuring that all the necessary BIOS update files are present.
- Copy the BIOS Update Files to the USB Drive: Copy the extracted BIOS update files to the root directory of the USB drive. Ensure that you do not place them in any folders or subdirectories on the drive.
- Name the BIOS Update File Appropriately: Rename the main BIOS update file to a recognizable and easy-to-remember name. This will make it easier to navigate and select during the update process.
Once you have completed these steps, your USB drive is now bootable and ready to be used for updating the BIOS on your EVGA graphics card.
It is crucial to note that the BIOS update process can vary depending on your specific EVGA graphics card model. Therefore, we recommend referring to the documentation provided by EVGA for your particular card. This documentation will outline any additional steps or considerations specific to your graphics card.
In the next section, we will guide you through the process of updating the BIOS using the bootable USB drive you created. Let’s proceed.
Updating the BIOS Using a Bootable USB Drive
Now that you have created a bootable USB drive with the necessary BIOS update files, it’s time to update the BIOS on your EVGA graphics card. The following steps will guide you through the process:
- Power Off and Disconnect: Ensure that your computer is powered off and disconnected from any power sources.
- Insert the Bootable USB Drive: Insert the bootable USB drive with the BIOS update files into a USB port on your computer.
- Power On the Computer: Power on your computer and immediately enter the BIOS settings by pressing the specified key (usually displayed on the screen) during the boot-up process.
- Navigate to the BIOS Update Section: Inside the BIOS settings, locate the section or menu that allows you to update the BIOS. The exact location and naming may vary depending on your motherboard manufacturer.
- Select the USB Drive as the Boot Device: In the BIOS update section, select the USB drive as the boot device. This ensures that your computer boots from the USB drive containing the BIOS update files.
- Start the BIOS Update: Once the USB drive is selected as the boot device, initiate the BIOS update process. Follow the on-screen prompts and select the appropriate BIOS update file that you previously renamed and copied to the USB drive.
- Wait for the BIOS Update to Complete: The BIOS update process will take some time to complete. During this time, it is crucial not to interrupt the process or power off your computer.
- Reboot Your Computer: After the BIOS update is finished, you can safely reboot your computer. The updated BIOS will now be applied to your EVGA graphics card.
Once your computer has rebooted, you can verify that the BIOS update was successful by checking the BIOS version, as we discussed in the earlier section. Ensure that the new version matches the one you downloaded from the EVGA website.
If there are any issues during the BIOS update process, refer to the documentation provided by EVGA or consult their support resources for further assistance.
Next, we will cover how to verify the BIOS update and make sure it was applied correctly. Let’s continue.
Verifying the BIOS Update
After updating the BIOS on your EVGA graphics card, it’s essential to verify that the update was applied successfully. Taking this step ensures that your graphics card is running the latest firmware and that any improvements or fixes included in the update are in effect.
Here are the steps to verify the BIOS update:
- Restart Your Computer: Start by restarting your computer to ensure that any changes made during the BIOS update are fully applied.
- Enter the BIOS Settings: During the boot-up process, enter the BIOS settings by pressing the specified key (usually displayed on the screen).
- Navigate to the System Information or BIOS Information: Inside the BIOS settings, navigate to the system information section, which may be labeled as BIOS information or something similar.
- Check the BIOS Version: Locate the entry that displays the BIOS version and compare it to the version you updated to. Ensure that the version matches, indicating that the BIOS update was successful.
- Ensure Proper System Functionality: After verifying the BIOS version, proceed to booting your operating system. Monitor your system’s performance, stability, and compatibility with software and games to ensure everything is functioning as expected.
If you encounter any issues or unexpected behavior after the BIOS update, it is recommended to revert back to the previous BIOS version or seek assistance from EVGA technical support. They can provide guidance and troubleshoot any issues you may be experiencing.
Remember, updating the BIOS always carries a certain level of risk. If you experience any difficulties during the verification process or encounter any problems with your system, it’s crucial to seek professional help to avoid any further complications.
With the BIOS update successfully verified, you can now enjoy the benefits of enhanced compatibility, improved performance, bug fixes, and any additional features that were introduced with the update.
In the next section, we will address common troubleshooting issues that may arise during the BIOS update process. Let’s continue.
Troubleshooting Common Issues
While updating the BIOS on your EVGA graphics card is generally a straightforward process, there may be instances where you encounter certain issues. Here are some common problems that may arise during the BIOS update and their potential solutions:
1. Power Interruption: If your computer loses power during the BIOS update process, it can result in a corrupted BIOS, rendering your graphics card unusable. In this case, you may need to seek professional help or contact EVGA technical support to recover your graphics card.
2. Incompatibility with Operating System: Ensure that the BIOS update you are attempting to install is compatible with your operating system. Using an incompatible BIOS update can lead to system instability or functionality issues. Make sure to carefully check compatibility before proceeding.
3. Incorrect BIOS Version: Check that you have downloaded the correct BIOS update for your specific EVGA graphics card model. Installing an incorrect BIOS can cause compatibility issues or even damage your hardware.
4. Internet Connection Interruptions: If you’re updating the BIOS using an online method, ensure that you have a stable and uninterrupted internet connection. Any interruptions during the download or update process can result in an incomplete or corrupted BIOS update.
5. Firmware Locked by Manufacturer: Some graphics cards have their firmware locked by the manufacturer, preventing users from updating the BIOS. Before attempting a BIOS update, check if your EVGA graphics card allows for user-initiated updates or requires a specific procedure.
6. BIOS Update Failure: In some cases, the BIOS update may fail to complete properly. If this occurs, reset your computer and try the update process again. If the problem persists, consult the documentation provided by EVGA or reach out to their technical support for further assistance.
7. Loss of Graphics Card Functionality: If your graphics card exhibits abnormal behavior or malfunctions after the BIOS update, it may suggest compatibility issues or a flawed installation. Consider reverting to the previous BIOS version or contacting EVGA technical support for guidance.
It’s important to remember that the BIOS update process can vary depending on your specific EVGA graphics card model. Always refer to the documentation provided by EVGA and follow their instructions carefully to minimize the risk of encountering any issues.
If you encounter any problems during the update process that are not covered here, don’t hesitate to seek assistance from EVGA technical support or consult their community forums for additional troubleshooting advice.
Now that you are aware of these common issues and their potential solutions, let’s wrap up this article with a brief recap.
Conclusion
Updating the BIOS on your EVGA graphics card is a crucial step in optimizing its performance, improving compatibility, and benefiting from the latest features and bug fixes. By following the steps outlined in this article, you can successfully update your EVGA graphics card BIOS and unlock its full potential.
We discussed the importance of updating the BIOS and how it can enhance compatibility, fix bugs, unlock new features, and optimize performance. We also walked through the process of checking your current BIOS version, downloading the latest BIOS update from the EVGA website, creating a bootable USB drive, and updating the BIOS using that drive. Additionally, we covered how to verify the BIOS update and troubleshoot common issues that may arise during the update process.
It is crucial to approach the BIOS update process with caution as it carries a certain level of risk. Make sure to carefully follow the instructions provided by EVGA, review the documentation specific to your EVGA graphics card model, and seek professional help or contact EVGA technical support if you encounter any difficulties or encounter issues.
By keeping your EVGA graphics card BIOS up to date, you can ensure that your graphics card is running at its best and taking advantage of all the improvements and optimizations offered by EVGA. Whether you are a gamer, content creator, or professional, a well-updated BIOS can make a noticeable difference in your overall computing experience.
Remember to back up important data and create system restore points before proceeding with BIOS updates to safeguard against any potential issues. It is always better to be prepared.
Now that you have the knowledge and know-how, go ahead and update your EVGA graphics card BIOS to unleash its true potential. Enjoy improved performance and stability while staying up to date with the latest features and enhancements!