Introduction
When it comes to optimizing the performance of your graphics processing unit (GPU), one important aspect to consider is the fan speed. The GPU fan plays a crucial role in keeping the temperature of the GPU within safe limits. By controlling the fan speed, you can effectively regulate the temperature and prevent overheating issues that can damage your GPU.
In this article, we will delve into the world of GPU fan speed and explore different methods to change it. Whether you are an avid gamer looking to fine-tune your GPU settings for optimal gaming performance or a professional video editor needing to push your GPU to its limits, understanding how to control and adjust the fan speed is essential.
But before we jump into the various ways of changing GPU fan speed, let’s take a moment to understand why this feature is important. The GPU produces a significant amount of heat during operation, which can lead to thermal throttling and performance degradation if not properly managed. The fan is responsible for dissipating the heat generated by the GPU by blowing cool air over the heatsink. By adjusting the fan speed, you can ensure that the GPU stays at an optimal temperature, allowing it to perform at its best without any thermal issues.
Now that we have a basic understanding of the importance of GPU fan speed, let’s move on to how you can check the current fan speed and explore different methods to adjust it to your specific needs. Whether you prefer manual adjustments through software or want to explore BIOS options for more permanent changes, we’ve got you covered. So, let’s dive in and explore the world of GPU fan speed control!
Understanding GPU Fan Speed
Before we delve into the various methods to change the GPU fan speed, it’s important to have a clear understanding of what GPU fan speed is and why it is crucial for optimal performance.
The fan speed of a GPU refers to the rotational speed of the fan attached to the graphics card. It is measured in revolutions per minute (RPM) and determines how fast the fan spins to regulate the temperature of the GPU.
Why is GPU fan speed so important? Well, as the GPU processes high-intensity graphics, it generates a considerable amount of heat. If this heat is not effectively dissipated, it can lead to overheating, causing performance issues and potentially damaging the GPU.
The GPU fan works in conjunction with the heatsink, which is responsible for absorbing and dissipating the heat generated by the GPU. By spinning at different speeds, the fan increases or decreases the airflow over the heatsink, thus regulating the temperature.
Controlling the fan speed allows you to strike a balance between cooling the GPU and minimizing noise levels. Running the fan at a higher speed will provide better cooling but increase the noise produced. Conversely, running the fan at a lower speed may reduce noise but pose a risk of higher temperatures.
Most modern GPUs have built-in mechanisms to automatically adjust fan speed based on temperature. As the temperature rises, the fan speed increases to cool down the GPU, and as the temperature decreases, the fan speed decreases to reduce noise levels. However, these automatic settings may not always meet your specific requirements, especially if you’re engaging in activities that put a heavy load on the GPU, such as gaming or video rendering.
Now that we understand the significance of GPU fan speed, let’s explore how to check the current fan speed of your graphics card and different methods to adjust it according to your needs.
Checking the Current GPU Fan Speed
Before making any adjustments to your GPU fan speed, it’s important to first check the current fan speed. This will give you a baseline to work with and help you determine whether any changes are necessary.
There are several ways to check the current GPU fan speed, depending on your operating system and the tools available. Here are two common methods:
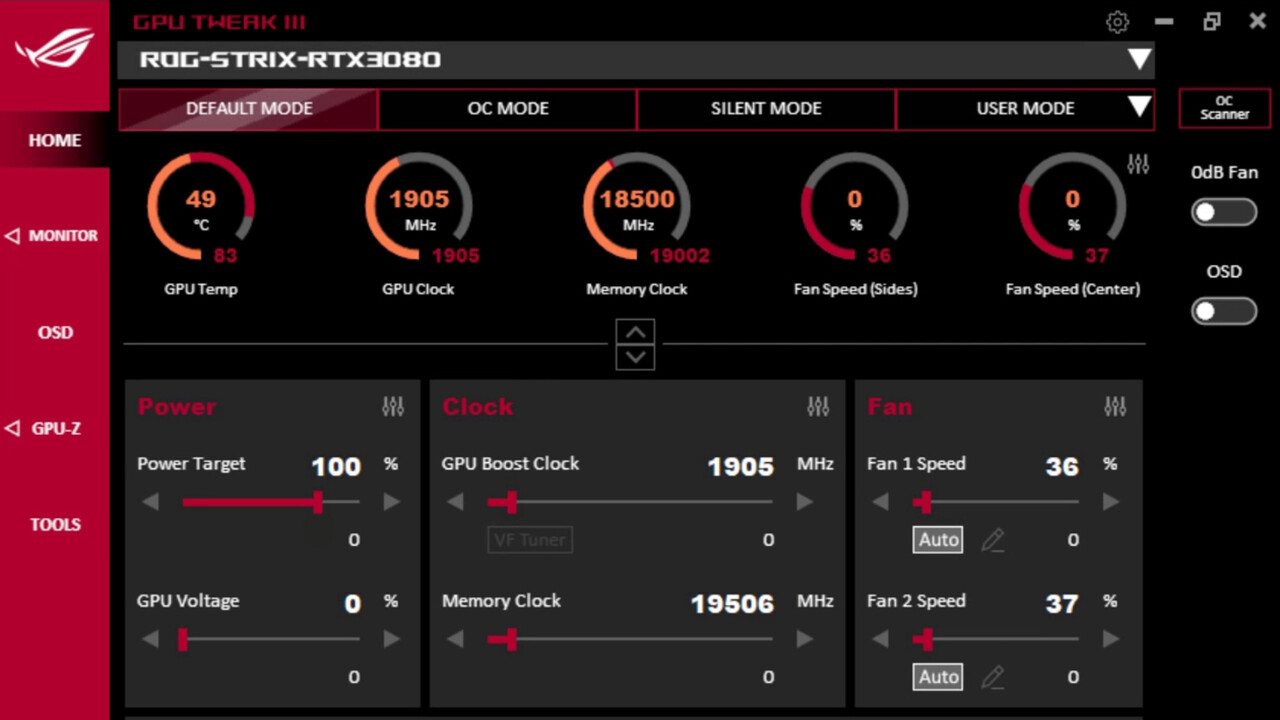
- Using GPU Monitoring Software: Many GPU manufacturers provide software utilities that allow you to monitor various aspects of your graphics card, including fan speed. These applications, such as NVIDIA’s GeForce Experience or AMD’s Radeon Software, provide a user-friendly interface that displays real-time information about your GPU, including temperature, clock speeds, and fan speed.
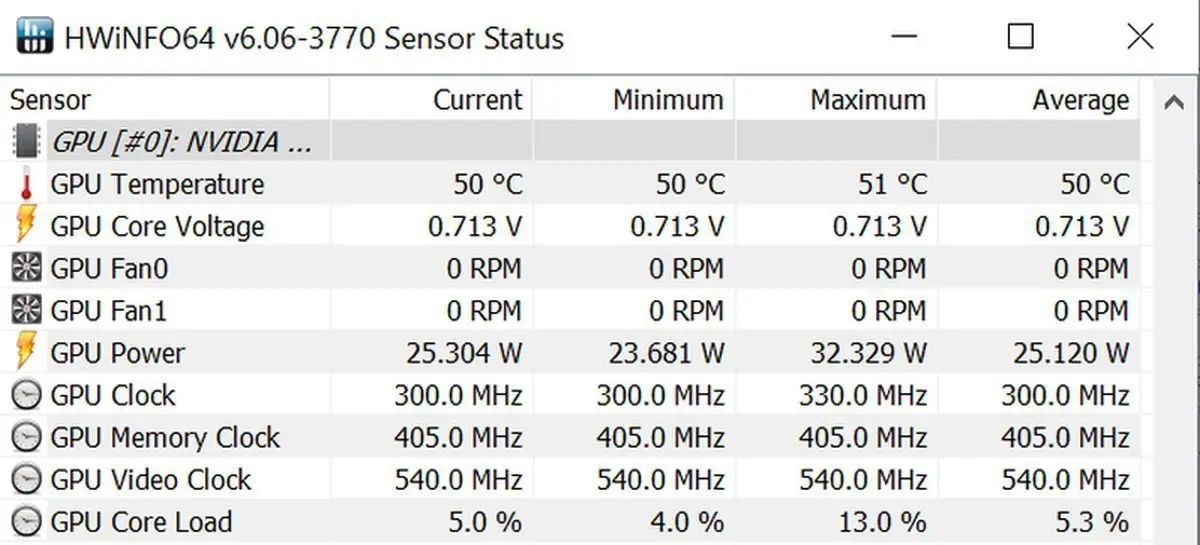
- Third-Party Monitoring Tools: If you prefer more advanced monitoring options or your GPU manufacturer doesn’t provide proprietary software, you can turn to third-party applications. One popular option is GPU-Z, a free tool that provides detailed information about your GPU, including fan speed. Simply download and install GPU-Z, launch the software, and navigate to the Sensors tab. Here, you will find the current GPU fan speed along with other relevant information.
Once you have determined the current fan speed, take note of it. If you find that the fan speed is consistently high or low, it may indicate an issue with cooling or fan control. In such cases, adjusting the fan speed manually or using the BIOS may be necessary to achieve optimal performance and temperature levels.
Remember, monitoring your GPU fan speed is a crucial step in managing the temperature and ensuring the longevity of your graphics card. Now that we know how to check the current fan speed, let’s explore different methods to change it according to your preferences and requirements.
Adjusting GPU Fan Speed in the BIOS
One of the most effective ways to adjust the GPU fan speed is through the BIOS (Basic Input/Output System) of your computer. The BIOS allows you to access and modify various settings related to your hardware, including the fan speed control.
Please note that not all GPUs have BIOS options for adjusting the fan speed. The availability of such options depends on the manufacturer and model of your graphics card. If your GPU supports fan speed control through the BIOS, here’s how you can do it:
- Restart your computer and enter the BIOS settings by pressing the designated key during the boot-up process. The key varies depending on your computer manufacturer but is often Del, F2, or F10.
- Navigate to the section related to your GPU or hardware settings. The exact location of the fan speed control option can vary, so refer to your motherboard’s manual or look for terms like “GPU settings” or “hardware configuration.”
- Once you find the fan speed control option, you may see different modes or presets. These presets typically include options such as “Auto,” “Silent,” or “Full Speed.” Selecting the “Auto” mode allows the GPU to adjust the fan speed automatically based on temperature, while the other modes allow you to set a fixed fan speed.
- If you choose to set a fixed fan speed, use the arrow keys or enter the desired value manually. Be cautious when adjusting the fan speed, as setting it too high may lead to excessive noise and wear on the fan.
- After making the necessary changes, save the settings and exit the BIOS. Your computer will then boot up with the adjusted fan speed settings.
It’s important to note that adjusting the fan speed in the BIOS applies the changes globally. This means that the fan speed will remain constant, regardless of the GPU load or temperature. While this method provides a simple and permanent solution, it may not be suitable for all scenarios, especially if you require dynamic fan speed adjustments based on the GPU’s activity.
If you prefer more flexibility and control over the GPU fan speed, you can utilize third-party software specifically designed for this purpose. In the next section, we will explore how to use these software options to adjust the GPU fan speed according to your preferences.
Using Third-Party Software to Control GPU Fan Speed
If you’re looking for more control and flexibility in adjusting the GPU fan speed, third-party software solutions can come to the rescue. There are several reputable applications available that allow you to fine-tune the fan speed according to your specific requirements. Here are a few popular options:
- MSI Afterburner: Developed by MSI, Afterburner is a widely used utility for overclocking and monitoring GPUs. In addition to its robust overclocking capabilities, Afterburner also provides fan speed control. After installing and launching Afterburner, you can navigate to the fan settings and manually adjust the fan speed using the intuitive sliders. You can also create custom fan profiles to automatically adjust the speed based on GPU temperature.
- EVGA Precision X1: If you own an EVGA graphics card, Precision X1 is a powerful tool for overclocking and monitoring your GPU. It also features fan speed control options, allowing you to adjust the fan speed based on temperature or create custom fan curves. Precision X1 provides a user-friendly interface, making it easy to fine-tune the fan speed settings to your preference.
- SpeedFan: SpeedFan is a popular third-party software that offers advanced fan control for various hardware components, including GPUs. It supports a wide range of graphics cards and allows you to manually adjust the fan speed, monitor temperatures, and create custom fan profiles. SpeedFan provides a comprehensive set of features for users who want precise control over their GPU fan speed.
When using third-party software, it’s important to ensure compatibility with your GPU model and follow the software’s instructions for fan speed adjustments. These applications typically provide real-time monitoring of GPU temperature and fan speed, allowing you to make adjustments on the fly.
It’s worth mentioning that while third-party software allows for more customization, it’s essential to exercise caution when modifying fan speed settings. Setting the fan speed too high may lead to increased noise levels and potential wear and tear on the fan, while setting it too low may result in higher GPU temperatures and potential performance issues.
Now that you’re familiar with third-party software options for GPU fan speed control, let’s explore another manual approach using MSI Afterburner to adjust the fan speed according to your needs.
Manually Adjusting GPU Fan Speed with MSI Afterburner
MSI Afterburner is a versatile software utility that not only allows for GPU overclocking and monitoring, but also provides the ability to manually adjust the fan speed of your graphics card. Here’s a step-by-step guide on how to use MSI Afterburner to manually adjust the GPU fan speed:
- Download and Install MSI Afterburner: Start by downloading MSI Afterburner from the official MSI website. Once downloaded, run the installer and follow the on-screen instructions to complete the installation process.
- Launch MSI Afterburner: After the installation is complete, launch MSI Afterburner. You should see a detailed interface with various sliders and monitoring information.
- Unlock the Core Voltage Control: By default, the Core Voltage Control is locked for safety reasons. To unlock it, navigate to the settings by clicking on the gear icon in the MSI Afterburner interface. In the settings window, go to the “General” tab and check the box next to “Unlock voltage control” and “Unlock voltage monitoring.” Click “OK” to save the changes.
- Adjust the Fan Curve: In the main MSI Afterburner interface, you will see a slider labeled “Fan Speed (%).” This slider allows you to manually adjust the fan speed. Move the slider to the desired position to increase or decrease the fan speed. You can also click on the “Auto” button to enable automatic fan control based on GPU temperature.
- Create Custom Fan Profiles: MSI Afterburner also provides the option to create custom fan profiles. To do this, click on the “Settings” button below the fan speed slider. In the settings window, go to the “Fan” tab and enable “User Defined Automatic Fan Control.” From here, you can set the desired fan speed at different temperature thresholds to create a custom fan curve.
- Apply and Test: After adjusting the fan speed or creating a custom fan profile, click on the “Apply” button to save the changes. You can now monitor the GPU temperature and observe the fan speed adjustments in real-time as you put your graphics card through various tasks.
Remember to monitor the GPU temperature while adjusting the fan speed to ensure that it stays within safe limits. It’s recommended to gradually increase the fan speed and test the performance and temperature of your GPU accordingly.
By utilizing MSI Afterburner to manually adjust the fan speed, you can strike a balance between achieving optimal cooling and reducing noise levels. This level of control allows you to tailor the fan speed to your specific needs, whether you’re engaging in demanding gaming sessions or working on resource-intensive tasks.
Now that you’re familiar with manually adjusting the GPU fan speed using MSI Afterburner, you have a powerful tool at your disposal to optimize the performance and temperature of your graphics card according to your preferences.
Conclusion
Controlling and adjusting the GPU fan speed is an important aspect of optimizing the performance and temperature of your graphics card. By effectively managing the fan speed, you can prevent overheating issues, ensure optimal GPU performance, and extend the lifespan of your hardware.
In this article, we have explored different methods to change the GPU fan speed. We started by understanding the significance of GPU fan speed and its role in maintaining a safe operating temperature. We then learned how to check the current GPU fan speed using monitoring software or third-party tools.
We discussed adjusting the GPU fan speed in the BIOS, which provides a permanent solution but lacks flexibility in dynamic fan speed adjustments. We also explored the use of third-party software, such as MSI Afterburner, for more precise control over the fan speed with features like manual adjustments and custom fan curves.
Remember, when adjusting the GPU fan speed, it’s crucial to strike a balance between cooling and noise levels. Setting the fan speed too high may increase noise but provide better cooling, while setting it too low may result in higher temperatures and potential performance issues.
Ultimately, the method you choose to adjust the GPU fan speed should align with your specific requirements and preferences. Whether you prefer the simplicity of BIOS adjustments or the customization options provided by third-party software, the key is to monitor your GPU’s temperature and ensure it stays within safe limits.
With the knowledge and tools gained from this article, you can now take control of your GPU fan speed and optimize your graphics card’s performance. So, go ahead and explore the different methods, experiment with fan speed settings, and enjoy a well-cooled and high-performing GPU!