Introduction
As computer hardware becomes more powerful, it also generates a greater amount of heat. To keep components running at optimal temperatures, manufacturers equip devices with cooling systems, including fans that help dissipate heat. Graphics processing units (GPUs) are no exception, and they rely on fans to maintain safe operating temperatures.
However, the default fan curve (the relationship between fan speed and GPU temperature) set by manufacturers may not always be the most efficient or suitable for your needs. This is where the ability to change the GPU fan curve comes in handy. By manually adjusting the fan curve, you can optimize cooling performance, reduce noise levels, and even potentially improve overall system stability.
In this guide, we will explore what a GPU fan curve is and delve into the reasons why you might want to change it. We will also provide a step-by-step tutorial on how to change the GPU fan curve and offer guidance on testing and fine-tuning the settings. Additionally, we will discuss the benefits and potential risks associated with adjusting the fan curve and offer troubleshooting tips for common issues that may arise.
Whether you are an avid gamer seeking better cooling for your graphics card during intense gaming sessions or a content creator working with resource-intensive applications, understanding how to change the GPU fan curve can help you optimize the performance and longevity of your GPU.
What is a GPU Fan Curve?
A GPU fan curve refers to the graphical representation of how the speed of the GPU fan changes in response to the temperature of the GPU. The fan curve is typically set by the GPU manufacturer and is designed to provide a balance between cooling performance and noise levels.
The fan curve is based on a simple principle: as the GPU temperature increases, the fan speed also increases to actively cool the GPU. Conversely, as the GPU temperature decreases, the fan speed decreases to reduce noise levels. The relationship between temperature and fan speed is determined by a predefined algorithm, which can vary between different GPU models and manufacturers.
The default fan curve set by the manufacturer is often a conservative approach that ensures the GPU operates within safe temperature limits while maintaining low noise levels. However, this default curve may not always be optimized for every user’s needs. Some users may prefer a more aggressive fan curve to keep the GPU cooler, while others may prioritize a quieter system and opt for a more lenient curve.
By manually adjusting the fan curve, users have the flexibility to customize their GPU’s cooling performance based on their specific requirements. This customization allows for higher fan speeds at lower temperatures, resulting in improved cooling effectiveness. Alternatively, users can also tweak the curve to reduce fan speeds at lower temperatures, which can help minimize noise levels.
It’s important to note that changing the GPU fan curve does not directly affect the performance of the GPU, but rather the cooling and noise characteristics. Properly configuring the fan curve can help prevent overheating, which can lead to reduced performance or even system instability. Understanding how the fan curve works and making informed adjustments can help you achieve the ideal balance between cooling performance and noise levels for your GPU.
Why Should You Change the GPU Fan Curve?
Changing the GPU fan curve can offer several benefits and advantages for users who want to optimize their GPU’s cooling performance and noise levels. Here are a few reasons why you might consider adjusting the fan curve:
1. Improved Cooling Performance:
By manually adjusting the fan curve, you can set more aggressive fan speeds at lower temperatures. This results in enhanced cooling performance by actively dissipating heat from the GPU more efficiently. Improved cooling performance can help prevent excessive temperatures that can lead to thermal throttling, reduced performance, or even GPU damage.
2. Reduced Noise Levels:
The default fan curve may prioritize noise reduction, resulting in lower fan speeds and quieter operation. However, this can come at the cost of slightly higher temperatures. By customizing the fan curve, you can find a balance between cooling performance and noise levels that suits your preferences. With a more lenient fan curve, you can reduce fan speeds and enjoy a quieter computing experience, especially during less demanding tasks.
3. Enhanced Overclocking Potential:
If you are someone who enjoys overclocking their GPU for better performance, adjusting the fan curve can aid in maintaining lower temperatures. Overclocking generally generates additional heat, and a more aggressive fan curve can help dissipate that heat effectively, allowing for more stable and higher overclocks without compromising on GPU temperatures.
4. Customization and Personalization:
Customizing the fan curve allows you to tailor your GPU’s cooling behavior to your specific needs. Whether you prioritize lower temperatures, minimal noise, or a combination of both, adjusting the fan curve gives you the freedom to create a cooling profile that aligns with your preferences and system requirements.
5. Optimized System Stability:
Overheating can lead to system instability, crashes, and other performance issues. By adjusting the fan curve to provide better cooling performance, you can ensure that your GPU operates within safe temperature limits, minimizing the risk of stability issues and improving overall system reliability.
It’s important to note that while changing the GPU fan curve can offer benefits, it should be done with caution. Extreme adjustments to fan speeds or inadequate cooling can lead to increased noise, unnecessary wear on the fan, or even damage to the GPU itself. It’s recommended to monitor temperatures and verify stability after making changes to ensure optimal performance and longevity of your GPU.
Preparations for Changing the GPU Fan Curve
Before diving into the process of changing the GPU fan curve, it’s important to make a few preparations to ensure a smooth and successful experience. Here are some steps you should follow:
1. Research and Familiarize Yourself:
Take the time to research and understand the specificities of your GPU model and its fan control capabilities. Different GPUs may have different methods and software for adjusting the fan curve. Familiarize yourself with the manufacturer’s guidelines and recommendations to avoid any potential issues.
2. Update Graphics Card Drivers:
Ensure that you have the latest drivers installed for your graphics card. Visit the manufacturer’s website or use their dedicated software to download and install the most up-to-date drivers. This will ensure compatibility and provide access to any additional tools or features that may be required for fan curve adjustments.
3. Install and Configure Fan Control Software:
Check if your GPU manufacturer provides dedicated software for fan control. If available, download and install the software. This software allows you to configure and adjust the fan curve in a user-friendly interface. Make sure to follow the instructions provided by the manufacturer to install the software correctly.
4. Backup and Monitor:
It’s always a good practice to back up important files or data before making any changes to your GPU settings. While adjusting the fan curve is unlikely to cause data loss, it’s better to be safe than sorry. Additionally, install a monitoring tool to keep an eye on your GPU temperatures during the adjustment process. This will help ensure that you stay within safe temperature limits and identify any potential issues promptly.
5. Understand the Limits:
It’s important to set realistic expectations when adjusting the fan curve. While it can improve cooling performance and reduce noise levels, there is a limit to what fan curves can achieve. Factors such as the design of the GPU cooler and overall system airflow also play a role. It’s crucial to understand that there may be a trade-off between temperature, noise, and overall system stability.
By taking these preparations into account, you can approach the process of changing the GPU fan curve with confidence. These steps will help ensure a smooth experience and minimize the risk of encountering any compatibility issues or unexpected outcomes. Remember to always refer to the manufacturer’s guidelines and proceed with caution to optimize the cooling performance of your GPU effectively.
Step-by-Step Guide to Changing the GPU Fan Curve
Changing the GPU fan curve may vary depending on your GPU model and manufacturer. However, the following steps provide a general guide to help you adjust the fan curve:
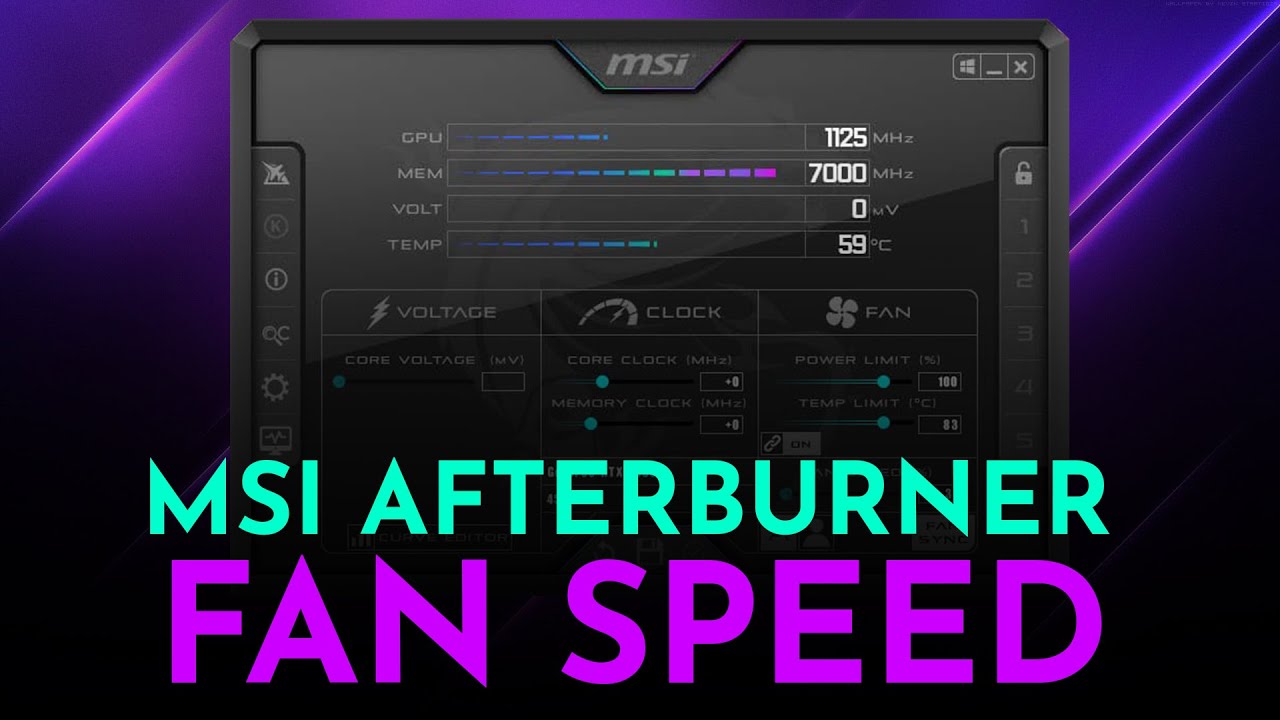
Step 1: Open Fan Control Software
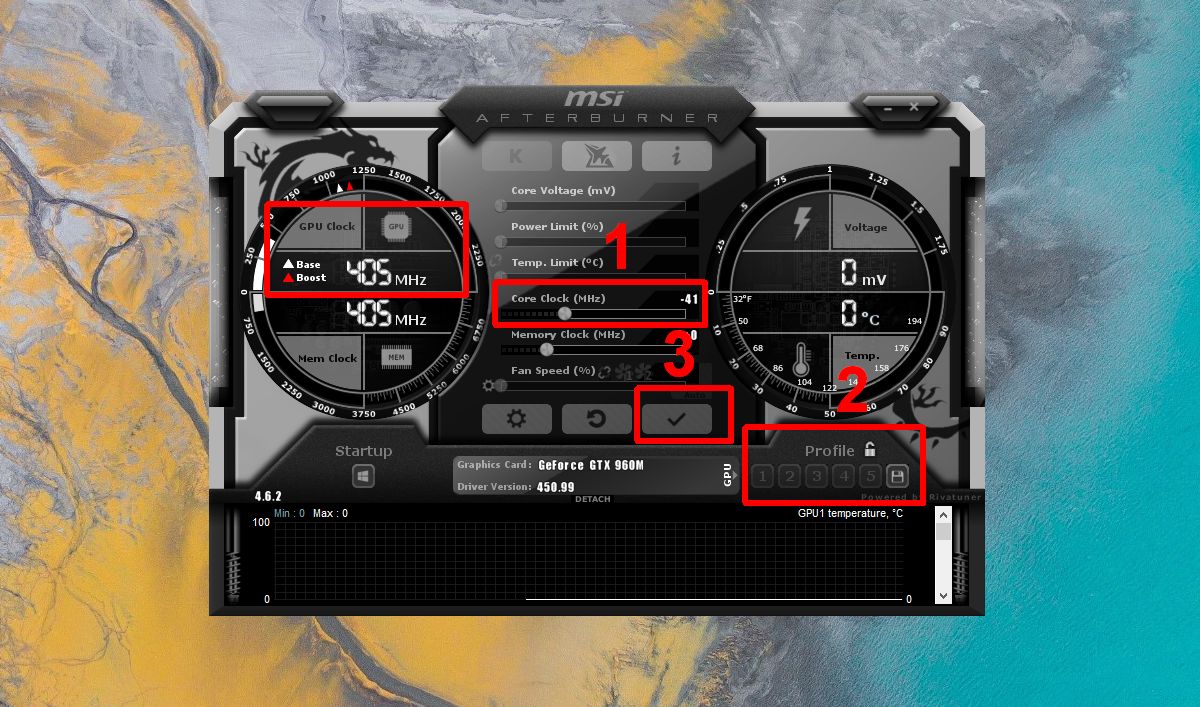
Launch the fan control software provided by your GPU manufacturer. This software allows you to access and modify the fan curve settings. Make sure you have installed the latest version of the software to ensure compatibility and access to all available features.
Step 2: Locate Fan Curve Settings
Within the fan control software, look for the section or tab that controls the fan curve settings. It may be labeled as “Fan Curve,” “Cooling,” or something similar. This is where you will find the controls to adjust the fan speeds at different temperatures.
Step 3: Understand the Interface
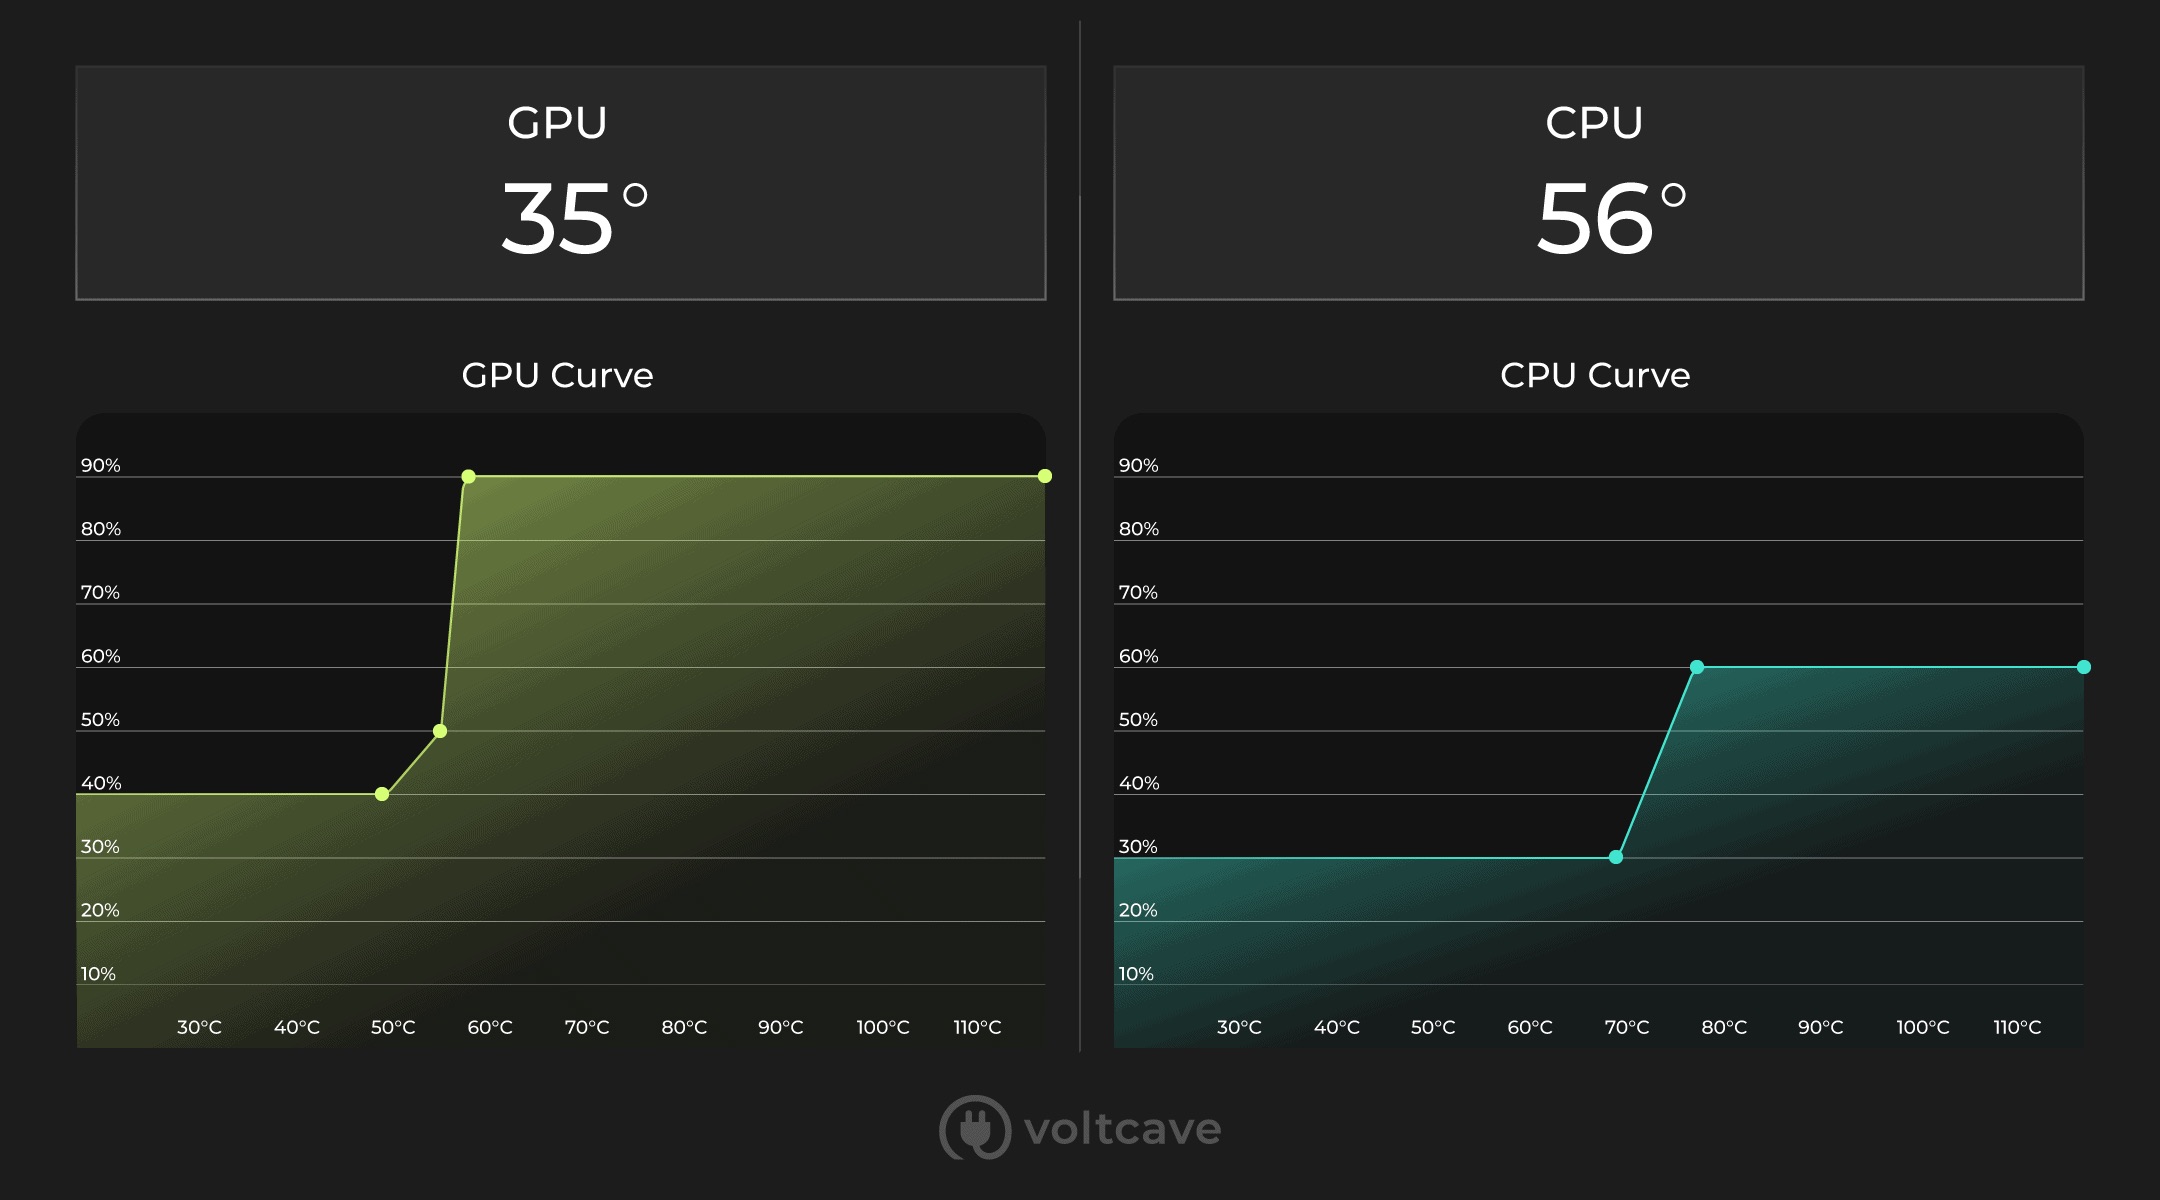
Take a moment to familiarize yourself with the fan curve interface. Typically, it displays a graphical representation of the curve, with temperature on the X-axis and fan speed on the Y-axis. Some software may also provide additional customization options such as manual fan control or predefined profiles.
Step 4: Adjust the Fan Curve
Using the graphical interface, make adjustments to the fan curve according to your preferences. You can click and drag points on the curve to set the desired fan speeds at specific temperatures. The adjustments you make will depend on your priorities—whether you want a more aggressive cooling profile or a quieter operation.
Step 5: Test and Monitor
Once you have made the adjustments, click apply or save to activate the new fan curve settings. Now it’s time to test the changes and monitor the GPU temperatures. Perform tasks that typically stress your GPU, such as gaming or running benchmarking software, and observe how the fan speeds and temperatures respond.
Step 6: Fine-tune if Necessary
If you find that the GPU temperatures are still higher than desired or the fan noise is too loud, you can go back to the fan control software and make further adjustments to the fan curve. Fine-tuning may involve incrementally increasing or decreasing fan speeds at specific temperature points until you find the optimal balance for your needs.
Step 7: Save and Monitor
Once you are satisfied with the fan curve settings, save the changes within the fan control software. It may offer an option to save profiles, allowing you to switch between different fan curve configurations when needed. Monitor your GPU temperatures and fan speeds periodically to ensure that the adjustments are providing the desired cooling performance and noise levels.
Remember, the steps outlined above provide a general guide, and the precise process may vary depending on your GPU model and the software provided by the manufacturer. Always consult the documentation provided by the manufacturer for any specific instructions or recommendations.
Testing and Fine-Tuning the GPU Fan Curve
After adjusting the GPU fan curve, it’s crucial to test and fine-tune the settings to ensure optimal cooling performance and noise levels. Here are some steps to help you with testing and fine-tuning:
Step 1: Stress Test the GPU
To assess the effectiveness of the new fan curve, stress test the GPU by running demanding applications or benchmarks that push the GPU to its limits. This will simulate real-world scenarios that generate maximum heat and enable you to evaluate how the fan curve performs under high-load conditions.
Step 2: Monitor GPU Temperatures
During the stress test, closely monitor the GPU temperatures using monitoring software or utilities. Note the maximum and average temperatures reached during the test. This data will serve as a baseline for evaluating the effectiveness of the new fan curve and any further adjustments that may be required.
Step 3: Assess Cooling Performance
Examine the recorded temperatures to assess the cooling performance. If the GPU temperatures remain within acceptable limits without excessive throttling or instability, the fan curve adjustments are likely effective. However, if the temperatures are still higher than desired, you may need to consider making further adjustments to the fan curve.
Step 4: Evaluate Noise Levels
As you test the fan curve, pay attention to the noise levels produced by the GPU fans. If the noise is noticeably reduced and falls within your acceptable range, the fan curve adjustments are successful in achieving a quieter operation. If the noise remains too loud, you might need to sacrifice some cooling performance by increasing fan speeds.
Step 5: Fine-Tune the Fan Curve
Based on the test results, fine-tuning the fan curve may be necessary to achieve the ideal balance between cooling performance and noise levels. Minor adjustments can be made to specific temperature points to further optimize the cooling effectiveness or noise reduction. Gradually increase or decrease fan speeds at the relevant temperatures to refine the fan curve settings.
Step 6: Repeat Testing and Monitoring
After making any adjustments, repeat the stress test and closely monitor the GPU temperatures and noise levels. Compare the new results with the previous test to evaluate the impact of the changes. Iterate this process of adjustment, testing, and monitoring until you achieve the desired balance in cooling performance and noise levels.
Remember to exercise caution and avoid extreme adjustments that could lead to inadequate cooling or excessive noise. It’s essential to find a compromise between temperature reduction and noise levels to maintain system stability and longevity.
By testing and fine-tuning the GPU fan curve, you can ensure that your graphics card operates within safe temperature limits, provides optimal cooling performance, and maintains a noise level that aligns with your preferences.
Benefits and Potential Risks of Changing the GPU Fan Curve
Changing the GPU fan curve offers several benefits, but it’s important to be aware of the potential risks. Let’s take a closer look at the advantages and considerations when adjusting the fan curve:
Benefits:
1. Improved Cooling Performance:
By customizing the fan curve, you can enhance the cooling performance of your GPU. This can help keep temperatures within safe limits, preventing thermal throttling and maintaining consistent performance.
2. Reduced Noise Levels:
Adjusting the fan curve allows you to control the fan speeds at different temperatures. This customization can lead to a quieter computing experience during less demanding tasks or idle periods, creating a more pleasant environment.
3. Enhanced System Stability:
Overheating can cause system instability, crashes, or even damage to your GPU. By optimizing the fan curve for better cooling, you can maintain stable operating temperatures and minimize the risk of performance issues or hardware failures.
4. Increased Overclocking Potential:
A more aggressive fan curve can help dissipate heat more effectively, allowing for higher levels of overclocking. With better cooling, you can push your GPU’s performance even further.
5. Personalized Customization:
Changing the fan curve offers the flexibility to tailor your GPU’s cooling behavior to your specific needs and preferences. You can find the sweet spot between cooling performance and noise levels that aligns with your demands and system requirements.
Potential Risks:
1. Higher Fan Noise:
Adjusting the fan curve to more aggressive settings can result in higher fan speeds, leading to increased noise levels. Balancing cooling performance and noise reduction may require finding the optimal compromise for your system.
2. Reduced Lifespan of Fans:
Running fans at higher speeds for extended periods can contribute to increased wear and tear on the fan bearings, potentially shortening their lifespan. Monitoring fan health and ensuring proper maintenance is essential in mitigating this risk.
3. Inadequate Cooling:
Extreme adjustments to the fan curve, such as setting low fan speeds for higher temperatures, can result in inadequate cooling. This can lead to higher GPU temperatures, decreased performance, and potential hardware damage.
4. Voiding Manufacturer Warranty:
Some manufacturers may consider changing the fan curve as tampering with the GPU’s default settings, potentially voiding the warranty. Check your manufacturer’s warranty policy and consider the potential ramifications before proceeding.
5. System Instability:
Extreme fan curve adjustments may lead to instability if GPU temperatures rise excessively. It’s important to monitor the system for stability issues and make adjustments as necessary to maintain a balance between cooling and performance.
Understanding the potential risks and benefits of adjusting the GPU fan curve allows you to make informed decisions. By exercising caution and properly testing and monitoring your system, you can reap the rewards of optimizing cooling performance while mitigating potential drawbacks.
Troubleshooting Common Issues
When changing the GPU fan curve, you may encounter some common issues that can impact the performance or stability of your system. Here are a few troubleshooting steps to address these issues:
1. Excessive GPU Temperatures:
If you notice that your GPU temperatures are consistently higher than desired after adjusting the fan curve, there are a few potential solutions:
- Ensure that the fan curve adjustments were made correctly and applied successfully. Double-check the settings in the fan control software.
- Verify that the GPU cooler is clean and free from dust or debris, as it can impede cooling performance. Clean the cooler if necessary.
- Consider making the fan curve more aggressive by increasing the fan speeds at higher temperatures, allowing for more effective heat dissipation.
- Re-evaluate the overall system airflow. Ensure that your case has sufficient ventilation and that the GPU is not obstructed by cables or other components.
2. Increased Fan Noise:
If the fan noise becomes excessive after adjusting the fan curve, you can take the following steps to address the issue:
- Check if the fan curve adjustments were properly executed and saved. Ensure that the fan control software is running correctly.
- Consider making the fan curve less aggressive by reducing the fan speeds at lower temperatures. This might result in slightly higher temperatures but quieter operation.
- Ensure that the GPU cooler is clean and free from dust, as a dirty cooler can cause the fans to work harder and produce more noise.
- If possible, try using alternative cooling solutions such as aftermarket GPU coolers or liquid cooling to improve cooling efficiency and reduce noise levels.
3. System Instability or Crashes:
If you experience system instability or crashes after adjusting the fan curve, the following steps can help resolve the issue:
- Reset the fan curve settings to their default values and test to see if stability improves. If the issues cease, it could indicate that the adjustments made to the fan curve were too aggressive.
- Ensure that your GPU is not being overclocked beyond its stability limit. Reset any overclocking settings to their default values and see if stability improves.
- Verify that your system is not suffering from inadequate power supply. Ensure that your power supply unit can provide sufficient power to support the GPU and its cooling demands.
- Check for any conflicting software or driver issues. Update your GPU drivers to the latest version and ensure that they are compatible with the fan control software you are using.
If the issues persist, it may be helpful to seek assistance from professional support or forums dedicated to your specific GPU model or manufacturer. They may provide specific recommendations or solutions to address the troubleshooting issues you are encountering.
Conclusion
Changing the GPU fan curve can be a valuable tool for optimizing cooling performance and noise levels according to your specific needs and preferences. By customizing the fan curve, you can improve temperature management, reduce noise, enhance system stability, and even unlock the potential for higher overclocking performance.
Throughout this guide, we have explored the concept of the GPU fan curve and why you might want to change it. We provided a step-by-step guide to help you adjust the fan curve settings and offered tips for testing and fine-tuning. Additionally, we discussed the benefits that come with customizing the fan curve and highlighted the potential risks and common troubleshooting steps to address any issues that may arise.
It’s important to remember that when adjusting the fan curve, finding the right balance between cooling performance and noise levels is crucial. Monitor your GPU temperatures regularly and listen to fan noise to validate that the adjustments are providing the desired results. Additionally, take precautions to avoid extreme settings that could lead to inadequate cooling, increased noise, or reduced system stability.
By following the guidelines outlined in this guide and being aware of the potential risks, you can optimize the cooling performance of your GPU and create a more comfortable and efficient computing experience.