Introduction
Welcome to the world of GPU tweaking! If you’re a PC gaming enthusiast or a content creator, chances are you’re already familiar with the importance of optimizing your graphics card’s performance. One of the most powerful tools at your disposal for fine-tuning your GPU settings is GPU Tweak.
GPU Tweak is a versatile software utility developed by graphics card manufacturer Asus. It enables users to monitor and overclock their GPUs, adjust fan speeds, and customize graphics settings for optimal performance and visual quality. Whether you’re looking to boost your gaming experience or enhance your video editing capabilities, GPU Tweak has got you covered.
Why should you use GPU Tweak, you may ask? Well, simply put, it allows you to unlock the full potential of your graphics card and get the most out of your hardware investment. By tweaking various parameters, you can achieve higher frame rates, smoother gameplay, and sharper visuals.
Not only does GPU Tweak provide you with the means to optimize your GPU performance, but it also gives you the flexibility to tailor your settings to different applications and games. With GPU Tweak, you can create profiles and switch between them effortlessly, ensuring that your graphics settings are perfectly tuned for each specific use case.
If you’re new to GPU tweaking, fear not! In this guide, we will walk you through the process of installing GPU Tweak, familiarizing yourself with its user interface, and utilizing its features to elevate your gaming or content creation experience. So, let’s get started and dive into the world of GPU tweaking with GPU Tweak!
What is GPU Tweak?
GPU Tweak is a comprehensive software utility designed specifically for Asus graphics cards. It provides users with a powerful set of tools and features to optimize and fine-tune the performance of their graphics card.
At its core, GPU Tweak allows you to monitor key metrics of your graphics card in real-time. From temperature and clock speeds to fan speeds and voltage, you can keep a close eye on the vital aspects of your GPU’s performance. This real-time monitoring is invaluable in understanding the impact of changes you make to your settings and ensuring that your graphics card is running optimally.
But GPU Tweak goes beyond just monitoring. It also offers a range of features to tweak and optimize your graphics card’s performance. One of the most notable features is overclocking. Overclocking essentially involves pushing your graphics card beyond its factory-defined limits to achieve higher clock speeds and consequently, better performance.
With GPU Tweak, you can easily adjust clock speeds, voltage, and memory timings to boost your GPU’s performance. This can lead to smoother gameplay, faster rendering times, and improved overall system performance. It’s important to note, however, that overclocking should be done with caution, as it can put additional stress on your graphics card and potentially void your warranty if not done correctly.
In addition to overclocking, GPU Tweak allows you to control and adjust fan speeds. By manually adjusting fan speeds, you can strike the right balance between cooling and noise levels. The ability to adjust fan speeds is particularly useful when you’re performing intensive tasks like gaming or video editing, as it helps to keep your graphics card cool and prevent thermal throttling.
Furthermore, GPU Tweak enables you to customize your graphics settings on a per-application basis. This means that you can create profiles with specific settings tailored to different games or software applications. This level of customization allows you to have optimal graphics settings for each application without needing to manually adjust them every time you launch a game or open a specific program.
Overall, GPU Tweak provides a wealth of tools and features that allow you to fully unleash the power of your Asus graphics card. From overclocking and fan control to custom graphics settings, GPU Tweak empowers you to optimize your GPU’s performance according to your specific needs and preferences.
Why Use GPU Tweak?
You might be wondering why you should consider using GPU Tweak when there are other similar software utilities available. Well, let’s delve into the reasons why GPU Tweak stands out as a valuable tool for optimizing your graphics card’s performance.
First and foremost, GPU Tweak is specifically designed for Asus graphics cards. This means that it is optimized to work seamlessly with the hardware, ensuring compatibility and maximizing performance. By using software tailor-made for your graphics card, you can take full advantage of its capabilities and unlock its true potential.
One of the key advantages of GPU Tweak is its user-friendly interface. Asus has put a lot of effort into making the software intuitive and easy to navigate, even for those who are new to GPU tweaking. The interface provides clear and concise information about your graphics card’s performance, allowing you to make informed decisions when adjusting your settings.
Another reason to use GPU Tweak is its versatility. Whether you’re a gamer, a content creator, or simply someone who wants the best performance out of their computer, GPU Tweak has features that cater to your specific needs. The software enables you to fine-tune your graphics settings, overclock your GPU, and monitor vital metrics, all in one convenient package.
When it comes to overclocking, GPU Tweak excels. It offers a range of options for adjusting clock speeds, voltages, and memory timings to squeeze out every bit of performance from your graphics card. Overclocking can result in significant improvements in frame rates and rendering times, allowing you to experience smoother gameplay and faster workflow in tasks such as video editing or 3D rendering.
In addition to overclocking, GPU Tweak allows you to control your graphics card’s fan speeds. By manually adjusting the fan speeds, you can strike the perfect balance between keeping your GPU cool and maintaining a quiet system. This is especially important during demanding gaming sessions or resource-intensive workloads, as it helps prevent overheating and ensures optimal performance.
Another noteworthy feature of GPU Tweak is its ability to create and manage profiles for different games and applications. This means that you can have specific graphics settings optimized for each game or software you use. With a few clicks, you can switch between profiles, saving you time and eliminating the hassle of constantly adjusting settings every time you launch a different application.
Overall, GPU Tweak provides a comprehensive and user-friendly solution for optimizing your Asus graphics card’s performance. Whether you’re a gaming enthusiast, a professional content creator, or simply someone who wants the best visual experience, GPU Tweak gives you the power to fine-tune your settings and elevate your GPU’s performance to new heights.
Getting Started with GPU Tweak
Now that you understand the benefits of using GPU Tweak, let’s dive into how you can get started with this powerful software tool. Follow the steps below to begin optimizing your graphics card’s performance and customizing your settings.
The first step is to download and install GPU Tweak from the official Asus website. Visit the support section of the Asus website and navigate to the page for your specific graphics card model. Look for the “Support & Downloads” section and locate the GPU Tweak software. Click on the download link, and once the download is complete, run the installer.
During the installation process, you may be prompted to choose between a standard or custom installation. We recommend selecting the standard installation, as it installs all the necessary components and ensures that you have access to all the features of GPU Tweak. Follow the on-screen instructions to complete the installation process.
Once GPU Tweak is installed, launch the software. Upon opening it, you will be greeted with the user interface, which provides a wealth of options and information. Take some time to familiarize yourself with the various sections and tabs of the interface. The main sections typically include information about your GPU, settings for overclocking and fan control, and options for creating and managing profiles.
Next, it’s time to start monitoring your GPU’s performance. Look for the monitoring section or tab in the GPU Tweak interface. Here, you will find real-time information about temperature, clock speeds, fan speeds, and more. Keep an eye on these metrics while performing various tasks, such as gaming or running demanding applications. Monitoring your GPU’s performance will help you identify any potential issues and ensure that it is running optimally.
Now that you have a good understanding of your GPU’s performance, you may want to consider overclocking it to achieve higher performance. Head to the overclocking section of GPU Tweak, where you can adjust core clock speeds, memory clock speeds, and voltage settings. It’s important to note that overclocking should be done gradually and with caution. Start by making small adjustments, and then test your system stability through benchmarking or stress testing tools. If your system runs stable, you can gradually increase the overclock settings until you reach the desired performance boost. However, always keep an eye on temperatures to ensure that your GPU remains within safe limits.
In addition to overclocking, GPU Tweak allows you to adjust fan speeds. Look for the fan control section in the interface, where you can manually adjust fan speeds to achieve the right balance between cooling and noise levels. Increasing fan speeds can help keep your GPU cool during intense gaming or demanding workloads, while lowering fan speeds can help reduce noise levels during light tasks.
Lastly, take advantage of GPU Tweak’s profile creation and management features. These allow you to create customized profiles for different games or applications, so you can have optimal graphics settings for each specific use case. Simply create a new profile, adjust the settings to your preference, and save it. Whenever you launch a game or open a specific software, GPU Tweak will automatically apply the corresponding profile, saving you time and effort.
By following these steps, you can confidently get started with GPU Tweak and begin optimizing your graphics card’s performance. Explore the features, experiment with different settings, and fine-tune your GPU for the ultimate gaming or content creation experience.
Installing GPU Tweak
To take advantage of the powerful features offered by GPU Tweak, you need to start by installing the software on your system. Follow the steps below to install GPU Tweak and begin optimizing your graphics card’s performance:
1. Start by visiting the official Asus website. Navigate to the support section and search for your specific graphics card model.
2. Locate the “Support & Downloads” section on the graphics card’s page. Here, you should find the GPU Tweak software listed as a download option. Click on the download link to start the download process.
3. Once the download is complete, locate the downloaded file in your designated downloads folder. It should have a filename similar to “GPUTweak_setup.exe”.
4. Double-click on the downloaded file to launch the GPU Tweak installer. You may be prompted to grant permission for the installer to make changes to your system. Allow the necessary permissions to proceed with the installation.
5. The installation wizard will guide you through the installation process. Review and accept the license agreement if asked to do so.
6. Next, you will be prompted to choose between a standard or custom installation. We recommend selecting the standard installation option unless you have specific preferences or requirements.
7. Choose the destination folder where you want to install GPU Tweak. The default location is usually “C:\Program Files (x86)\ASUS\GPU Tweak”. If you prefer a different location, you can browse and select a different folder.
8. Once you’ve chosen the installation folder, click on the “Install” button to begin the installation process. The installer will start copying the necessary files to your system.
9. Wait for the installation to complete. This may take a few minutes depending on your system specifications.
10. Once the installation is finished, you will see a message indicating that the installation was successful. You can choose to launch GPU Tweak immediately by leaving the “Launch GPU Tweak” option checked, or you can uncheck it and manually launch the software later.
11. Click on the “Finish” button to close the installer and complete the installation process.
Now that GPU Tweak is successfully installed on your system, you can launch the software and begin exploring its features. Take some time to familiarize yourself with the user interface and get ready to start optimizing and fine-tuning your graphics card’s performance.
Understanding the User Interface
Once you have installed GPU Tweak, it’s important to familiarize yourself with its user interface. Understanding the different sections and features of the interface will allow you to navigate the software efficiently and take full advantage of its capabilities. Let’s explore the key components of the GPU Tweak user interface:
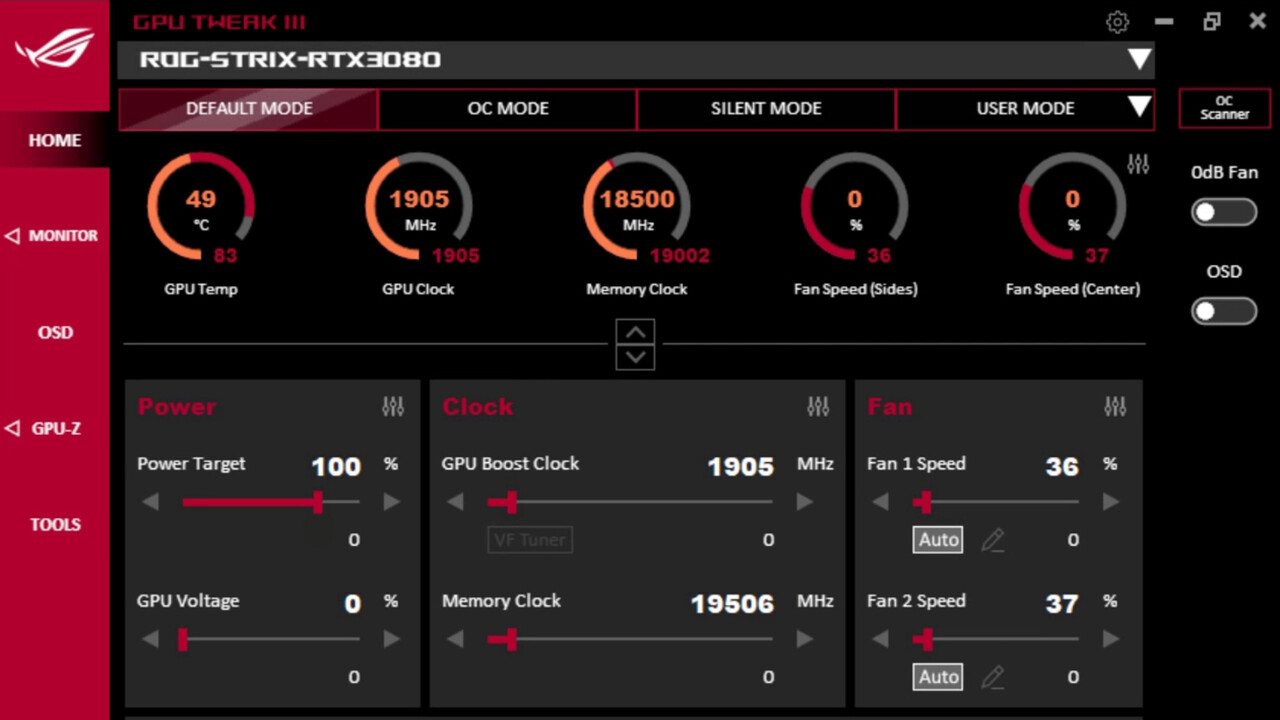
1. Main Dashboard: The main dashboard provides an overview of your graphics card’s important metrics, such as GPU temperature, clock speeds, memory usage, and fan speed. This section gives you a quick snapshot of your GPU’s performance in real-time.
2. Overclocking Settings: This section allows you to adjust the core clock speeds, memory clock speeds, and voltage settings of your graphics card. Depending on your graphics card model, you may also have additional options, such as GPU boost settings. Always exercise caution when overclocking and monitor temperatures closely to avoid any potential issues.
3. Fan Control: In this section, you can manually adjust the fan speed of your graphics card. Changing the fan speed can help optimize the cooling performance based on your preferences. Keep in mind that higher fan speeds result in increased noise levels.
4. GPU Information: This section provides detailed information about your graphics card, including its model, driver version, GPU architecture, and memory type. It’s helpful to have this information readily available when troubleshooting or comparing GPU specifications.
5. Profiles: This section allows you to create and manage profiles for different games or applications. You can customize graphics settings and overclocking preferences for each profile. When you launch a specific game or application, GPU Tweak will automatically apply the corresponding profile, saving you time and effort.
6. Monitoring: GPU Tweak provides a comprehensive monitoring section where you can track various metrics in real-time. These metrics include GPU temperature, clock speeds, fan speed, voltage, and more. Monitoring your GPU’s performance can help you identify any issues, optimize settings, and prevent overheating.
7. Help and Support: If you have any questions or need guidance, the help and support section provides useful resources, including tutorials, FAQs, and access to the Asus support website. This section can help you troubleshoot issues and learn more about the features of GPU Tweak.
Keep in mind that the user interface may vary slightly depending on the version of GPU Tweak and your graphics card model. However, the general layout and functionality remain consistent.
Take some time to explore the different sections and features of the GPU Tweak interface. Familiarize yourself with the various tabs and settings, and feel free to experiment with different options to find the optimal configuration for your graphics card.
By understanding the user interface of GPU Tweak, you’ll be equipped to make informed adjustments to optimize your graphics card’s performance and customize your settings according to your specific needs.
Monitoring Your GPU Performance
One of the key features of GPU Tweak is its ability to monitor your graphics card’s performance in real-time. Monitoring your GPU’s performance allows you to keep track of vital metrics and ensure that your graphics card is running optimally. Let’s explore how you can effectively monitor your GPU performance using GPU Tweak:
1. Launch GPU Tweak: Start by opening the GPU Tweak software on your computer. Once launched, you will be greeted with the main interface that displays various sections and metrics related to your GPU’s performance.
2. Main Dashboard: The main dashboard is where you can find a summarized view of your graphics card’s key metrics. This includes GPU temperature, core clock speeds, memory clock speeds, fan speeds, and voltages. Keep an eye on these metrics to understand how your GPU is performing in real-time.
3. Customizing the Dashboard: GPU Tweak allows you to customize the main dashboard to display the metrics that are most important to you. You can choose which metrics are visible, rearrange their positions, and resize the sections according to your preferences. This flexibility allows you to focus on the metrics that matter the most to you.
4. Real-Time Graphs: GPU Tweak provides real-time graphs that show how the different metrics change over time. These graphs offer visual representation of your GPU’s performance and can help you identify any irregularities or patterns. Pay close attention to temperature and clock speed graphs to ensure that they remain within safe limits and maintain stability.
5. Temperature Monitoring: The temperature of your GPU is an essential metric to keep an eye on. GPU Tweak displays the current temperature of your graphics card and often includes an alert or warning system to notify you if the temperature reaches a critical level. Monitoring temperatures helps ensure that your GPU is running within safe limits and prevents overheating, which can negatively impact performance and potentially damage the hardware.
6. Clock Speeds and Voltages: GPU Tweak also displays the current clock speeds and voltages of your graphics card. These metrics directly impact the performance and power consumption of your GPU. Monitoring them helps you identify any abnormalities and make necessary adjustments to optimize performance or address stability issues. Keep in mind that when overclocking, monitor the clock speeds and voltages closely to ensure that they remain stable and within safe ranges.
7. Fan Speed Control: Another important aspect of monitoring your GPU performance is keeping an eye on fan speeds. Adjusting fan speeds allows you to control the cooling performance of your graphics card. GPU Tweak provides the ability to manually adjust fan speeds or set them to automatic mode. Monitor fan speeds to ensure that your GPU is properly cooled during demanding tasks while also maintaining a comfortable noise level.
8. Monitoring in Games/Applications: GPU Tweak also provides the option to overlay the performance metrics on top of your games or applications. This is particularly useful for monitoring your GPU’s performance while gaming or running resource-intensive software. The overlay provides real-time performance information without the need to switch between windows or screens.
By utilizing the monitoring features of GPU Tweak, you can keep a close eye on your GPU’s performance and ensure that it is running optimally. Monitoring temperature, clock speeds, voltages, and fan speeds allows you to make informed adjustments to optimize performance, maintain stability, and prevent overheating.
Overclocking Your GPU
One of the most powerful features of GPU Tweak is the ability to overclock your graphics card. Overclocking involves increasing the clock speeds of the GPU core and memory to achieve higher performance than the factory-defined settings. By pushing your GPU beyond its default limits, you can experience smoother gameplay, faster rendering times, and improved overall system performance. Here’s a step-by-step guide on how to overclock your GPU using GPU Tweak:
1. Stability Testing: Before starting the overclocking process, it’s important to ensure that your GPU is stable at its default settings. Run stability tests such as FurMark or Heaven Benchmark to check for any stability issues or artifacts. If your system passes the stability tests without any problems, you can proceed with overclocking.
2. Launch GPU Tweak: Open the GPU Tweak software on your computer. Once launched, navigate to the overclocking section or tab. This is where you can adjust the clock speeds and voltages of your graphics card.
3. Core Clock Speed: Start by increasing the core clock speed of your GPU. Incrementally increase the core clock speed by small intervals, such as 10-20 MHz, and click apply after each adjustment. It’s important to increase the clock speed gradually to ensure stability. Monitor temperatures and stability as you make adjustments, and run benchmarks or stress tests to check for any issues.
4. Memory Clock Speed: After adjusting the core clock speed, move on to the memory clock speed. Similar to the core clock speed, increase the memory clock speed gradually in small increments. Apply the changes and continue monitoring temperatures and stability. Running memory-intensive applications or benchmarks can help identify any instability caused by the memory overclock.
5. Voltage Adjustment: In some cases, increasing the clock speeds may require a voltage adjustment for stability. However, adjusting the voltage should be done with caution, as it can increase power consumption and generate more heat. If you need to adjust the voltage, do so in small increments and closely monitor temperatures to ensure they remain within safe limits. Test stability after each voltage adjustment.
6. Benchmarking and Testing: After adjusting the clock speeds and voltage, it’s important to test the stability of your overclocked GPU. Run benchmarks such as 3DMark or Unigine Heaven to gauge the performance improvements and check for any stability issues. If your system remains stable and temperatures are within acceptable ranges, congratulations, you have successfully overclocked your GPU.
7. Fine-Tuning: Overclocking is not a one-size-fits-all process. Every GPU is unique, and optimal overclocking settings can vary. Fine-tuning your overclock involves finding the sweet spot where you achieve the highest performance while maintaining stability. Experiment with different clock speeds, voltages, and stress tests to find the best balance for your graphics card.
Remember, overclocking should always be approached with caution. Be aware of the risks associated with overclocking, such as increased power consumption, heat generation, and potential voiding of warranty. Take the time to research your specific graphics card model and understand its limits before starting the overclocking process.
By using GPU Tweak to overclock your GPU, you can unlock its full potential and experience enhanced performance in your favorite games and applications. However, always prioritize stability, monitor temperatures, and perform proper stress testing to ensure a safe and stable overclock.
Adjusting Fan Speed
Controlling the fan speed of your graphics card is an essential aspect of optimizing its performance and maintaining optimal temperatures. GPU Tweak provides you with the ability to manually adjust the fan speed, allowing you to find the perfect balance between cooling efficiency and noise levels. Let’s explore how you can adjust the fan speed using GPU Tweak:
1. Launch GPU Tweak: Open the GPU Tweak software on your computer. Once opened, navigate to the section or tab that controls fan speed. This is generally found within the main interface or the settings menu.
2. Manual Fan Control: GPU Tweak provides manual control over the fan speed. You can adjust the fan speed manually by moving a slider or entering a percentage value. Moving the slider to the right increases the fan speed, while moving it to the left decreases it. Alternatively, you can enter a specific percentage value to set the fan speed at your desired level.
3. Note the Fan Curve: In addition to manual control, GPU Tweak may provide an option to set a fan curve. A fan curve determines how the fan speed adjusts depending on the GPU temperature. You can customize the fan curve by setting specific fan speeds at different temperature points. This allows the fan speed to adjust automatically based on the GPU’s temperature, providing efficient cooling as needed.
4. Finding the Right Balance: Adjusting the fan speed is a matter of finding the right balance between cooling effectiveness and noise level. Increasing the fan speed improves cooling performance, but it also increases the noise level. Decreasing the fan speed reduces noise, but it may compromise cooling. Experiment with different fan speed settings to find the balance that suits your preferences and cooling requirements.
5. Monitor Temperatures: While adjusting the fan speed, monitor your GPU’s temperatures closely. GPU Tweak provides real-time temperature monitoring, allowing you to keep an eye on the temperature changes as you adjust the fan speed. Ensure that the fan speed is adequate to maintain safe temperatures during intensive tasks such as gaming or rendering.
6. Automatic Fan Control: Some versions of GPU Tweak may also provide an automatic fan control option. With automatic fan control enabled, the software adjusts the fan speed based on the GPU’s temperature without any manual intervention. This can be a convenient option if you prefer a hands-off approach to fan control.
7. Test and Validate: After adjusting the fan speed, it’s essential to validate your changes. Run stress tests or perform tasks that push the GPU to its limits, such as gaming or rendering. Monitor the temperatures and ensure that they remain within safe limits. If necessary, make further adjustments to the fan speed until you find the optimal cooling performance for your graphics card.
Remember, while adjusting the fan speed, maintaining temperature stability is crucial for the longevity and performance of your graphics card. Always strike a balance between cooling efficiency and noise levels, ensuring that temperatures remain within safe limits.
By utilizing GPU Tweak’s fan speed control, you can customize the cooling performance of your graphics card, optimizing its performance and keeping temperatures under control during demanding tasks.
Customizing Your Graphics Settings
One of the key benefits of using GPU Tweak is the ability to customize your graphics settings according to your preferences and the requirements of different games or applications. GPU Tweak allows you to fine-tune various graphics options, ensuring the optimal visual experience or performance for each specific use case. Let’s explore how you can customize your graphics settings using GPU Tweak:
1. Launch GPU Tweak: Open the GPU Tweak software on your computer. Once launched, navigate to the graphics settings section or tab. This is where you can adjust various aspects of your graphics settings.
2. Visual Quality Settings: GPU Tweak typically provides a range of options for adjusting visual quality settings. These options may include resolution, anti-aliasing, texture quality, shadow quality, and more. Experiment with different settings to find the balance between visual quality and performance that suits your preferences.
3. Performance Settings: Beyond visual quality, GPU Tweak also allows you to tweak performance settings. This includes options such as vertical synchronization (V-sync), which synchronizes the frame rate with your monitor’s refresh rate, and power management settings to optimize power consumption during gaming or rendering.
4. Advanced Graphics Options: Depending on your graphics card model and the capabilities of your GPU, you may have access to advanced graphics options. These options may include features like dynamic super resolution (DSR) or virtual reality (VR) optimizations. Explore these options to unlock additional visual enhancements or performance improvements based on your specific requirements.
5. Per-Application Profiles: One of the powerful features of GPU Tweak is the ability to create and manage profiles for different games or applications. Instead of adjusting settings every time you launch a specific game, you can create a profile with customized graphics settings for that game. GPU Tweak will automatically apply the corresponding profile when you launch the game, saving you time and effort.
6. Experiment and Optimize: The process of customizing your graphics settings is often a matter of experimentation and optimization. As each game or application is unique, it may require different settings to achieve the best performance or visual quality. Take the time to test different settings, monitor their impact on performance, and adjust accordingly to find the optimal configuration for each specific use case.
7. Save and Load Profiles: GPU Tweak allows you to save customized profiles for future use. Once you have fine-tuned your graphics settings for a specific game or application, save the profile with a distinctive name. Whenever you launch that game or application again, simply load the corresponding profile, and GPU Tweak will apply your customized settings automatically.
Remember, customizing your graphics settings is about finding the right balance between visual quality and performance. Experiment with different options, monitor the impact on performance, and take into account your hardware specifications to achieve the optimal settings.
By utilizing GPU Tweak’s customization options, you can tailor your graphics settings to your specific preferences and ensure the best visual experience or performance for each game, application, or task you encounter.
Creating Profiles for Different Games
One of the standout features of GPU Tweak is its ability to create and manage profiles for different games or applications. This functionality allows you to customize your graphics settings for each specific game, ensuring the optimal visual experience and performance. Let’s explore how you can create profiles for different games using GPU Tweak:
1. Launch GPU Tweak: Start by opening the GPU Tweak software on your computer. Once launched, navigate to the profiles section or tab. This is where you can create and manage profiles for different games or applications.
2. Select the Game: In the profiles section, you will typically find a list of installed games or applications on your computer. Select the game for which you want to create a profile by clicking on it. If the game is not automatically detected by GPU Tweak, you may need to manually add it to the list.
3. Customize Graphics Settings: Once you have selected the game, you can begin customizing the graphics settings for that specific game. GPU Tweak provides a range of options to adjust visual quality settings, including resolution, anti-aliasing, texture quality, and more. Experiment with different settings to find the optimal balance between visual quality and performance for that particular game.
4. Adjust Performance Settings: In addition to visual quality settings, you may also have access to performance settings in GPU Tweak. These settings include options like vertical synchronization (V-sync) or power management options. Adjust these settings based on your preferences and the performance requirements of the game.
5. Save the Profile: Once you have customized the graphics and performance settings for the game, be sure to save the profile. Give the profile a distinctive name that corresponds to the game or application. Saving the profile ensures that the settings are easily accessible and will be applied automatically whenever you launch the game.
6. Load the Profile: The next time you launch the game, GPU Tweak will automatically apply the corresponding profile that you created. This saves you the hassle of manually adjusting the settings each time you want to play a specific game. GPU Tweak makes it seamless to switch between different profiles as you launch different games or applications.
7. Modify or Update Profiles: Over time, you may want to make changes or updates to existing profiles. GPU Tweak allows you to load a profile, make adjustments to the settings, and resave it under the same name or a new name. This flexibility enables you to continually refine and optimize your graphics settings as needed.
By creating profiles for different games or applications, GPU Tweak simplifies the process of customizing your graphics settings. You can quickly and easily switch between profiles, ensuring that each game or application has the optimal visual quality and performance settings for an immersive and satisfying experience.
Troubleshooting Tips
While GPU Tweak is a powerful tool for optimizing your graphics card’s performance, occasional issues may arise. Here are some troubleshooting tips to help you resolve common problems and ensure smooth operation when using GPU Tweak:
1. Update GPU Drivers: Outdated graphics card drivers can sometimes cause compatibility issues with GPU Tweak. To ensure smooth operation, make sure to regularly update your GPU drivers to the latest version available from the manufacturer’s website.
2. Check System Requirements: Verify that your system meets the minimum requirements to run GPU Tweak. Insufficient hardware specifications could potentially cause performance issues or prevent the software from running properly. Ensure that your system meets the recommended specifications for GPU Tweak.
3. Restart the Software: If you encounter any glitches or performance slowdowns, try restarting GPU Tweak. This can resolve minor software-related issues and restore proper functionality.
4. Reinstall GPU Tweak: If all else fails, reinstalling GPU Tweak can often fix persistent issues. Uninstall the software completely, then download and install the latest version from the official Asus website to ensure you have the most up-to-date and stable version.
5. Reset GPU Settings: If you experience stability issues after overclocking or modifying graphics settings, it may be necessary to reset your GPU settings to default. Most versions of GPU Tweak provide an option to reset to defaults, ensuring a clean slate for troubleshooting purposes.
6. Check for Conflicting Software: Some third-party software, such as system monitoring tools or overlay software, can conflict with GPU Tweak. Temporarily disable or close any unnecessary background processes or software before using GPU Tweak to see if it resolves any compatibility issues.
7. Scan for Malware: Occasionally, malware or viruses can interfere with GPU Tweak’s performance. Run a full system scan using a reputable antivirus or malware scanner to identify and remove any potential threats that may affect the functionality of GPU Tweak.
8. Seek Support: If you encounter persistent issues or need further assistance, reach out to the official support channels provided by Asus. The Asus website typically offers support resources, including FAQs, forums, and contact information, where you can find additional assistance and troubleshooting help.
Remember, troubleshooting can be a process of elimination, and not all issues have a simple solution. Be patient and methodical in your approach to identify and resolve any problems you encounter while using GPU Tweak.
By following these troubleshooting tips, you can overcome common issues and ensure the smooth operation of GPU Tweak, helping you unleash the full potential of your graphics card and optimize your gaming or content creation experience.
Conclusion
Congratulations! You’ve now become familiar with GPU Tweak and its powerful features for optimizing your graphics card’s performance. From monitoring GPU metrics and adjusting fan speeds to overclocking and customizing graphics settings, GPU Tweak provides you with the tools to unlock the full potential of your graphics card.
By using GPU Tweak, you can fine-tune your graphics settings, achieve higher frame rates, smoother gameplay, and improved overall system performance. Whether you’re a hardcore gamer, a professional content creator, or simply someone who wants the best visual experience, GPU Tweak empowers you to optimize your GPU’s performance according to your specific needs and preferences.
Remember, when overclocking or adjusting settings using GPU Tweak, it’s important to always monitor temperatures, test for stability, and proceed with caution. Overclocking should be done gradually and with patience to ensure that your graphics card remains within safe limits and does not risk damage.
If you encounter any issues, refer to the troubleshooting tips provided to address common problems. Always keep your GPU drivers up to date and verify that your system meets the requirements for using GPU Tweak.
Ultimately, GPU Tweak puts you in control of your graphics card’s performance and allows you to customize your settings for optimal visual quality and performance in every game or application you use.
So, whether you’re aiming for that extra FPS in your favorite game or striving for a smoother editing experience, take advantage of GPU Tweak and unlock the full potential of your graphics card like never before.