Introduction
Overclocking a GPU, or Graphics Processing Unit, refers to the process of increasing its clock speed to achieve higher performance. This popular practice allows gamers, graphic designers, and other GPU-intensive users to push their hardware to the limits, extracting every last ounce of power from their graphics cards.
While overclocking can provide significant performance gains, there are times when it may be necessary to revert the GPU back to its original clock speed. Un-overclocking, as it is commonly known, is the process of restoring the GPU to its default settings. This can be useful in situations where stability issues occur, or when you no longer require the increased performance that overclocking provides.
Un-overclocking a GPU can be a daunting task, especially for those unfamiliar with computer hardware. However, with the right knowledge and careful execution, anyone can successfully revert their GPU back to its stock specifications.
In this article, we will explore the ins and outs of un-overclocking a GPU. We will discuss why you may want to un-overclock your GPU, the precautions you need to take before starting the process, and provide a step-by-step guide to help you safely un-overclock your GPU. Additionally, we will cover how to test your GPU after un-overclocking to ensure everything is functioning as expected.
If you have been experiencing instability issues or simply want to return your GPU to its default settings, this guide will walk you through the process of un-overclocking your GPU, allowing you to restore its original performance and stability.
What is GPU overclocking?
GPU overclocking is the process of increasing the clock speed of a graphics card beyond its factory-set specifications. The clock speed refers to the frequency at which the GPU operates, and overclocking allows users to push this frequency higher to achieve better performance.
Graphics cards come with pre-set clock speeds determined by the manufacturer. These clock speeds are designed to provide a balance between performance and stability. However, some users may find that their GPU performance falls short of their expectations, especially when running demanding applications or playing graphically intensive games.
By overclocking the GPU, users can increase the clock speed, allowing the graphics card to process more instructions per second. This results in improved performance and faster rendering, leading to smoother gameplay, higher frame rates, and quicker graphics processing for tasks like video editing and 3D rendering.
GPU overclocking is typically achieved by adjusting two main parameters: the GPU core clock and the memory clock. The core clock determines how fast the GPU processor runs, while the memory clock controls the speed at which the GPU’s memory accesses data. By increasing these clock speeds, users can achieve higher performance. However, it’s important to note that overclocking can also lead to increased power consumption and heat generation, which may require additional cooling solutions.
It’s important to mention that not all graphics cards are created equal when it comes to overclocking. Some GPUs have better headroom for overclocking, meaning they can be pushed to higher clock speeds without stability issues. Others may have limited overclocking potential or may require more advanced cooling solutions to maintain stability.
Overclocking a GPU is a popular practice among gamers, as it allows them to squeeze out extra performance and stay ahead of the curve in the ever-evolving gaming industry. Additionally, professionals in fields such as graphic design and video editing may also benefit from overclocking, as it can significantly reduce rendering times and improve overall productivity.
In the next sections, we will delve into why you might want to un-overclock your GPU and provide a step-by-step guide on how to safely revert to the default settings.
Why would you want to un-overclock your GPU?
While overclocking your GPU can deliver a noticeable performance boost, there are several reasons why you might want to un-overclock your graphics card and revert it back to its default clock speeds.
1. Stability issues: One of the most common reasons for un-overclocking a GPU is instability. When a graphics card is overclocked beyond its limits, it can lead to crashes, system freezes, or even blue screen errors. If you have been experiencing these issues while running demanding applications or playing games, it might be a sign that your GPU is not stable at its overclocked frequencies. Un-overclocking can help resolve these stability issues and restore a reliable computing experience.
2. Reduced lifespan: Overclocking increases the power consumption and heat output of a GPU. While modern graphics cards are designed to handle higher temperatures, continuous and prolonged exposure to extreme temperatures can potentially shorten the lifespan of the GPU. Un-overclocking your GPU can help reduce the heat generated and prolong the life of your graphics card.
3. Power consumption and heat: Overclocking a GPU can significantly increase its power consumption. This additional power draw not only impacts your electricity bill but also results in higher heat production. This can be a concern, especially if you already have limited cooling solutions in your system. Un-overclocking your GPU will return it to its default power consumption levels and help keep temperatures within a safe range.
4. Compatibility issues: Some games or software applications might not play well with overclocked GPUs. They may have stability issues or exhibit graphical glitches when running on an overclocked graphics card. Un-overclocking your GPU can help ensure compatibility and provide a smoother gaming or software experience.
5. No longer needed performance: Overclocking is primarily done to gain extra performance when running demanding tasks. However, there may come a time when you no longer require that extra performance. For example, if you upgrade to a more powerful graphics card or if you switch to less GPU-intensive tasks, un-overclocking your GPU can help conserve energy and reduce unnecessary strain on the card.
By un-overclocking your GPU, you can address stability issues, extend the lifespan of your graphics card, reduce power consumption and heat output, ensure compatibility with software applications, and conserve energy when the extra performance is no longer needed.
Now that we understand the reasons for un-overclocking, let’s move on to the precautions you need to take before proceeding with the un-overclocking process.
Precautions before un-overclocking your GPU
Before proceeding with the un-overclocking process, it is important to take certain precautions to ensure a smooth and safe transition back to the default clock speeds of your GPU. Here are some key precautions to keep in mind:
1. Back up your data: Un-overclocking your GPU involves making changes to its settings. While it is rare for un-overclocking to cause data loss, it is always a good practice to back up important files and data before making any changes to your system. This way, you can easily recover your files in case of any unforeseen issues during the un-overclocking process.
2. Understand your GPU model and capabilities: Before un-overclocking your GPU, it is essential to understand the technical specifications of your graphics card. This includes knowing the default clock speeds, power limits, and any specific cooling requirements. Refer to the manufacturer’s documentation or their official website to gather the necessary information about your GPU model.
3. Ensure proper cooling: Overclocking generates additional heat, and the cooling solution in your system plays a vital role in keeping your GPU temperature within safe limits. Before un-overclocking, make sure that your cooling system, including fans and heat sinks, is clean and functioning properly. Monitor your GPU temperatures during the un-overclocking process to ensure that the card stays within a safe temperature range.
4. Take note of stability issues: If you experienced stability issues while the GPU was overclocked, it is important to take note of them. Pay attention to any crashes, freezes, or graphical glitches that occurred during the overclocking period. This information can help identify any potential issues during the un-overclocking process and assist in troubleshooting if needed.
5. Have the necessary tools and software: To revert your GPU back to its default clock speeds, you will need access to the appropriate tools and software. This typically includes graphics card management software provided by the GPU manufacturer or third-party overclocking software. Make sure you have the latest version of the software installed to ensure compatibility and access to the required settings.
6. Follow manufacturer guidelines: Each GPU manufacturer may have specific instructions or recommendations when it comes to un-overclocking their graphics cards. It is important to refer to their guidelines and follow the recommended steps for un-overclocking. This will help ensure that you are taking the correct approach and minimize the risk of any potential issues.
By taking these precautions, you can better prepare for the un-overclocking process, minimize potential risks, and ensure a smoother transition back to the default settings of your GPU. Now, let’s move on to the step-by-step guide on how to un-overclock your GPU.
Step-by-step guide to un-overclocking your GPU
Now that you have taken the necessary precautions, it’s time to dive into the step-by-step process of un-overclocking your GPU. Follow these instructions carefully to revert your graphics card back to its default clock speeds:
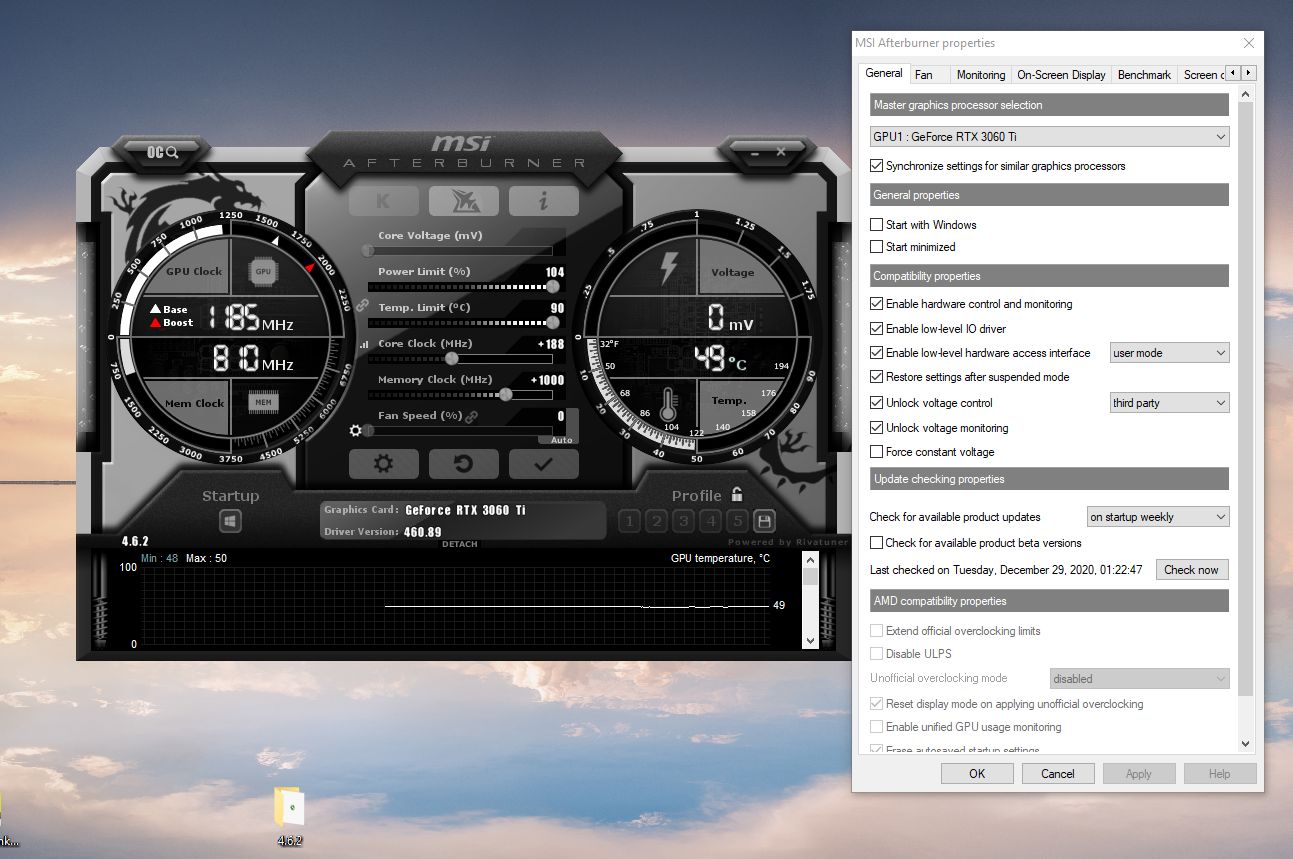
Step 1: Open the graphics card management software: Launch the software provided by your GPU manufacturer or any third-party overclocking software that you have installed. This software allows you to modify the GPU settings and adjust the clock speeds.
Step 2: Reset core clock and memory clock: In the software, locate the options for adjusting the core clock and memory clock. Set both values to their default levels, which can usually be found in the software or by referring to the manufacturer’s documentation. Make sure you are not modifying any other settings during this process.
Step 3: Apply the changes: After setting the core clock and memory clock to their default values, apply the changes in the software. This step ensures that the new settings take effect and the GPU reverts to its original clock speeds.
Step 4: Test stability: Restart your computer and run stress tests or graphically demanding applications to test the stability of your GPU at the default clock speeds. Monitor the temperatures and check for any crashes, freezes, or graphical glitches. If any issues arise, refer to the manufacturer’s documentation or seek assistance to troubleshoot the problem.
Step 5: Adjust fan curves (optional): If you have modified the fan curves or fan speed during the overclocking process, consider setting them back to default or adjusting them based on your specific requirements. This step ensures that the GPU receives adequate cooling and prevents overheating.
Step 6: Monitor performance: After un-overclocking, keep an eye on the GPU performance in your regular usage and while running demanding tasks. Ensure that your graphics card performs as expected and provides the desired level of performance for your needs.
It’s important to note that the specific steps and options in the graphics card management software may vary depending on the manufacturer and the software being used. Always refer to the software’s documentation or consult the manufacturer’s website for detailed instructions tailored to your GPU model.
By following this step-by-step guide, you can successfully un-overclock your GPU and restore it to its default clock speeds. Now, let’s move on to the next section, where we will discuss how to test your GPU after un-overclocking.
Testing your GPU after un-overclocking
After un-overclocking your GPU and reverting it back to its default clock speeds, it’s crucial to perform thorough testing to ensure that everything is functioning as expected. This testing phase helps verify the stability and performance of your graphics card. Here are some tests you can perform:
1. Stress tests: Use stress testing software, such as FurMark or 3DMark, to put your GPU through rigorous and demanding scenarios. These tests perform intense graphics rendering to push your GPU to its limits. Monitor the temperatures, check for any abnormalities or crashes, and ensure that the GPU maintains stable performance throughout the stress tests.
2. Benchmark tests: Run benchmarking software like Heaven Benchmark or Futuremark’s Time Spy to assess the performance of your GPU. These tests provide scores and performance metrics, allowing you to compare your graphics card’s performance before and after un-overclocking. Look for any noticeable differences in performance and ensure that the scores align with your expectations.
3. Gaming tests: Play graphically demanding games or run game benchmarks to evaluate the GPU’s performance in real-world scenarios. Monitor the frame rates, smoothness of gameplay, and any graphical anomalies that may occur. Ensure that the game runs smoothly and without any stability issues after un-overclocking.
4. Graphics-intensive tasks: If you use your GPU for tasks like video editing, 3D rendering, or graphic design, run these applications and monitor their performance. Check for any improvements or issues compared to the overclocked state. Ensure that the GPU handles the workload effectively and without any stability problems.
5. Temperature monitoring: Keep an eye on the GPU temperatures during testing. If the un-overclocked GPU is running cooler than before, it could be an indication that the system is more stable and efficiently managing heat. However, if you notice unusually high temperatures, it may be necessary to adjust cooling solutions or investigate further for potential issues.
Throughout the testing process, it’s important to remain vigilant and observe any anomalies or unexpected behavior. If you encounter stability issues or performance problems, it may be necessary to retrace your steps, recheck the settings, or seek assistance from GPU manufacturers or technical support forums.
By thoroughly testing your GPU after un-overclocking, you can ensure that it is working optimally and providing the expected level of performance and stability. Now that you have successfully un-overclocked and tested your GPU, you can enjoy the default settings with peace of mind.
Conclusion
Un-overclocking your GPU is an important process to consider when faced with stability issues, compatibility problems, or when the additional performance is no longer necessary. By following the precautions and step-by-step guide outlined in this article, you can safely revert your graphics card back to its default clock speeds.
We explored the concept of GPU overclocking, understanding how it can provide a performance boost but also come with potential drawbacks such as instability and increased power consumption. Knowing the reasons for un-overclocking, including stability concerns, reduced lifespan, power consumption, heat generation, and compatibility issues, helps make an informed decision.
Before jumping into the un-overclocking process, it is crucial to take certain precautions, including backing up important data, understanding your GPU’s capabilities, ensuring proper cooling, noting stability issues, and having the necessary tools and software at hand.
Following the step-by-step guide provided, you can successfully un-overclock your GPU by adjusting the core clock and memory clock settings to their default values. Testing your GPU after un-overclocking through stress tests, benchmarking software, gaming tests, and graphics-intensive tasks helps ensure stability and performance.
Remember to monitor temperatures and seek assistance if any issues arise during the un-overclocking process or testing phase. By taking these steps, you can enjoy a stable and reliable GPU experience while maintaining the longevity of your graphics card.
Un-overclocking your GPU doesn’t have to be a daunting task. With proper knowledge, precautions, and careful execution, you can safely restore your graphics card to its default settings and achieve a balance between performance and stability.
Now that you understand the importance and process of un-overclocking your GPU, you can confidently make informed decisions regarding your graphics card and optimize its performance according to your specific needs.