Introduction
Undervolting is a technique that has gained popularity among tech enthusiasts and gamers for maximizing the performance and efficiency of their GPUs (Graphics Processing Units). With the ability to reduce power consumption and heat output while maintaining stable performance, undervolting has become a valuable tool to achieve a better balance between power usage, thermal management, and overall system optimization.
Undervolting involves lowering the voltage supplied to the GPU, resulting in lower power consumption and decreased heat generation. This technique is different from overclocking, which involves increasing the GPU’s clock speed to improve performance but often leads to higher power consumption and increased heat.
By undervolting your GPU, you can potentially achieve a range of benefits, including reduced power consumption, lower operating temperatures, potential decrease in fan noise, extended overall lifespan of the graphics card, and even increased stability during demanding tasks such as gaming or video editing.
However, it is crucial to understand the risks associated with undervolting. If not done properly, undervolting can lead to system instability, crashes, and even permanent damage to the GPU. Therefore, it is important to follow the correct procedures and take necessary precautions when attempting to undervolt your GPU.
In this guide, we will walk you through the process of undervolting your GPU step by step, while also highlighting the essential aspects to consider and the potential pitfalls to avoid. By the end of this guide, you will have a solid understanding of how to undervolt your GPU effectively and confidently.
What is GPU undervolting?
GPU undervolting is a process of lowering the voltage supplied to the graphics card’s GPU (Graphics Processing Unit) without compromising its performance. The GPU typically operates at a certain voltage level set by the manufacturer, which is often higher than necessary for optimal performance. Undervolting allows you to find the balance between power consumption, heat generation, and performance by reducing the voltage levels to a point where stable operation is maintained.
When a GPU is undervolted, it consumes less power and generates less heat during operation. This not only contributes to a more energy-efficient system but also helps to keep the temperatures within acceptable limits, preventing the GPU from throttling or overheating. Undervolting can be particularly beneficial for reducing power consumption on high-performance GPUs used in gaming rigs or professional workstations.
Undervolting is different from underclocking, which involves reducing the GPU’s clock speed to lower performance in exchange for decreased power consumption. While underclocking can be effective for achieving power savings, it may come at the cost of reduced performance. On the other hand, undervolting aims to maintain or even enhance performance while minimizing power usage and heat output.
One of the key advantages of GPU undervolting is that it allows you to achieve optimal performance without resorting to extreme cooling solutions like liquid cooling or aftermarket coolers. By keeping the voltage levels at an efficient level, you can often achieve lower temperatures even with the stock cooling solution provided by the GPU manufacturer.
It is important to note that the extent to which a GPU can be undervolted without compromising stability varies from model to model. Some GPUs have more headroom for voltage adjustments than others. Therefore, it is recommended to research undervolting results and experiences specific to your GPU model before attempting the process.
Undervolting your GPU can lead to various benefits, including reduced power consumption, improved thermal performance, potentially lower fan noise, and extended overall lifespan of your graphics card. However, it is crucial to approach undervolting with caution and perform comprehensive testing to ensure stability and avoid potential issues.
Why should you undervolt your GPU?
Undervolting your GPU can provide a range of benefits that make it a worthwhile endeavor for many users. Here are some key reasons why you should consider undervolting your GPU:
- Reduced power consumption: Undervolting allows your GPU to operate at lower voltage levels, resulting in decreased power consumption. This can be particularly beneficial for users who want to save on energy costs or have limited power supply capacity.
- Improved thermal performance: By lowering the voltage and consequently reducing power consumption, undervolting can help to reduce the heat generated by your GPU. This can result in lower temperatures during heavy usage, decreasing the risk of overheating and potential thermal throttling.
- Potential decrease in fan noise: The reduced heat output from undervolting can also translate into lower fan speeds and quieter operation. By keeping temperatures in check, your GPU’s fans may not need to run at high speeds, resulting in a more peaceful computing experience.
- Extended overall lifespan: Operating your GPU at lower voltages and temperatures can contribute to its longevity. By reducing the stress on the GPU components, undervolting can potentially help prolong the lifespan of your graphics card.
- Potential performance gains: While not guaranteed in all cases, some users have reported achieving slight performance improvements with undervolting. By optimizing the power delivery to the GPU, it may be possible to reach higher sustained clock speeds, resulting in improved frame rates and smoother performance.
- Flexibility and customization: Undervolting allows you to fine-tune your GPU’s voltage levels based on your system’s specific needs and requirements. This level of customization gives you control over power consumption, heat output, and performance, allowing you to find the optimal balance that suits your preferences.
It is important to note that the actual benefits you can achieve through undervolting will depend on various factors, including your GPU model, its cooling capabilities, and your system’s configuration. Additionally, undervolting is not a guaranteed solution for everyone, as some GPUs may not have much headroom for voltage adjustments or may already be operating optimally out of the box.
Before undervolting, it is highly recommended to do thorough research specific to your GPU model, including user experiences, benchmarks, and potential issues others may have encountered. This will help you make an informed decision and ensure a safer undervolting process.
Understanding the risks and benefits of undervolting
Undervolting your GPU can offer several benefits, as discussed in the previous section. However, it’s crucial to be aware of the potential risks and challenges associated with this process to ensure a successful undervolting experience. Here, we will explore both the risks and benefits of undervolting your GPU.
- Benefit: Reduced power consumption – Undervolting allows your GPU to operate at lower voltage levels, resulting in decreased power consumption. This can help save energy and lower electricity bills.
- Benefit: Improved thermals – By reducing voltage and consequently power consumption, undervolting can lead to lower temperatures during GPU-intensive tasks. This helps prevent overheating and potential thermal throttling.
- Benefit: Potential stability improvements – Undervolting your GPU can potentially lead to better stability during demanding tasks, such as gaming or video editing, by optimizing power delivery and reducing potential voltage spikes or drops.
- Risk: System instability – If undervolting is not done properly, it can result in system instability, crashes, or even complete shutdowns. Finding the right balance between voltage reduction and system stability is crucial.
- Risk: Reduced performance – While some users have reported slight performance improvements with undervolting, there is also a chance of decreased performance if the voltage is set too low. It’s essential to find the optimal voltage that maintains stability without sacrificing performance.
- Risk: Voiding warranty – Undervolting is generally considered a safe practice, but it is important to note that modifying voltage settings may void the GPU’s warranty. It’s recommended to check with the manufacturer’s guidelines before proceeding.
- Risk: Compatibility issues – Not all GPUs are created equal, and their response to undervolting can vary. Some GPUs may have limited undervolting headroom, while others may not respond well to voltage adjustments. It’s essential to research and gather information specific to your GPU model.
Undervolting is a technical process that requires careful consideration and experimentation. It’s important to follow proper procedures, use reliable software tools, and perform comprehensive testing to ensure stability and avoid potential issues. Undervolting is not a universal solution, and the results may vary depending on your specific GPU model and system configuration.
Before proceeding with undervolting, it’s recommended to create a backup of your important data and settings, as well as document your current GPU voltage and clock settings for reference. This will allow you to revert to the original settings if any issues arise during the undervolting process.
Preparing your system for undervolting
Before you begin the process of undervolting your GPU, it’s essential to prepare your system to ensure a smooth and successful undervolting experience. Taking the time to properly prepare will help minimize the risks associated with undervolting and maximize the potential benefits.
- Research your GPU model: Familiarize yourself with your GPU’s specifications, including the recommended voltage range and any limitations or known issues related to undervolting. This information will help you set realistic expectations and avoid potential problems.
- Update GPU drivers: Ensure that you have the latest drivers for your GPU installed. Newer drivers often include optimizations and bug fixes that can improve stability and compatibility with undervolting tools and software.
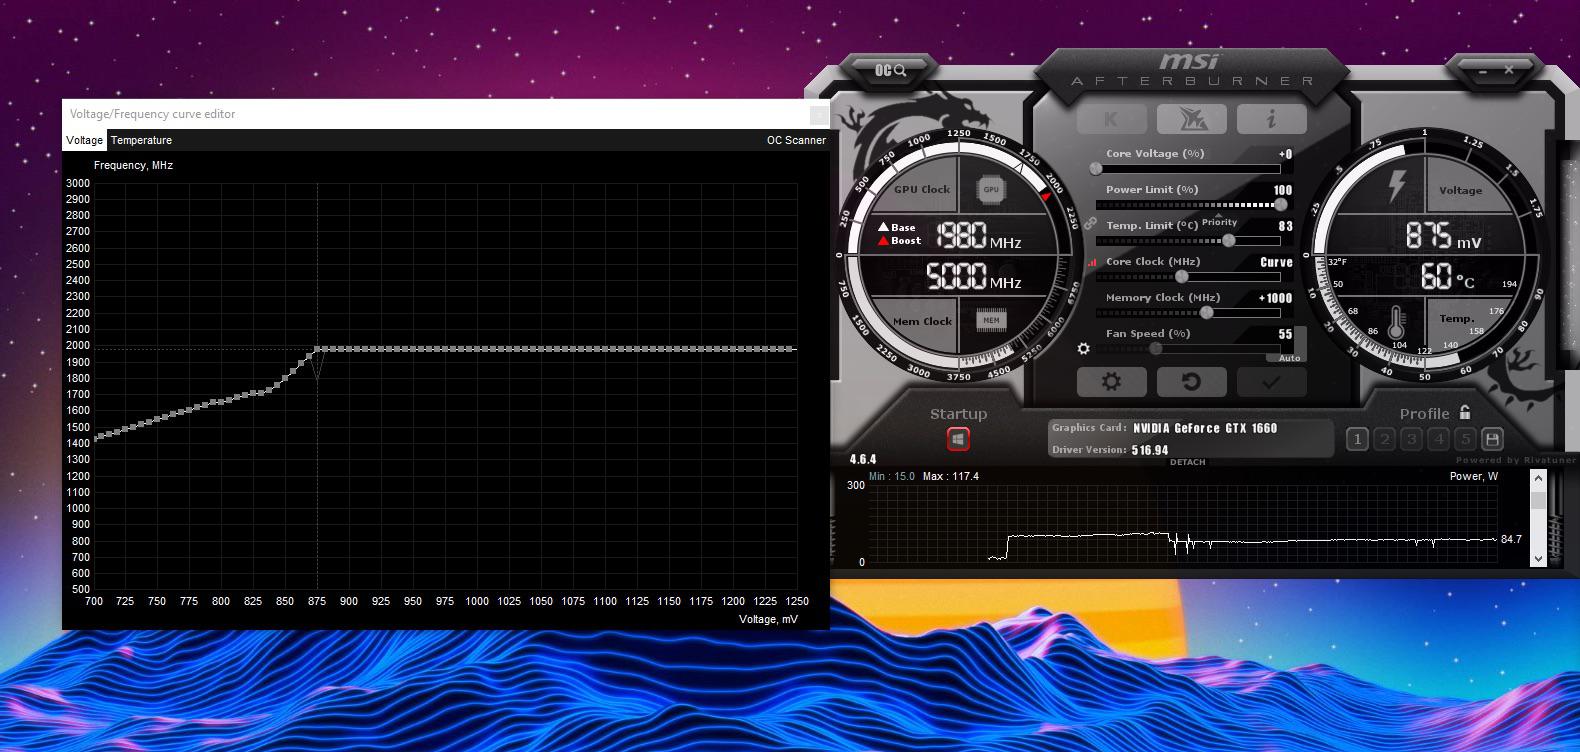
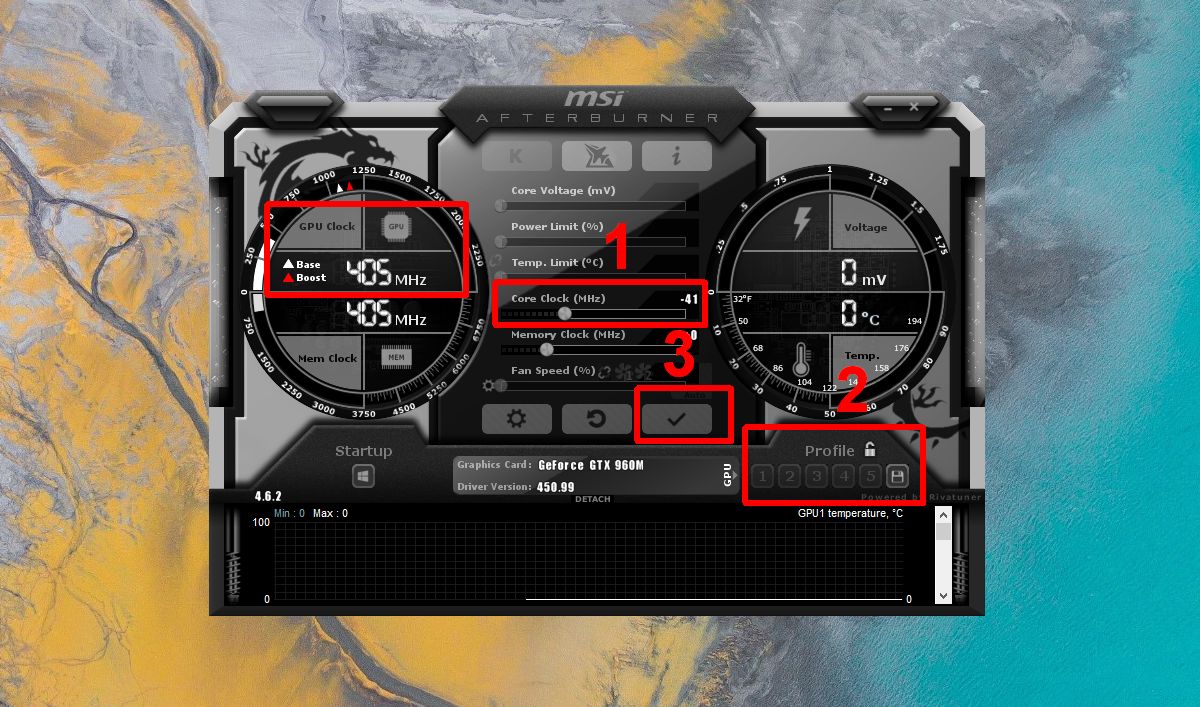
- Choose a reliable undervolting software: Select a reputable undervolting software tool that is compatible with your GPU model. Popular options include MSI Afterburner, EVGA Precision X1, and Radeon Wattman (for AMD GPUs). Check for compatibility and read user reviews to find the best-suited tool for your needs.
- Gather benchmarking tools: To assess the impact of undervolting on your GPU’s performance, it’s beneficial to have benchmarking software on hand. Programs like 3DMark or Unigine Heaven can provide valuable insights into performance changes before and after undervolting.
- Backup your data: Undervolting involves modifying the voltage settings of your GPU, which carries a certain level of risk. To mitigate the potential for data loss or system instability, create backups of important files and settings before proceeding with undervolting.
- Document current voltage and clock settings: Take note of your GPU’s current voltage and clock settings, as well as any custom fan curves or other modifications you have in place. Having this documentation will help you revert to the original settings if necessary.
- Prepare for stability testing: Undervolting requires thorough stability testing to ensure that your system remains stable under various workloads. Make sure you have software tools like FurMark or Heaven Benchmark to stress-test your GPU after applying undervolting settings.
- Read guides and user experiences: Before diving into undervolting, read guides and user experiences specific to your GPU model. Online forums and communities can provide valuable insights into potential issues, optimal voltage ranges, and recommended undervolting strategies.
By following these preparation steps, you can set yourself up for a successful undervolting experience. Remember that undervolting is not a one-size-fits-all solution, and the results may vary based on your specific GPU model and system configuration. Take your time, exercise caution, and be prepared to experiment to find the optimal undervolting settings for your GPU.
Step-by-step instructions for undervolting your GPU
Undervolting your GPU involves adjusting the voltage settings to achieve a balance between power consumption, heat generation, and performance. Here is a step-by-step guide to help you through the undervolting process:
- Prepare your system: Ensure that you have completed the necessary preparations outlined in the previous section, including updating GPU drivers, choosing undervolting software, and backing up your data.
- Open the undervolting software: Launch the undervolting software of your choice. Make sure it is compatible with your GPU model and that you have the latest version installed.
- Adjust voltage/frequency curve: Many undervolting software tools allow you to adjust the voltage/frequency curve of your GPU. This curve represents the relationship between voltage and clock speeds. Lowering the voltage along the curve can reduce power consumption and heat output without sacrificing performance.
- Gradually reduce voltage: To avoid instability, start by gradually reducing the voltage of each frequency point on the curve. It’s recommended to make small voltage adjustments (e.g., 10-20 mV) and test for stability after each adjustment.
- Stress test your GPU: After each voltage adjustment, run stability tests using benchmarking software like FurMark or Heaven Benchmark. These tests will help ensure that your GPU remains stable under heavy loads.
- Monitor temperature and performance: Keep an eye on your GPU’s temperature while stress testing. If temperatures exceed safe limits or if you experience crashes or artifacts, it may indicate that you’ve reduced the voltage too much. Increase the voltage slightly and retest for stability.
- Find the optimal balance: Continuously adjust the voltage settings, running stress tests and monitoring temperatures, until you find the optimal balance between power consumption, heat generation, and performance for your specific GPU.
- Document your undervolted settings: Once you’ve found stable undervolting settings, document them for future reference. Note down the new voltage and frequency values that work best for your GPU.
- Monitor and retest periodically: It’s important to monitor your GPU’s performance and temperatures periodically after undervolting. Over time, as the GPU ages and accumulates dust, you may need to adjust the undervolted settings to maintain stability and optimal performance.
Remember that undervolting is not without risks, and it may not provide significant benefits for all GPUs. The results can vary based on the specific model and system configuration. Take your time, be patient, and don’t be afraid to revert to default settings or seek assistance if you encounter difficulties during the undervolting process.
Monitoring and testing the undervolted GPU
Once you have undervolted your GPU, it is essential to monitor its performance and test its stability to ensure that the new settings are working optimally and reliably. Here are some key aspects to consider when monitoring and testing your undervolted GPU:
- Temperature monitoring: Keep a close eye on your GPU’s temperature while running demanding tasks or stress tests. Use monitoring software such as MSI Afterburner or HWMonitor to track the temperature levels. If the temperatures remain within acceptable limits and do not exceed the manufacturer’s recommended thresholds, it indicates that the undervolted settings are working effectively.
- Stress testing: Perform stress tests on your GPU using benchmarking software like FurMark or Heaven Benchmark. These tests will push your GPU to its limits, allowing you to verify stability under heavy workloads. If the undervolted GPU passes the stress tests without crashes, artifacts, or system instability, it confirms that the undervolted settings are stable.
- Performance benchmarking: Benchmark your undervolted GPU using software like 3DMark or Unigine Heaven to assess its performance compared to its stock settings. While undervolting may not always result in noticeable performance improvements, you can evaluate any changes in frame rates or overall system responsiveness.
- Fan speed and noise level: Observe the behavior of your GPU’s fans under load after undervolting. If the undervolted settings effectively reduce power consumption and heat generation, you may notice lower fan speeds and reduced fan noise. This can lead to a quieter and more pleasant computing experience.
- Long-term monitoring: Continuously monitor your undervolted GPU’s performance and temperatures over an extended period. Observe any changes in stability or temperature levels over time, as factors like dust accumulation or aging components can impact performance. Periodically retest and make necessary adjustments to the undervolted settings if required.
- Documentation and comparisons: Keep a record of your undervolted GPU’s settings, including voltage, clock speeds, and fan profiles. This documentation will be useful for future reference, comparisons, or when configuring new systems. It can also help troubleshoot any issues that may arise down the line.
Remember that monitoring and testing your undervolted GPU is an ongoing process. It ensures that your GPU remains stable, performs optimally, and runs at safe temperatures. Regular monitoring helps identify any potential issues, allowing you to make adjustments or seek assistance if necessary. Keep an eye on your GPU’s performance indicators, stay vigilant, and enjoy the benefits of an efficiently undervolted GPU.
Troubleshooting common issues with undervolting
Undervolting your GPU can sometimes be accompanied by issues that require troubleshooting to ensure stability and optimal performance. Here are some common issues you may encounter during the undervolting process and potential solutions:
- System instability: If you experience system crashes or instability after undervolting, it may indicate that the voltage reduction is too aggressive. Increase the voltage slightly and retest for stability. Gradually find the balance between voltage reduction and stability.
- Artifacts or visual glitches: Undervolting can sometimes cause visual abnormalities or artifacts on the screen. This is often a sign that the undervolted settings are too aggressive for your specific GPU. Increase the voltage slightly and retest to eliminate these anomalies.
- Unexpected performance drop: If you notice a significant performance drop after undervolting, it may indicate that the voltage reduction has gone too far. Increase the voltage slightly and retest to achieve a better balance between power savings and performance.
- Temperature issues: Undervolting is intended to reduce temperature levels, but in some cases, it may lead to unexpected increases in GPU temperatures. This can occur if your GPU was already running close to its thermal limits before undervolting. Consider reverting to default settings or adjust the undervolted settings to find a better balance between temperature reduction and stability.
- Fan speed abnormalities: During undervolting, you may observe irregular fan behavior, such as fan speeds being too high or too low. This can be resolved by adjusting the fan curves in your GPU’s control software to better match the undervolted settings.
- Compatibility issues: Not all GPUs respond well to undervolting, and certain models may have limited undervolting headroom. If you encounter compatibility issues or are unable to achieve stable undervolted settings, consider seeking guidance from online communities or consulting with GPU manufacturers’ support teams.
- Failed stress tests: If your undervolted GPU fails stress tests, it suggests that the voltage reduction is too aggressive or unstable. Increase the voltage slightly and retest until the GPU passes the stress tests without issues.
It’s important to remember that undervolting is a trial-and-error process. Finding the optimal undervolted settings requires patience, experimentation, and thorough testing. Always ensure that your data is backed up and be prepared to revert to default settings if needed. Consult GPU-specific forums and communities for guidance, and refer to manufacturer resources for any specific troubleshooting steps. With persistence and careful adjustment, you can achieve stable undervolted settings for your GPU and enjoy the benefits it offers.
Conclusion
Undervolting your GPU is a powerful technique that allows you to strike a balance between power consumption, heat generation, and performance. By reducing the voltage supplied to your graphics card, you can achieve benefits such as decreased power consumption, improved thermal performance, potential reduction in fan noise, extended overall lifespan, and even potential performance gains.
However, it is important to approach undervolting with caution and thorough preparation. Understanding the risks and benefits, researching your specific GPU model, choosing reliable undervolting software, and documenting your settings are all crucial steps in ensuring a successful undervolting experience.
Undervolting requires careful adjustment, monitoring, and testing. Gradually reducing the voltage, stress testing your undervolted GPU, and monitoring temperatures and fan behavior are essential aspects to consider. It is also important to troubleshoot common issues that may arise, such as system instability, artifacts, unexpected performance drops, temperature issues, fan speed abnormalities, compatibility issues, and failed stress tests.
Undervolting is not a universal solution, and the results may vary depending on your specific GPU model and system configuration. Patience, experimentation, and thorough testing are necessary to find the optimal undervolted settings for your GPU.
In conclusion, undervolting can be a valuable tool for optimizing your GPU’s performance, power consumption, and thermal output. By following the step-by-step instructions, monitoring your undervolted GPU, and troubleshooting any issues, you can achieve a more efficient and balanced system. Undervolting is a personalization option that gives you more control over your system and allows you to tailor it to your specific needs and preferences.