Introduction
Welcome to the world of GPU underclocking! When it comes to optimizing your graphics card’s performance, overclocking is a commonly known practice. However, have you ever considered the benefits of underclocking your GPU? In this article, we will explore the concept of GPU underclocking and explain why it can be a valuable technique in certain situations.
Before we dive into the details, let’s briefly discuss what underclocking entails. Underclocking refers to the process of reducing the operating frequency and voltage of a graphics processing unit (GPU). It allows you to lower your GPU’s clock speed below its default settings, effectively slowing down its performance.
You might wonder, why would anyone want to intentionally reduce the performance of their GPU? Well, there are several reasons why you might consider underclocking. Firstly, underclocking can help lower the temperature of your GPU, which can be beneficial in situations where your graphics card tends to overheat. By reducing the clock speed, you can reduce the heat generated and potentially prevent thermal throttling.
Secondly, underclocking can assist in reducing power consumption. If you’re using a high-performance GPU in a system that prioritizes energy efficiency, underclocking can be an effective way to conserve power. By lowering the clock speed and voltage, you can achieve a balance between performance and energy consumption.
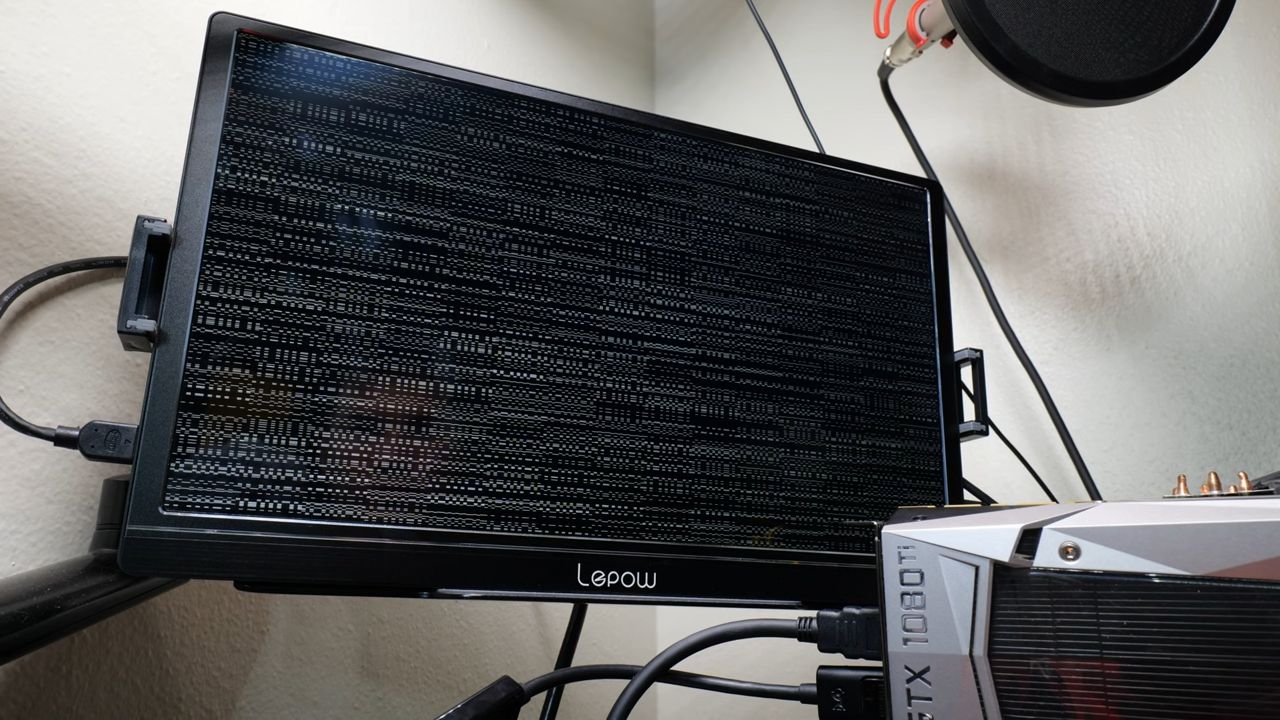
Furthermore, underclocking can be useful when troubleshooting stability issues. If you’re experiencing crashes, artifacts, or other graphical glitches while running intensive applications or games, underclocking the GPU can help alleviate these problems. By running the GPU at a lower clock speed, you can potentially eliminate instability issues caused by overheating or insufficient power supply.
Now that we understand the potential advantages of underclocking, let’s discuss how to check your GPU’s temperature and performance to determine if underclocking is necessary. In the next section, we will explore the tools and techniques needed to monitor your graphics card’s temperature and performance effectively.
What is GPU Underclocking?
Before we delve deeper into the process of GPU underclocking, it’s important to understand what it exactly means. Simply put, GPU underclocking refers to the practice of reducing the clock speed and voltage of your graphics card below its default settings. By doing so, you intentionally decrease the performance of your GPU.
The clock speed of a GPU determines how fast it can process data and perform tasks. A higher clock speed generally results in better performance, allowing for smoother gameplay, faster rendering, and quicker data processing. However, there are instances when running the GPU at its default clock speed isn’t ideal.
Underclocking can benefit users in several ways. Firstly, it can help tackle overheating issues. Graphics cards have a thermal threshold – a maximum temperature at which they can operate efficiently. When a GPU exceeds this threshold, it may throttle its performance or even shut down to prevent damage. Underclocking the GPU can reduce the heat generated, allowing for better temperature management and preventing overheating.
Secondly, underclocking is also useful in scenarios where power consumption is a concern. GPUs can consume a significant amount of power, especially high-performance models. By underclocking, you can lower the voltage and clock speed, thereby reducing power consumption without a significant impact on performance. This is particularly valuable for those who prioritize energy efficiency and want to lower their electricity bills.
Another benefit of underclocking is stability. Some GPUs may experience stability issues, such as crashes, artifacts, or graphical glitches when pushed to their maximum clock speeds. Underclocking can help mitigate these problems by running the GPU at a lower frequency, ensuring a more stable and reliable performance.
It’s important to note that underclocking doesn’t necessarily mean sacrificing performance entirely. In fact, it allows you to find a balance between performance and efficiency. By fine-tuning the clock speed and voltage settings, you can customize your GPU’s performance to meet your specific needs.
Now that we have a solid understanding of what GPU underclocking entails, let’s move on to the next section where we will explore how to check your GPU’s temperature and performance to determine if underclocking is necessary.
Why Underclock a GPU?
While the concept of underclocking might seem counterintuitive to some, there are valid reasons why individuals choose to underclock their GPUs. Let’s explore some of the key motivations behind underclocking and how it can be beneficial.
One of the primary reasons to underclock a GPU is to address temperature concerns. Graphics cards can generate a significant amount of heat, especially when running demanding applications or games. When the temperature exceeds a certain threshold, the GPU may throttle its performance or even shut down to prevent damage. By underclocking, you can lower the clock speed and voltage, resulting in reduced heat output and improved temperature management. This can help prevent overheating and maintain optimal performance for more extended periods.
Another compelling reason to underclock is to reduce power consumption. GPUs, especially high-performance ones, can consume a substantial amount of power. This can lead to higher energy bills and put a strain on your power supply. By underclocking, you can lower the voltage and clock speed, thereby decreasing power usage without sacrificing performance significantly. This is particularly valuable for those concerned with energy efficiency or running their systems on limited power sources, such as laptops or compact PCs.
Underclocking can also be useful in situations where a GPU’s performance exceeds the requirements of a specific application or game. Some older titles or less demanding software might not fully utilize the capabilities of high-end GPUs. By underclocking, you can reduce power consumption and lower the temperature without sacrificing noticeable performance. This allows for a more efficient use of your graphics card’s resources while still maintaining a smooth and enjoyable experience.
Furthermore, underclocking can be an effective troubleshooting method. If you’re experiencing stability issues such as crashes, artifacts, or graphical glitches, underclocking can help alleviate these problems. These issues can sometimes occur when a GPU is pushed beyond its limits, either due to high temperatures or insufficient power supply. By underclocking, you can reduce the strain on the GPU and potentially eliminate instability symptoms, leading to a more stable and reliable system.
It’s essential to note that underclocking is not recommended for all scenarios. If you require maximum performance for demanding applications or games, overclocking may be a more suitable option. However, if you’re facing temperature or power-related issues or need to fine-tune your GPU’s performance to your specific requirements, underclocking can be a valuable technique.
In the next section, we will discuss how to monitor GPU temperature and performance to determine if underclocking is necessary and how to proceed with the process.
Checking GPU Temperature and Performance
Before proceeding with underclocking your GPU, it’s crucial to monitor its temperature and performance to determine if underclocking is necessary and understand the current state of your graphics card. Fortunately, there are various tools available that allow you to track these metrics effectively.
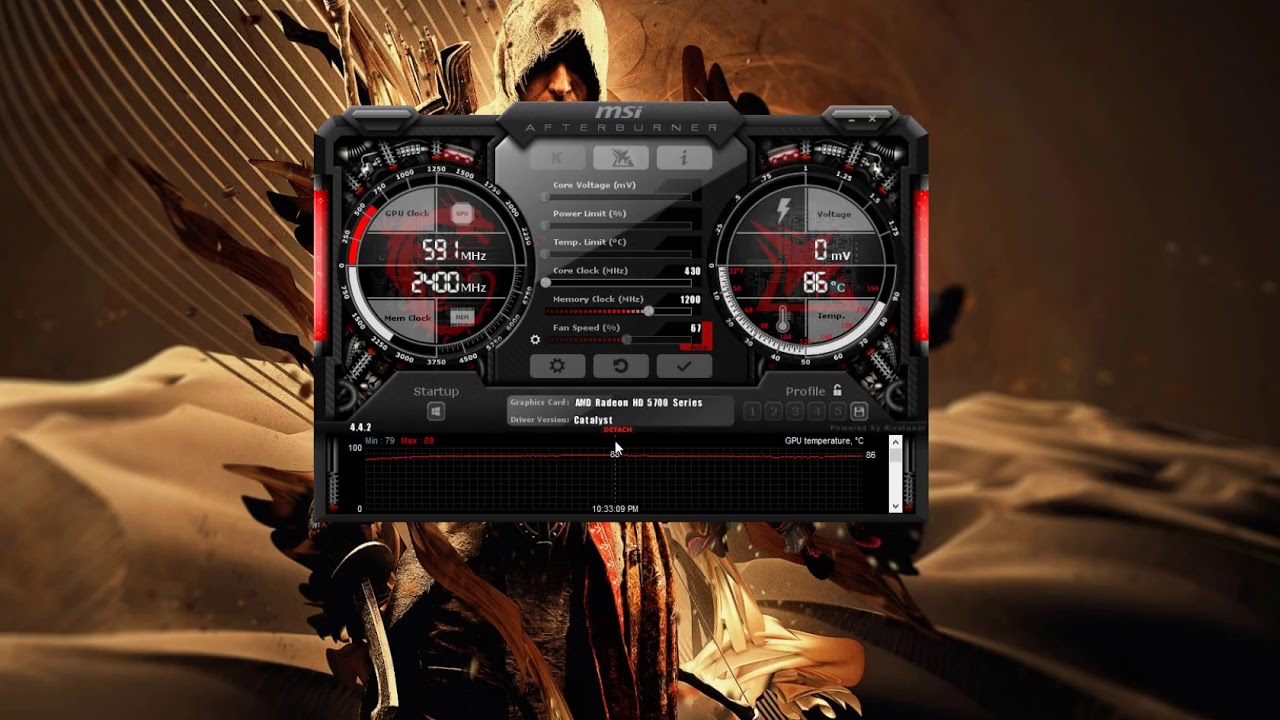
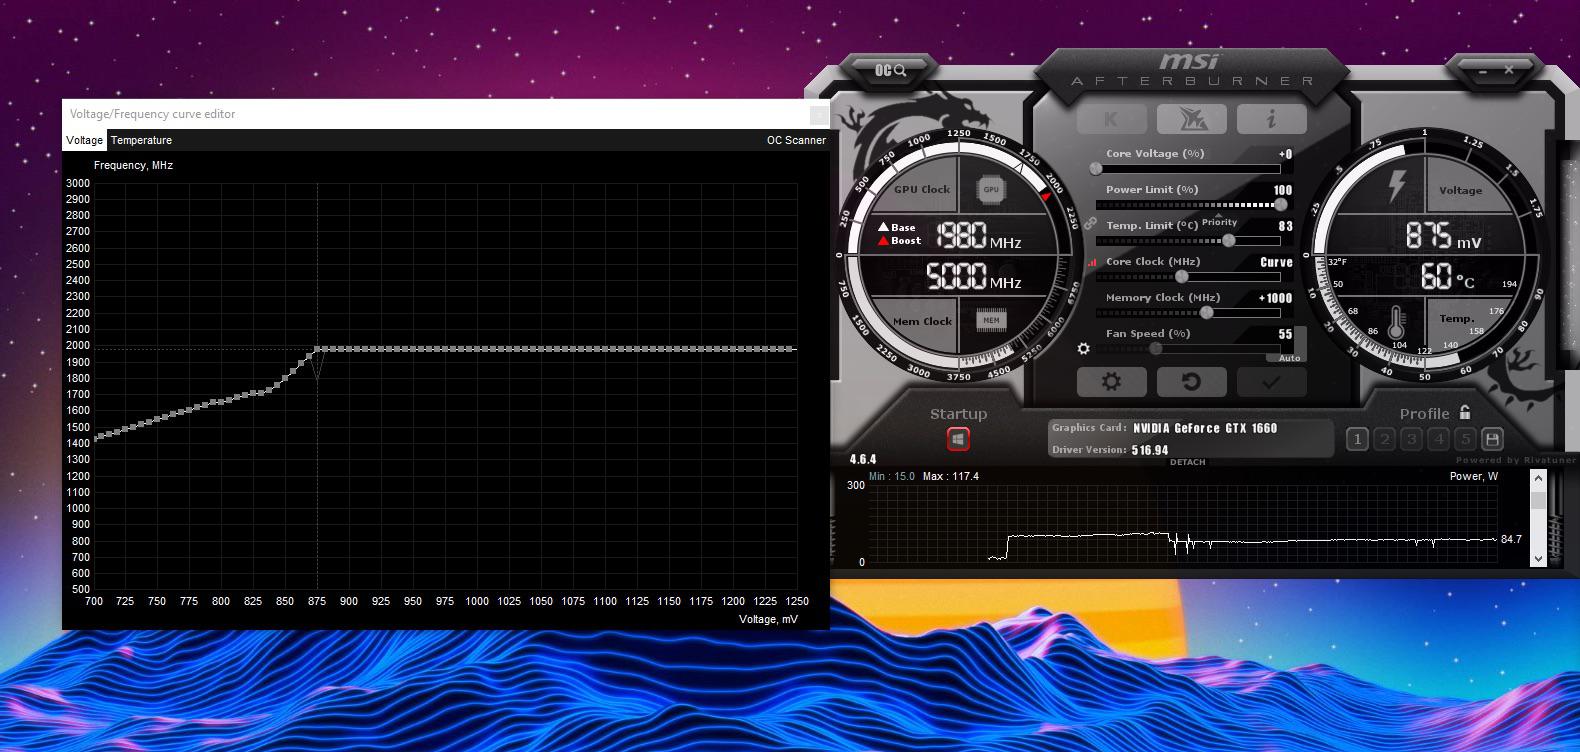
One of the most popular tools for monitoring GPU temperature and performance is MSI Afterburner. This software provides comprehensive monitoring capabilities and allows you to adjust various GPU settings, including clock speeds and voltages. Afterburner is compatible with a wide range of graphics cards and offers real-time monitoring of key metrics such as GPU temperature, core clock, memory clock, fan speed, and more.
After installing MSI Afterburner, launch the program and navigate to the monitoring tab. Here, you can select the metrics you want to track. It’s recommended to monitor GPU temperature, core clock, memory clock, and fan speed as these will provide important insights into your graphics card’s performance and heat output.
While MSI Afterburner is a powerful monitoring tool, there are also other options available. GPU-Z is a lightweight software that provides detailed information about your GPU, including temperature, clock speeds, and performance stats. This tool can be handy if you prefer a simpler interface or want to cross-reference the data gathered with MSI Afterburner.
In addition to software, many high-end graphics cards come with their own monitoring utilities. These utilities are often provided by the manufacturer and offer specific features tailored to the GPU model. For example, ASUS GPU Tweak, EVGA Precision X1, and Gigabyte AORUS Engine are popular monitoring and tweaking tools that come bundled with their respective GPUs.
Once you have the monitoring software installed, it’s time to run some stress tests on your GPU and observe the temperature and performance. There are various stress-testing applications available, such as FurMark, Heaven Benchmark, and 3DMark. These programs put your GPU under heavy load to simulate demanding scenarios and provide an accurate representation of its performance and temperature under intensive usage.
During the stress test, keep a close eye on your GPU temperature. If the temperature exceeds the maximum operating threshold or reaches uncomfortably high levels, it may be an indication that underclocking is necessary to maintain a stable and safe operating temperature.
Monitoring your GPU temperature and performance is a crucial first step before proceeding with underclocking. It allows you to assess the current state of your graphics card and make informed decisions about the need for underclocking and the optimal settings for your specific requirements. In the next section, we will explore the steps involved in underclocking your GPU using MSI Afterburner.
Steps to Underclock a GPU
Now that you’ve determined the need for underclocking your GPU, it’s time to dive into the process. We will outline the steps involved in underclocking your graphics card using MSI Afterburner, one of the popular software options for GPU customization and monitoring.
Step 1: Install MSI Afterburner
The first step is to download and install MSI Afterburner from the official website. Ensure that you download the latest version to have access to all the features and compatibility with your GPU.
Step 2: Monitoring GPU Temperature and Performance
After launching MSI Afterburner, navigate to the monitoring tab and select the metrics you want to track. This typically includes GPU temperature, core clock, memory clock, and fan speed. Monitoring these metrics will provide real-time information on your GPU’s temperature and performance.
Step 3: Underclocking the GPU Core Clock
Underclocking the GPU core clock involves reducing the clock speed of the graphics processor. In MSI Afterburner, you can achieve this by moving the core clock slider to the left. Start with small increments, such as -50 MHz, and then observe the impact on temperature and performance during stress tests.
Step 4: Underclocking the GPU Memory Clock
Similar to the core clock, underclocking the GPU memory clock involves reducing the speed at which the graphics card’s memory operates. In MSI Afterburner, adjust the memory clock slider to the left, again starting with small increments. Monitor the impact on temperature and performance during stress tests.
Step 5: Testing and Fine-tuning the Underclock Settings
After adjusting the core clock and memory clock, it’s essential to test the stability and performance of your GPU with the new settings. Run stress tests or intensive applications/games to observe the temperature and ensure that the underclocked settings don’t result in instability or artifacts. Fine-tune the underclock settings as needed, finding the optimal balance between temperature reduction and acceptable performance trade-offs.
Remember that each GPU is unique, and the underclocking process may require some trial and error. It’s crucial to monitor temperature and performance metrics closely and make incremental adjustments to achieve the desired results.
By following these steps and utilizing the monitoring and customization features of MSI Afterburner, you can successfully underclock your GPU and optimize its performance, temperature, and power consumption to meet your specific requirements.
In the next section, we will conclude our discussion on GPU underclocking and summarize the key takeaways from this article.
Step 1: Install MSI Afterburner
The first step in underclocking your GPU is to install MSI Afterburner, a powerful software utility that allows you to monitor and customize your graphics card settings. MSI Afterburner is compatible with a wide range of GPUs, making it a popular choice among PC enthusiasts.
To install MSI Afterburner, follow these simple steps:
1. Download MSI Afterburner: Go to the official MSI Afterburner website and download the latest version of the software. It’s important to download the correct version based on your operating system.
2. Run the Installer: Once the download is complete, locate the installer file and run it. The installer will guide you through the installation process, allowing you to choose the desired installation location and any additional components you want to install.
3. Agree to the Terms and Conditions: During the installation process, you will be presented with the software’s terms and conditions. Read through them and, if you agree, check the box indicating your acceptance.
4. Select Additional Components: The installer may offer additional components such as RivaTuner Statistics Server, which provides overlay functionality for displaying information in games. Choose the components you want to install according to your needs.
5. Complete the Installation: Once you have made your selections, proceed with the installation by clicking “Next” or “Install”. The installation process should only take a few moments.
6. Launch MSI Afterburner: After the installation is complete, you can find the MSI Afterburner shortcut on your desktop or in the Start Menu. Double-click the shortcut to launch the program.
By following these steps, you can easily install MSI Afterburner and prepare it for monitoring and customizing your GPU’s settings.
Now that you have MSI Afterburner installed, you’re ready to move on to the next step: monitoring your GPU’s temperature and performance. In the next section, we will explore how to effectively monitor these metrics using MSI Afterburner.
Step 2: Monitoring GPU Temperature and Performance
After installing MSI Afterburner, the next step in underclocking your GPU is to monitor its temperature and performance. This will provide valuable insights into the current state of your graphics card and help you determine if underclocking is necessary.
To monitor GPU temperature and performance using MSI Afterburner, follow these steps:
1. Launch MSI Afterburner: Locate the MSI Afterburner shortcut on your desktop or in the Start Menu and double-click it to open the program.
2. Navigate to the Monitoring Tab: In the MSI Afterburner interface, you will find several tabs at the top. Click on the “Monitoring” tab to access the monitoring settings.
3. Select Metrics to Monitor: In the monitoring settings, you will see a list of metrics that you can track in real-time. These metrics include GPU temperature, core clock, memory clock, fan speed, and more. Check the box next to each metric you want to monitor.
4. Customize Monitoring Display: MSI Afterburner also allows you to customize how the monitoring information is displayed. You can choose to show the metrics as on-screen display (OSD), in the system tray, or in the hardware monitoring graph. Select the desired display options and adjust their position or appearance if needed.
5. Start Monitoring: Once you have selected the metrics and customized the display, click on the “Apply” or “OK” button to start monitoring. The selected metrics will now be displayed in real-time according to your chosen settings.
With MSI Afterburner monitoring your GPU, you can keep a close eye on temperature, core clock, memory clock, fan speed, and other important metrics. This will allow you to observe the behavior of your graphics card under different workloads and identify any temperature or performance issues that may require underclocking.
Monitoring is a crucial step before underclocking your GPU as it provides the necessary information to make informed decisions about the need for underclocking and the optimal settings for your specific requirements. In the next section, we will explore the steps involved in underclocking the GPU core clock.
Step 3: Underclocking the GPU Core Clock
Underclocking the GPU core clock is an essential step in optimizing the performance and temperature of your graphics card. By reducing the clock speed of the graphics processor, you can achieve a balance between performance and efficiency. To underclock the GPU core clock using MSI Afterburner, follow these steps:
1. Launch MSI Afterburner: Open MSI Afterburner by clicking on the desktop shortcut or accessing it through the Start Menu.
2. Familiarize Yourself with the Interface: Take a moment to familiarize yourself with the MSI Afterburner interface. You will notice various sliders and settings that allow you to customize your GPU’s clock speeds.
3. Adjust the Core Clock Slider: Locate the “Core Clock” slider in the MSI Afterburner interface. This slider controls the clock speed of the GPU core. To underclock the core clock, move the slider to the left (towards the negative side).
4. Make Incremental Adjustments: It’s recommended to make incremental adjustments to the core clock slider. Start with small increments, such as -50 MHz, and observe the effects on temperature and performance during stress tests or demanding applications.
5. Monitor Temperature and Performance: While underclocking, keep a close eye on the GPU temperature and performance metrics displayed in MSI Afterburner. Ensure that the underclocked settings result in a noticeable temperature reduction without sacrificing performance too much.
6. Fine-tune the Underclock Settings: Based on the temperature and performance observations, adjust the core clock underclocking settings as needed. Fine-tuning the core clock is a trial-and-error process, so continue making adjustments until you find the ideal balance between temperature reduction and acceptable performance trade-offs.
7. Test Stability: After applying the underclocked core clock settings, run stability tests or engage in demanding applications/games to verify the stability of your GPU. Watch out for any artifacts, crashes, or instability issues that may arise due to underclocking. If stability issues occur, revisit the underclock settings and make further adjustments.
Underclocking the GPU core clock can result in a significant reduction in temperature, especially during heavy workloads. By fine-tuning the core clock settings using MSI Afterburner, you can efficiently optimize your graphics card’s performance and temperature to meet your specific requirements.
In the next section, we will discuss the process of underclocking the GPU memory clock and its impact on overall GPU performance and temperature.
Step 4: Underclocking the GPU Memory Clock
Underclocking the GPU memory clock is an important step in fine-tuning the performance and temperature of your graphics card. By reducing the speed at which the memory operates, you can achieve better efficiency and potentially lower temperatures. To underclock the GPU memory clock using MSI Afterburner, follow these steps:
1. Launch MSI Afterburner: Open MSI Afterburner by double-clicking the desktop shortcut or accessing it through the Start Menu.
2. Locate the Memory Clock Slider: In the MSI Afterburner interface, locate the “Memory Clock” slider. This slider controls the clock speed of the GPU memory.
3. Adjust the Memory Clock Slider: Move the memory clock slider to the left (towards the negative side) to underclock the GPU memory clock. Start with small increments, such as -50 MHz, before applying more significant adjustments.
4. Observe Temperature and Performance: As you make adjustments to the memory clock, monitor the temperature and performance metrics displayed in MSI Afterburner. Ensure that the underclocking results in a noticeable temperature reduction while maintaining acceptable performance levels.
5. Fine-tune the Underclock Settings: Based on the temperature and performance observations, fine-tune the memory clock underclocking settings as necessary. Make incremental adjustments to find the optimal balance between temperature reduction and performance trade-offs.
6. Test Stability: After applying the underclocked memory clock settings, it’s crucial to test the stability of your GPU. Run stress tests or engage in demanding applications/games to ensure the underclocking does not lead to artifacts, crashes, or other stability issues. If any issues arise, revisit the memory clock underclocking settings and make further adjustments.
Underclocking the GPU memory clock can have a significant impact on temperature reduction and power efficiency. By fine-tuning the memory clock settings using MSI Afterburner, you can effectively optimize the performance of your graphics card while maintaining stable and cooler operating temperatures.
In the next step, we will discuss the importance of testing and fine-tuning the underclock settings to ensure optimal performance and stability.
Step 5: Testing and Fine-tuning the Underclock Settings
After adjusting the core clock and memory clock settings of your GPU, it’s crucial to thoroughly test and fine-tune the underclock settings to ensure optimal performance and stability. Testing and fine-tuning allow you to find the right balance between temperature reduction and acceptable performance trade-offs. Follow these steps to test and fine-tune your underclock settings:
1. Run Stress Tests: Start by running stress tests or engaging in demanding applications/games with your underclocked GPU settings. Stress tests such as FurMark or 3DMark push your GPU to its limit, allowing you to observe any potential stability issues or artifacts. Monitor the temperature and performance metrics in MSI Afterburner during these tests.
2. Observe Temperature and Performance: Pay close attention to the temperature readings displayed in MSI Afterburner during stress tests. Ensure that the underclocked settings effectively reduce the GPU temperature without causing excessive performance degradation. Monitor other performance metrics, such as core clock and memory clock, to ensure they align with your expectations.
3. Fine-tune the Settings: Based on the observations from the stress tests, fine-tune the underclock settings as needed. If the temperature is still too high, consider further reducing the core clock and memory clock. Conversely, if you notice a significant drop in performance, you may need to make slight adjustments to increase the clock speeds while keeping the temperature in check.
4. Test Stability: Stability is a key consideration when underclocking your GPU. After applying fine-tuned settings, continue to test the stability of your GPU by running demanding applications or games for an extended period. Keep an eye out for crashes, artifacts, or other signs of instability. If any issues arise, revisit the underclock settings and make necessary adjustments.
5. Iterate and Repeat: Testing and fine-tuning underclock settings is an iterative process. It may require multiple rounds of adjustments and tests to find the optimal balance. Take your time and be patient in the fine-tuning process to ensure the best results.
By thoroughly testing and fine-tuning the underclock settings, you can ensure a stable and efficient performance for your GPU. Once you’re satisfied with the results, you can enjoy the benefits of reduced temperature and power consumption without compromising the overall performance of your graphics card.
In the next section, we will conclude our discussion on underclocking a GPU and summarize the key takeaways from this article.
Conclusion
Underclocking your GPU can be a valuable technique to optimize its performance, temperature, and power consumption. By reducing the clock speed and voltage of your graphics card, you can achieve lower temperatures, decrease power consumption, and potentially resolve stability issues.
In this article, we discussed the concept of GPU underclocking and explored the reasons why one might consider underclocking their graphics card. We highlighted the benefits of underclocking, such as temperature reduction, power efficiency, and stability improvement.
We also provided a step-by-step guide on how to underclock a GPU using MSI Afterburner, a popular software utility. The steps involved installing MSI Afterburner, monitoring GPU temperature and performance, underclocking the GPU core clock, underclocking the GPU memory clock, and testing and fine-tuning the underclock settings.
Throughout the underclocking process, it’s important to monitor the temperature and performance of your GPU using software like MSI Afterburner. This allows you to make informed decisions about adjusting the core clock and memory clock settings to achieve the desired balance between temperature reduction and acceptable performance trade-offs.
Remember, underclocking is not recommended for all scenarios. If you require maximum performance for demanding applications or games, overclocking may be a more suitable option. However, underclocking can be beneficial in situations where temperature, power consumption, or stability are concerns.
We hope this article has provided you with valuable insights into the world of GPU underclocking. By following the steps and guidelines outlined in this article, you can effectively optimize the performance and efficiency of your graphics card to meet your specific needs.
So, go ahead and explore the possibilities of underclocking your GPU. Experiment, monitor, and fine-tune to find the perfect balance that suits your requirements. Enjoy a cooler, more efficient, and stable GPU experience!