Introduction
Welcome to our comprehensive guide on how to underclock a graphics card. If you’re wondering what underclocking is and why it’s useful, you’ve come to the right place. Whether you’re a hardcore gamer, a multimedia enthusiast, or simply someone who wants to optimize their graphics card’s performance, understanding how to underclock can be a valuable skill.
Before we dive into the details, let’s clarify what underclocking actually means. In a nutshell, underclocking involves reducing the clock speeds of your graphics card. Clock speeds determine how fast the GPU (Graphics Processing Unit) processes data, and by underclocking, you intentionally slow down these speeds.
Now, you might be wondering why anyone would want to intentionally decrease the performance of their graphics card. Well, there are a few reasons why underclocking has its merits. First and foremost, underclocking can help reduce the power consumption and heat generated by your graphics card. This is particularly useful if you have an older or overheating GPU that struggles to keep up with demanding tasks.
Additionally, underclocking can provide a more stable and consistent experience when it comes to gaming or using graphics-intensive software. By lowering the clock speeds, you can potentially minimize the occurrence of crashes, stuttering, or artifacts caused by an overworked or unstable GPU.
Underclocking can also be beneficial if you’re looking to achieve quieter system operation. By reducing the clock speeds, your graphics card’s fans don’t have to work as hard to keep temperatures under control, resulting in a quieter overall experience.
It’s essential to note that underclocking isn’t a one-size-fits-all solution. The effectiveness and degree of underclocking will vary depending on your specific graphics card model, the tasks you’re performing, and your system’s overall configuration. Nonetheless, understanding how to underclock your graphics card can be a valuable technique to optimize performance, extend the lifespan of your GPU, and create a more efficient and stable computing environment.
What is Underclocking?
Underclocking refers to the process of intentionally reducing the clock speeds of a graphics card. Clock speeds determine how quickly the GPU (Graphics Processing Unit) processes data, and by underclocking, you can lower these speeds to achieve certain benefits.
Typically, when you purchase a graphics card, it comes with default clock speeds that are optimized for performance. However, there are situations where running a graphics card at its default clock speeds may not be ideal. This is where underclocking comes into play.
Underclocking can be seen as the opposite of overclocking, where you increase the clock speeds of a component to gain better performance. While overclocking aims for increased performance, underclocking focuses on reducing power consumption, heat generation, and potentially improving stability.
By lowering the clock speeds of your graphics card, you can decrease the power consumption, which is particularly beneficial if you have an older or power-hungry GPU. This reduction in power consumption translates to less heat being generated, which can help keep your system temperature under control and potentially improve the overall lifespan of your graphics card.
Underclocking can also be handy in scenarios where you’re experiencing crashes, instability, or graphical artifacts during demanding tasks. By reducing the clock speeds, you can ease the workload on the GPU, potentially resolving these issues and providing a more stable computing experience.
Another advantage of underclocking is the potential for a quieter system operation. By reducing the clock speeds and subsequently lowering the heat generation, your graphics card’s fans won’t have to work as hard to maintain cool temperatures. This can result in a quieter overall system, which can be particularly desirable for those who value a noise-free computing environment.
It’s worth noting that the effectiveness of underclocking will vary depending on several factors, including your specific graphics card model, the tasks you’re performing, and the overall configuration of your system. It’s essential to experiment and find the optimal balance between performance and power consumption for your specific needs.
Now that you have a better understanding of what underclocking is, let’s explore why you might want to consider underclocking your graphics card in the next section.
Why Underclock a Graphics Card?
Underclocking a graphics card may seem counterintuitive at first, as most people associate higher clock speeds with better performance. However, there are several reasons why you might want to underclock your graphics card.
One of the main reasons to underclock a graphics card is to reduce power consumption. Graphics cards, especially high-performance ones, can consume a significant amount of power, leading to higher energy bills and potentially putting strain on your power supply. By underclocking, you can lower the power requirements of your graphics card, resulting in decreased energy consumption.
Another compelling reason to underclock is to manage heat generation. Graphics cards can generate substantial amounts of heat, which can affect system stability and potentially cause performance throttling. Underclocking helps decrease the workload on the GPU, reducing heat production and allowing for better cooling. This can result in lower temperatures, quieter operation, and increased overall system stability.
If you have an older graphics card that struggles to keep up with the demands of newer games or software, underclocking can be a viable solution. By reducing the clock speeds, you can alleviate some of the strain on the GPU and prevent it from overheating or becoming overloaded. This can result in smoother gameplay, fewer crashes, and improved overall performance.
Underclocking can also be beneficial for overclockers who are pushing their graphics card to its limits. Overclocking can often lead to higher power consumption and heat generation. By underclocking, you can find a balance between increased performance and keeping the GPU within acceptable temperature and power limits.
Furthermore, underclocking can be particularly useful for those who prioritize a quiet computing environment. By reducing the clock speeds and subsequently lowering heat generation, you can reduce the workload on the cooling fans. This can result in a quieter system with less fan noise, which is especially appealing for those who value a peaceful and distraction-free workspace.
Ultimately, underclocking a graphics card provides a range of benefits, including reduced power consumption, improved heat management, enhanced system stability, and quieter operation. However, it’s important to note that the results may vary depending on the specific graphics card model, system configuration, and the tasks you’re performing. It’s always wise to experiment and find the right balance between performance and power efficiency that meets your individual needs.
Step 1: Downloading and Installing the Required Software
Before you can start underclocking your graphics card, you’ll need to download and install the necessary software. Fortunately, there are various programs available that allow you to adjust the clock speeds and other settings of your graphics card.
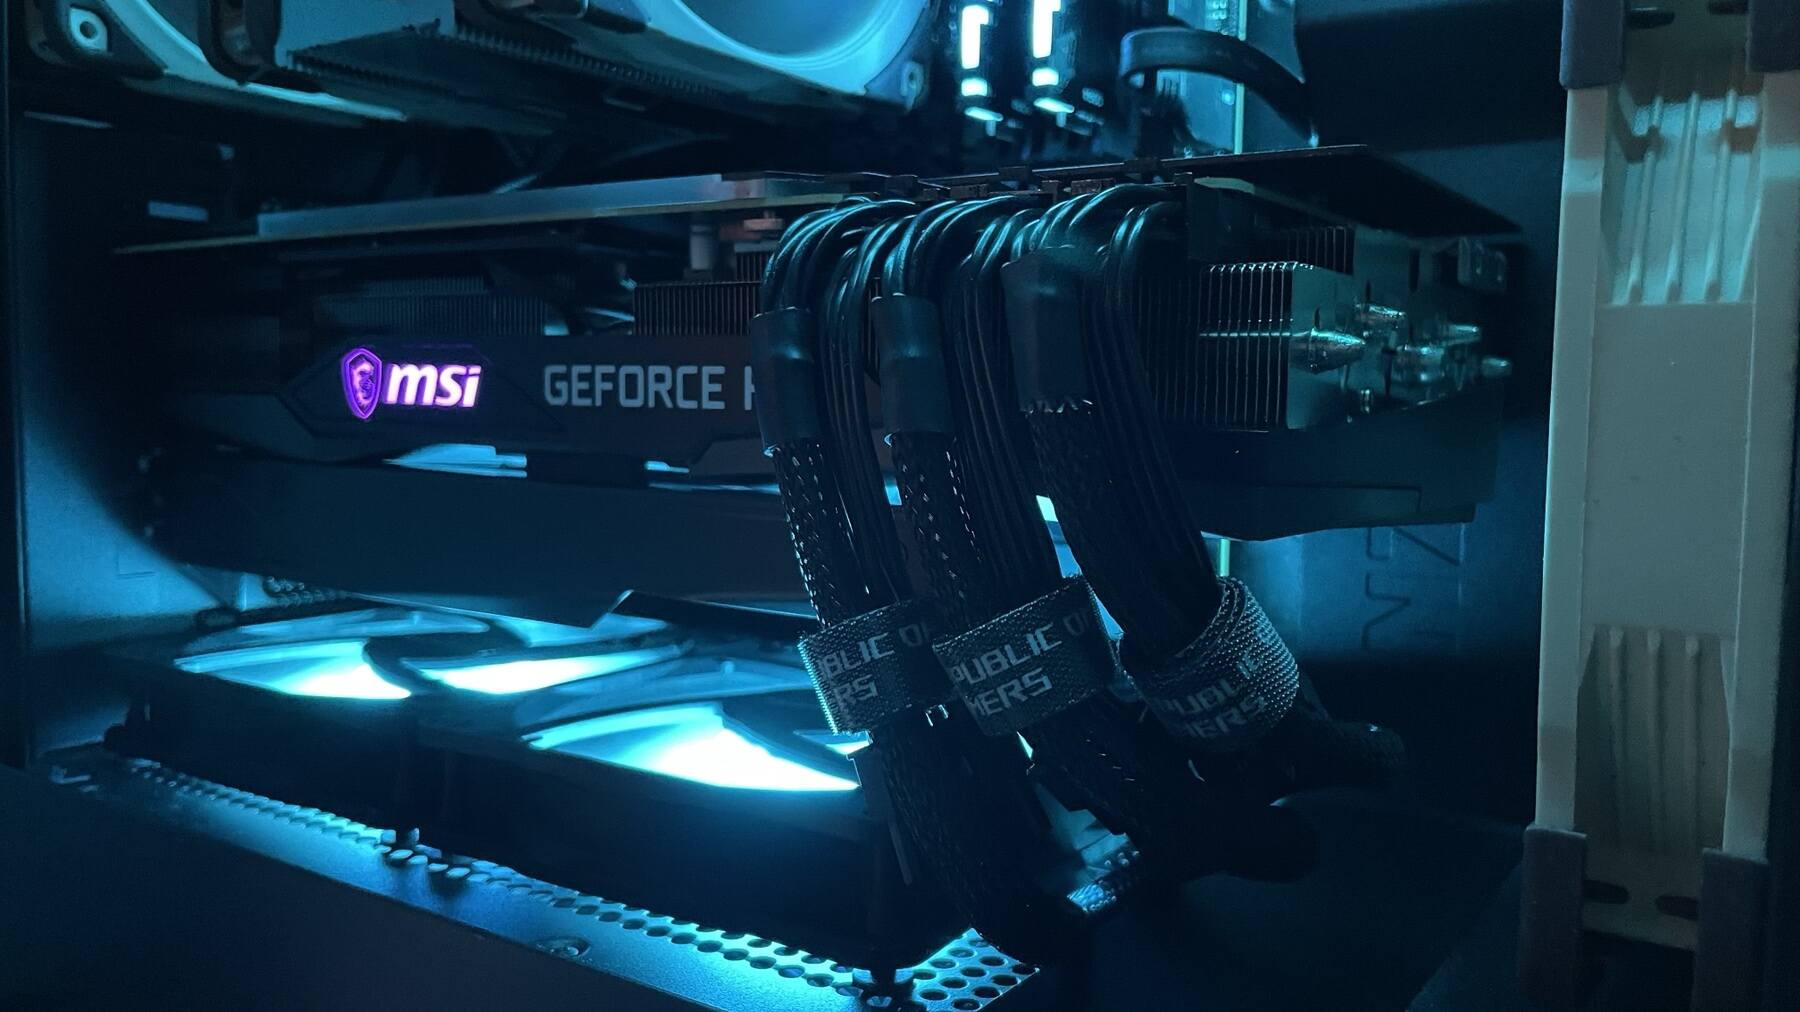
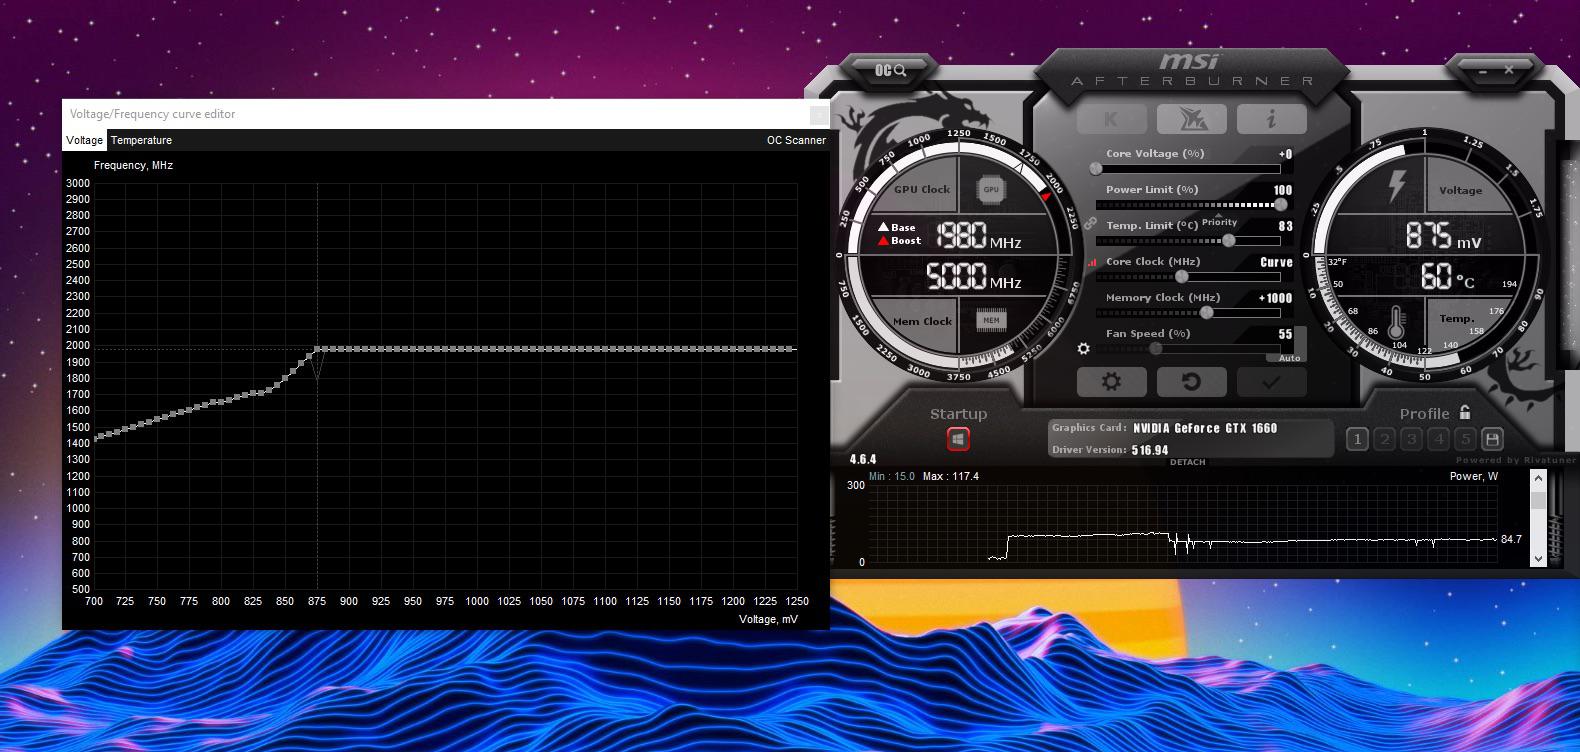
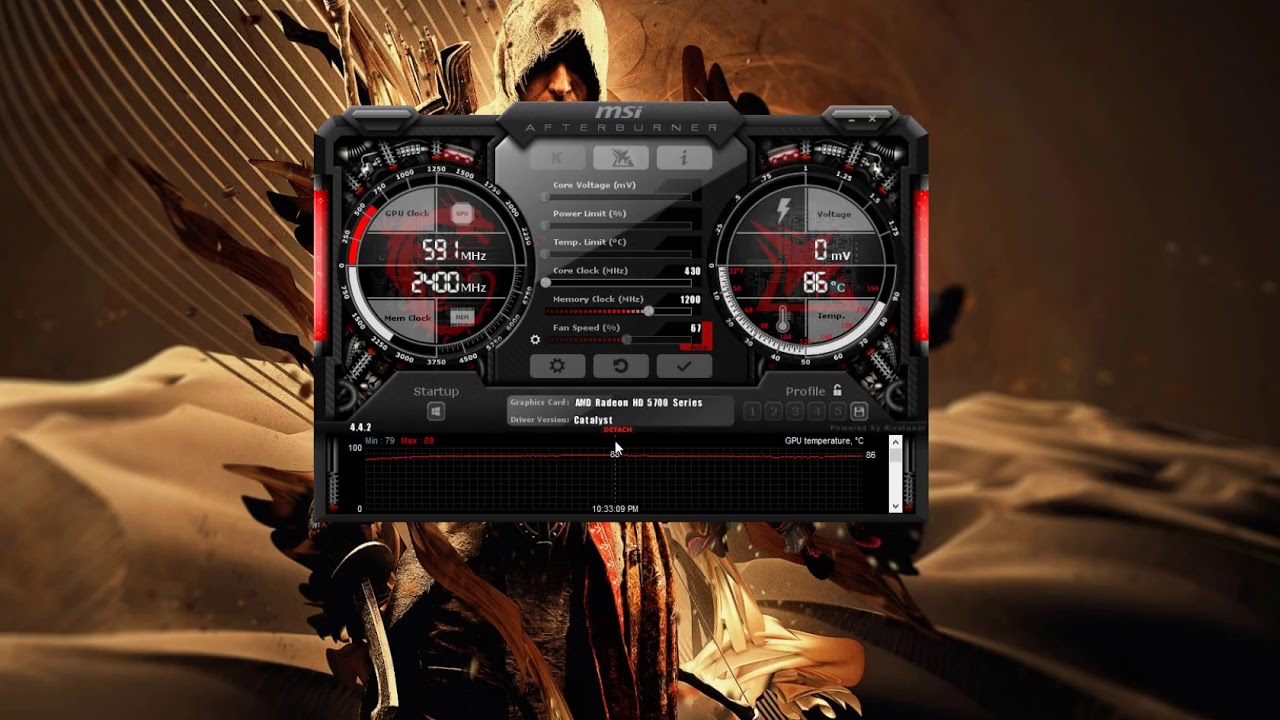
The most commonly used software for underclocking graphics cards is MSI Afterburner. It’s a popular choice among gamers and enthusiasts due to its user-friendly interface and robust feature set. You can download MSI Afterburner from the official website of MSI or other reputable software download platforms.
Once you have downloaded the software, run the installation file and follow the on-screen instructions to install it on your computer. Make sure to read and accept any license agreements and choose the desired installation location.
During the installation process, you may be prompted to install additional components or drivers. It’s recommended to install these components as they are often necessary for the software to function correctly. If you have any concerns or questions during the installation, refer to the software documentation or seek assistance from online forums or communities.
After the installation is complete, launch the software and familiarize yourself with the interface. MSI Afterburner, for example, provides a comprehensive set of options for adjusting clock speeds, voltages, fan speeds, and other GPU settings. Take some time to explore the software and understand its various features and functionalities.
It’s important to note that the specific steps and software required for underclocking may differ depending on your graphics card manufacturer. Some manufacturers, such as NVIDIA and AMD, offer their own software for adjusting graphics card settings. Ensure that you download the software from the official website of your graphics card manufacturer to ensure compatibility and reliability.
With the required software installed and ready to go, you’re now prepared to move on to the next steps of underclocking your graphics card. In the upcoming sections, we’ll walk you through the process of understanding the default clock speeds of your GPU, choosing the desired clock speeds, and making the necessary adjustments using the graphics card software.
Step 2: Understanding the Graphics Card’s Default Clock Speeds
Before you start underclocking your graphics card, it’s crucial to have a good understanding of its default clock speeds. Each graphics card model comes with predefined clock speeds set by the manufacturer, optimized for performance and stability.
To begin, launch the graphics card software you installed in the previous step, such as MSI Afterburner. The software should display the default clock speeds of your graphics card, including the core clock speed and memory clock speed.
The core clock speed refers to the frequency at which the GPU’s processor runs, while the memory clock speed represents the speed at which the graphics card’s dedicated memory operates.
Take note of the default clock speeds displayed in the software. These values serve as a reference point and will help you adjust the clock speeds effectively in later steps.
It’s important to keep in mind that changing the clock speeds of your graphics card can impact its performance, stability, and compatibility with certain applications. As you underclock your graphics card, you’ll want to ensure that the new clock speeds are within a safe range, allowing for stable operation without sacrificing too much performance.
Additionally, be aware that not all graphics cards support underclocking to the same extent. Some lower-end or older graphics cards may have limited underclocking capabilities, while higher-end or more recent models usually provide more flexibility in adjusting clock speeds.
If you find that your graphics card software does not display the default clock speeds, consult the manufacturer’s documentation or visit their official website for detailed information on your specific model.
Understanding the default clock speeds of your graphics card is crucial to effectively underclock it in subsequent steps. In the next section, we will discuss how to choose the desired clock speeds for your underclocked graphics card.
Step 3: Choosing the Desired Clock Speeds
Now that you have a clear understanding of the default clock speeds of your graphics card, it’s time to determine the desired clock speeds for underclocking. The specific clock speeds you choose will depend on your goals and preferences.
Underclocking allows you to find a balance between performance and other factors such as power consumption and heat generation. Lowering the clock speeds can help reduce power usage and heat output, potentially leading to a more stable and efficient system.
When choosing the desired clock speeds, there are a few factors to consider:
- Power Consumption: If you’re mainly concerned about reducing power usage, aim for more significant reductions in clock speeds. However, keep in mind that overly aggressive underclocking may impact performance.
- Heat Generation: If you want to keep your graphics card temperatures under control, consider moderate underclocking. This can help lower the heat produced by the GPU, resulting in potentially quieter system operation and increased stability.
- Performance vs. Stability: It’s essential to strike a balance between clock speeds and system stability. Underclocking too much can result in reduced performance or compatibility issues with certain applications. Experiment with different clock speeds to find the optimal balance for your specific needs.
- Specific Tasks: Consider the tasks you typically perform on your computer. If you primarily use your computer for everyday tasks like web browsing and productivity applications, you may be able to underclock more aggressively. On the other hand, if you’re a gamer or use resource-intensive software, you might want to be more conservative with your underclocking settings.
It’s important to note that every graphics card is unique, and the extent to which you can underclock may vary. Some graphics cards may have more headroom for underclocking, while others may have limitations due to hardware or firmware restrictions.
Take your time to experiment with different clock speed settings and assess the impact on performance, power consumption, and heat generation. It’s always a good idea to test underclocked settings under normal usage conditions to ensure stability and smooth operation.
Once you have determined the desired clock speeds for underclocking your graphics card, we can move on to the next step: adjusting the clock speeds using the software provided by your graphics card manufacturer.
Step 4: Adjusting the Clock Speeds with Graphics Card Software
Now that you’ve chosen the desired clock speeds for your underclocked graphics card, it’s time to make the necessary adjustments using the graphics card software installed on your computer. The specific steps may vary depending on the software you’re using, but the general process remains similar.
Launch the graphics card software, such as MSI Afterburner, and locate the options or settings related to clock speeds. Typically, these options are labeled as core clock, memory clock, or similar terms.
Use the sliders or input fields provided in the software to decrease the clock speeds to the desired levels. Make incremental adjustments, saving your changes and testing for stability after each adjustment. This will help you find the optimal balance between performance and stability.
Keep in mind that while underclocking, you don’t have to adjust both the core clock and memory clock if you don’t want to. You can choose to underclock one or the other, depending on your requirements and priorities.
It’s important to note that when underclocking, stability is paramount. If you encounter any crashes, artifacts, or other issues during stress testing or regular use, it may indicate that the underclocked settings are too aggressive. Consider reverting to higher clock speeds or adjusting them to a more conservative level to ensure stable operation.
As you make adjustments, monitor the temperature and power consumption of your graphics card. Many graphics card software applications provide real-time monitoring features that display this information. Keeping an eye on these metrics will help you assess the impact of your underclocking on power usage and heat generation.
Remember to save your underclocked settings in the graphics card software. This allows you to easily apply the underclocked profile each time you start your computer. You can typically save the settings in a profile or preset within the software.
Once you have successfully adjusted the clock speeds of your graphics card and saved the underclocked profile, you’re ready to move on to the next step: stress testing and monitoring the results of your underclocked graphics card settings.
Step 5: Stress Testing and Monitoring the Results
After you’ve adjusted the clock speeds of your graphics card, it’s important to stress test and monitor the results to ensure stability and optimal performance. Stress testing allows you to assess the stability and reliability of your underclocked settings under demanding conditions.
There are several stress testing tools available that can put your graphics card through rigorous tests to evaluate its performance. Popular options include FurMark, 3DMark, and Unigine Heaven. These programs push your graphics card to its limits, simulating heavy usage scenarios such as gaming or renderings.
Before running a stress test, ensure that your graphics card software is set to apply the underclocked profile you created. Double-check that the clock speeds match your desired settings.
Start the stress testing program of your choice, and select the appropriate benchmark or stress test. Let the test run for an extended period, typically around 15-30 minutes, to get a good understanding of the stability of your underclocked settings.
While the stress test is running, closely monitor the temperature, power consumption, and performance metrics provided by the testing program or your graphics card software. Ensure that the temperature remains within safe limits, the power consumption is lower than before underclocking, and the performance is satisfactory for your needs.
If you encounter any crashes, artifacts, or other issues during the stress test, it may indicate that the underclocked settings are too aggressive or not suitable for your graphics card. In such cases, consider adjusting the clock speeds slightly or reverting to default settings.
It’s important to strike a balance between lower clock speeds for power efficiency and stability, and maintaining adequate performance for your intended usage. Your goal is to find the sweet spot where your graphics card operates efficiently while delivering satisfactory performance.
After completing the stress test and monitoring the results, you should have a good understanding of how well your graphics card performs with the underclocked settings. If you’re satisfied with the stability, power consumption, and temperature levels, congratulations! You have successfully underclocked your graphics card.
However, if you’re not satisfied with the results or encounter stability issues, you may need to make further adjustments to the clock speeds or explore alternative methods of optimizing your graphics card’s performance.
In the next step, we will explore the process of fine-tuning the underclocked settings to achieve the best balance between performance, power consumption, and stability for your specific needs.
Step 6: Fine-Tuning the Underclocked Settings
After stress testing and monitoring the results of your underclocked graphics card, you may find that further fine-tuning is necessary to achieve the optimal balance between performance and stability. Fine-tuning allows you to make minor adjustments to the clock speeds and other settings to optimize your graphics card’s performance based on your specific needs.
Start by examining the results of the stress test and monitoring the temperature, power consumption, and performance metrics. Take note of any areas where improvements can be made.
If you encountered stability issues during stress testing, consider slightly increasing the clock speeds to find a more stable setting. It’s important to make incremental adjustments to avoid drastic changes that could impact stability and compatibility.
On the other hand, if you’re satisfied with the stability but want to further reduce power consumption and heat generation, you can try slightly lowering the clock speeds. Keep in mind that lowering the clock speeds too much may result in a noticeable decrease in performance.
During the fine-tuning process, it’s essential to keep track of the changes you make and their impact on the overall performance and stability of your graphics card. Documenting your adjustments will help you revert to previous settings if needed or compare the effectiveness of different configurations.
Alongside adjusting the clock speeds, you may also consider fine-tuning other settings in the graphics card software, such as voltage levels and fan speeds. These settings can further optimize power consumption and heat management as needed.
After making adjustments, re-run the stress test and closely monitor the performance, temperature, and power consumption. Compare the new results with the previous ones to assess the effectiveness of your fine-tuning efforts.
Be patient and iterate through the process of fine-tuning until you find the best balance for your graphics card. Remember that the optimal settings may differ for each individual based on their specific hardware, software, and usage requirements.
Once you’re satisfied with the fine-tuned underclocked settings and have achieved the desired balance between performance and stability, you can save the new profile within the graphics card software.
With the underclocked settings fine-tuned and saved, you can proceed to the final step: saving and applying the underclocked profile for future use on your graphics card.
Step 7: Saving and Applying the Underclocked Profile
After fine-tuning the underclocked settings for your graphics card, it’s important to save the profile and apply it for future use. Saving the underclocked profile ensures that your preferred settings are easily accessible whenever you restart your computer or make changes to your graphics card’s configuration.
Open the graphics card software you’ve been using to adjust the clock speeds and access the settings for saving profiles. Depending on the software, this feature may be labeled as “Save Profile” or similar.
Select the option to save your underclocked settings as a profile and give it a meaningful name that reflects the changes you have made.
Once the profile is saved, you can apply it to your graphics card by selecting it from the available profiles within the software. This ensures that the underclocked settings are automatically loaded whenever you start your computer or access the graphics-intensive applications.
It’s important to note that when applying the underclocked profile, ensure that the clock speeds, voltage levels, and other settings are correctly applied. Verify these settings within the software’s interface to confirm their accuracy.
By saving and applying the underclocked profile, you eliminate the need to manually adjust the clock speeds and other settings each time you want to use your graphics card with the underclocked configuration.
If you want to revert to the default settings or experiment with different configurations in the future, you can easily switch to a different profile within the graphics card software or reset the settings to the factory defaults.
It’s worth mentioning that saving and applying the underclocked profile is not a permanent change to your graphics card. It can be modified or reverted at any time, providing flexibility if you wish to try different performance settings or optimize for specific applications.
With the underclocked profile saved and applied, you have successfully completed the process of underclocking your graphics card. Enjoy the benefits of reduced power consumption, lower temperatures, improved stability, and potentially quieter operation.
Conclusion
Underclocking your graphics card can be a valuable technique for reducing power consumption, managing heat generation, improving stability, and creating a more efficient and enjoyable computing experience. By intentionally lowering the clock speeds of your graphics card, you can strike a balance between performance and other factors that are important to you.
In this comprehensive guide, we have explored the steps involved in underclocking a graphics card. Starting from downloading and installing the necessary software, understanding the default clock speeds, choosing the desired clock speeds, adjusting the settings with graphics card software, stress testing and monitoring the results, fine-tuning the underclocked settings, and finally saving and applying the underclocked profile.
Throughout the process, it’s important to prioritize stability and consider the specific goals and requirements of your system. Every graphics card is unique, and the results may vary based on the specific hardware, software, and usage patterns.
Remember to monitor the temperature and power consumption of your graphics card, especially during stress testing and when making adjustments to the clock speeds. It’s crucial to find the optimal balance between underclocking and system performance, ensuring that your graphics card operates efficiently and reliably.
Lastly, saving and applying the underclocked profile allows for easy access to your preferred settings, eliminating the need to manually adjust the clock speeds each time you start your computer or use graphics-intensive applications.
By following this guide and experimenting with underclocking, you can optimize the performance, power consumption, and stability of your graphics card to suit your specific needs and create a more efficient and enjoyable computing experience.