Introduction
Welcome to the world of overclocking, where enthusiasts push their hardware to the limit in search of better performance. If you’ve ever wondered how to squeeze every bit of power out of your graphics card, you’re in the right place.
Overclocking a graphics card involves increasing its clock speeds to achieve higher frame rates and smoother gameplay. While it can provide a significant boost in performance, overclocking comes with certain risks that need to be managed carefully. In this guide, we will take you through the process of safely overclocking your graphics card to help you get the most out of your gaming experience.
Before we dive into the overclocking process, it’s important to understand the key concepts and considerations involved. Overclocking is not just about increasing clock speeds; it also involves managing power consumption, monitoring temperatures, and testing stability. By following the steps outlined in this guide, you can avoid common pitfalls and ensure a successful overclocking experience.
It’s worth noting that overclocking voids the warranty of your graphics card, so proceed at your own risk. However, if done correctly, it can provide a noticeable performance boost, especially in graphically demanding games.
Now that we’ve covered the basics, let’s move on to the next section and explore the world of graphics card overclocking in more detail.
Understanding Overclocking
Before you start overclocking your graphics card, it’s essential to have a clear understanding of what overclocking entails. Essentially, overclocking is the process of increasing the clock speeds of your graphics card beyond its factory settings to achieve higher performance.
Typically, graphics cards come with predefined clock speeds set by the manufacturer to ensure stability and compatibility. However, these settings are often conservative to account for different system configurations and ensure broad compatibility. Overclocking allows you to push your graphics card to its limits and extract more performance out of it.
There are two primary parameters that you can adjust during the overclocking process: the core clock and the memory clock. The core clock determines how fast the GPU’s processor operates, while the memory clock controls the speed at which data is transferred to and from the GPU’s memory.
When overclocking, it’s crucial to increase these clock speeds gradually and carefully. Rapidly increasing the clocks can lead to instability and crashes. It’s always recommended to make small adjustments and test for stability before moving on to higher clock speeds.
It’s important to note that overclocking is not guaranteed to provide a significant improvement in performance for every graphics card. The extent to which you can overclock your graphics card depends on various factors, including the quality of the GPU chip, the cooling solution, and the power delivery system on your graphics card.
Overclocking can be a trial-and-error process, as different graphics cards may react differently to overclocking attempts. It’s also worth mentioning that different games and applications can have varying levels of stability when the GPU is overclocked. As such, thorough testing is necessary to ensure stability and compatibility.
Now that we have covered the basics of overclocking, let’s move on to the next section, which focuses on checking hardware compatibility before you begin the overclocking process.
Checking Hardware Compatibility
One of the essential steps before diving into the overclocking process is checking the compatibility of your hardware. While most modern graphics cards are designed with overclocking in mind, it’s crucial to ensure that your specific hardware configuration is suitable for overclocking.
The first consideration is the power supply unit (PSU) in your system. Overclocking puts additional strain on the GPU, which requires more power. Ensure that your PSU has enough wattage to accommodate the increased power consumption. It’s recommended to have a PSU with a higher wattage rating than the minimum requirement of your graphics card.
Next, check the cooling solution on your graphics card. Overclocking generates additional heat, and efficient cooling is necessary to prevent thermal throttling and maintain stability. Ensure that your graphics card has a robust cooling solution, such as an aftermarket cooler or multiple fans, to dissipate the heat effectively.
Another aspect to consider is the quality of the VRMs (voltage regulation modules) on your graphics card. VRMs control the power delivery to the GPU and other components. Overclocking increases the power consumption, potentially straining the VRMs. High-quality VRMs with efficient heat dissipation are vital for stable overclocking.
It’s also important to check the VRAM (video random access memory) on your graphics card. VRAM stores temporary data used by the GPU. Overclocking the VRAM can lead to improved performance in memory-intensive tasks. Ensure that your graphics card has quality VRAM modules capable of handling overclocking.
Lastly, check if your motherboard supports overclocking. Some older or budget motherboards may not provide sufficient power delivery or have limited BIOS options for overclocking. Ensure that your motherboard is compatible and has adequate features for overclocking.
By checking these hardware compatibility factors, you can minimize the risk of instability or damage during the overclocking process. It’s worth noting that overclocking is always done at your own risk, and any damage caused by overclocking is not covered under the warranty.
Now that we have covered hardware compatibility, let’s move on to the next section, which focuses on installing GPU-Z, a handy monitoring tool for overclocking.
Installing GPU-Z for Monitoring
When it comes to overclocking your graphics card, monitoring the performance and temperatures is crucial to ensure stability and prevent overheating. One of the most popular monitoring tools used by overclockers is GPU-Z, a lightweight software that provides detailed information about your graphics card.
To install GPU-Z, follow these simple steps:
- Go to the official TechPowerUp website (https://www.techpowerup.com/gpuz/).
- Click on the “DOWNLOAD NOW” button to start the download.
- Once the download is complete, locate the downloaded file and run the installer.
- Follow the instructions provided in the installation wizard, ensuring that you agree to the terms and conditions.
- After the installation is complete, launch GPU-Z.
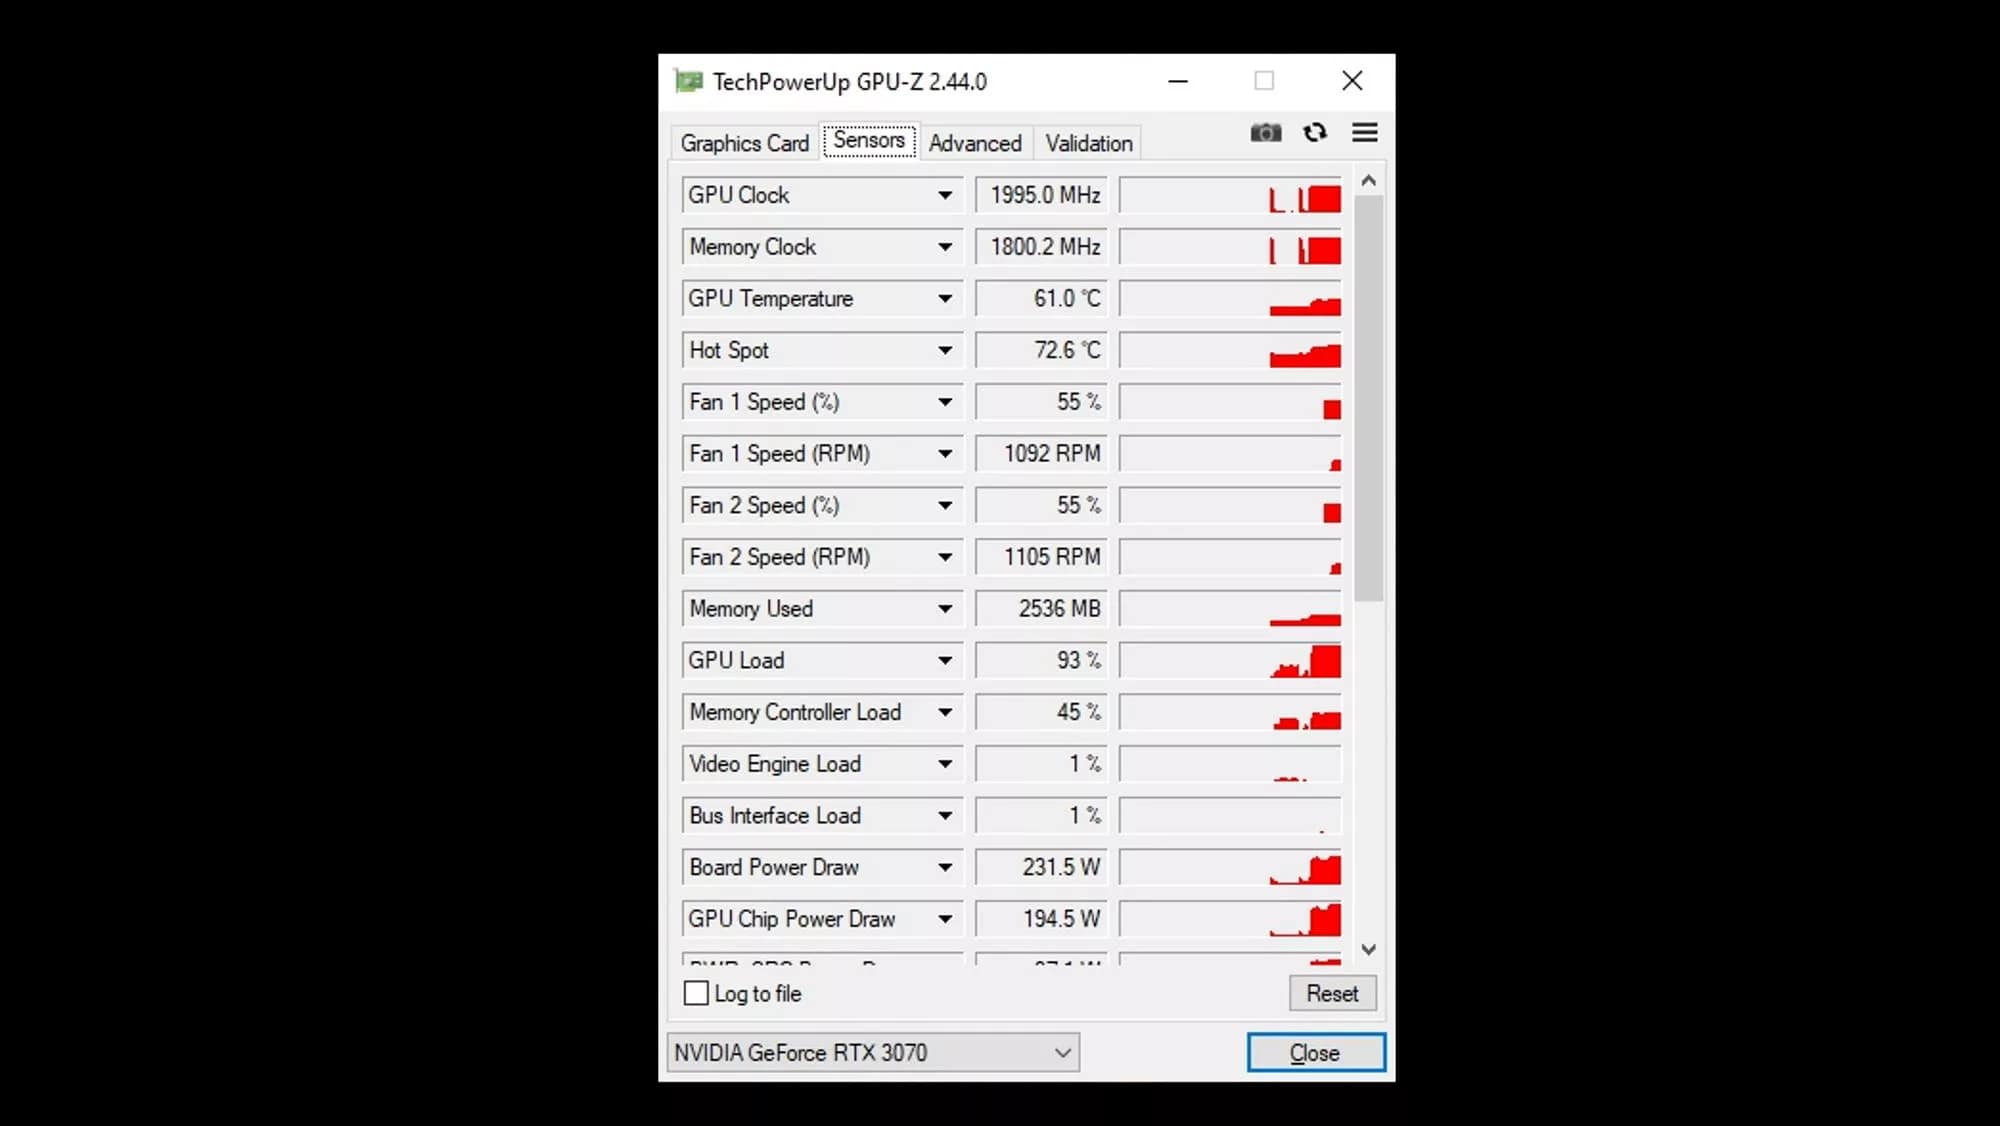
Once GPU-Z is running, you’ll see a wealth of information about your graphics card. The main window displays details such as the GPU model, BIOS version, memory type, and clock speeds. The Sensors tab provides real-time information about temperature, fan speed, GPU usage, and more.
GPU-Z also offers a handy feature called Log to File, which allows you to record the sensor data over a period of time. This can be helpful for analyzing the performance and stability of your overclocked graphics card.
With GPU-Z installed and running, you’ll have access to vital information that will aid you in monitoring the effects of your overclocking efforts. Keep a close eye on the temperatures to ensure they stay within safe limits, and use this tool to gauge the impact of any overclocking adjustments you make.
Now that you have GPU-Z installed, let’s move on to the next section, which covers managing power limits during the overclocking process.
Managing Power Limits
When overclocking your graphics card, managing the power limits is crucial to maintain stability and prevent excessive heat buildup. Power limits control the amount of power the GPU can draw, and adjusting these limits can impact the performance and thermals of your graphics card.
Most modern graphics cards come with predefined power limits set by the manufacturer. These limits are meant to ensure the GPU operates within safe parameters. However, when overclocking, you may need to increase the power limits to accommodate the higher clock speeds and voltage levels.
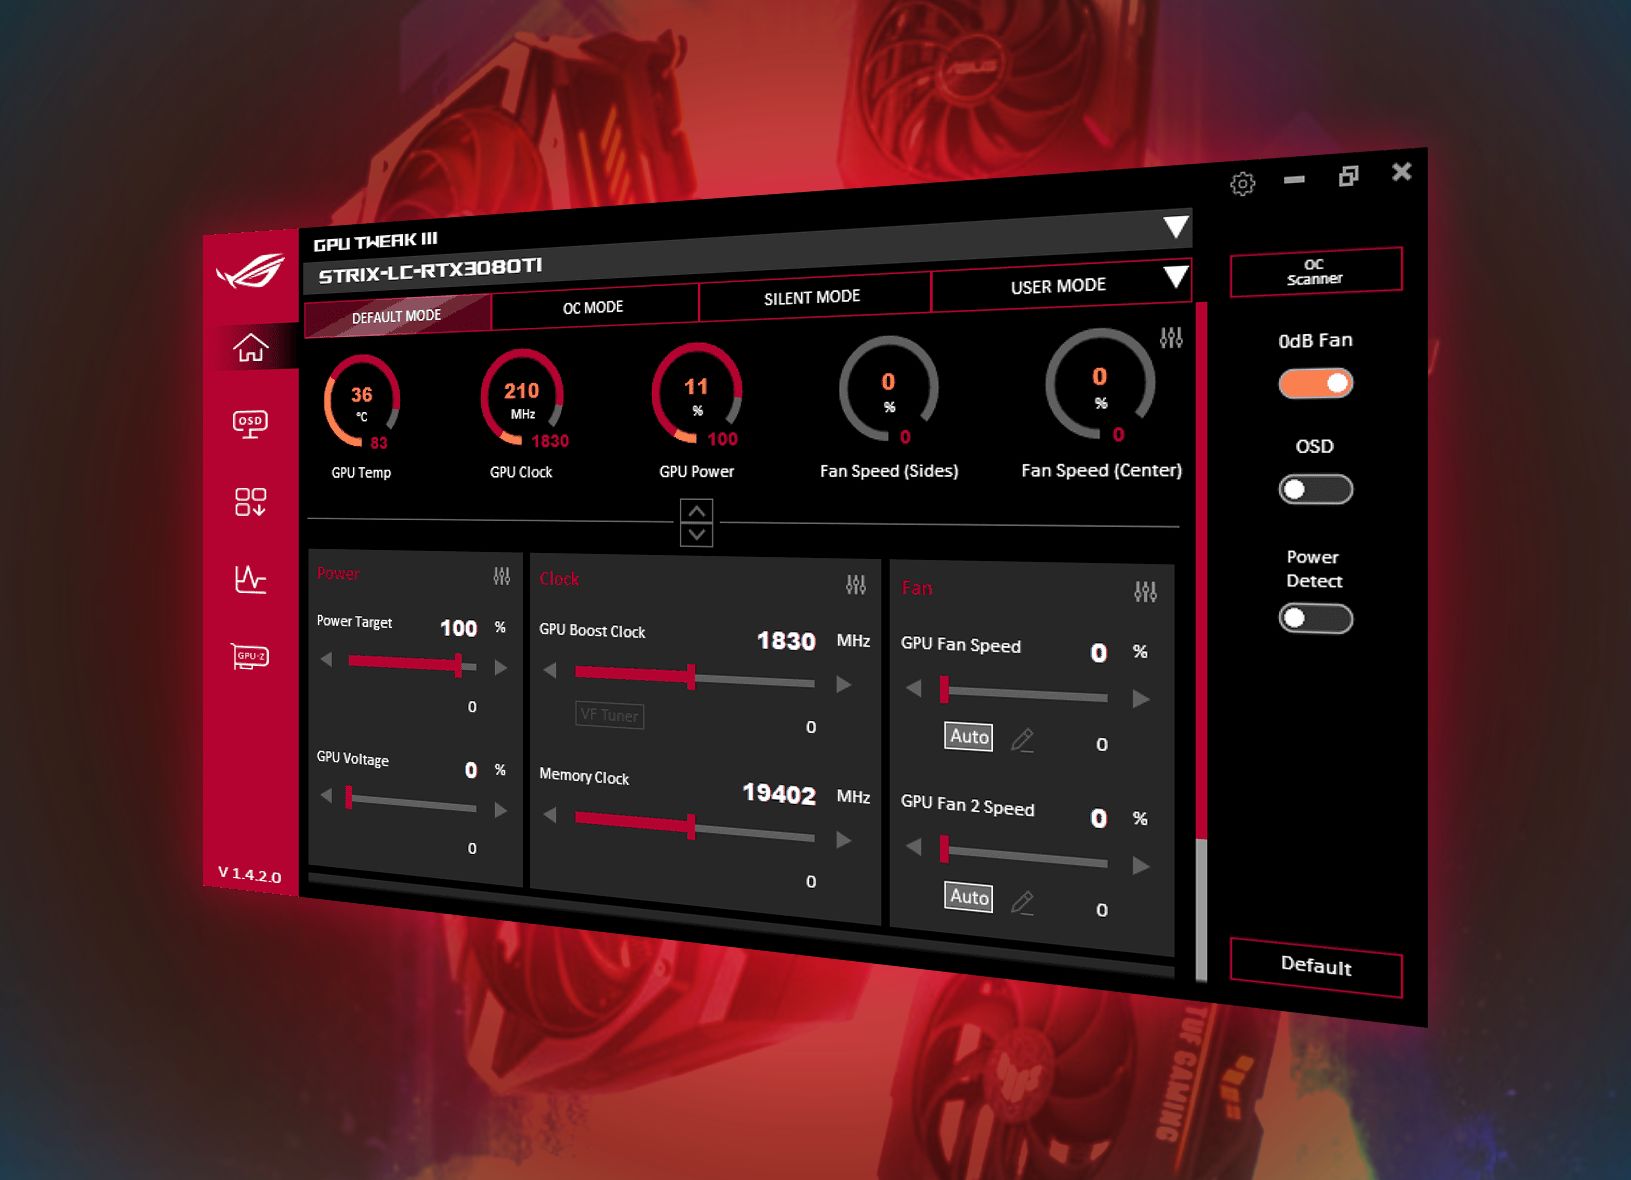
Adjusting the power limits can be done through the graphics card’s software utility or through third-party overclocking tools such as MSI Afterburner or EVGA Precision X. These utilities allow you to modify parameters like the power limit, voltage, and fan speed to fine-tune the overclocking settings.
Increasing the power limit allows the GPU to draw more power when needed, which can result in higher performance. However, it’s essential to keep an eye on the temperatures and ensure that your cooling solution can handle the increased power consumption.
It’s worth mentioning that raising the power limit too high without adequate cooling can lead to overheating, stability issues, and even permanent damage to your graphics card. It’s recommended to increase the power limit incrementally and monitor the temperatures and stability after each adjustment.
On the other hand, lowering the power limit can help in scenarios where heat and power consumption need to be reduced. This can be beneficial when operating in small form factor cases or when trying to achieve a balance between performance and energy efficiency.
Overall, managing the power limits of your graphics card is a crucial aspect of overclocking. It allows you to find the sweet spot between performance and stability while also ensuring that your GPU operates within safe temperature ranges. Experiment with different power limit adjustments and find the optimal setting for your specific graphics card and cooling solution.
Now that we have covered power limits, let’s move on to the next section, which focuses on adjusting clock speeds during the overclocking process.
Adjusting Clock Speeds
When it comes to overclocking your graphics card, adjusting the clock speeds is the most fundamental step. By increasing the core clock and memory clock, you can achieve a noticeable boost in performance. However, it’s crucial to approach this process cautiously and methodically.
Before tinkering with the clock speeds, it’s essential to establish a baseline. Run benchmarks or play demanding games to determine the stock performance of your graphics card. This will help you gauge the improvements achieved through overclocking.
When adjusting the clock speeds, it’s recommended to make small increments, usually around 10-20 MHz at a time, and test for stability before moving on. Stability testing involves running stress tests or stability benchmarks to ensure that the GPU can handle the new clock speeds without crashing or causing artifacts.
While increasing the core clock can result in substantial performance gains, it also produces more heat. Keep a close eye on the temperatures, as excessive heat can lead to instability and potential damage to the GPU. Ensure that your cooling solution can handle the increased heat generated by the overclocked graphics card.
The memory clock is another parameter that can be adjusted during the overclocking process. Increasing the memory clock can enhance the GPU’s ability to handle large amounts of data, especially in memory-intensive applications. However, the impact of memory overclocking on overall gaming performance may vary depending on the game and the specific tasks being performed.
It’s worth noting that not all graphics cards are created equal and that each GPU chip has its own overclocking limits. Some chips may be more tolerant of overclocking, while others may reach their limits quickly. Experimenting with different clock speeds and finding the stable maximum for your specific graphics card is a trial-and-error process.
Once you have found stable clock speeds, ensure that you test them rigorously in real-world scenarios, such as gaming or content creation, to confirm stability and performance improvements. Remember to monitor temperatures and adjust cooling as necessary.
Adjusting clock speeds is a critical step in the overclocking process, as it directly affects the performance of your graphics card. By gradually increasing the core and memory clocks, monitoring the temperatures, and testing for stability, you can optimize your graphics card for better gaming and computing experiences.
Now that we have covered adjusting clock speeds, let’s move on to the next section, which discusses testing the stability of your overclocked graphics card using benchmarking tools.
Testing Stability with Benchmarking Tools
After adjusting the clock speeds of your graphics card, it’s crucial to test the stability of your overclocked settings. Stability testing helps identify any instability or artifacts that may occur during intensive tasks like gaming or rendering. This ensures that your graphics card can handle the increased clock speeds without crashing or causing errors.
One of the most popular tools for stability testing is FurMark. FurMark is a GPU stress testing tool that pushes your graphics card to its limits, generating a high load and measuring the performance and stability. It’s recommended to run FurMark for an extended period, usually around 15-30 minutes, to thoroughly test your graphics card’s stability.
In addition to FurMark, there are several other benchmarking tools available for stability testing. Examples include 3DMark, Unigine Heaven, and Prime95. These tools put your system through rigorous tests, simulating real-world scenarios and ensuring that your overclocked graphics card can handle the demands of modern games and applications.
When running stability tests, it’s essential to closely monitor the temperatures of your graphics card. Utilize monitoring software such as GPU-Z or MSI Afterburner to keep track of the temperatures during the stress test. If temperatures exceed safe limits, consider adjusting your cooling solution or dialing back the overclocked settings.
During stability testing, keep an eye out for any artifacts or graphical glitches. Artifacts are visual anomalies that may appear on the screen, such as colored dots, flickering, or distorted textures. If you encounter artifacts during the stability test, it’s an indication that your overclocked settings are not stable, and you may need to dial back the clock speeds.
Remember that stability testing is a crucial step in the overclocking process. While achieving high clock speeds can be exciting, it’s important to ensure that your graphics card can handle those speeds consistently without compromising stability or risking damage to the hardware.
Now that we have covered stability testing, let’s move on to the next section, which focuses on monitoring temperatures and ensuring proper cooling during overclocking.
Monitoring Temperatures
When overclocking your graphics card, monitoring temperatures is essential to ensure that your GPU stays within safe operating limits. Overclocking increases the workload on the GPU, generating additional heat that needs to be managed effectively to maintain stability and prevent overheating.
There are several software tools available that allow you to monitor the temperatures of your graphics card in real-time. GPU-Z, HWMonitor, and MSI Afterburner are popular choices that provide accurate temperature readings for your GPU.
During the overclocking process, it’s important to keep a close eye on the temperatures and ensure they stay within safe limits. The maximum safe temperature for most graphics cards is typically around 85-90 degrees Celsius (185-194 degrees Fahrenheit). Exceeding these temperatures can lead to instability, thermal throttling, and potentially permanent damage to the GPU.
If you notice that your temperatures are reaching unsafe levels, there are several steps you can take to mitigate the heat. One option is to adjust the fan speeds on your graphics card. Increasing the fan speed will enhance airflow and improve cooling, but it may also result in increased noise levels. Strike a balance between cooling and noise based on your preferences and system requirements.
Another option is to ensure proper case airflow. Make sure that your case has adequate ventilation and that the airflow is unobstructed. Adding case fans or optimizing fan placement can help dissipate heat more effectively and reduce temperatures during overclocking.
In some cases, you may need to consider aftermarket cooling solutions, such as installing a larger heatsink or an all-in-one liquid cooling system. These options provide better heat dissipation and can keep temperatures lower during overclocking sessions.
Remember that monitoring temperatures is an ongoing process, especially during extended gaming sessions or demanding tasks. Keep an eye on the temperature readings and adjust the overclocked settings or cooling solutions as required to maintain a stable and cool operating environment for your graphics card.
Now that we have covered monitoring temperatures, let’s move on to the next section, which discusses adjusting fan speeds to optimize cooling during the overclocking process.
Adjusting Fan Speeds
During the overclocking process, properly managing the cooling of your graphics card is crucial to maintain stability and prevent excessive heat buildup. Adjusting the fan speeds of your graphics card is one effective way to optimize cooling and keep temperatures under control.
Most modern graphics cards have built-in fan control mechanisms that automatically adjust fan speeds based on the GPU temperature. However, you can also manually adjust the fan speeds using software utilities like MSI Afterburner.
Increasing the fan speeds will enhance the airflow around the graphics card, enabling better heat dissipation. This can help lower temperatures during demanding tasks and minimize the risk of thermal throttling or stability issues. However, keep in mind that higher fan speeds also result in increased noise levels.
When adjusting fan speeds, find a balance between cooling performance and noise levels that suits your preference and system requirements. It’s recommended to gradually increase the fan speeds while monitoring the temperatures to find the optimal sweet spot. Bear in mind that setting the fan speeds too high may result in unnecessary noise without providing significant cooling benefits.
Alternatively, you can create custom fan speed profiles based on different temperature thresholds. For example, you can set the fans to run at lower speeds when the GPU is idle or under light load and ramp up the speeds as the temperature rises during heavy workload scenarios. This allows for a quieter operation when the GPU isn’t stressed and maximizes cooling performance when needed.
It’s worth noting that the ideal fan speed settings may vary depending on your specific graphics card model, cooling solution, and ambient temperature. Experiment with different fan speed configurations to find the optimal balance of cooling performance and noise levels for your setup.
Lastly, alongside adjusting fan speeds, it’s crucial to ensure proper airflow within your system. Make sure that your case has adequate ventilation, and consider additional case fans or optimizing the fan placement to facilitate better heat dissipation. Good airflow helps cool not just the graphics card but also other vital components within your system.
By adjusting the fan speeds appropriately and optimizing airflow, you can effectively cool your graphics card during the overclocking process, maintaining stable temperatures and ensuring optimal performance.
Now that we have covered adjusting fan speeds, let’s move on to the next section, which examines undervolting as a method to improve efficiency during overclocking.
Undervolting for Better Efficiency
Undervolting is a technique used to reduce the voltage supplied to a graphics card, resulting in lower power consumption and potentially better efficiency. While overclocking typically involves increasing voltages, undervolting reduces them without sacrificing performance.
When a graphics card is manufactured, it is designed to operate with a certain voltage level that ensures stability and compatibility across a range of systems. However, there is often room for optimization, as individual graphics cards may perform well at lower voltages while still maintaining stability.
Undervolting can bring several benefits, including reduced power consumption, lower temperatures, and improved efficiency. By lowering the voltage, the graphics card generates less heat and requires less power, resulting in reduced energy consumption and potentially quieter operation.
Undervolting can also lead to improved overclocking potential and better thermal headroom. Lowering the voltage reduces the heat generated by the GPU, allowing for higher stable clock speeds within the same thermal limits. This can result in improved performance while maintaining lower power consumption.
Undervolting is a balancing act, as setting the voltage too low can instigate instability or crashes. It’s recommended to gradually reduce the voltage in small increments and test for stability after each adjustment. Run stress tests and real-world applications to ensure that the undervolted settings are stable under various workloads.
It’s worth noting that undervolting results may vary between different graphics card models and even different chip variations within the same model. Each GPU responds differently to undervolting, and finding the optimal undervolt settings requires experimentation and testing.
Undervolting can be accomplished using software utilities such as MSI Afterburner or AMD Wattman (for AMD GPUs). These tools allow you to adjust the voltage/frequency curve, finding the balance between voltage reduction and stability.
Undervolting is particularly beneficial for users concerned with power consumption and thermal efficiency. It allows you to optimize the performance of your graphics card while reducing both energy consumption and heat output, making it an excellent option for those looking to achieve better efficiency.
Now that we have covered undervolting, let’s move on to the next section, which addresses common troubleshooting issues that may arise during the overclocking process.
Troubleshooting Common Issues
When overclocking your graphics card, it’s not uncommon to encounter certain issues along the way. From stability problems to graphical artifacts, these issues can be frustrating but are usually resolvable with some troubleshooting. Here are some common issues you may encounter during the overclocking process and steps to address them:
1. System instability and crashes: If your system becomes unstable or experiences frequent crashes after overclocking, it’s likely due to unstable clock speeds or voltage settings. Try reducing the clock speeds or increasing the voltage slightly to find a more stable configuration. Additionally, ensure that your cooling solution is sufficient to handle the increased heat generated by overclocking.
2. Graphical artifacts: Artifacts are visual anomalies that appear on the screen, such as flickering, colored dots, or distorted textures. These artifacts indicate an unstable overclock. Lower the clock speeds or increase the voltage to resolve this issue. If the artifacts persist, it may indicate that your graphics card has reached its maximum overclocking capability.
3. High temperatures: Overclocking can increase temperatures, but excessively high temperatures can lead to thermal throttling or instability. Ensure that your cooling solution is adequate, and consider adjusting fan speeds or applying better thermal paste to the GPU. If temperatures remain too high, you may need to dial back the overclocked settings or adjust the voltage to reduce heat output.
4. System freezes or blue screens: System freezes or blue screens can occur when the overclocked settings are not stable. Reset your clock speeds and voltage settings to default, then gradually increase them while monitoring for stability. It’s also recommended to update your graphics card drivers to the latest version, as outdated drivers can sometimes cause stability issues.
5. Incompatibility with certain games or applications: Some games or applications may not handle overclocked settings well, leading to crashes or graphical glitches. If you encounter issues with specific software, try reducing the clock speeds or voltages slightly to find a stable configuration for that particular application. Each game or application may have different overclocking tolerance levels.
6. Power consumption and PSU limitations: Overclocking can increase power consumption, and in extreme cases, it may exceed the capabilities of your power supply unit (PSU). Ensure that your PSU has sufficient wattage and proper power delivery capabilities to handle the increased load. If you experience instability or sudden shutdowns during heavy GPU load, it could be due to insufficient power supply.
Remember, troubleshooting overclocking issues requires patience and perseverance. Take incremental steps and test for stability after each adjustment. It’s also worth seeking guidance from community forums or forums specific to your graphics card model for additional troubleshooting tips or possible solutions to specific issues.
Now that we have covered common troubleshooting issues, let’s move on to the concluding section of this guide.
Conclusion
Congratulations! You’ve reached the end of this guide on safely overclocking your graphics card. We’ve covered the key aspects of overclocking, including understanding the process, checking hardware compatibility, monitoring temperatures, adjusting clock speeds, and managing power limits. We also discussed stability testing, adjusting fan speeds, undervolting for better efficiency, and troubleshooting common issues.
By following the steps and guidelines outlined in this guide, you can unleash the full potential of your graphics card and achieve better performance in games and demanding applications. However, it’s essential to approach overclocking with caution and respect for the risks involved.
Remember to always prioritize stability and monitor temperatures closely during the overclocking process. Test for stability using benchmarking tools and be prepared to make adjustments if instability or artifacts occur. Keep an eye on temperatures and ensure that your cooling solution can handle the increased heat generated by overclocking.
Undervolting can be a useful technique to optimize power consumption and improve efficiency, while troubleshooting common issues requires patience and experimentation to find the best settings for your specific graphics card.
Lastly, always remember that overclocking voids the warranty of your graphics card, and any damage caused by overclocking is your responsibility. Proceed with caution and at your own risk.
We hope this guide has provided you with valuable insights and knowledge to safely and effectively overclock your graphics card. Now, it’s time to put this knowledge into practice and unleash the full potential of your gaming rig!