Introduction
Checking the temperatures of your CPU (Central Processing Unit) and GPU (Graphics Processing Unit) is crucial for maintaining the health and performance of your computer. Overheating can lead to system crashes, reduced lifespan of components, and even permanent damage. Therefore, monitoring and understanding the temperature of your CPU and GPU is essential.
When your computer’s CPU and GPU are under heavy load, they generate heat. The cooling system in your computer, including fans and heatsinks, works to dissipate this heat and keep the components within safe operating temperatures. However, various factors like dust accumulation, inadequate cooling, overclocking, or running resource-intensive applications can cause the temperature to rise beyond acceptable limits.
By monitoring the temperature of your CPU and GPU, you can take necessary precautions to prevent overheating and potential damage. This includes adjusting fan speeds, cleaning out dust, applying thermal paste, or reducing the workload on your computer.
In this guide, we will explore different methods for checking CPU and GPU temperatures on various operating systems such as Windows, Mac, and Linux. Whether you are a casual user or a hardcore gamer, understanding the temperature of your computer’s components will enable you to optimize performance and ensure the longevity of your system.
Why is it important to check CPU and GPU temperatures?
Monitoring the temperatures of your CPU and GPU is a critical aspect of computer maintenance. Here are several reasons why it is important to regularly check these temperatures:
1. Preventing overheating: Overheating can lead to system instability, crashes, and even permanent damage to your computer’s components. By keeping an eye on the temperatures, you can identify any potential issues and take appropriate action before they cause significant damage.
2. Optimizing performance: Heat is the enemy of electronic components. High temperatures can slow down the performance of your CPU and GPU, affecting the overall speed and responsiveness of your computer. By ensuring that temperatures are within the acceptable range, you can maintain optimal performance.
3. Extending component lifespan: Excessive heat can shorten the lifespan of your CPU and GPU, reducing their overall durability. By regularly monitoring temperatures and keeping them in check, you can help extend the lifespan of these crucial components, ultimately saving you money on replacements.
4. Identifying cooling system issues: Checking the temperatures allows you to assess the effectiveness of your computer’s cooling system. If temperatures are consistently high, it may indicate a problem with the fans, heatsinks, or airflow in your system. Identifying these issues early on can help you address them and prevent further damage.
5. Overclocking stability: Overclocking, the process of increasing the speed of your CPU or GPU beyond their stock specifications, can generate additional heat. Monitoring temperatures while overclocking is essential to ensure stability and prevent overheating. By closely monitoring temperatures, you can find the right balance between performance and temperature.
Overall, checking CPU and GPU temperatures is a proactive approach to computer maintenance. It helps to prevent overheating, optimize performance, extend component lifespan, identify cooling system issues, and ensure the stability of overclocked systems. By being aware of the temperatures and taking necessary precautions, you can keep your computer running smoothly and avoid potential hardware failures.
How to check CPU and GPU temperatures on Windows
Windows provides several methods to monitor the temperature of your CPU and GPU. Here are two common methods:
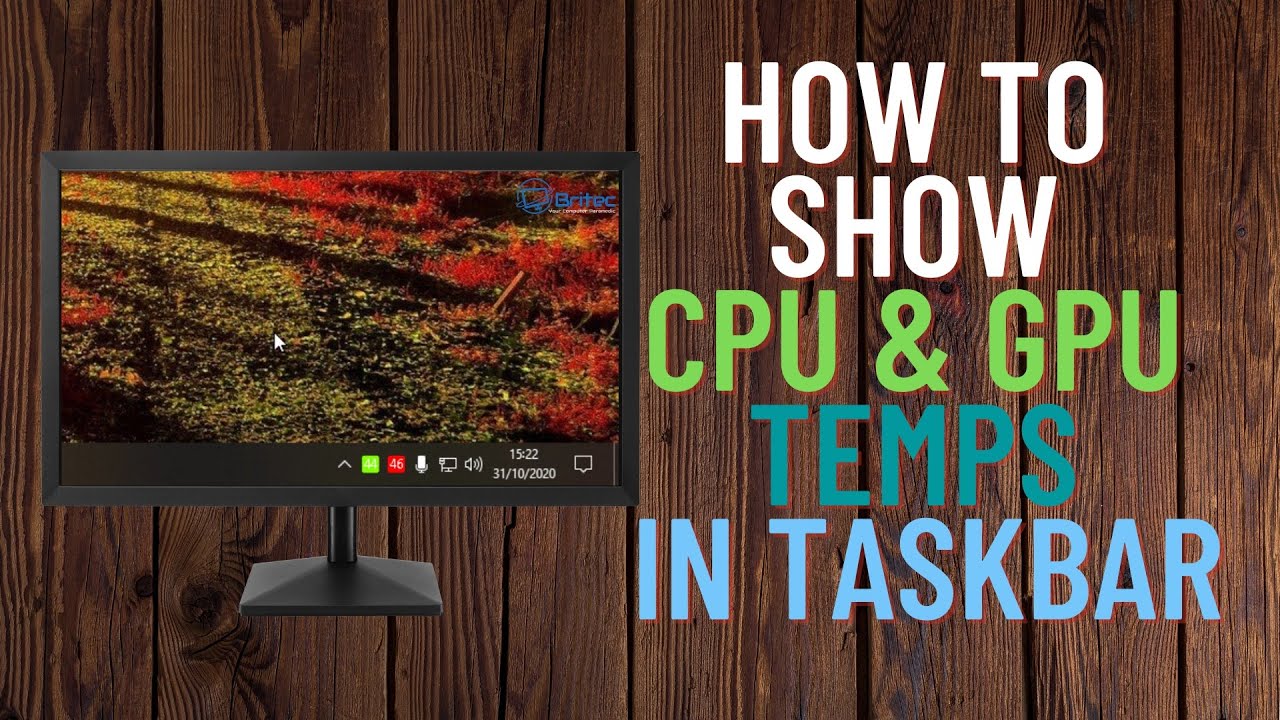
Method 1: Using Task Manager
1. Open Task Manager by right-clicking on the taskbar and selecting “Task Manager” from the menu.
2. Click on the “Performance” tab in the Task Manager window.
3. In the left-hand pane, select “CPU” or “GPU” to view the temperature readings for the respective component.
4. The temperatures will be displayed in degrees Celsius or Fahrenheit.
Method 2: Using Third-Party Software
Alternatively, you can use third-party software to monitor CPU and GPU temperatures. Here are two popular options:
a) HWMonitor: HWMonitor is a free software that provides detailed information about your computer’s hardware, including temperature readings for the CPU and GPU. Simply download and install HWMonitor, and it will display real-time temperature data.
b) Open Hardware Monitor: Open Hardware Monitor is another free software utility that offers comprehensive monitoring of CPU and GPU temperatures. It provides a user-friendly interface and supports a wide range of sensors, making it a popular choice among users.
Both HWMonitor and Open Hardware Monitor allow you to track temperatures, fan speeds, voltages, and other vital data related to your computer’s hardware.
When checking CPU and GPU temperatures, it’s essential to note that different CPUs and GPUs may have different acceptable temperature ranges. Consult the manufacturer’s technical specifications or documentation for your specific components to determine the optimal temperature ranges.
Regularly monitoring CPU and GPU temperatures on Windows can help you identify any underlying issues, prevent overheating, and maintain optimal performance. Whether you prefer using Task Manager or third-party software, having this information at your fingertips enables you to ensure the health and longevity of your computer.
Method 1: Using Task Manager
Task Manager is a built-in feature in Windows that allows you to monitor various aspects of your computer’s performance, including CPU and GPU temperatures. Follow these steps to check CPU and GPU temperatures using Task Manager:
1. Open Task Manager by right-clicking on the taskbar and selecting “Task Manager” from the menu. Alternatively, you can press the Ctrl + Shift + Esc keys simultaneously to open Task Manager directly.
2. In the Task Manager window, click on the “Performance” tab.
3. In the left-hand pane, you will see multiple categories listed, including “CPU”, “GPU”, “Memory”, and more. Click on either “CPU” or “GPU” to view the temperature readings for the respective component.
4. The temperature readings for the selected component will be displayed in real-time in the graph and text fields on the right-hand side.
5. By default, temperatures are displayed in Celsius. If you prefer to view temperatures in Fahrenheit, right-click on the graph area and select “Change graph to” followed by “Degrees Fahrenheit”.
Task Manager provides a convenient and quick way to monitor CPU and GPU temperatures without the need for additional software. However, it’s important to note that Task Manager’s temperature readings may not be as detailed or accurate as those provided by specialized monitoring software.
Monitoring temperatures using Task Manager can be especially useful when you want to quickly assess the state of your system or identify any abnormal temperature spikes. However, for more in-depth temperature monitoring and analysis, it is recommended to use dedicated third-party software such as HWMonitor or Open Hardware Monitor.
By regularly using Task Manager to monitor CPU and GPU temperatures, you can keep a close eye on the health of your computer and take necessary steps to prevent overheating and performance degradation.
Method 2: Using Third-Party Software
If you prefer more detailed and comprehensive CPU and GPU temperature monitoring, using third-party software can provide additional features and flexibility. Here are two popular options:
a) HWMonitor:
HWMonitor is a free software utility that allows you to monitor various hardware components, including CPU and GPU temperatures. Follow these steps to use HWMonitor:
1. Download HWMonitor from the official website and install it on your computer.
2. Launch HWMonitor. It will automatically detect and display information about your CPU, GPU, and other hardware components.
3. Look for the temperature readings for your CPU and GPU in the respective sections. HWMonitor provides real-time temperature data, allowing you to monitor changes and fluctuations.
4. HWMonitor also provides additional information such as fan speeds, voltages, and utilization percentages, giving you a comprehensive overview of your system’s performance.
b) Open Hardware Monitor:
Open Hardware Monitor is another free software utility that offers detailed monitoring of CPU and GPU temperatures. Here’s how to use it:
1. Download and install Open Hardware Monitor from the official website.
2. Launch Open Hardware Monitor. The software will display various temperature sensors available on your computer.
3. In the program’s main window, look for the CPU and GPU temperature readings. Open Hardware Monitor provides real-time updates on temperature changes.
4. Additionally, you can explore other sections in the software to check fan speeds, voltages, and other vital information related to your computer’s hardware.
Both HWMonitor and Open Hardware Monitor offer user-friendly interfaces and provide accurate temperature monitoring capabilities. They allow you to track not only CPU and GPU temperatures but also other crucial parameters, giving you a comprehensive understanding of your system’s performance.
Using third-party software for monitoring CPU and GPU temperatures is especially beneficial if you require more advanced features and detailed insights into your computer’s performance. These tools enable you to take proactive measures to prevent overheating, optimize system performance, and ensure the longevity of your components.
How to check CPU and GPU temperatures on Mac
Monitoring the temperature of your CPU and GPU is just as important on Mac systems as it is on Windows. Although Mac does not have a built-in tool like Task Manager, there are other ways to check CPU and GPU temperatures on your Mac. Here are two common methods:
Method 1: Using Activity Monitor
1. Open the “Applications” folder on your Mac, then navigate to the “Utilities” folder and open “Activity Monitor”.
2. In the Activity Monitor window, click on the “CPU” tab at the top of the window.
3. You will see a list of running processes, along with their CPU usage percentages. At the bottom of the window, you will find the “CPU Usage” section, which displays the overall CPU usage as a graph.
4. To view the CPU temperature, click on the “View” menu in the menu bar and select “Dock Icon” and then “Show CPU Usage”. This will display the temperature in a small floating window or in the Activity Monitor icon in the Dock.
Method 2: Using Third-Party Software
If you prefer more detailed temperature monitoring or want additional features, you can use third-party software designed for Mac systems. Here are two popular options:
a) iStat Menus: iStat Menus is a powerful system monitoring tool that provides detailed information about your Mac’s hardware, including CPU and GPU temperatures. You can customize the menu bar icons to display temperature readings, fan speeds, and other system parameters in real-time.
b) MacFansControl: MacFansControl is a specialized software that allows you to manually adjust the fan speed of your Mac. Along with fan control, it also provides temperature monitoring for various components, including CPU and GPU.
Both iStat Menus and MacFansControl offer comprehensive monitoring solutions for Mac systems, allowing you to keep track of temperature changes, fan speeds, and other vital information related to your CPU and GPU.
Regularly checking CPU and GPU temperatures on your Mac is crucial for maintaining optimal performance, preventing overheating, and ensuring the longevity of your system. Whether you use the built-in Activity Monitor or opt for third-party software, having this information readily available empowers you to take proactive measures to keep your Mac running smoothly.
Method 1: Using Activity Monitor
Activity Monitor is a built-in utility on Mac that provides insights into your system’s performance, including CPU usage and temperature. While it doesn’t display GPU temperature directly, monitoring CPU temperature can still give you an idea of the overall system temperature. Here’s how to check CPU temperature using Activity Monitor:
1. Navigate to the “Applications” folder on your Mac and open the “Utilities” folder.
2. Locate and launch “Activity Monitor.
3. In the Activity Monitor window, click on the “CPU” tab at the top of the window.
4. You’ll see a list of running processes, along with their CPU usage percentages. At the bottom of the window, you’ll find the “CPU Usage” section, displaying the overall CPU usage as a graph.
5. To view the CPU temperature, click on the “View” menu in the menu bar and select “Dock Icon” and then “Show CPU Usage.” This will display the CPU temperature in a small floating window or in the Activity Monitor icon in the Dock.
While Activity Monitor doesn’t provide direct GPU temperature readings, monitoring CPU temperature can still offer valuable insights into your system’s temperature. High CPU utilization often indicates a load on the GPU as well, thus indirectly reflecting the GPU temperature.
Keep in mind that Activity Monitor’s temperature readings may not be as detailed or accurate as those provided by specialized temperature monitoring software. If you require more advanced features or precise temperature data for your GPU, you may want to explore third-party software options specifically designed for monitoring temperatures on Mac systems.
By regularly checking CPU temperature using Activity Monitor, you can stay informed about your system’s temperature status and take necessary steps to ensure optimal performance and avoid potential overheating issues.
Method 2: Using Third-Party Software
If you prefer more detailed and comprehensive temperature monitoring on your Mac, using third-party software can provide additional features and flexibility. Here are two popular options:
a) iStat Menus:
iStat Menus is a powerful system monitoring tool that offers detailed information about various hardware parameters, including CPU and GPU temperatures. Here’s how to check CPU and GPU temperatures using iStat Menus:
1. Download iStat Menus from the developer’s website and install it on your Mac.
2. Launch iStat Menus. The software will be added to your menu bar.
3. Click on the iStat Menus icon in the menu bar, and a drop-down menu will appear.
4. Hover over the “Sensors” option in the drop-down menu, and a sub-menu will appear.
5. In the sub-menu, you’ll see various temperature sensors listed, such as CPU, GPU, and more. Click on the “CPU” or “GPU” option to display the respective temperature reading.
6. The temperature reading will be displayed in real-time in the iStat Menus drop-down menu.
b) MacFansControl:
MacFansControl is another software utility that allows you to monitor temperature and provides manual control over fan speeds on your Mac. Here’s how to check CPU and GPU temperatures using MacFansControl:
1. Download and install MacFansControl from the developer’s website.
2. Launch MacFansControl. The software will display temperature readings for various components, including CPU and GPU, in real-time.
3. MacFansControl also offers the option to manually adjust the fan speeds, enabling you to fine-tune the cooling system for optimal temperature management.
Both iStat Menus and MacFansControl provide comprehensive monitoring solutions for Mac systems. They offer real-time temperature updates, customizable menu bar icons, and additional features to help you keep track of CPU and GPU temperatures and ensure system stability.
Using third-party software for monitoring temperature gives you more control and in-depth insights into the temperature status of your Mac. By keeping an eye on CPU and GPU temperatures, you can take proactive measures to prevent overheating, optimize performance, and ensure the longevity of your Mac.
How to check CPU and GPU temperatures on Linux
Linux provides several methods to monitor the temperature of your CPU and GPU. Here are two common methods:
Method 1: Using Command Line
Linux offers various command line tools that allow you to check CPU and GPU temperatures. One of the widely used tools is lm-sensors. Follow these steps to check temperatures using the command line:
1. Install lm-sensors by running the following command in the terminal:
sudo apt-get install lm-sensors
2. Detect the available sensor modules by running the following command:
sensors-detect
Follow the prompts and respond with “yes” whenever asked to add sensor modules to the configuration file.
3. Once the detection process is complete, run the following command to display temperature readings:
sensors
You will see a list of sensors and their corresponding temperature readings, including those for your CPU and GPU.
Method 2: Using Third-Party Software
Linux also offers third-party software solutions for monitoring CPU and GPU temperatures. One popular option is Psensor. Here’s how to use it:
1. Install Psensor by running the following command in the terminal:
sudo apt-get install psensor
2. Launch Psensor either from the applications menu or by running the following command:
psensor
3. Psensor will display temperature readings for various sensors present on your system, including those for your CPU and GPU. You can customize the display and choose which sensors to monitor.
Both the command line method and third-party software offer convenient ways to check CPU and GPU temperatures on Linux. They provide real-time temperature data, allowing you to monitor changes and take necessary measures to prevent overheating and optimize system performance.
Regularly checking CPU and GPU temperatures on your Linux system helps in maintaining stability, improving longevity, and ensuring the efficient operation of your computer.
Method 1: Using Command Line
Linux provides a powerful command line interface that allows you to check CPU and GPU temperatures using the lm-sensors tool. Here’s how to check temperatures using the command line:
1. Install lm-sensors:
Start by installing the lm-sensors package. Open the terminal and run the following command:
sudo apt-get install lm-sensors
Follow the prompts and enter your password to complete the installation.
2. Detect and configure sensors:
Run the command below to detect and configure the available sensors:
sensors-detect
Follow the on-screen prompts, and when asked if the detected sensors should be added to the configuration file, respond with “yes”.
3. View temperature readings:
Once the detection process is complete, you can view the temperature readings by running the command:
sensors
This will display a list of temperature sensors and their corresponding temperature readings, including those for your CPU and GPU.
The lm-sensors tool provides detailed information about various hardware sensors on your system, allowing you to monitor temperature changes and identify any potential overheating issues.
Using the command line method to check CPU and GPU temperatures is particularly useful for advanced users and those who prefer a lightweight solution. It provides accurate and real-time temperature data directly from the hardware sensors.
Keep in mind that the output from the lm-sensors command may vary depending on your hardware configuration, and the naming conventions for temperature sensors may differ between systems.
Regularly checking CPU and GPU temperatures using the command line helps you keep track of the health and performance of your Linux system. With this information, you can take proactive steps to optimize performance, prevent overheating, and ensure the longevity of your hardware components.
Method 2: Using Third-Party Software
Linux also provides third-party software options for monitoring CPU and GPU temperatures with more advanced features and user-friendly interfaces. One such popular option is Psensor. Here’s how to use it:
1. Install Psensor:
Start by installing Psensor on your Linux system. Open the terminal and run the following command:
sudo apt-get install psensor
Enter your password when prompted and wait for the installation to complete.
2. Launch Psensor:
Once the installation is finished, you can launch Psensor either from the applications menu or by searching for it in the dash.
3. Monitor CPU and GPU temperatures:
Upon launching Psensor, it will display temperature readings for various sensors in your system, including those for your CPU and GPU.
Psensor provides real-time updates on temperatures and allows you to configure sensor options, set temperature thresholds, and customize the way the readings are displayed.
This user-friendly interface makes it easy to keep track of your CPU and GPU temperatures, ensuring that they stay within safe operating limits.
Additionally, Psensor can display sensor information in the system tray and even provide notifications when temperatures exceed certain thresholds, allowing you to take immediate action to prevent overheating.
Other third-party software options are also available for temperature monitoring on Linux, such as Xsensors and Hardinfo. Each software may offer a slightly different set of features and interfaces, so you can choose the one that best fits your needs and preferences.
By using third-party software like Psensor to monitor CPU and GPU temperatures on Linux, you can have a more streamlined and intuitive method of managing your system’s temperature levels. This enables you to optimize performance, maintain stability, and prolong the lifespan of your computer components.
Tips for maintaining optimal CPU and GPU temperatures
Keeping your CPU and GPU temperatures within a safe and optimal range is crucial for the performance and longevity of your computer. Here are some tips to help you maintain optimal temperatures:
1. Adequate cooling: Ensure that your computer has proper cooling mechanisms, including fans and heatsinks. Clean dust and debris regularly from cooling components to maintain efficient heat dissipation.
2. Maintain airflow: Make sure that your computer’s airflow is not obstructed. Ensure that intake and exhaust vents are free from blockages and that cables are neatly arranged to promote smooth airflow.
3. Monitor ambient temperature: Keep an eye on the ambient temperature of the room where your computer is located. Excessive heat in the environment can make it harder for your cooling system to keep temperatures within the desirable range.
4. Avoid overclocking: Overclocking your CPU or GPU can lead to increased heat generation. If you are experiencing high temperatures, consider reverting to default clock speeds or using a milder overclocking profile.
5. Apply thermal paste: Properly apply high-quality thermal paste between the CPU/GPU and the heatsink. This helps to improve heat transfer and ensures efficient cooling.
6. Use a cooling pad: If you use a laptop, consider using a cooling pad that provides additional airflow for better cooling performance. Cooling pads can help dissipate heat and keep your laptop’s temperature under control.
7. Optimize power settings: Adjust your computer’s power settings to balance performance and power consumption. High-performance modes often generate more heat, while power-saving modes may help reduce temperatures during light tasks.
8. Clean the computer regularly: Regularly clean the internal components of your computer, including fans and heatsinks. Dust accumulation can impede proper airflow and lead to higher temperatures.
9. Avoid running resource-intensive tasks for extended periods: Heavy-duty tasks such as gaming or rendering put significant stress on your CPU and GPU. Take breaks, give your system time to cool down, and avoid extended periods of intense usage.
10. Keep your computer up to date: Regularly update your operating system, drivers, and firmware to ensure optimal compatibility and performance. Updates often include bug fixes and optimizations that can help with temperature management.
By following these tips, you can maintain optimal CPU and GPU temperatures, reducing the risk of overheating and ensuring the longevity of your computer’s components. Monitoring temperatures regularly and taking appropriate action will help keep your system running smoothly and reliably.
Conclusion
Monitoring the temperatures of your CPU and GPU is essential for maintaining the health, performance, and longevity of your computer. By regularly checking these temperatures, you can prevent overheating, optimize performance, and ensure the stability of your system.
On Windows, you can use built-in tools like Task Manager to check CPU and GPU temperatures quickly. Third-party software such as HWMonitor and Open Hardware Monitor provide more detailed insights into temperature readings.
Mac users can rely on Activity Monitor to check CPU temperature, while third-party software like iStat Menus and MacFansControl offer more advanced temperature monitoring features.
Linux users have the option to use command-line tools like lm-sensors or explore third-party software like Psensor for temperature monitoring.
Regardless of the operating system, it’s important to follow best practices for maintaining optimal CPU and GPU temperatures. Adequate cooling, proper airflow, monitoring ambient temperature, avoiding overclocking, applying thermal paste, and cleaning your computer regularly are all crucial steps to ensure efficient heat dissipation.
By implementing these tips, you can minimize the risk of overheating, reduce performance degradation, and extend the lifespan of your components.
Remember, maintaining optimal CPU and GPU temperatures not only safeguards the stability and performance of your computer but also enhances your overall computing experience.
Take the time to monitor temperatures and perform maintenance tasks regularly to ensure your system remains cool, efficient, and reliable for years to come.