Introduction
Chromebooks have become increasingly popular due to their affordability, simplicity, and seamless integration with Google services. While they offer numerous features and functionalities, one common concern for many users is how to take screenshots without a Windows key, as traditional methods often rely on this specific key combination.
Luckily, there are alternative methods available to capture screenshots on a Chromebook. In this article, we will explore various techniques that will allow you to take screenshots effortlessly, regardless of whether your device has a Windows key or not.
Whether you need to capture an important moment during a video call, save a funny meme, or document an error message for troubleshooting purposes, learning how to take screenshots on your Chromebook can be incredibly useful.
In the following sections, we will delve into different methods and shortcuts that you can use to capture screenshots on your Chromebook, even if it lacks a Windows key. From using key combinations to utilizing on-screen keyboards and extensions, we will cover all the tricks you need to know.
So, let’s dive in and find out how you can capture and save screenshots on your Chromebook without the need for a Windows key!
Using the Ctrl + Window Switcher Key
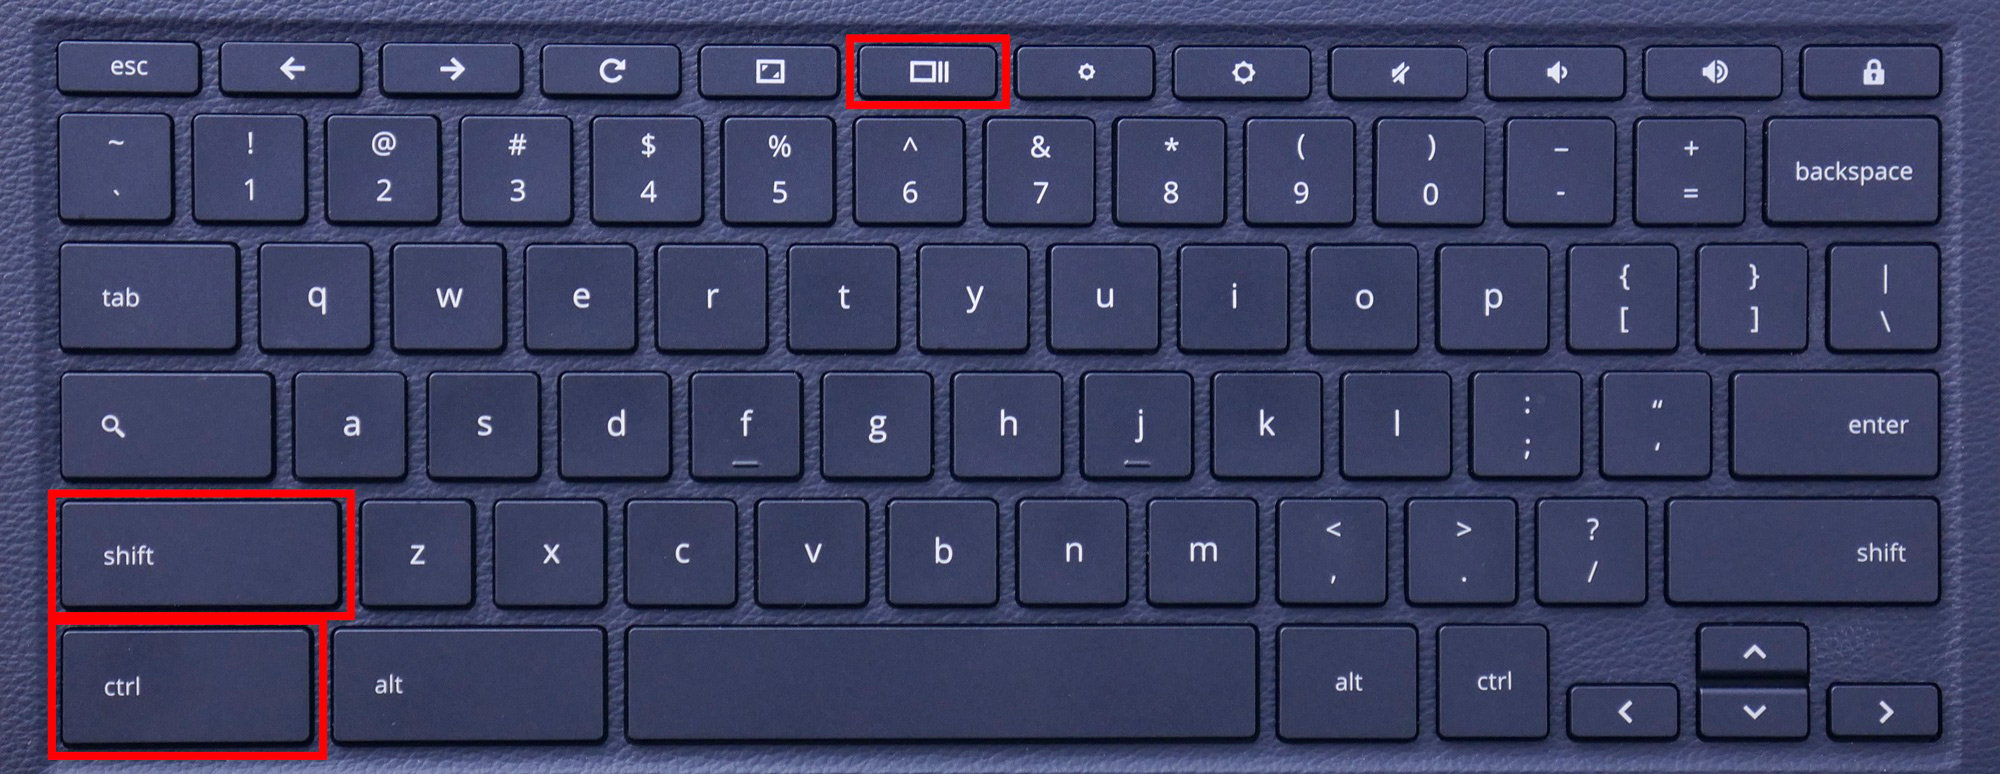
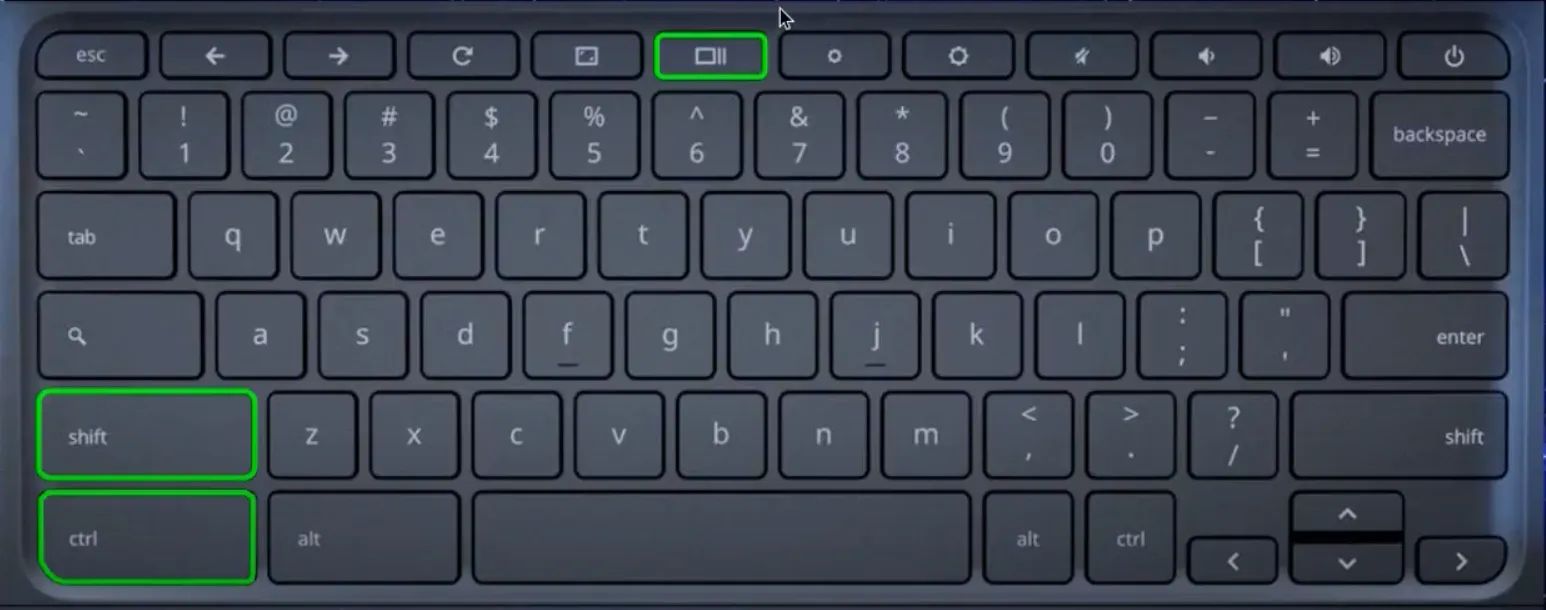
One of the simplest and most common methods to take a screenshot on a Chromebook is by using the Ctrl + Window Switcher key combination. The Window Switcher key is usually located at the top row of the keyboard and is represented by an icon that resembles overlapping rectangles or windows.
To capture a screenshot using this method, follow these steps:
- Identify the content you want to capture on your screen.
- Press and hold the Ctrl key on your keyboard.
- While holding the Ctrl key, press the Window Switcher key.
- Release both keys simultaneously.
After performing these steps, your Chromebook will automatically save the screenshot in the Downloads folder. You can access your Downloads folder by opening the File Manager app and navigating to the Downloads section.
If you have an external keyboard connected to your Chromebook, make sure to use the Window Switcher key on the external keyboard instead of the one on the Chromebook itself.
The Ctrl + Window Switcher key combination is a quick and efficient way to capture screenshots on your Chromebook, and it works regardless of whether your device has a Windows key or not. Remember to save your screenshots in a location that is easily accessible to you, such as a cloud storage platform or a designated folder on your device.
Now that you know how to use the Ctrl + Window Switcher key combination, you can easily capture and save screenshots on your Chromebook for various purposes, such as creating presentations, sharing information, or troubleshooting.
Using the Ctrl + Shift + Window Switcher Key
If the previous method doesn’t work on your Chromebook or if you prefer a different key combination, you can use the Ctrl + Shift + Window Switcher key combination to capture screenshots. This method is similar to the previous one but adds the Shift key to the mix.
To take a screenshot using this method, follow these steps:
- Identify the content you want to capture on your Chromebook’s screen.
- Press and hold the Ctrl key.
- While holding the Ctrl key, press and hold the Shift key.
- While still holding both keys, press the Window Switcher key.
- Release all the keys simultaneously.
After performing these steps, your Chromebook will capture a screenshot of the entire screen, just like with the previous method. The screenshot will be saved in the Downloads folder, and you can access it using the File Manager app.
Using the Ctrl + Shift + Window Switcher key combination gives you an alternative way to capture screenshots on your Chromebook without a Windows key. This method is particularly useful if you find it more comfortable or intuitive to use these key combinations.
Remember to practice and familiarize yourself with the key combinations to ensure smooth and efficient screenshot capturing. With a little bit of practice, you’ll be able to take screenshots effortlessly using this method.
Now that you are aware of the Ctrl + Shift + Window Switcher key combination, you have another valuable tool at your disposal to capture important moments and information on your Chromebook.
Using the On-Screen Keyboard
If your Chromebook lacks a physical keyboard or if you prefer a more visual approach to taking screenshots, you can utilize the on-screen keyboard to capture screenshots.
To access the on-screen keyboard on your Chromebook, follow these steps:
- Click on the status area in the bottom-right corner of the screen, where the time and date are displayed.
- Select the gear icon to open the settings menu.
- Within the settings menu, click on the “Accessibility” option.
- Under the “Keyboard & Text Input” section, toggle on the “Enable on-screen keyboard” option.
Once the on-screen keyboard is enabled, follow these steps to capture a screenshot:
- Open the content or window you want to capture on your Chromebook’s screen.
- Click on the on-screen keyboard icon in the bottom-right corner of the screen to bring up the keyboard.
- Locate and click on the “PrtScn” or “Print Screen” button on the on-screen keyboard. Note that the button may have a different name or symbol depending on your Chromebook model.
- Your Chromebook will capture a screenshot of the entire screen, and it will be saved to the Downloads folder.
Using the on-screen keyboard is a convenient method, especially if you have a touchscreen Chromebook or if you prefer a visual interface for capturing screenshots. It allows you to have a dedicated button for taking screenshots, making the process more straightforward and intuitive.
Remember to disable the on-screen keyboard once you have finished taking screenshots to free up screen space and improve your overall browsing experience.
Now that you know how to use the on-screen keyboard to capture screenshots, you can easily capture and save important information and moments on your Chromebook without the need for a physical keyboard.
Using Extensions
If you prefer a more customizable and feature-rich solution for capturing screenshots on your Chromebook, you can consider using extensions from the Chrome Web Store. There are several extensions available that offer advanced screenshot functionalities and options.
To use extensions for capturing screenshots on your Chromebook, follow these steps:
- Open the Chrome Web Store on your Chromebook.
- Search for “screenshot” or “screen capture” in the search bar to explore available extensions.
- Review the different extensions and read their descriptions and reviews to find the one that best fits your needs.
- Click on the “Add to Chrome” button next to the extension you want to install.
- Once the extension is installed, you’ll usually find its icon in the top-right corner of the Chrome browser.
- Click on the extension’s icon to access its features and options.
- Follow the instructions provided by the extension to capture screenshots using its specific functionalities.
Conclusion
Taking screenshots on a Chromebook without a Windows key is not only possible but also relatively easy. Whether you use the Ctrl + Window Switcher key combination, the Ctrl + Shift + Window Switcher key combination, the on-screen keyboard, or extensions from the Chrome Web Store, you have a range of options to capture and save screenshots for various purposes.
By using the Ctrl + Window Switcher key combination, you can quickly take screenshots with just a few keystrokes. The Ctrl + Shift + Window Switcher key combination offers an alternative method for capturing screenshots that adds the Shift key into the mix. The on-screen keyboard provides a visual interface for taking screenshots, which is useful if you have a touchscreen Chromebook or prefer a more visual approach. Lastly, extensions from the Chrome Web Store offer additional features and customization options for capturing screenshots.
It’s important to practice and familiarize yourself with these methods to improve your efficiency and productivity when it comes to taking screenshots on your Chromebook.
Experiment with different methods and find the one that works best for you. Consider your personal preferences, the specific features you need, and the ease of use for each method. With a little practice, you’ll be able to capture and save screenshots effortlessly on your Chromebook, regardless of whether it has a Windows key or not.
Now that you have learned various methods for taking screenshots on a Chromebook without a Windows key, you can capture and save important moments, information, and images with ease. So go ahead and start exploring the possibilities of screenshot capture on your Chromebook!