Introduction
Chromebooks have become increasingly popular for their simplicity, affordability, and efficiency. Whether you’re a student, professional, or casual user, there may come a time when you need to take a screenshot on your Chromebook.
A screenshot is a useful way to capture and save what you see on your screen, whether it’s a funny meme, an important error message, or a portion of a webpage. Thankfully, Chromebooks offer several methods to easily capture screenshots, catering to different preferences and needs.
In this article, we will explore five different methods to take screenshots on a Chromebook. We will cover capturing the entire screen, capturing a specific area, using keyboard shortcuts, utilizing the power and volume buttons (for convertible Chromebooks), and employing helpful browser extensions.
No matter which method you choose, you can rest assured that capturing a screenshot on your Chromebook is a breeze. So, let’s dive in and learn how to capture those memorable moments, important information, or anything else you want to preserve on your screen!
Method 1: Capturing the Entire Screen
Taking a screenshot of the entire screen is the quickest and easiest way to capture what’s currently displayed on your Chromebook. To do this, follow these simple steps:
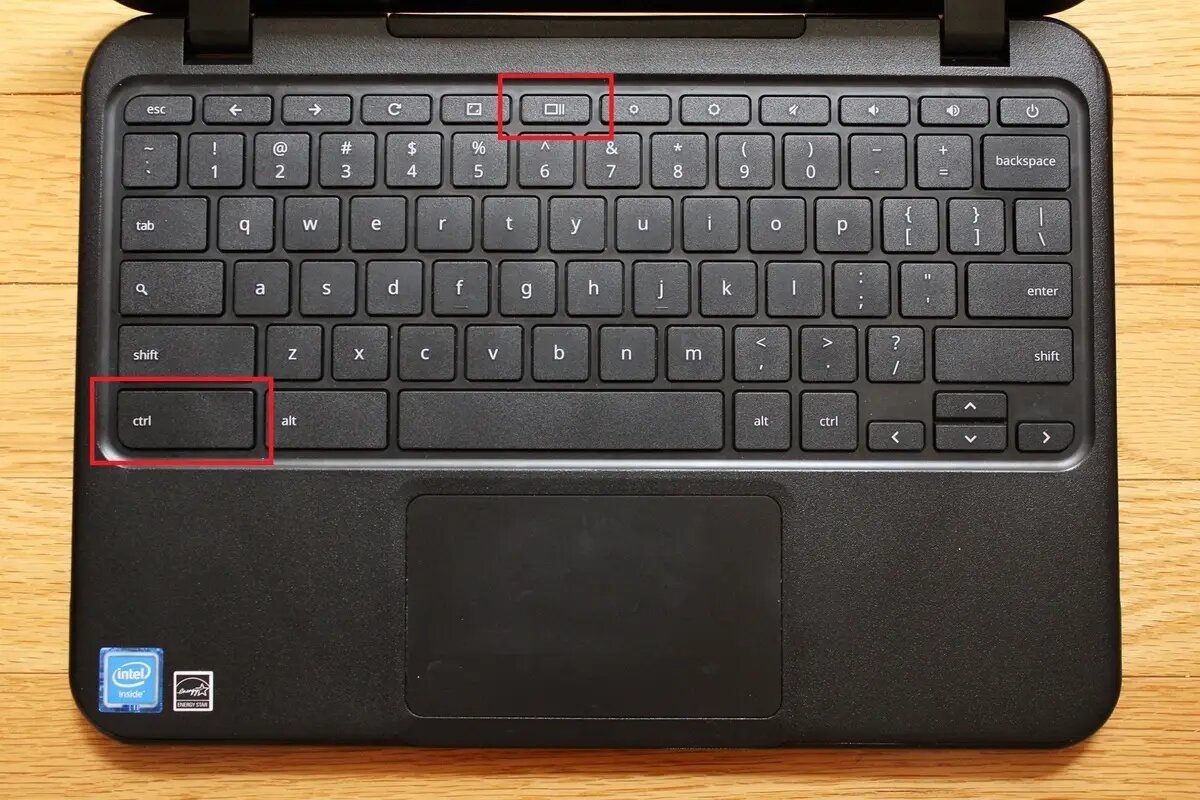
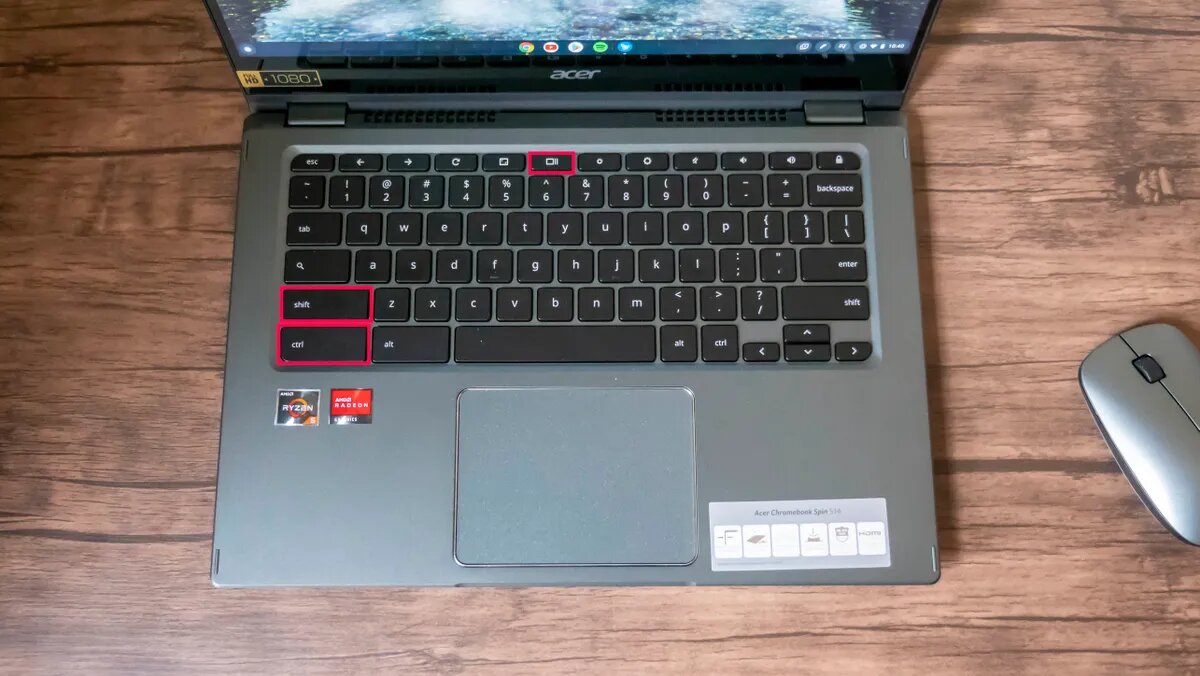
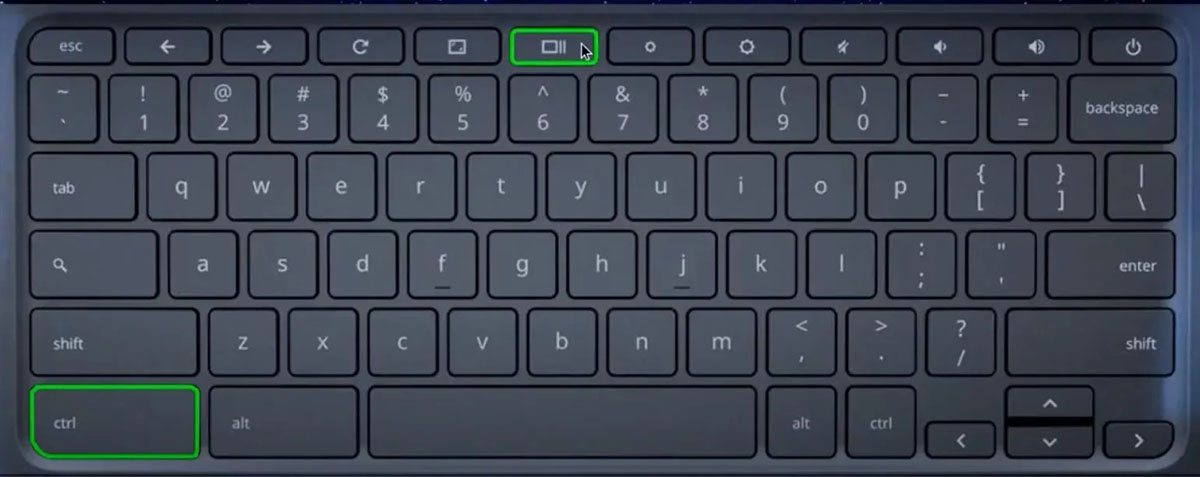
- Locate the “Ctrl” and “Switch Window” keys on your Chromebook’s keyboard. The “Switch Window” key is usually denoted by an icon that looks like two rectangles overlapping each other.
- Press and hold down the “Ctrl” key.
- While holding down the “Ctrl” key, press the “Switch Window” key. This will instantly capture a screenshot of your entire screen.
After following these steps, you should see a notification confirming that the screenshot has been saved. You can then access your screenshot through the “Files” app, which can be found in the app drawer or on the shelf at the bottom of your screen. Alternatively, you can also view your screenshots by typing “chrome://downloads” in the address bar of your Chrome browser.
It’s important to note that the screenshot will be saved in PNG format by default. If you prefer a different format, such as JPEG, you can convert the screenshot using an image editing program or an online conversion tool.
This method is perfect for capturing the entire screen, whether it’s a webpage, a document, or a software interface. However, if you only need to capture a specific area of the screen, we’ll explore that in the next section.
Method 2: Capturing a Specific Area
If you need to capture a specific area of your Chromebook screen rather than the entire screen, you can easily do so using the built-in screenshot tool. Here’s how:
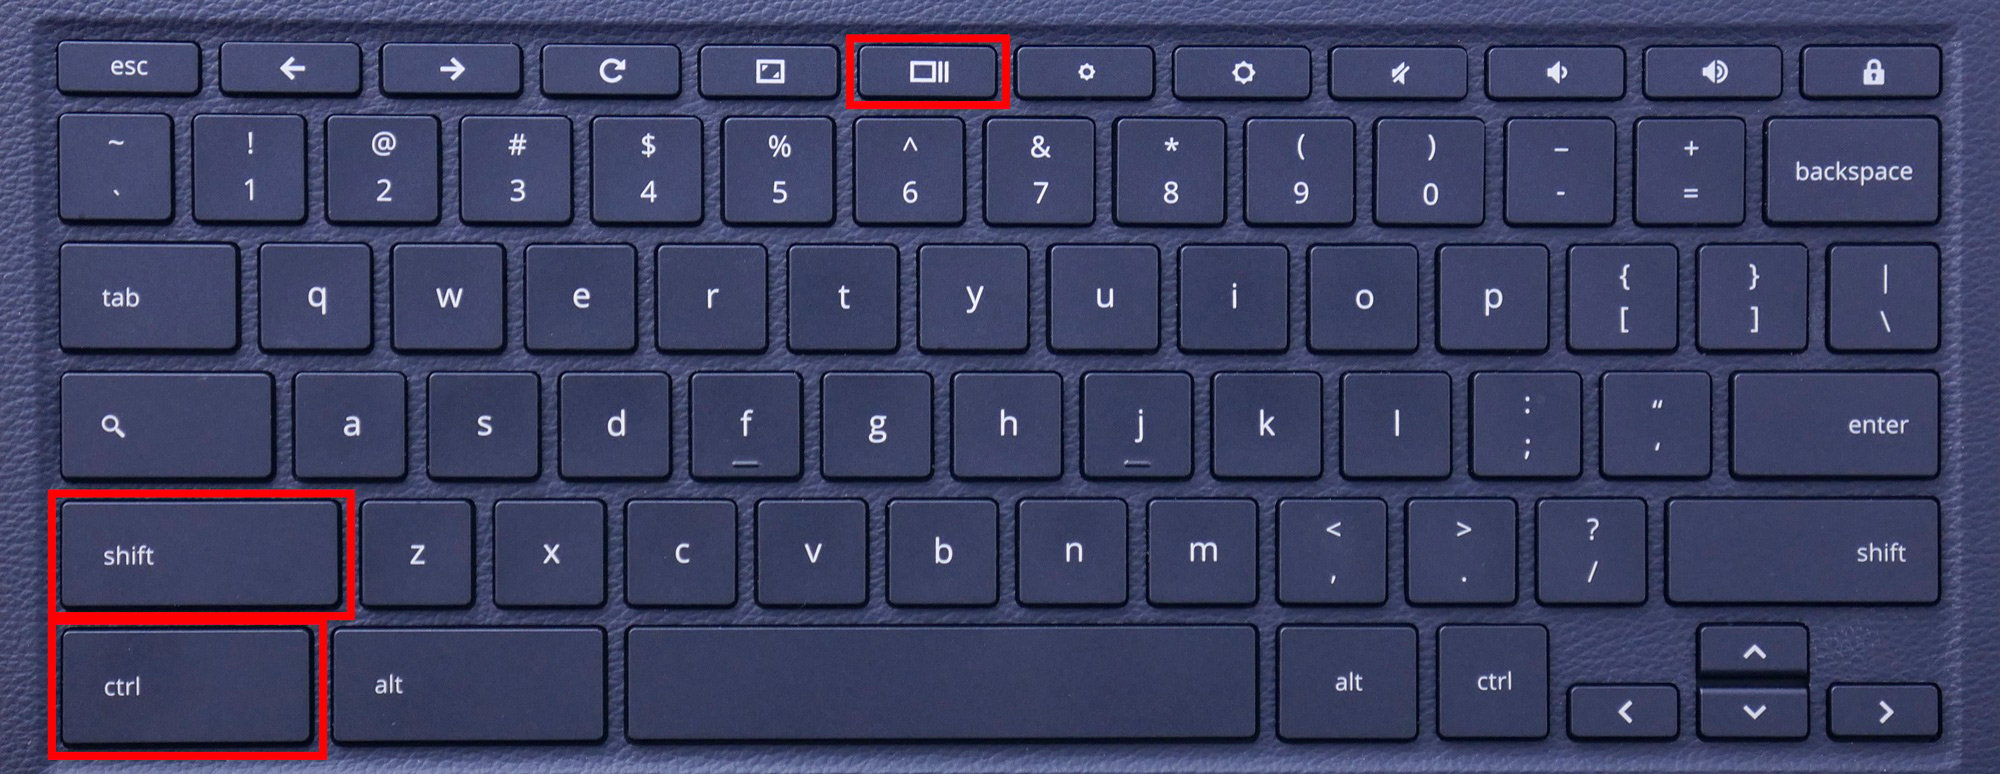
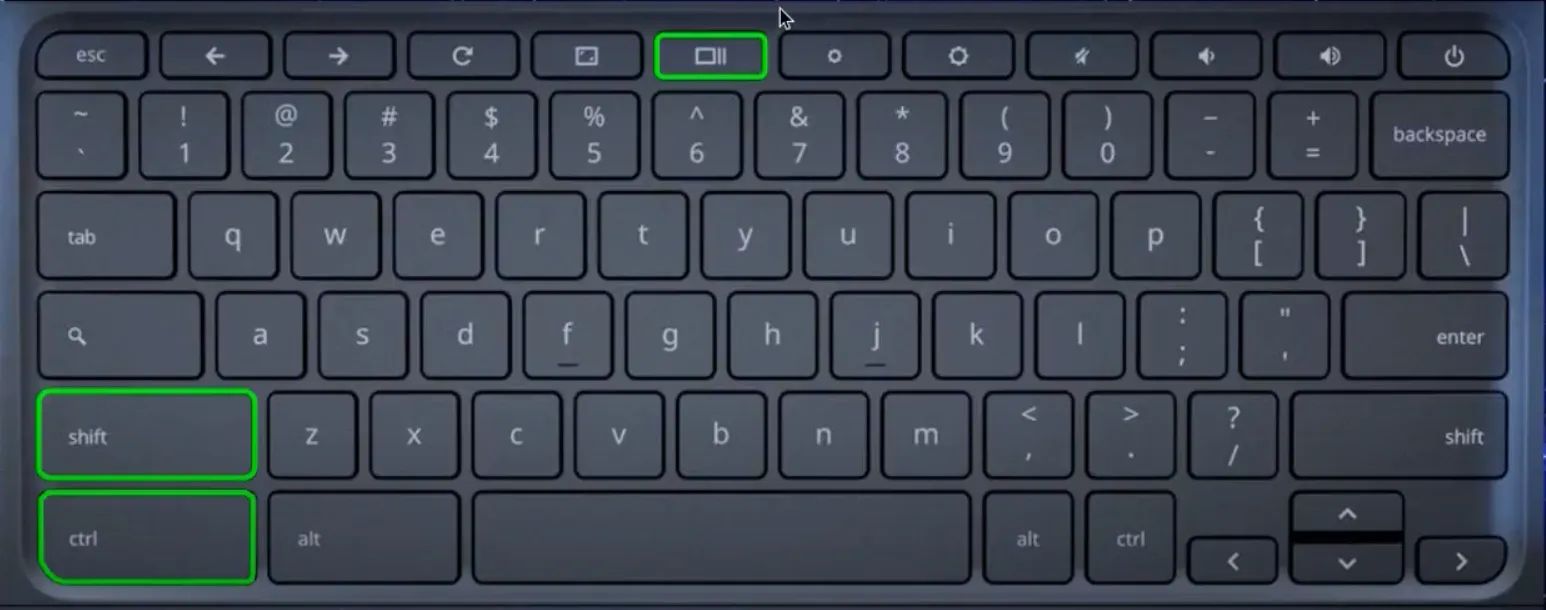
- Locate the “Ctrl” and “Shift” keys on your Chromebook’s keyboard.
- Press and hold down the “Ctrl” key.
- While holding down the “Ctrl” key, press the “Shift” key and the number “5” key simultaneously. This will activate the screenshot tool.
After activating the screenshot tool, your screen will become dimmed, and the cursor will turn into a crosshair. You can then click and drag to select the desired area you want to capture. Once you release the mouse button, the screenshot will be saved automatically.
Similar to capturing the entire screen, the specific area screenshot will also be saved in PNG format. You can access it through the “Files” app or via the “chrome://downloads” page in your Chrome browser.
By using this method, you can pinpoint exactly what you need to capture, whether it’s a particular section of a webpage, an image, or a specific portion of an application. This flexibility makes it ideal for capturing precise information without any unnecessary clutter.
Now that you know how to capture the entire screen and a specific area, let’s explore another method that will allow you to take screenshots using keyboard shortcuts.
Method 3: Using Keyboard Shortcuts
Using keyboard shortcuts is a convenient way to quickly take screenshots on your Chromebook without having to navigate through menus or use additional tools. You can take a screenshot of the entire screen or a specific area by following these keyboard shortcuts:
- Entire Screen: Press the “Ctrl” and “Switch Window” keys simultaneously to capture the entire screen.
- Specific Area: Press the “Ctrl”, “Shift”, and “number 5” keys simultaneously to activate the screenshot tool and select the desired area to capture.
Once you’ve taken a screenshot using the keyboard shortcuts, you can access it through the “Files” app or the “chrome://downloads” page in your Chrome browser, as mentioned in the previous methods.
Using keyboard shortcuts is not only efficient but also allows for quick and seamless capture of your desired screen content. It’s particularly useful when you need to take frequent screenshots or capture specific information on the fly.
Now that we’ve covered three different methods for capturing screenshots on your Chromebook, let’s move on to another method specifically designed for convertible Chromebooks, which allows you to use the power and volume buttons to take screenshots.
Method 4: Using the Power and Volume Buttons (for Convertible Chromebooks)
If you’re using a convertible Chromebook with a touchscreen, you can utilize the power and volume buttons to capture screenshots. This method is particularly convenient when you’re in tablet mode. Here’s how:
- Locate the power button and volume down button on your Chromebook.
- Simultaneously press and hold the power button and volume down button for a moment.
After holding down the buttons, your Chromebook’s screen will momentarily dim, indicating that a screenshot has been taken. The screenshot will be saved automatically and can be found in the “Files” app or by visiting the “chrome://downloads” page in your Chrome browser, just like with the previous methods.
This method is particularly useful if you find it more comfortable to use physical buttons or if you prefer capturing screenshots while using your Chromebook in tablet mode, as it provides a seamless and intuitive way to capture the screen content.
Now that we’ve covered screenshot methods for various use cases and preferences, let’s explore another option that allows you to enhance your screenshot capabilities with the help of browser extensions.
Method 5: Using Extensions
Chromebooks offer a wide range of browser extensions that can further enhance your screenshot capabilities. These extensions provide additional features and customization options, allowing you to capture and edit screenshots with ease. Here’s how you can use extensions to capture screenshots:
- Open the Chrome Web Store and search for screenshot extensions. Popular options include “Awesome Screenshot,” “Nimbus Screenshot,” and “Lightshot.”
- Select the extension you want to install and click on the “Add to Chrome” button.
- Follow the installation prompts and grant any necessary permissions.
Once the extension is installed, you can access its features by clicking on its icon in the Chrome toolbar. These extensions often provide additional screenshot tools, including options to capture the entire page, annotate or edit screenshots, and share them directly to social media or cloud storage platforms.
Extensions can be a valuable addition to your screenshot arsenal, allowing you to customize your capturing process and access advanced features that might not be available through the built-in methods. However, it’s important to note that installing too many extensions can impact the performance and memory of your Chromebook, so choose the ones that best fulfill your requirements.
With the multitude of screenshot extensions available, you can personalize your experience and take your screenshot capabilities to the next level.
Now that we’ve explored five different methods to capture screenshots on a Chromebook, depending on your preference and specific needs, you can choose the method that best suits you.
Conclusion
Capturing screenshots on your Chromebook is a straightforward process that can be done using various methods. Whether you need to capture the entire screen, a specific area, or utilize keyboard shortcuts, there are options available to suit your preferences and requirements.
By following the instructions provided in this article, you can easily take screenshots on your Chromebook. Remember to access your screenshots through the “Files” app or the “chrome://downloads” page in your Chrome browser.
Additionally, for convertible Chromebook users, utilizing the power and volume buttons provides a convenient way to capture screenshots, especially when in tablet mode.
If you desire more advanced features and customization options, browser extensions can be an excellent addition to your screenshot toolkit. They offer additional functionalities, such as annotation and easy sharing of screenshots.
Now that you’re equipped with these methods, you can capture and save important information, memorable moments, or anything else you need from your Chromebook screen.
So go ahead and start capturing those screenshots with ease and make the most out of your Chromebook’s capabilities!