Introduction
Have you ever wanted to capture a screenshot on your HP Chromebook? Whether you need to save an important image or share something funny you came across online, taking a screenshot is a useful feature to have. Luckily, there are multiple methods you can use to screenshot on an HP Chromebook, and in this article, we’ll explore each one of them, step by step.
Chromebooks are known for their simplicity and ease of use, and the same goes for taking screenshots. Depending on your preference and the situation, you can choose from keyboard shortcuts, physical buttons, on-screen keyboards, or even Chrome extensions to capture your desired screenshot.
In the following sections, we’ll guide you through each method, explaining the steps in detail to ensure you can easily take screenshots on your HP Chromebook. Whether you’re a seasoned Chromebook user or new to the platform, this guide will help you capture and save screenshots effortlessly.
So, let’s dive in and explore the various methods you can use to screenshot on your HP Chromebook.
Method 1: Using the Keyboard Shortcut
Taking a screenshot on an HP Chromebook can be done quickly and easily using a keyboard shortcut. The specific key combination may vary slightly depending on your Chromebook model, but the general method remains the same.
Here’s how you can take a screenshot using the keyboard shortcut:
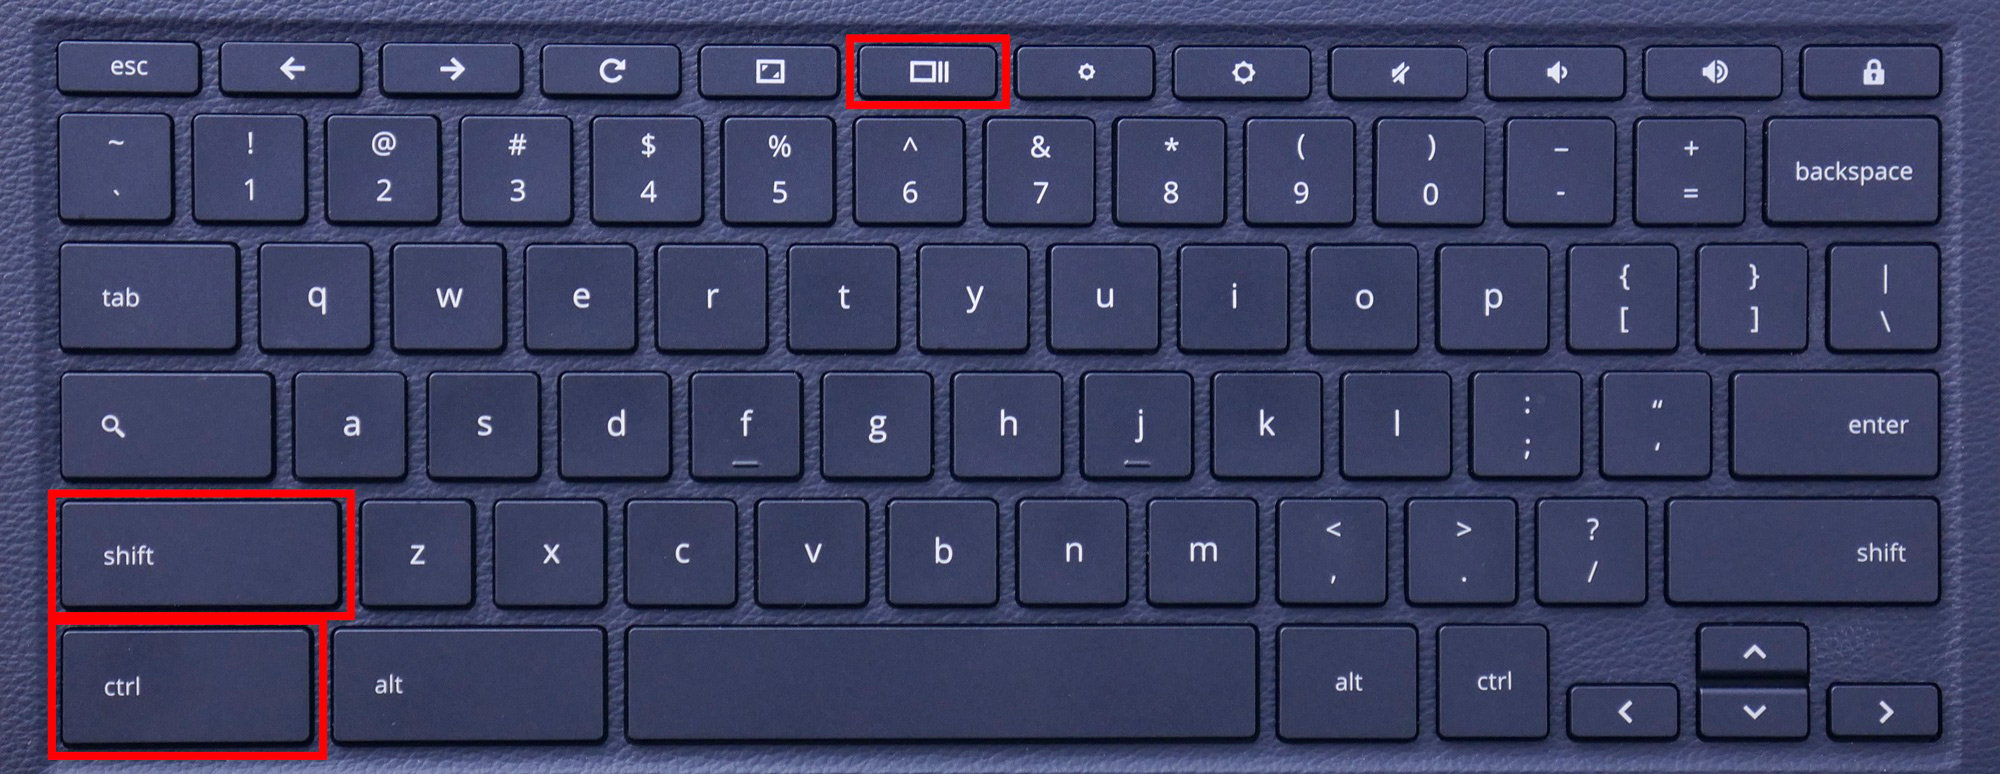
- Locate the Ctrl (Control) key and the Switch window key on your Chromebook’s keyboard. The Switch window key is typically located in the top row, between the full screen and brightness controls.
- On your Chromebook screen, navigate to the content you want to capture in the screenshot.
- Press and hold the Ctrl key and the Switch window key simultaneously.
- Once you release the keys, the screen will dim momentarily, indicating that the screenshot has been captured.
- The screenshot image will be saved in the Downloads folder on your Chromebook. You can access it by opening the Files app and navigating to the Downloads section.
Using the keyboard shortcut is the quickest and most straightforward method to take a screenshot on an HP Chromebook. It allows you to capture the entire screen, including any open windows and the desktop background.
Keep in mind that the keyboard shortcut captures the entire screen by default. If you only want to capture a specific portion of the screen, you can further edit and crop the screenshot using an image editor or online tool.
Now that you’re familiar with the keyboard shortcut method, let’s explore another method using the physical buttons on your HP Chromebook.
Method 2: Using the Power and Volume Down Buttons
If you prefer a hands-on approach, you can use the physical buttons on your HP Chromebook to capture a screenshot. This method is especially useful if you’re unable to use the keyboard shortcut or prefer a more tactile option.
Here’s how you can take a screenshot using the power and volume down buttons:
- Locate the Power button and the Volume Down button on your Chromebook. The Power button is typically located on the side or top of your device, while the Volume Down button is usually positioned on the opposite side.
- On your Chromebook screen, navigate to the content you want to capture in the screenshot.
- Simultaneously press and hold the Power button and the Volume Down button.
- The screen will flash briefly, indicating that the screenshot has been taken.
- The captured screenshot will be saved in the Downloads folder on your Chromebook, accessible through the Files app.
Using the power and volume down buttons provides a tactile and straightforward way to capture screenshots on your HP Chromebook. This method is especially useful if you need to quickly capture a screenshot while using your device in tablet mode or if the keyboard shortcut isn’t accessible.
Similar to the keyboard shortcut method, screenshots taken using the physical buttons will capture the entire screen. If you only want to capture a specific area, you can edit and crop the screenshot using an image editor or online tool.
Now that you know how to capture screenshots using the power and volume down buttons, let’s explore another method that utilizes the on-screen keyboard.
Method 3: Using the On-Screen Keyboard
If you prefer using touch or your HP Chromebook does not have a physical keyboard, you can still capture screenshots using the on-screen keyboard. This method allows you to utilize a virtual keyboard on your Chromebook’s display to perform the screenshot action.
Here’s how you can take a screenshot using the on-screen keyboard:
- Click on the clock icon located in the bottom-right corner of your Chromebook screen. This will open the system tray.
- From the system tray, click on the settings icon (represented by a gear symbol) to open the Chromebook settings menu.
- In the settings menu, click on the “Accessibility” option.
- Scroll down to the “Manage accessibility features” section and click on “Keyboard”.
- Toggle the switch next to “Enable on-screen keyboard”.
- A virtual keyboard will appear on your Chromebook’s screen. Click on the “keyboard” icon on the virtual keyboard to access additional options.
- Click on the “Capture Screenshot” option to take a screenshot.
- The screenshot will be saved in the “Downloads” folder on your Chromebook.
Using the on-screen keyboard method is especially useful if you’re using your Chromebook in tablet mode, or if you prefer touch input over physical keys. It allows you to easily capture screenshots without the need for a physical keyboard or buttons.
Remember, screenshots taken using the on-screen keyboard will capture the entire screen by default. If you want to capture a specific portion, you can edit and crop the screenshot using an image editor or online tool.
Now that you’re familiar with capturing screenshots using the on-screen keyboard method, let’s take a look at one final method that involves using Chrome extensions.
Method 4: Using Chrome Extensions
If you’re looking for additional features and customization options for taking screenshots on your HP Chromebook, you can utilize Chrome extensions. Extensions are downloadable add-ons that enhance the functionality of your Chrome browser, and there are several available specifically for capturing screenshots.
Here’s how you can use Chrome extensions to capture screenshots on your HP Chromebook:
- Open the Chrome Web Store by typing “chrome://extensions” in the address bar of your Chrome browser.
- In the search bar, type “screenshot” or “screen capture” to browse through the available extension options.
- Select an extension that meets your requirements and click on the “Add to Chrome” button to install it.
- Follow the installation prompts to complete the process.
- Once installed, the extension will typically appear as an icon in the Chrome toolbar or as an option in the right-click menu.
- Click on the extension icon or access the screenshot feature through the right-click menu.
- Follow the prompts or options provided by the extension to capture the desired screenshot.
- The extension may offer additional features such as editing, annotating, or sharing options.
Using Chrome extensions allows you to customize your screenshot-taking experience by providing additional features and tools. You can choose an extension that best suits your preferences and needs, whether it’s for capturing specific areas, scrolling pages, or adding annotations to your screenshots.
Keep in mind that Chrome extensions may vary in functionality and capabilities, so it’s essential to choose one that has positive reviews and fits your requirements. Additionally, ensure that the extension is compatible with your Chromebook model.
Now that you’re aware of the Chrome extension method for capturing screenshots, let’s summarize the methods we’ve explored to take a screenshot on an HP Chromebook.
Conclusion
Capturing screenshots on your HP Chromebook is a straightforward process, thanks to the various methods available. Whether you prefer using keyboard shortcuts, physical buttons, on-screen keyboards, or Chrome extensions, there’s a method for everyone. By following the steps outlined in this article, you can easily capture and save screenshots of your desired content.
The keyboard shortcut method is the quickest and easiest way to capture a screenshot on an HP Chromebook. With a simple key combination, you can capture the entire screen and have the screenshot conveniently saved in the Downloads folder.
If you prefer a more hands-on approach, using the power and volume down buttons allows you to capture screenshots with a tactile feel. This method is particularly useful when using your Chromebook in tablet mode or if you’re unable to use the keyboard shortcut.
For touch-enabled Chromebooks or those without a physical keyboard, the on-screen keyboard method provides a virtual solution. Enabling and utilizing the on-screen keyboard allows you to take screenshots with ease, using a touch-based interface.
Lastly, Chrome extensions offer additional features and customization options for screenshot capturing. By choosing an extension that suits your needs, you can tailor your screenshot-taking experience with editing, annotating, and sharing capabilities.
Whether you’re a student, professional, or casual user, knowing how to take screenshots on your HP Chromebook can be incredibly useful. It allows you to capture important information, share content with others, and save memorable moments effortlessly.
Now that you’re equipped with the knowledge of various screenshot methods, give them a try and find the one that works best for you. Experiment with different techniques and explore the options available to enhance your Chromebook experience.
Remember, a picture is worth a thousand words, and with the ability to capture screenshots on your HP Chromebook, you can easily capture and save those special moments with just a few simple steps.