Introduction
Welcome to this guide on how to take a screenshot on a Dell Chromebook! Screenshotting is a common task that allows you to capture and save a specific moment on your screen for various purposes, such as sharing information, reporting issues, or simply creating content.
Dell Chromebooks are popular for their lightweight design and seamless integration with the Chrome OS, making them ideal for both work and play. Whether you want to capture an image, save a webpage, or record important information, knowing how to take a screenshot on your Dell Chromebook will come in handy.
In this article, we will explore three different methods to capture screenshots on your Dell Chromebook. The first method involves using a keyboard shortcut, which offers a quick and convenient way to capture the entire screen. The second method allows you to take a partial screenshot, focusing only on a specific area of interest. Finally, we will introduce the built-in Chromebook screenshot tool, which offers additional options for capturing screenshots.
So, whether you’re a student, professional, or casual Chromebook user, let’s dive into the different methods and discover how to efficiently take screenshots on your Dell Chromebook!
Method 1: Use the Keyboard Shortcut
One of the fastest and simplest ways to take a screenshot on your Dell Chromebook is by using a keyboard shortcut. This method allows you to capture the entire screen and save it as an image file.
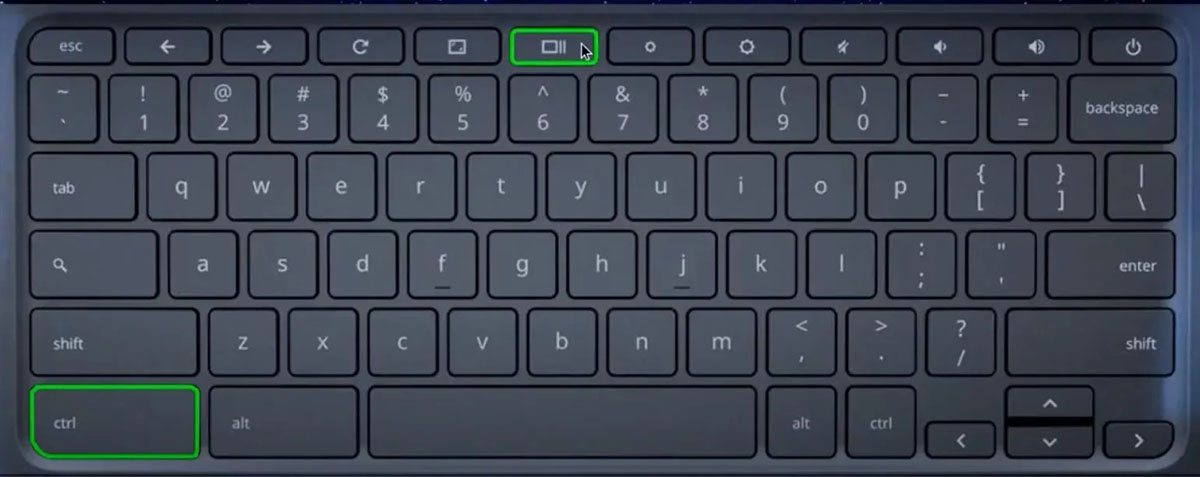
To take a screenshot using the keyboard shortcut, follow these steps:
- Make sure the screen you want to capture is active and visible.
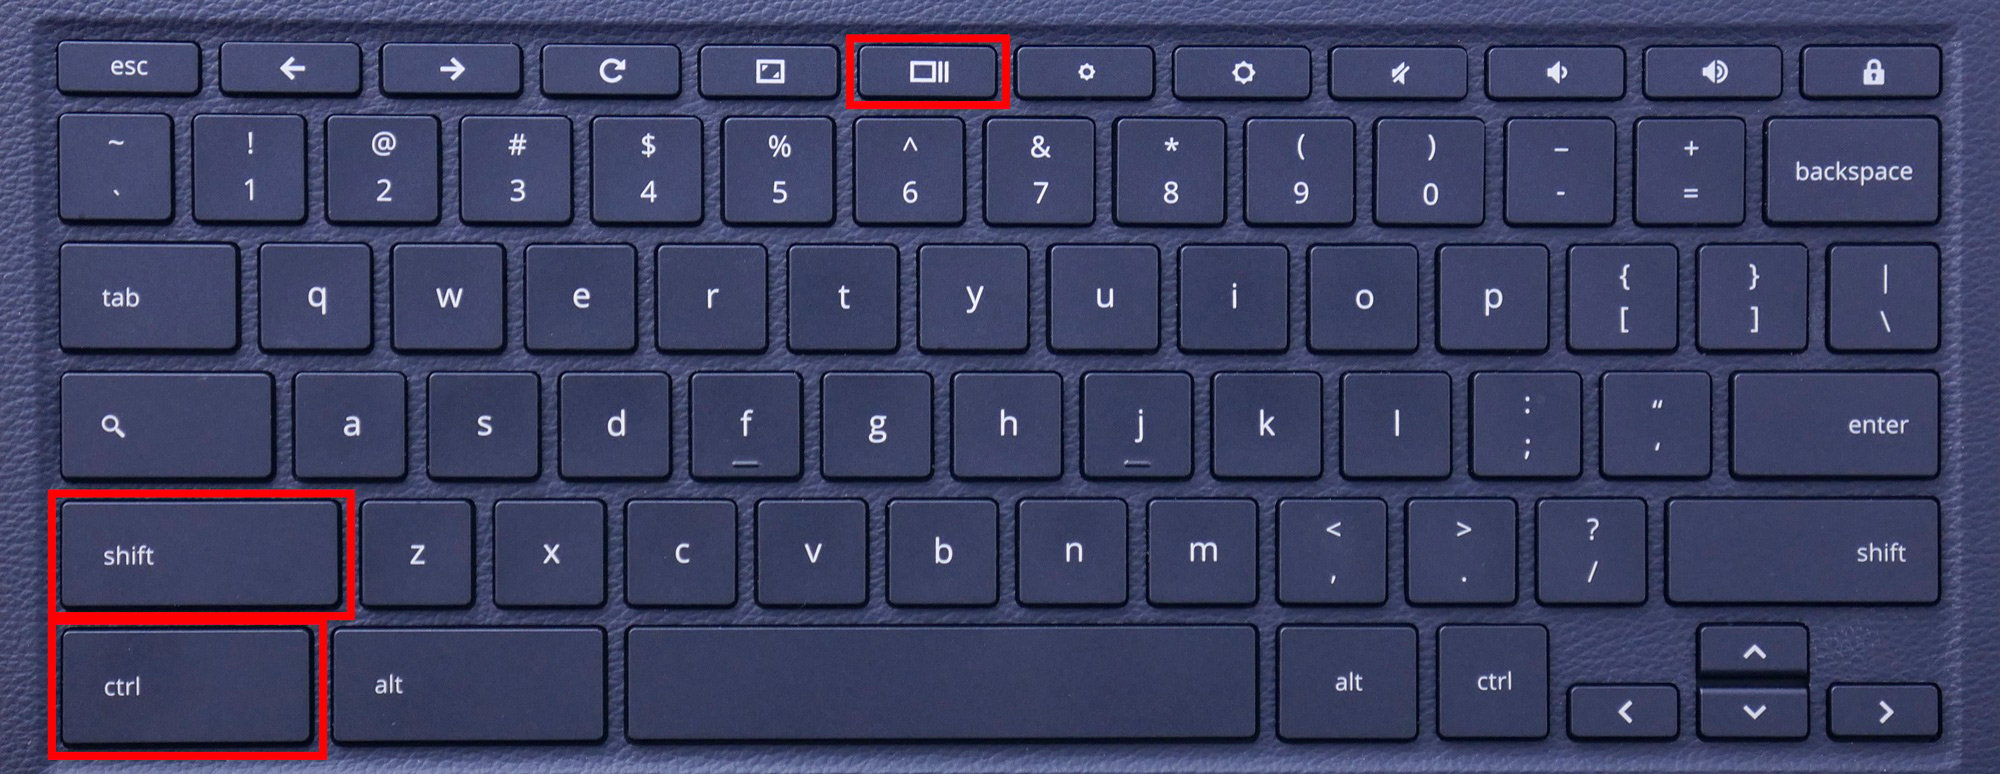
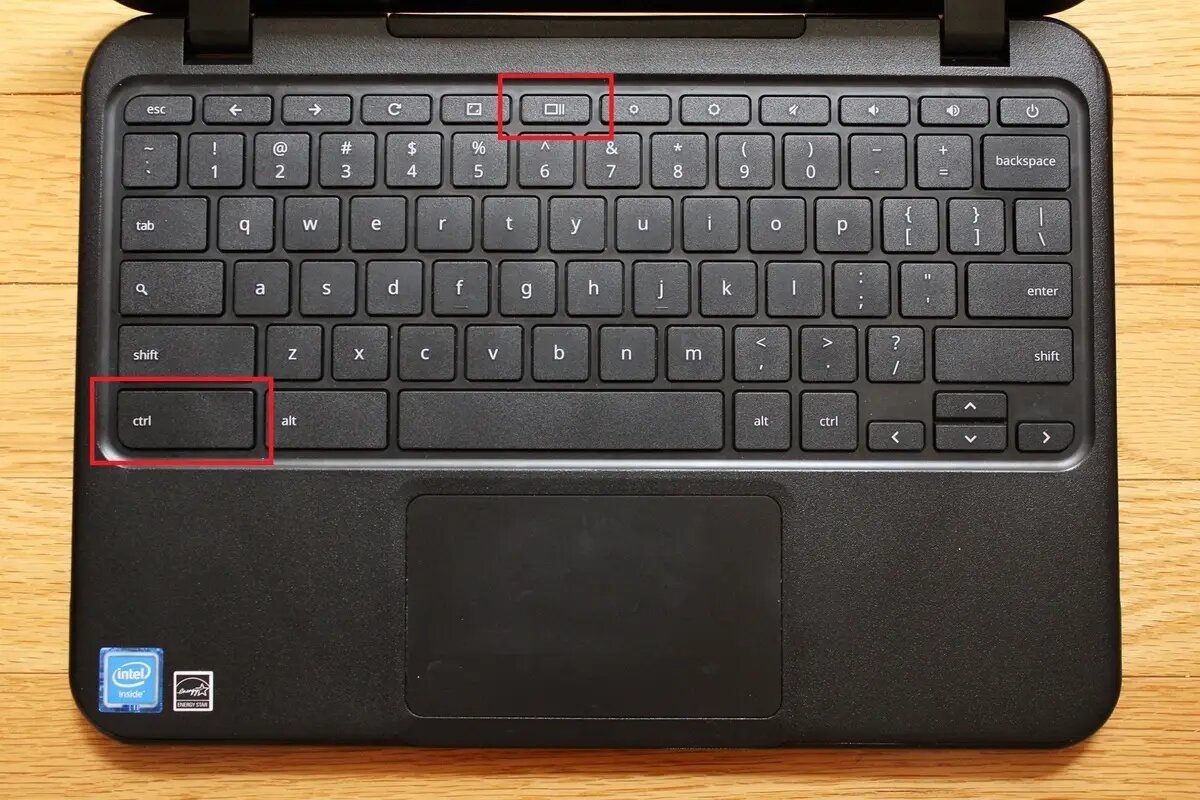
- Press the Ctrl and Window Switcher keys simultaneously.
- You will see a notification confirming that the screenshot has been saved.
- To access the screenshot, go to the Files app and navigate to the Downloads folder. The screenshot will be saved as a PNG file with a name starting with “Screenshot”.
This method is ideal for capturing images, webpages, or any other content displayed on your screen. It’s a convenient way to document information, save visual references, or even capture error messages.
Keep in mind that using the keyboard shortcut captures the entire screen, including the desktop background and any open windows or tabs. If you only want to capture a specific area, you can try the next method: taking a partial screenshot.
Method 2: Take a Partial Screenshot
If you want to capture only a portion of your screen on your Dell Chromebook, taking a partial screenshot is the perfect method. This allows you to focus on a specific area of interest, such as a particular image, text, or element, without capturing the entire screen.
To take a partial screenshot on your Dell Chromebook, follow these steps:
- Open the screen you want to capture.
- Press the Ctrl, Shift, and Window Switcher keys simultaneously.
- Your cursor will change to a crosshair or plus sign.
- Click and drag your cursor to select the desired portion of the screen.
- Release the mouse button to capture the selected area.
- A notification will appear, confirming that the screenshot has been saved.
- To access the screenshot, open the Files app and navigate to the Downloads folder. The partial screenshot will be saved as a PNG file.
This method allows for greater precision and control when capturing screenshots. Whether you need to highlight a specific part of an image or extract essential information from a webpage, taking a partial screenshot is an efficient way to achieve that.
Remember that the partial screenshot captures only the selected area, which means you can exclude any unnecessary elements or personal information from the screenshot.
Method 3: Use the Chromebook Screenshot Tool
If you prefer a more advanced and versatile way to take screenshots on your Dell Chromebook, you can utilize the built-in Chromebook screenshot tool. This tool offers additional options and features, allowing you to enhance your screenshots before saving them.
To access the Chromebook screenshot tool and take screenshots, follow these steps:
- Open the screen or webpage you want to capture.
- Press the Ctrl and Show Windows keys simultaneously.
- The screen will temporarily dim, and you will see a toolbar at the bottom of the screen.
- From the toolbar, you can select different screenshot options, such as capturing the entire screen, a window, or a specific area.
- Once you have selected the desired option, click on it to capture the screenshot.
- The screenshot will be automatically saved to the Screenshots folder within the Files app.
One of the advantages of using the Chromebook screenshot tool is that it enables you to annotate and edit your screenshots before saving them. The toolbar provides options for drawing, highlighting, cropping, and adding text to your screenshots, allowing you to enhance their visual impact and convey specific information.
Additionally, the Chromebook screenshot tool offers a time delay option. This allows you to set a delay before the screenshot is captured, giving you time to position windows or initiate specific actions before the screenshot is taken. This can be useful when capturing dropdown menus, tooltips, or other elements that may disappear quickly.
By utilizing the Chromebook screenshot tool, you can take full advantage of the advanced capabilities of your Dell Chromebook and create professional-looking screenshots with ease.
Conclusion
Capturing screenshots on your Dell Chromebook is a fundamental skill that can greatly enhance your productivity and ability to visually communicate information. Whether you need to save a webpage, document a bug, or create content, knowing how to take a screenshot is essential.
In this guide, we explored three different methods to capture screenshots on your Dell Chromebook. The keyboard shortcut method allows you to quickly capture the entire screen, while the partial screenshot method lets you focus on specific areas of interest. Additionally, the Chromebook screenshot tool offers advanced features, such as annotation and editing options, to enhance your screenshots.
Remember that each method has its advantages and can be used in different scenarios. The keyboard shortcut is perfect for capturing the entire screen, while the partial screenshot method allows for selective capturing. The Chromebook screenshot tool provides additional capabilities for editing and annotating your screenshots.
Now that you have learned how to take screenshots on your Dell Chromebook, you can start capturing images, saving webpages, or sharing important information with ease. Take advantage of these methods to streamline your workflow, improve collaboration, and enhance your overall Chromebook experience.
So, whether you’re a student, professional, or casual user, mastering the art of screenshotting on your Dell Chromebook will undoubtedly prove beneficial in your daily activities.