Introduction
Welcome to the step-by-step guide on how to factory reset your Dell Chromebook. If you find that your Chromebook is running slower than usual, experiencing software glitches, or you simply want to start fresh, a factory reset can help resolve these issues.
A factory reset will erase all the data and settings on your Chromebook, restoring it to its original out-of-the-box state. This means that all your personal files, apps, and customizations will be deleted. It is crucial to back up any important data before proceeding with the reset process.
Performing a factory reset is also beneficial if you plan to sell or give away your Dell Chromebook. By resetting it to factory settings, you ensure that none of your personal information remains on the device.
In this guide, we will walk you through the necessary steps to safely and effectively perform a factory reset on your Dell Chromebook. So, let’s get started!
Step 1: Back up your data
Before proceeding with a factory reset, it is essential to back up any important data on your Dell Chromebook. This includes documents, photos, videos, and any other files that you want to preserve.
There are a few different options for backing up your data, depending on your preferences and requirements:
- Google Drive: One of the easiest and most convenient ways to back up your files is by using Google Drive. This cloud storage service allows you to upload and sync your files across multiple devices. Simply log into your Google account, open Google Drive, and upload the files you want to save.
- External Storage Device: If you prefer to have a physical copy of your files, you can use an external storage device such as a USB flash drive or an external hard drive. Connect the storage device to your Chromebook and manually copy and paste the files you want to back up.
- Cloud Backup Services: There are various third-party cloud backup services available, such as Dropbox, OneDrive, or iCloud. These services offer additional storage space and backup options, allowing you to safeguard your data.
Choose the method that best suits your needs and ensure that all your important files are securely saved before proceeding to the next step. It’s always better to be safe than sorry when it comes to protecting your valuable data!
Step 2: Sign out of your Google account
Before you perform a factory reset on your Dell Chromebook, it is crucial to sign out of your Google account. This step ensures that your personal information and account preferences are not accessible to anyone else who may use the device.
Here’s how you can sign out of your Google account:
- Click on the clock or battery icon in the bottom-right corner of your screen to open the status area.
- Click on your profile picture or the account name associated with your Google account.
- In the drop-down menu, select the “Sign out” option.
Once you have signed out, make sure to confirm that you are no longer signed in by visiting any Google-owned apps or services, such as Gmail or Google Drive.
Signing out of your Google account is an important security measure, as it prevents anyone else from accessing your email, documents, and other personal information during the factory reset process. It also ensures that your Chromebook is ready for the next user, should you decide to sell or give it away.
Remember to keep your account credentials secure and do not share them with anyone to maintain the privacy of your digital identity.
Step 3: Access the factory reset option
Once you have backed up your data and signed out of your Google account, you can proceed to access the factory reset option on your Dell Chromebook. The steps to access this option may vary slightly depending on the model of your Chromebook, but here is a general guide:
- Turn on your Chromebook if it is not already powered on.
- At the login screen, press and hold the Ctrl + Shift + Alt + R keys simultaneously.
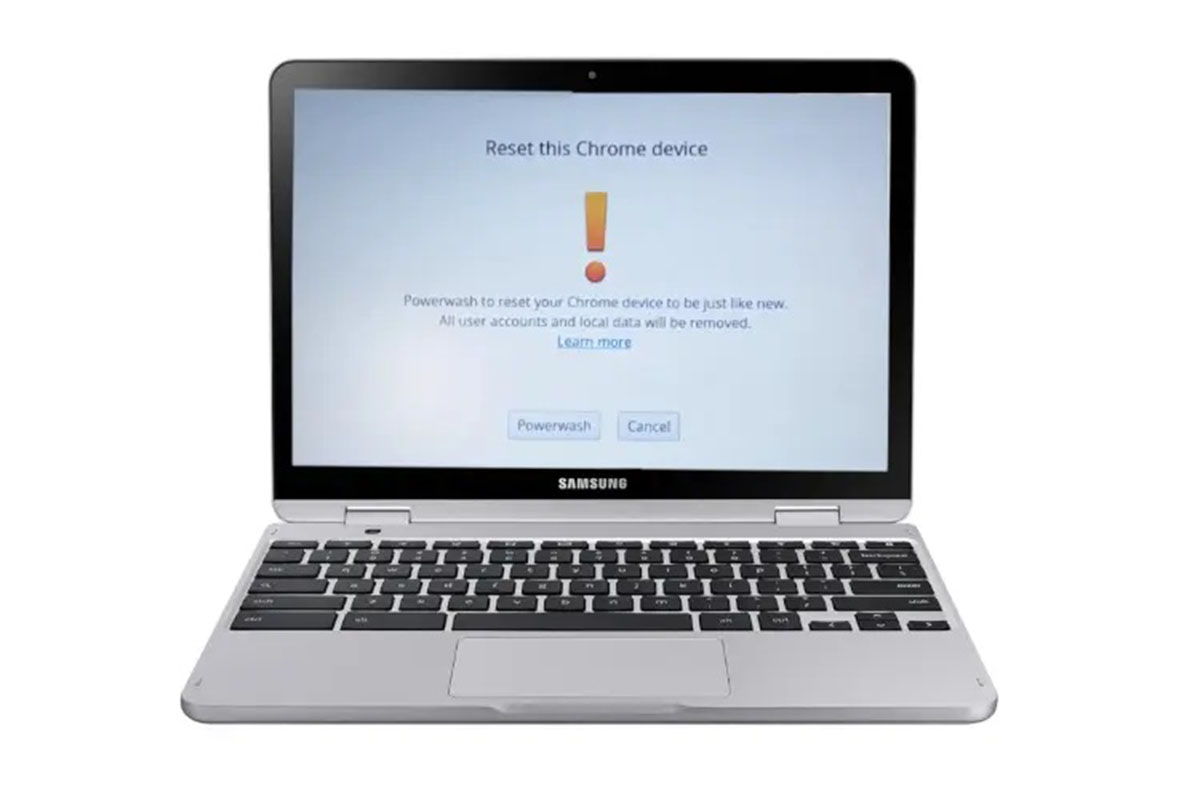
- A pop-up window will appear with the heading “Powerwash your Chromebook.
- Read the information provided in the pop-up window to understand the implications of performing a factory reset.
- To confirm that you want to proceed with the factory reset, click on the “Reset” button.
After clicking the “Reset” button, your Dell Chromebook will begin the process of erasing all data and settings, reverting it to its original factory state. This process may take some time, so be patient and do not interrupt it.
It’s worth noting that on some Chromebook models, you may need to enable Developer Mode or access the settings menu to find the factory reset option. Consult your Chromebook’s user manual or the Dell support website for specific instructions on how to access the factory reset option for your model.
Once the factory reset is complete, your Dell Chromebook will restart and be ready for the next step, which is setting it up again.
Step 4: Perform the factory reset
After accessing the factory reset option and confirming your intention to proceed, it’s time to perform the actual reset on your Dell Chromebook. Follow these steps to complete the process:
- Your Chromebook will automatically restart and begin the factory reset process. During this time, you might see a progress bar indicating the status of the reset.
- Wait for the reset process to finish. The duration can vary depending on the model and the amount of data being erased.
- Once the reset is complete, your Dell Chromebook will restart again.
When the Chromebook reboots, it will resemble a brand new device, with all personal information and settings erased. You will be prompted to go through the set-up process, similar to when you first got your Chromebook.
Please note that the factory reset process will remove all the data, including apps, extensions, and customizations from your Chromebook. It is crucial to have a backup of any important files or data before proceeding with this step.
If you encounter any difficulties or error messages during the factory reset, consult the Dell support website or contact their customer support for further assistance.
Following this step, you are ready to move on to the final step of setting up your Dell Chromebook again.
Step 5: Set up your Dell Chromebook again
After performing the factory reset on your Dell Chromebook, it’s time to go through the setup process to get your device up and running again. Follow these steps to set up your Chromebook:
- Choose your language preferences and click on the “Continue” button.
- Select your Wi-Fi network from the available options and enter the password to connect to the internet.
- Review and accept the terms of service and privacy policy.
- Sign in to your Google account by entering your email address and password. This will restore your Chromebook’s sync settings, bookmarks, and extensions if they were backed up to your Google account previously.
- Set up any additional preferences, such as enabling Google Assistant or configuring the touchpad settings.
- Follow the prompts to customize your Chromebook, such as choosing a profile picture or setting up a PIN for easy sign-in.
- Once you have completed the setup process, your Dell Chromebook is ready to be used again.
Take this opportunity to reinstall any apps or extensions that you had previously on your Chromebook. You can do this through the Chrome Web Store or by accessing your previously installed apps and extensions from your Google account.
If you encountered any issues during the setup process or have any questions, don’t hesitate to consult the Dell support website or reach out to their customer support for further assistance.
With your Dell Chromebook now set up and restored to its default settings, you can enjoy a fresh and optimized user experience.
Conclusion
Performing a factory reset on your Dell Chromebook can be a valuable solution to address software glitches, improve performance, or prepare your device for sale or donation. By following the step-by-step guide outlined in this article, you can safely and effectively reset your Chromebook to its original factory settings.
Remember, before initiating the reset process, it’s crucial to back up any important data to prevent permanent loss. Take advantage of cloud storage services, external storage devices, or third-party backup solutions to securely store your files.
Additionally, ensure that you sign out of your Google account to protect your privacy and prevent unauthorized access to your personal information. Following these precautions will help you have a smooth and worry-free factory reset experience.
Once the reset is complete, you can set up your Dell Chromebook again by going through the initial setup process. This allows you to customize your device, reinstall apps and extensions, and restore your sync settings from your Google account.
If you encounter any difficulties or have specific questions regarding your Dell Chromebook model, refer to the Dell support website, user manual, or reach out to their customer support for further assistance.
By effectively performing a factory reset, you can enjoy a fresh start with your Dell Chromebook, ensuring optimal performance and a clean user experience.