Introduction
Welcome to the guide on how to factory reset a Chromebook. If you’re experiencing performance issues, software glitches, or you simply want to start fresh, a factory reset can help restore your device to its original state. This process wipes all the data on your Chromebook and reinstalls the operating system, giving you a clean slate to work with.
A factory reset can be a bit intimidating for those who are unfamiliar with the process. But fear not, as this guide will walk you through the steps required to perform a factory reset on your Chromebook. We’ll cover everything from backing up your data to performing the reset and restarting your device.
Before we dive into the details, it’s important to note that a factory reset will erase all the files, settings, and customizations on your Chromebook. Make sure to back up any important data you want to keep before proceeding. Once the reset is complete, you’ll need to set up your Chromebook again and reinstall any necessary applications and extensions.
Whether you’re looking to troubleshoot an issue or simply want a fresh start, a factory reset can be a great solution. So let’s get started and learn how to factory reset your Chromebook step by step!
Understanding the Factory Reset Process
Before we jump into the step-by-step instructions, let’s take a moment to understand what a factory reset actually does. When you perform a factory reset on your Chromebook, you are essentially restoring it back to its original settings as if it just came out of the factory.
This process is useful in a variety of situations. If your Chromebook is experiencing frequent crashes, slowing down, or exhibiting unusual behavior, a factory reset can often help resolve these issues. It’s also a good option if you plan to sell or give away your Chromebook, as it ensures that all your personal information and data are completely erased.
During a factory reset, the Chromebook’s operating system (Chrome OS) is reinstalled, removing any software glitches or conflicts that may have arisen over time. Additionally, all user accounts, files, and settings are erased, leaving you with a clean slate.
It’s important to note that a factory reset only affects the software and settings on your Chromebook. It does not affect the firmware or hardware of the device. So if you’re experiencing hardware issues, a factory reset may not be the solution.
Before proceeding with a factory reset, ensure that you have backed up any important data, as it will be permanently deleted during the process. Additionally, be prepared to reinstall any necessary applications and extensions after the reset is complete.
Now that we have a clear understanding of what a factory reset entails, let’s move on to the step-by-step process of performing a factory reset on your Chromebook.
Step 1: Backing Up Your Data
Before you begin the factory reset process, it’s crucial to back up any important data on your Chromebook. Since the reset will erase all files, including documents, photos, and videos, creating a backup ensures that you don’t lose any valuable information.
There are a few different options for backing up your data on a Chromebook:
- Google Drive: One of the easiest and most convenient methods is to upload your files to Google Drive. If you already have a Google account, you have 15GB of free storage to use. Simply drag and drop your files into Google Drive or use the Backup and Sync application to automatically sync specific folders.
- External Storage Devices: If you have a USB flash drive or an external hard drive, you can copy your files onto the storage device. Connect the device to your Chromebook, locate the files you want to back up, and copy them to the external storage.
- Cloud Storage Services: Aside from Google Drive, there are other cloud storage services like Dropbox, OneDrive, and Box that you can use to back up your files. Install the respective application on your Chromebook and upload your files to their servers.
Remember to check that your backup is complete and accessible before proceeding with the factory reset process. Once you have made sure that all your important data is safely backed up, you can confidently move on to the next step.
Step 2: Accessing the Settings Menu
Once you have backed up your data, it’s time to access the settings menu on your Chromebook to initiate the factory reset process. Here’s how:
- First, click on the clock in the bottom-right corner of the screen to open the system tray.
- In the system tray popup, click on the gear icon labeled “Settings”. This will open the Chrome OS settings menu.
- Alternatively, you can access the settings menu by clicking on your profile picture in the bottom-right corner and selecting “Settings” from the dropdown menu.
Once you have opened the settings menu, you will see a variety of options to customize your Chromebook. We will be utilizing this menu to perform the factory reset.
It’s important to note that depending on the version of Chrome OS and the device you’re using, the interface and layout of the settings menu may vary slightly. However, the general steps should remain the same.
Now that you have accessed the settings menu, you’re one step closer to resetting your Chromebook. In the next step, we will discuss how to enter developer mode if necessary. If you’re already in developer mode, you can skip ahead to Step 4.
Step 3: Entering Developer Mode (if necessary)
Entering developer mode may be necessary depending on your Chromebook model and the specific requirements of your device’s firmware. Developer mode allows you to modify the Chrome OS system and install custom firmware, which can be useful for advanced users and developers.
Here’s how you can enter developer mode:
- Make sure your Chromebook is powered off.
- Press and hold the Esc key and the Refresh key (the one with the circular arrow) located in the top row of your keyboard.
- While holding these keys, press the Power button to turn on your Chromebook.
- Continue holding the Esc and Refresh keys until the “Chrome OS is missing or damaged” screen appears.
- Release the keys, then press Ctrl + D to enter developer mode.
- A warning screen will appear, informing you that entering developer mode will erase all local data on your Chromebook. Read the warning carefully and then press Enter to proceed.
- Your Chromebook will reboot and go through the process of enabling developer mode, which may take several minutes.
Once developer mode is enabled, you will see a “OS verification is OFF” message on the screen. From here, you can continue to the next step to perform the factory reset.
It’s important to note that enabling developer mode will remove the data and user profiles on your Chromebook. Make sure you have backed up any important files before proceeding.
If you don’t need to enter developer mode for the factory reset process, you can skip ahead to Step 4: Performing the Factory Reset.
Step 4: Performing the Factory Reset
Now that you have accessed the settings menu and, if necessary, entered developer mode, it’s time to perform the factory reset on your Chromebook. Here’s how:
- In the Chrome OS settings menu, scroll down to the bottom and click on the “Advanced” section to expand it.
- Scroll further down until you find the “Reset settings” option, and click on it.
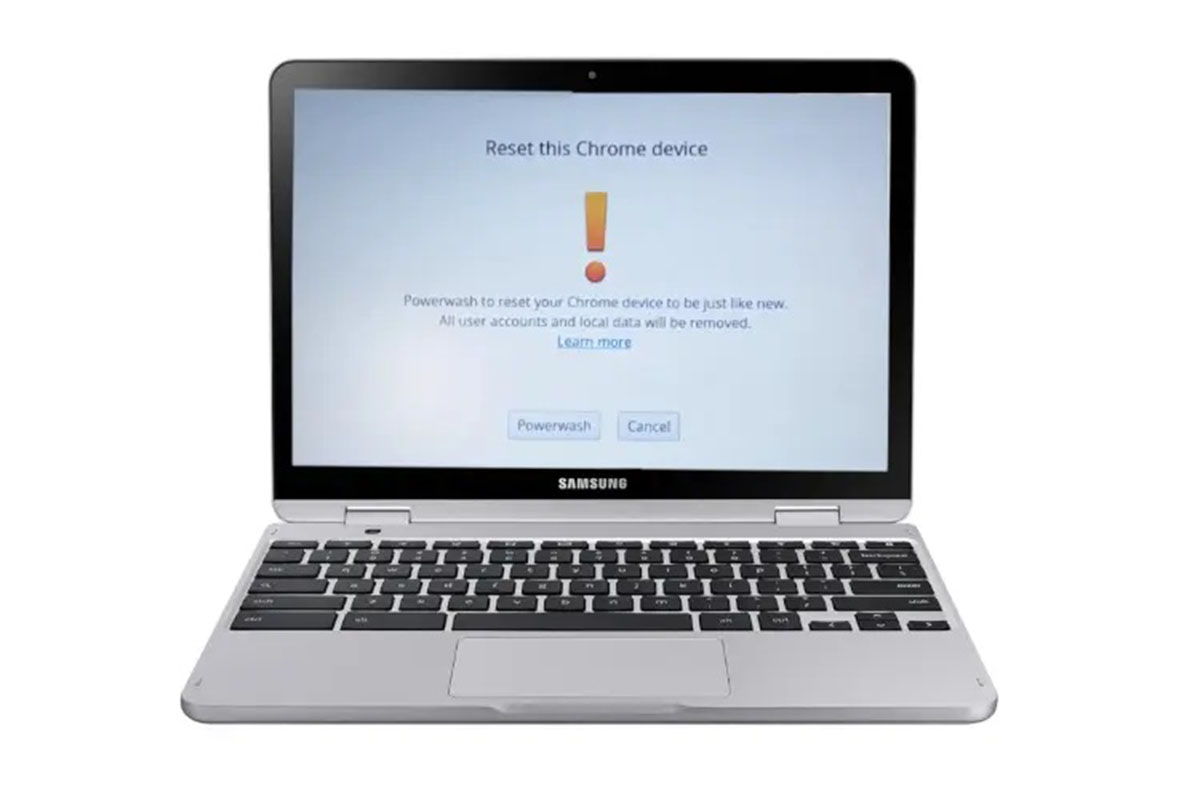
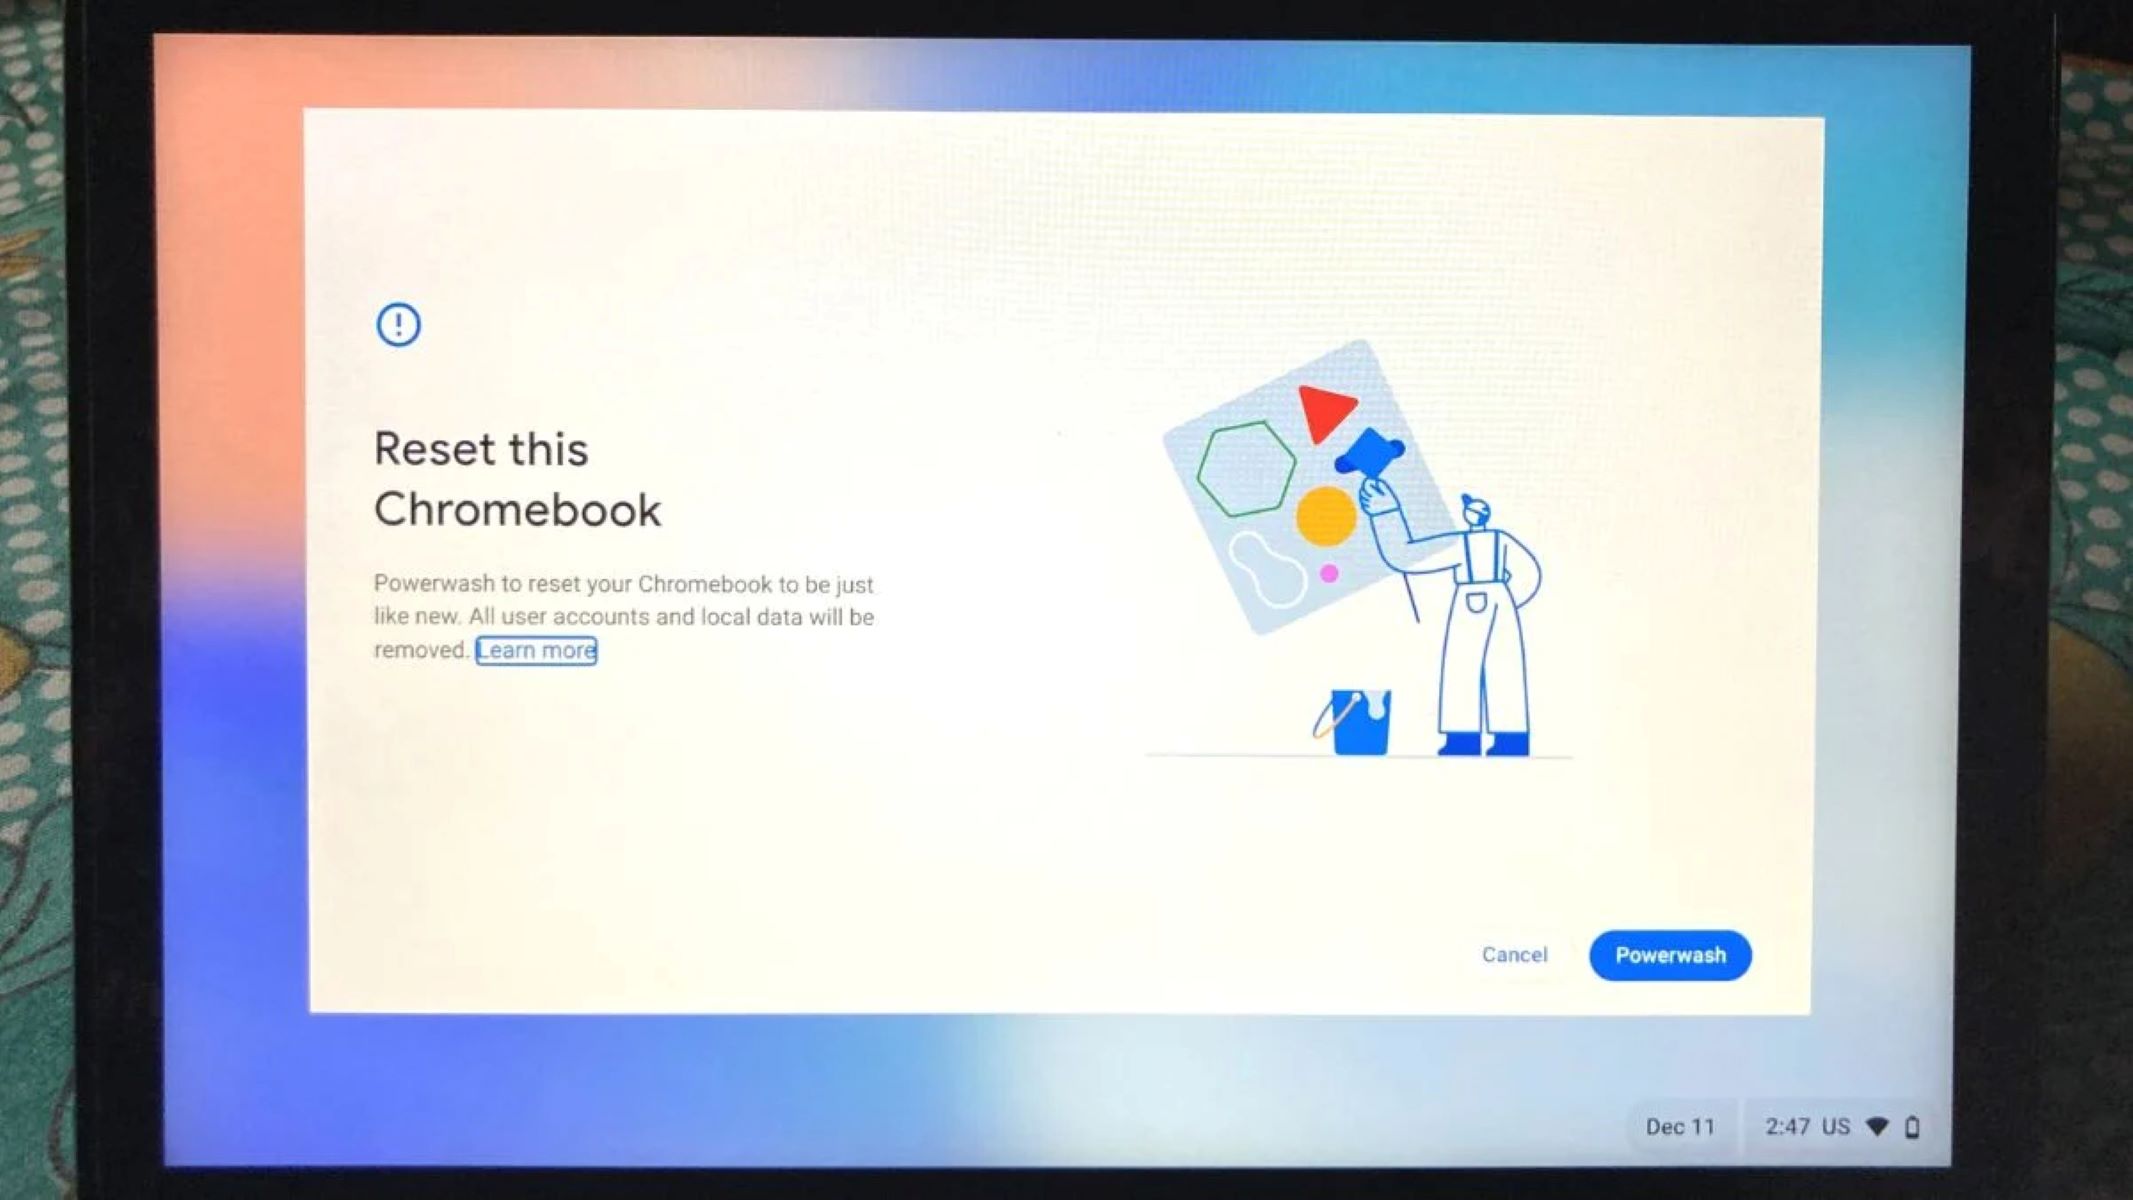
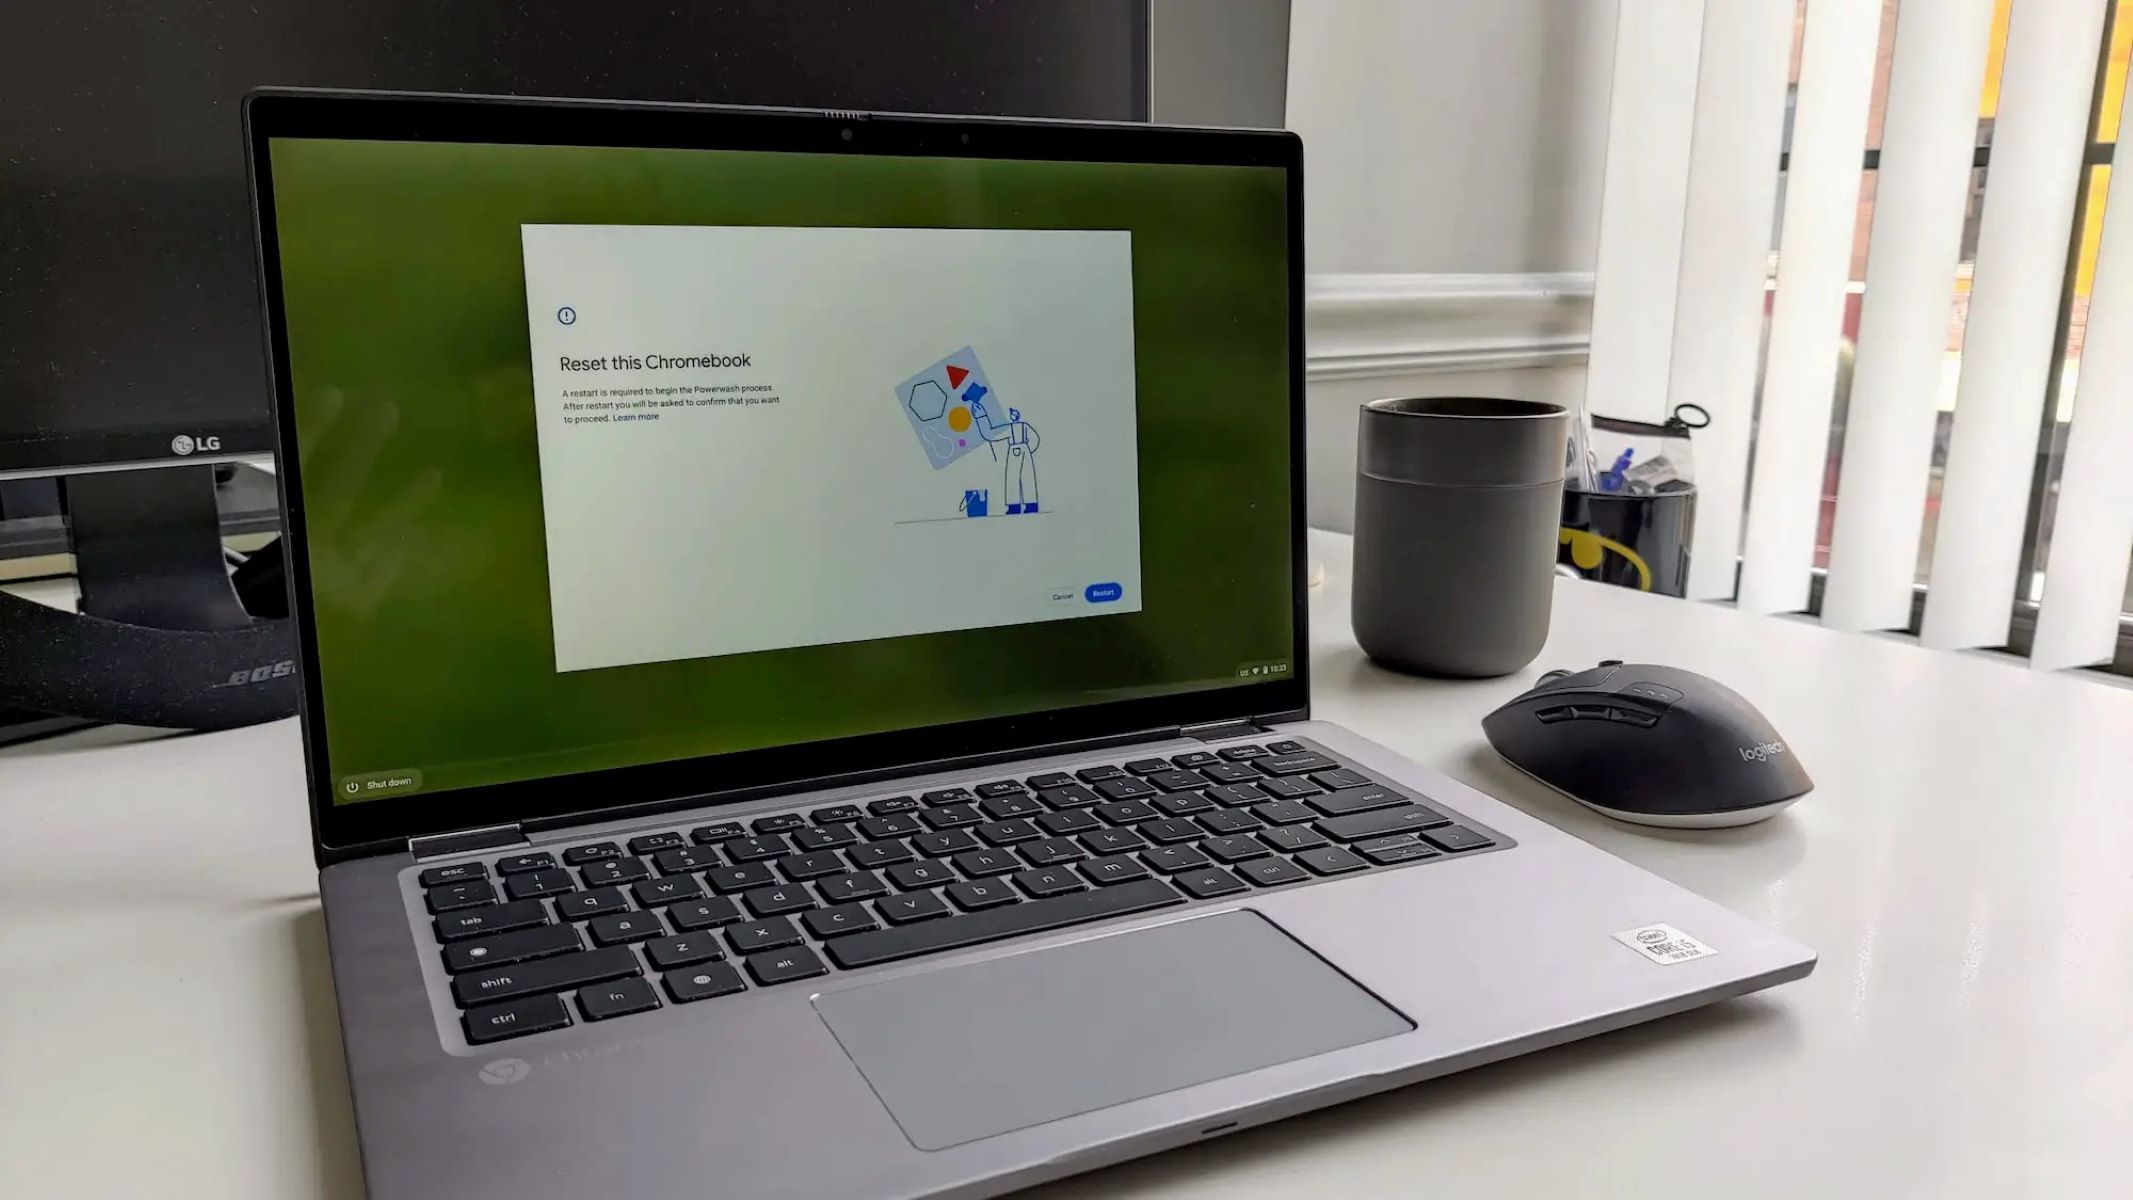
- A new window will appear, giving you the option to reset settings for your Chromebook. Click on the “Powerwash” button.
- A confirmation dialog will pop up, informing you that all of your data will be erased. Carefully review the information and then click on the “Confirm” button to proceed.
- The Chromebook will now begin the factory reset process. This may take a few minutes as the operating system is reinstalled and all user data is wiped.
- During the reset process, your Chromebook may restart multiple times. It’s important to let the process complete without interruption.
- Once the factory reset is complete, your Chromebook will reboot and present you with the initial setup screen.
It’s worth noting that some Chromebook models may have a physical reset pinhole or button on the underside or sides of the device. If you encounter any issues during the factory reset process, consult your device’s manual or the manufacturer’s website for specific instructions on performing a hardware reset.
Now that you have successfully performed the factory reset, you are ready for the final step: restarting your Chromebook.
Step 5: Restarting Your Chromebook
After completing the factory reset process, it’s essential to restart your Chromebook to finalize the changes and ensure that everything is functioning properly. Here’s what you need to do:
- Once the factory reset is complete, your Chromebook will display the initial setup screen.
- Follow the on-screen instructions to configure your language preferences and connect to a Wi-Fi network.
- Next, sign in to your Google account associated with the Chromebook. This will restore your settings and sync your data, if you have enabled sync before the factory reset.
- Continue following the prompts and customize your Chromebook’s settings to your preference.
- Once you have completed the setup process, your Chromebook will be ready to use with a clean slate and restored default settings.
It’s important to note that performing a factory reset removes all installed applications and extensions. You will need to reinstall any necessary apps and extensions from the Chrome Web Store.
Additionally, if your Chromebook was managed by an organization or school, it may be automatically enrolled back into their management system after the factory reset. If you no longer want your Chromebook to be managed, you will need to contact the organization or school’s IT department for further assistance.
With your Chromebook now reset and restarted, it’s time to take advantage of its fresh state and enjoy its optimized performance. Remember to periodically back up your data and perform regular maintenance to keep your device running smoothly.
Congratulations! You have successfully completed the factory reset process on your Chromebook. Whether you were troubleshooting an issue or starting fresh, this guide has provided you with the necessary steps to restore your Chromebook to its original settings.
Conclusion
Performing a factory reset on your Chromebook can be a powerful tool to resolve software issues, erase personal data, or start fresh with a clean slate. Understanding the process and following the step-by-step instructions can help you successfully reset your device.
In this guide, we covered the essential steps involved in the factory reset process. We started with the importance of backing up your data to ensure that no important files are lost during the reset. Then, we walked through accessing the settings menu, entering developer mode if necessary, performing the actual factory reset, and finally, restarting your Chromebook to complete the process.
Remember that a factory reset wipes all data, settings, and customizations on your Chromebook, so it’s essential to back up any important files beforehand. Also, be aware that enabling developer mode and performing a factory reset may have different implications depending on your Chromebook model and the specific firmware requirements.
By following these steps, you can easily restore your Chromebook to its original state and resolve any software-related issues you may have encountered. A factory reset can give you a fresh start, ensuring optimal performance and a seamless user experience.
We hope this guide has been helpful in understanding how to perform a factory reset on your Chromebook. Remember to periodically back up your data, keep your device updated, and enjoy the enhanced performance that comes with a clean and optimized Chromebook.