Introduction
Welcome to the world of Dell Chromebooks! Whether you’re experiencing issues with your device or simply want to start fresh, performing a factory reset can be a helpful solution. A factory reset will restore your Chromebook to its original settings, erasing all data and customized settings you’ve made.
In this guide, we will walk you through the step-by-step process of factory resetting a Dell Chromebook. Following these instructions will ensure that your device is reset to its factory state, allowing you to start anew and potentially resolve any software or performance-related issues.
It’s important to note that a factory reset will erase all locally-stored data on your Chromebook. Therefore, it’s crucial to back up any important files or documents before proceeding with the reset to prevent permanent data loss.
So, if you’re ready to give your Dell Chromebook a fresh start, let’s dive into the process of factory resetting it.
Step 1: Backup Your Data
Before you embark on the factory reset process, it’s essential to safeguard your data by creating a backup. This will ensure that you don’t lose any important files or documents during the reset. Here’s how you can back up your data on a Dell Chromebook:
- Sign in to your Google Account: Ensure that you are signed in to your Chromebook using your Google Account. This will enable you to access and back up your files seamlessly.
- Open the Files App: Locate and open the Files app on your Chromebook. You can find it in the Chrome OS Shelf, which is typically positioned at the bottom of the screen.
- Select Files to Backup: Navigate to the specific files or folders you want to back up. You can use the familiar file explorer interface to browse through your local storage, Google Drive, or any other cloud storage services you have linked to your Chromebook.
- Copy or Move Files: Once you’ve identified the files or folders you wish to back up, you can either copy them to an external storage device, such as a USB drive, or move them to your Google Drive. The choice depends on your preference and the size of the files you’re backing up.
- Verify Backup: After copying or moving your files, double-check to ensure that they are successfully backed up in their respective locations. This extra step will provide you with peace of mind, knowing that your files are securely stored.
By following these simple steps, you can back up your important data before proceeding with the factory reset. Once you’ve completed the backup process, you can move on to the next step of signing out of your Google Account.
Step 2: Sign Out of Your Google Account
Before performing a factory reset on your Dell Chromebook, it is important to sign out of your Google Account. By signing out, you ensure that your personal information and account settings are protected and not accessible by anyone else. Here’s how you can sign out of your Google Account:
- Open Settings: Click on the bottom-right corner of the screen, where the time and date are displayed. Tap on the gear icon to open the Settings menu.
- Access Your Account: In the Settings menu, click on the “Accounts” option to access your Google Account settings.
- Sign Out: Under the “People” section, click on your Google Account name. A pop-up window will appear, giving you the option to sign out. Click on the “Sign out” button to proceed.
- Confirm Sign Out: Another confirmation window will appear, asking if you want to sign out of your Google Account. Ensure that you have backed up any necessary data associated with your account before proceeding. Once you’re ready, click on the “Sign out” button.
That’s it! You have successfully signed out of your Google Account on the Dell Chromebook. Now you can proceed to the next step of powerwashing the device, which will remove all user accounts, apps, and settings from the Chromebook.
Step 3: Powerwash the Chromebook
Powerwashing your Dell Chromebook is a crucial step in the factory reset process. This step will erase all user accounts, apps, and settings from your device, returning it to its original state. Here’s how you can powerwash your Chromebook:
- Access Settings: Click on the bottom-right corner of the screen, where the time and date are displayed. Tap on the gear icon to open the Settings menu.
- Open Advanced Settings: Scroll down in the Settings menu and click on the “Advanced” option.
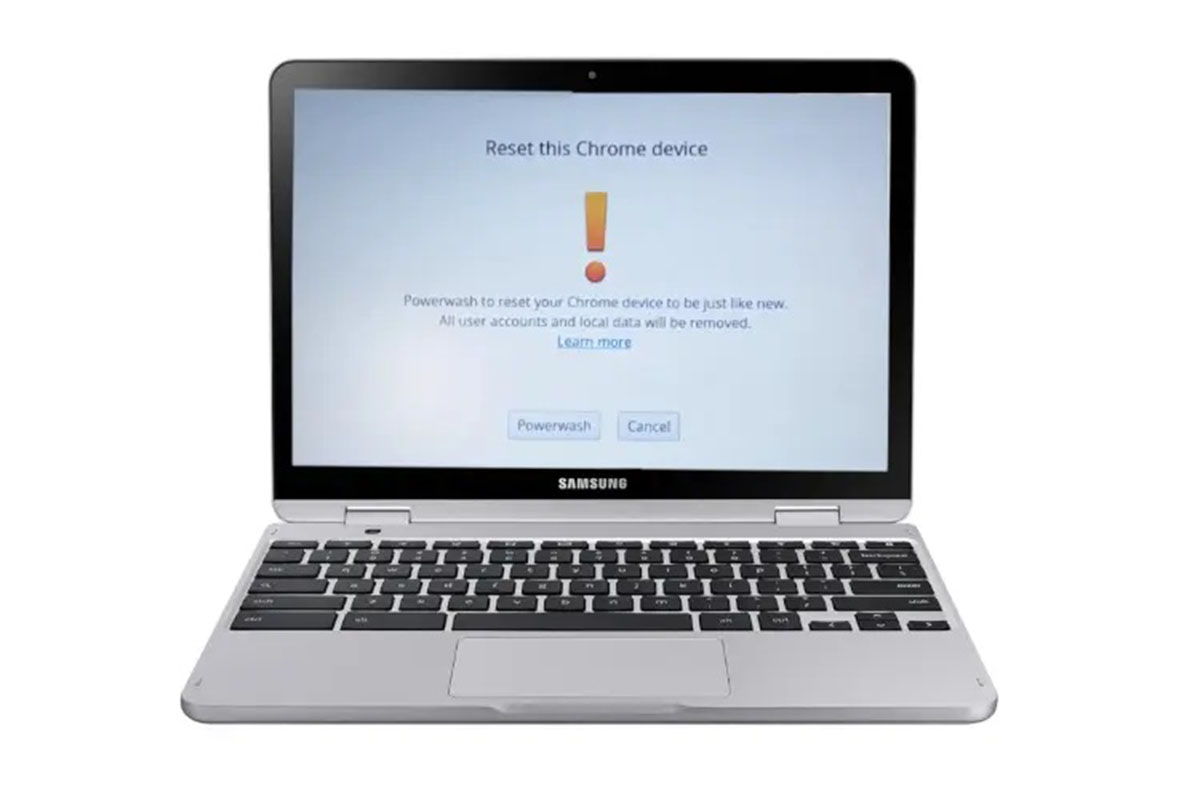
- Locate Powerwash: Under the “Reset settings” section, you will find the “Powerwash” option. Click on “Powerwash” to proceed.
- Confirm Powerwash: A confirmation window will appear, explaining what powerwashing does. Read the information carefully and make sure you have backed up any important data before proceeding. If you’re ready to continue, click on the “Reset” button.
- Complete Powerwash: The Chromebook will now begin the powerwashing process. This will take a few minutes, during which the device may restart. Follow any on-screen prompts, if applicable.
Once the powerwashing process is complete, your Dell Chromebook will reboot and be restored to its original factory settings. This means that all user accounts, apps, and settings will be removed. You are now ready to proceed to the next step of restoring the Chromebook to its factory settings.
Step 4: Restore Chromebook to Factory Settings
After powerwashing your Dell Chromebook, the next step is to restore it to its factory settings. This will ensure that all system configurations are set back to their original state. Here’s how you can restore your Chromebook:
- Power on the Chromebook: Press the power button to turn on your Chromebook. If necessary, follow any on-screen prompts to set up the basic preferences.
- Set Language and Wi-Fi: Select your preferred language and connect to a Wi-Fi network by following the on-screen instructions.
- Accept Terms of Service: Read and accept the Chrome OS terms of service by clicking on the appropriate button.
- Sign in with Your Google Account: If desired, sign in with your Google Account to restore your personalized settings, bookmarks, and saved passwords. If you prefer a completely fresh start, you can skip this step.
- Complete Initial Setup: Follow the on-screen prompts to complete the initial setup process, which may include choosing a profile picture and customizing the Chromebook settings.
- Update Chrome OS: Once you have completed the initial setup, ensure that your Chromebook is up to date by installing any available system updates. This will ensure that your device has the latest security patches and features.
By following these steps, you can successfully restore your Dell Chromebook to its factory settings. This process will remove any remaining trace of your previous usage and provide you with a clean and fresh Chromebook experience.
Step 5: Set Up Your Chromebook Anew
Now that you have successfully restored your Dell Chromebook to its factory settings, it’s time to set it up anew. This step involves customizing your preferences, installing apps, and personalizing your Chromebook experience. Follow these steps to get your Chromebook up and running:
- Sign in with your Google Account: If you skipped signing in earlier, you can do so now to sync your settings, bookmarks, and other data with your Google Account. This will make it easier to access your information across devices.
- Configure System Preferences: Open the settings menu by clicking on the bottom-right corner of the screen and selecting the gear icon. Explore the different options available to customize your Chromebook’s system preferences, such as display settings, keyboard shortcuts, and accessibility features.
- Install Apps from the Chrome Web Store: Open the Chrome Web Store and browse through the various apps and extensions available. Install the applications you need for work, entertainment, or productivity.
- Set Up Peripherals: If you have external peripherals, such as a printer or mouse, connect them to your Chromebook and follow any prompts to set them up and ensure compatibility.
- Adjust Chromebook Settings: Explore the Chromebook settings and adjust them according to your preferences. You can change the wallpaper, customize the taskbar, and modify other settings to make your Chromebook feel personalized.
- Synchronize Your Data: If you previously backed up your data to the cloud or an external storage device, you can now restore your files and documents to your Chromebook. This will ensure that you have access to your important data.
By following these steps, you can set up your Dell Chromebook anew and make it tailored to your needs. Whether it’s installing your favorite apps or adjusting the settings to your liking, customizing your Chromebook will create an optimized and personalized experience for you.
Conclusion
Congratulations! You have successfully factory reset your Dell Chromebook using the step-by-step guide outlined above. By following these instructions, you have restored your Chromebook to its original settings, cleared any software or performance-related issues, and created a fresh start.
Remember, before proceeding with the factory reset, it is important to back up any important data to prevent permanent loss. Take the time to save your files to an external storage device or upload them to the cloud to ensure their safety.
Through the process of backing up your data, signing out of your Google Account, powerwashing the Chromebook, restoring it to factory settings, and setting it up anew, you have rejuvenated your Dell Chromebook and prepared it for a new beginning.
Now, you can enjoy a clean and optimized Chromebook, customize your settings, install your preferred apps, and make it personalized to suit your needs. Whether you use your Chromebook for work, school, or entertainment, having a fresh and efficient device will enhance your overall experience.
If you ever encounter any issues or need to perform a factory reset in the future, refer back to this guide for easy-to-follow steps. Remember to always back up your data and follow best practices to ensure a smooth and successful reset.
Thank you for following this guide, and enjoy your refreshed Dell Chromebook!