Introduction
Welcome to our guide on how to download Zoom on Chromebook. As remote work and online meetings become increasingly popular, Zoom has emerged as one of the leading video conferencing platforms. Chromebook, with its lightweight design and user-friendly interface, is a popular choice for many users. In this article, we will walk you through the step-by-step process of downloading Zoom on your Chromebook, enabling you to participate in virtual meetings and connect with others seamlessly.
With the Zoom app installed on your Chromebook, you can enjoy a wide range of features, including video and audio conferencing, screen sharing, chat messaging, and more. Whether you’re a student attending online classes, a professional collaborating with remote colleagues, or simply looking to stay connected with friends and family, Zoom can help you achieve all of that from the comfort of your Chromebook.
Installing Zoom on a Chromebook is a straightforward process, and we will guide you through each step to make the process hassle-free. So, let’s dive in and get Zoom up and running on your Chromebook!
Step 1: Open the Google Play Store
The Google Play Store is the official app store for Chromebook users, where you can find and download a wide range of applications, including Zoom. To begin, follow these simple steps to open the Google Play Store on your Chromebook:
- Ensure that your Chromebook is connected to the internet.
- Locate and click on the Launcher icon in the bottom left corner of your screen. It is represented by a circle icon with dots inside.
- Once the Launcher opens, you will see a search bar at the top. Type “Play Store” or “Google Play Store” into the search bar.
- As you type, you will see suggestions appearing below the search bar. Click on the option that says “Play Store” or “Google Play Store” to open it.
- The Google Play Store will now open, displaying various apps and categories.
Great! You have successfully opened the Google Play Store on your Chromebook. Now, let’s move on to the next step and search for the Zoom app.
Step 2: Search for Zoom
Now that you have the Google Play Store open on your Chromebook, it’s time to search for the Zoom app. Follow these steps to find and locate the Zoom app in the Play Store:
- Once you are in the Google Play Store, you will see a search bar at the top of the screen. Click on the search bar to activate it.
- Type “Zoom” into the search bar and press Enter or click on the magnifying glass icon to initiate the search.
- The Play Store will now display a list of search results related to “Zoom”. Look for the official Zoom app, which is marked with the Zoom logo.
- You may find other apps with similar names, but it’s important to choose the official Zoom app developed by Zoom Video Communications Inc.
It is always recommended to download and install the official Zoom app to ensure a seamless and secure experience. Once you have located the official Zoom app, proceed to the next step to install it on your Chromebook.
Step 3: Install the Zoom App
Now that you have found the official Zoom app in the Google Play Store, it’s time to install it on your Chromebook. Follow these simple steps to download and install the Zoom app:
- On the Zoom app page in the Play Store, click on the “Install” button.
- A pop-up window will appear, informing you of the permissions required by the Zoom app. Click on “Accept” to proceed with the installation.
- The app will now begin downloading and installing on your Chromebook. The progress will be displayed on the screen, and you can see the app’s icon appearing in the app shelf at the bottom of the screen.
- Once the installation is complete, you will see a notification confirming that the Zoom app has been installed successfully.
Congratulations! You have successfully installed the Zoom app on your Chromebook. Now, let’s move on to the next step and learn how to open and set up Zoom on your Chromebook.
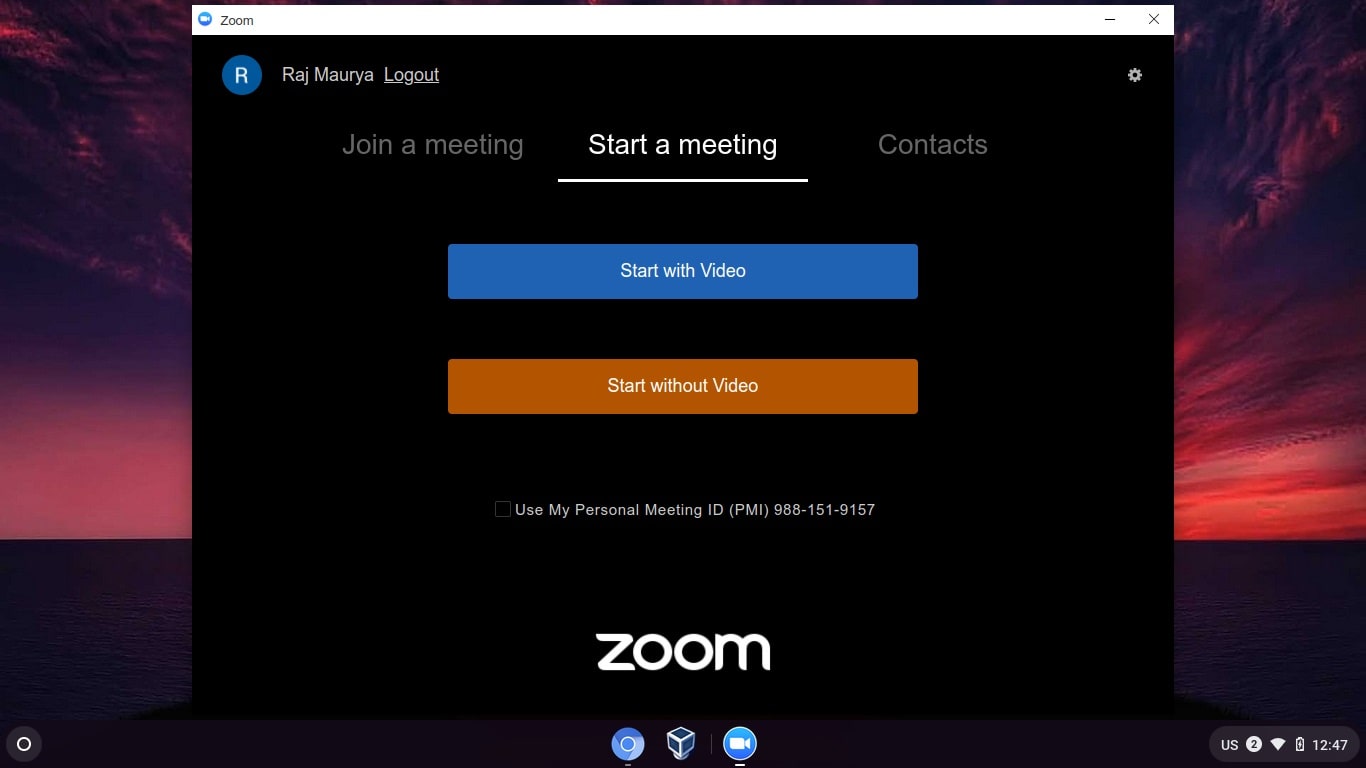
Step 4: Open Zoom on Chromebook
With the Zoom app successfully installed on your Chromebook, it’s time to open the app and start using it. Follow these steps to open Zoom on your Chromebook:
- Locate the Zoom app icon on the app shelf at the bottom of your screen. It is represented by a blue and white icon with the letter “Z” in the center.
- Click on the Zoom app icon to launch the application.
- Alternatively, you can also open the app by typing “Zoom” in the search bar of the Launcher and selecting the Zoom app from the search results.
- Upon opening the Zoom app, you will be presented with the login screen.
If you already have a Zoom account, enter your account credentials (email and password) in the provided fields and click on the “Sign In” button. However, if you don’t have an account yet, click on the “Sign Up Free” or “Sign Up with Google” options to create a new Zoom account.
Once you have signed in or created a new account, you will be ready to use Zoom on your Chromebook. In the next step, we will explore how to sign in or join a meeting using the Zoom app.
Step 5: Sign in or Join a Meeting
Now that you have opened the Zoom app on your Chromebook, it’s time to sign in to your Zoom account or join a meeting. Follow these steps to sign in or join a meeting in Zoom:
- If you have already signed in to your Zoom account, you will be directed to the main dashboard of the Zoom app.
- To join a meeting, click on the “Join” button on the main dashboard.
- Enter the Meeting ID or Personal Link Name provided by the meeting organizer.
- Optionally, you can also enter your display name to be shown to other meeting participants if prompted.
- Click on the “Join” button to enter the meeting.
- If you want to sign in to your Zoom account, click on the “Sign In” button on the main dashboard.
- Enter your Zoom account credentials (email and password) in the provided fields.
- Click on the “Sign In” button to log in to your account.
Once you have signed in or joined a meeting, you will be able to access all the features and functionalities of Zoom on your Chromebook. In the next step, we will explore how to adjust Zoom settings to optimize your experience on Chromebook.
Step 6: Adjust Zoom Settings on Chromebook
After signing in or joining a meeting on Zoom using your Chromebook, you may want to customize the app settings to suit your preferences and optimize your experience. Here are the steps to adjust Zoom settings on Chromebook:
- Click on your profile picture or initials at the top right corner of the Zoom app window.
- A dropdown menu will appear. Click on “Settings” to access the Zoom settings.
- In the settings window, you will find various tabs on the left-hand side to navigate different settings categories.
- Explore the different settings tabs, such as General, Audio, Video, and more, to customize Zoom based on your preferences.
- You can adjust settings such as your audio and video devices, meeting preferences, virtual background, and more.
- Make the desired changes to the settings as per your requirements.
- Once you have made the necessary adjustments, you can close the settings window by clicking on the “X” at the top right corner.
By adjusting the Zoom settings on your Chromebook, you can tailor the app to your liking and optimize your meetings and video conferences. In the final step, we will explore how to use Zoom on your Chromebook and start collaborating with others.
Step 7: Start Using Zoom on Chromebook
Now that you have adjusted the Zoom settings on your Chromebook, you are ready to start using Zoom for virtual meetings, video conferences, and more. Here are a few key steps to get you started with using Zoom on your Chromebook:
- To host a meeting, click on the “New Meeting” button on the main dashboard of the Zoom app.
- Set up the meeting options, such as whether to have video on or off, and whether to enable audio for participants upon joining.
- Click on the “Start Meeting” button to initiate the meeting.
- You can then invite participants by sharing the meeting ID or the meeting link.
- To join a scheduled meeting, click on the “Meet & Chat” tab on the main dashboard.
- Select the upcoming meeting from the list and click on the “Join” button.
- During a meeting, you can utilize various features such as screen sharing, chat messaging, virtual backgrounds, and more.
- When you are done with the meeting, click on the “End Meeting” button to conclude the session.
Zoom on your Chromebook offers a user-friendly interface and a wide array of collaboration tools. As you explore the app, you’ll find many features and options to enhance your virtual meetings and interactions.
Now that you are familiar with the steps to download, install, and use Zoom on your Chromebook, you can enjoy seamless and high-quality video conferencing and stay connected with colleagues, friends, and family.
Start utilizing Zoom on your Chromebook and experience the convenience and flexibility of virtual communication.
Conclusion
Congratulations! You have successfully learned how to download, install, and use Zoom on your Chromebook. With Zoom, you can participate in virtual meetings, attend online classes, collaborate with colleagues, or simply stay connected with friends and family.
Throughout this guide, we walked you through the step-by-step process of downloading the Zoom app from the Google Play Store, installing it on your Chromebook, and adjusting the Zoom settings to optimize your experience.
Remember, Chromebook provides a lightweight and user-friendly platform for using Zoom, making it convenient to participate in video conferences from anywhere with an internet connection.
Whether you are a student attending virtual classes, a professional working remotely, or seeking to connect with loved ones, Zoom on your Chromebook offers a seamless and feature-rich experience.
So, go ahead and start using Zoom on your Chromebook to enjoy the benefits of virtual communication. Explore the various features, such as screen sharing, chat messaging, and video conferencing, to enhance your interactions and collaborations.
Stay connected, conduct productive meetings, and make the most out of the Zoom platform on your Chromebook!