Introduction
Welcome to the world of video conferencing with Zoom! In this digital age, communication has taken on a whole new dimension, and Zoom has rapidly become one of the go-to platforms for virtual meetings, webinars, and online collaborations. Whether you are a professional looking to connect with colleagues or a student attending virtual classes, Zoom provides a user-friendly and feature-rich experience.
With its easy-to-use interface and robust set of tools, Zoom has revolutionized the way we communicate remotely. Gone are the days of traditional conference calls where conversations were limited to audio only. Zoom allows you to see and interact with participants through video, making virtual meetings feel more personal and engaging.
This article will guide you through the essentials of using Zoom, from getting started with creating an account to troubleshooting common issues. Whether you’re a beginner or an experienced user, this guide will help you navigate the various features and settings of Zoom, ensuring that your virtual meetings run smoothly.
So, if you’re ready to step into the world of Zoom and unlock the full potential of virtual communication, let’s dive in and explore the amazing features and functionalities this platform has to offer!
Getting Started
Before you can start using Zoom, you’ll need to set up an account. Follow these steps to get started:
- Visit the Zoom website at zoom.us and click on the “Sign Up, It’s Free” button.
- Enter your email address and click on “Sign Up.” You can also sign up using your Google or Facebook account.
- Check your email for a confirmation message from Zoom and click on the link provided to activate your account.
- Once your account is activated, you can sign in to Zoom using your email and password.
Now that you have a Zoom account, you can start hosting and joining meetings. To make the most of your Zoom experience, consider downloading the Zoom desktop application for Windows or macOS. The desktop app provides additional features and a more streamlined experience compared to using Zoom in a web browser.
To download the Zoom desktop app, follow these steps:
- Sign in to your Zoom account on the Zoom website.
- Click on “Resources” in the top menu bar and select “Download Zoom Client.
- Choose the version that is suitable for your operating system and click on the download link.
- Once the download is complete, open the installer file and follow the on-screen instructions to install Zoom on your computer.
With the Zoom desktop app installed, you’ll have access to all the features and settings available in Zoom, allowing for a more seamless meeting experience.
That’s it! Now you’re all set to start using Zoom and enjoy its advanced features for virtual meetings and collaborations. In the next sections, we’ll delve into more specific aspects of using Zoom, such as scheduling meetings, joining meetings, and exploring the Zoom interface.
Creating an Account
To access the full range of features and host your own meetings on Zoom, you’ll need to create an account. Here’s how you can create a Zoom account:
- Go to the Zoom website at zoom.us and click on the “Sign Up, It’s Free” button.
- Enter your email address in the provided field and click on “Sign Up.” Alternatively, you can sign up using your Google or Facebook account by clicking on the respective buttons.
- If you signed up using your email address, you will receive a confirmation email from Zoom. Open the email and click on the confirmation link to activate your account. If you signed up using your Google or Facebook account, you can skip this step.
- Once your account is activated, you will be redirected to the Zoom website. You’ll need to fill out a short form to complete your profile. Provide your name, choose a password, and click on “Continue.”
- Next, you’ll be prompted to invite others to join Zoom. You can skip this step if you prefer.
That’s it! You have now successfully created a Zoom account. You can start exploring the various features and options available on the Zoom platform.
Keep in mind that the free version of Zoom has some limitations, such as a 40-minute time limit for group meetings of three or more participants. If you anticipate requiring longer meetings or more advanced features, you may want to consider upgrading to a paid plan.
Now that you have an account, you can sign in to Zoom using your registered email address and password. With a Zoom account, you can schedule, host, and join meetings, customize your profile, and access other Zoom features to enhance your virtual collaboration experience.
In the next sections, we’ll explore how to schedule a meeting, join a meeting, and get familiar with the Zoom interface.
Scheduling a Meeting
Scheduling a meeting in Zoom allows you to plan and organize virtual gatherings with ease. Whether it’s a business meeting, a virtual classroom session, or a social gathering, Zoom provides a straightforward process for scheduling meetings. Here’s how to do it:
- Sign in to your Zoom account on the Zoom website or open the Zoom desktop application.
- Click on the “Schedule a Meeting” button, usually located on the home screen or in the Meetings tab.
- Enter a title for your meeting in the “Topic” field. This could be a brief description or a specific name for your meeting.
- Set the date and time for your meeting using the calendar and time options.
- Choose the duration of your meeting. If you have a free Zoom account, keep in mind that group meetings of three or more participants are limited to a maximum of 40 minutes.
- Configure the meeting settings according to your preferences. You can customize settings like enabling or disabling video, audio, and screen sharing options. You can also set a meeting password or enable waiting rooms for added security.
- Once you have set up all the necessary details, click on the “Schedule” or “Save” button to create the meeting.
- After scheduling the meeting, you will be provided with the meeting invitation details, which can be sent to participants via email or shared through other communication channels.
Additionally, Zoom offers integrations with popular calendar applications like Google Calendar and Microsoft Outlook. By linking your Zoom account to your calendar, you can easily schedule and manage Zoom meetings directly from your calendar interface.
By scheduling a meeting in Zoom, you ensure that all participants are aware of the meeting details and can join at the designated time. It provides a structured approach to virtual gatherings, enhancing productivity and collaboration.
In the next section, we’ll explore how to join a meeting in Zoom, whether you are the host or a participant.
Joining a Meeting
Joining a meeting in Zoom is a simple and straightforward process, whether you have received an invitation or have the meeting ID and password. Here’s how you can join a meeting:
- If you have received a meeting invitation via email or any other communication channel, open the invitation and click on the meeting link provided. This will automatically launch the Zoom application or open Zoom in your web browser, depending on your setup.
- If you already have the meeting ID and password, open the Zoom application or go to the Zoom website and click on “Join a Meeting.” Enter the meeting ID and password in the prompted fields.
- Once you have entered the meeting, you will be prompted to choose your audio and video settings. You can select whether to join with or without video and choose your preferred audio source.
- After selecting your settings, click on the “Join” or “Join Meeting” button to enter the meeting.
- If the meeting has not started yet, you may need to wait in a virtual waiting room until the host admits you to the meeting.
If you join a meeting before the host has started it, you will be placed in a waiting room where you can chat with other participants or view any announcements that the host has provided. Once the host starts the meeting, you will automatically be admitted and can begin participating.
Zoom also provides the option to join a meeting via telephone or mobile device audio if you can’t join using your computer. Simply dial the phone number provided in the meeting invitation and enter the meeting ID and password when prompted.
Whether you’re joining a meeting as a host or participant, Zoom offers a range of interactive features such as screen sharing, virtual backgrounds, chat functionality, and more to enhance your meeting experience.
Now that you know how to join a meeting, let’s explore the Zoom interface and its various functionalities in the next section.
Understanding the Zoom Interface
When you join a meeting on Zoom, it’s essential to familiarize yourself with the Zoom interface to make the most of your virtual collaboration experience. Here’s an overview of the key components of the Zoom interface:
- Video and Audio Controls: At the bottom left corner of your screen, you will find controls for enabling or disabling your video and audio. You can toggle your camera on or off and mute or unmute your microphone.
- Participants Panel: Towards the right side of the screen, you will see the Participants panel. Clicking on the “Participants” button will open a panel that displays a list of all meeting attendees. From here, you can manage participant settings, view raised hands, and chat with participants.
- Chat Panel: Next to the Participants panel, you’ll find the Chat button. Clicking on it will open the Chat panel, allowing you to send messages to individual participants or to the entire group. You can also share files and links through the chat window.
- Share Screen: Located in the center-bottom of the screen, the Share Screen button allows you to share your screen with other participants. This feature is particularly useful for presenting slideshows, demonstrating software, or collaborating on documents.
- Meeting Controls: At the bottom center of the screen, you will find a row of meeting controls. These include features such as recording the meeting, managing video layouts, accessing the reactions and emojis, and more.
- Toolbar: Along the top of the screen, you’ll find a toolbar with various options, such as managing video and audio settings, accessing breakout rooms (if enabled), enabling closed captioning, and more.
- End Meeting: To end the meeting, click on the “End Meeting” button located in the bottom-right corner of the screen. Only the meeting host has the authority to end the meeting for all participants.
As a meeting participant, it’s important to be mindful of the Zoom interface and utilize the various features to enhance communication and collaboration. Familiarize yourself with the different controls and functionalities available so that you can actively participate and make the most of your Zoom meetings.
In the next sections, we’ll delve deeper into specific features, such as adjusting audio and video settings, sharing your screen, and recording a meeting.
Audio and Video Settings
Zoom provides a range of audio and video settings that allow you to customize your meeting experience and ensure optimal communication with other participants. Let’s explore some of the key audio and video settings in Zoom:
Audio Settings:
- Microphone: Click on the microphone icon in the bottom left corner of the Zoom interface to mute or unmute your microphone. You can also access audio settings to choose a different microphone or adjust the volume levels.
- Speaker: By clicking on the speaker icon, you can adjust the volume of your speakers or headphones. You can also choose a different audio output source if desired.
- Test Audio: Before entering a meeting, you have the option to test your audio settings to ensure they are working correctly. Click on the “Test Speaker and Microphone” button in the audio settings to perform a quick audio test.
- Joining Audio: When joining a meeting, you can choose to join with computer audio or dial in using your telephone. The meeting invitation usually provides the necessary dial-in numbers and access codes.
Video Settings:
- Start/Stop Video: Determine whether your video is visible to other participants by clicking on the video icon in the bottom-left corner of the Zoom interface. You can start or stop your video feed based on your preference.
- Video Settings: Click on the arrow next to the video icon to access video settings. Here, you can choose your preferred video source, adjust video settings such as exposure and brightness, and select a virtual background, if available.
- Virtual Background: Zoom offers the option to use virtual backgrounds to enhance your video presence, mask your surroundings, or add some fun to your meetings. You can select a virtual background image or video from the video settings menu.
Within the audio and video settings, you can also access additional options such as adjusting the audio and video settings for screen sharing, optimizing video for low-bandwidth situations, and enabling the original sound mode for higher audio quality.
Remember to test your audio and video settings before entering a meeting to ensure everything is functioning correctly. By customizing your audio and video settings in Zoom, you can create a more immersive and productive meeting experience.
In the next section, we’ll explore how to share your screen in Zoom, allowing you to present slideshows, documents, and other content to meeting participants.
Sharing Your Screen
Screen sharing is a powerful feature in Zoom that allows you to share your computer screen with meeting participants. Whether you need to present a slideshow, demonstrate a software application, or collaborate on documents, screen sharing facilitates seamless communication and collaboration. Here’s how to share your screen in Zoom:
- During a meeting, locate the “Share Screen” button in the Zoom interface. It is typically located at the center-bottom of the screen.
- Click on the “Share Screen” button to open a menu with various screen sharing options.
- Select the specific screen or application window you want to share. You can choose to share your entire screen, a specific application window, or even a whiteboard for collaborative drawing sessions.
- Enable the option to share computer sound if you need to play audio from your screen.
- Click on the “Share” button to start sharing your screen with the meeting participants.
Once you begin screen sharing, the Zoom interface will display a floating toolbar that allows you to control the sharing experience. You can pause, stop, or switch between shared screens or applications through this toolbar.
As the host, you have additional control over screen sharing capabilities. For example, you can control whether participants can share their screens, give remote control of your screen to participants, or limit screen sharing to specific individuals.
During a screen sharing session, meeting participants will be able to see what you are sharing on their screens. They can also use the chat feature or participate in audio discussions while the screen sharing is ongoing.
Remember to stop screen sharing once you have finished presenting or collaborating. Simply click on the “Stop Share” button in the sharing toolbar or on the “Stop Share” option in the Zoom interface to end the screen sharing session.
Screen sharing is a powerful tool that enhances remote collaboration and allows for effective presentations and demonstrations. Take advantage of this feature in Zoom to engage participants and communicate more effectively in your virtual meetings.
In the next section, we’ll explore how to record a meeting in Zoom, providing the option to capture important discussions, presentations, or training sessions for future reference.
Recording a Meeting
Zoom offers the ability to record your meetings, allowing you to capture important discussions, presentations, or training sessions for future reference. Recording a meeting in Zoom is a straightforward process, and it provides the flexibility to review or share the recorded content later. Here’s how you can record a meeting:
- Once you have joined a meeting, locate the “Record” button in the Zoom interface. It is usually located in the meeting controls bar at the bottom of the screen.
- Click on the “Record” button to open a menu with recording options.
- Select whether you want to record the meeting to your computer or to the Zoom cloud. If you choose the cloud option, your recorded meeting will be saved online and can be accessed later.
- Once you have chosen your recording location, the recording will start automatically. A red dot indicator will be displayed in the top-left corner of the Zoom interface to indicate that the meeting is being recorded.
- Throughout the meeting, you can continue with your discussions and presentations as usual. The recording will capture everything that is displayed on the screen, including video, audio, and any shared content.
- When you are ready to stop the recording, click on the “Stop Recording” button or the “End Meeting” button in the Zoom interface to end the meeting and stop the recording.
- If you have chosen to save the recording to your computer, it will be saved in the designated location on your device. If you have recorded to the Zoom cloud, the recording will be processed and made available in your Zoom account’s cloud recording section.
It’s important to note that if you’re the host of the meeting, you have control over whether participants can record the meeting or not. You can also enable advanced recording settings, such as recording separate audio files for each participant for easier post-meeting editing.
By recording your meetings in Zoom, you have the flexibility to review the discussions, share them with absent participants, or use them for reference in the future. It’s a valuable feature that enhances the documentation and retention of important information.
In the next section, we’ll explore how to manage participants in Zoom, allowing you to control who can join your meetings and manage participant settings during a meeting.
Managing Participants
Managing participants in Zoom gives you control over who can join your meetings, as well as allows you to control participant settings during a meeting. This feature is particularly useful when hosting large meetings, webinars, or classes. Let’s explore some of the ways you can manage participants in Zoom:
Admitting Participants:
- Waiting Room: When enabled, the waiting room feature allows you to review and admit participants before they can join the meeting. This adds an extra layer of security and control by preventing unauthorized access.
- Admit All: If you have participants waiting in the waiting room, you can quickly admit all of them at once by clicking on the “Admit All” button.
- Individual Admit: Alternatively, you can admit participants individually by clicking on the “Admit” button next to their name in the Participants panel.
Participant Settings:
- Mute/Unmute Participants: As the host, you have the ability to mute or unmute participants in a meeting. This can be helpful in managing background noise or ensuring that only designated speakers have access to the microphone.
- Raise Hand: Participants can use the “Raise Hand” feature to indicate that they have a question or something to contribute. As the host, you can see participants who have raised their hand and manage the discussion accordingly.
- Chat and Emojis: Zoom provides a chat feature that allows participants to send messages. You can control whether participants can chat with everyone, only the host, or no one. Emojis can also be used to express reactions and engagement.
- Assigning Co-Hosts: If you have co-hosts or co-moderators assisting you in managing the meeting, you can assign them co-host privileges. Co-hosts have additional capabilities, such as managing participants and controlling certain meeting features.
Managing participants in Zoom provides a level of control and organization during your meetings. It allows you to ensure a smooth and productive session by managing audio, engaging participants through chat, and preventing unwanted disruptions.
Furthermore, as the host, you can control specific meeting settings, such as disabling attendee-to-attendee private chat or restricting screen sharing for participants. These settings can be adjusted to suit the needs and dynamics of your meeting.
In the next section, we’ll explore how to use the chat and emojis feature in Zoom, providing an additional means of communication and engagement during your meetings.
Using Chat and Emojis
The chat and emojis feature in Zoom provides an additional means of communication and engagement during your meetings. It allows participants to exchange messages, share links, and express reactions using emojis. Let’s explore how you can utilize the chat and emojis feature in Zoom:
Chat Feature:
- Public Chat: Participants can send messages that are visible to everyone in the meeting. This is useful for general announcements, questions, or collaborative discussions.
- Private Chat: Zoom also offers the option of private chat, allowing participants to send messages to specific individuals without the rest of the participants seeing them. This feature can be useful for one-on-one conversations or sharing confidential information.
- File Sharing: Using the chat feature, participants can also share files, documents, or links with the entire group or specific individuals. This facilitates collaborative work and sharing of resources during the meeting.
Emojis:
- Reactions: Zoom provides a range of emojis that can be used to express reactions or feedback during the meeting. Participants can use emojis to give a thumbs-up, clap, express laughter, or show agreement or disagreement.
- Nonverbal Feedback: Emojis can serve as a nonverbal way for participants to contribute to the conversation without interrupting the flow. For example, participants can raise their hand emoji to indicate they have a question or need to speak.
The chat and emojis feature can enhance your meeting experience by allowing participants to engage with one another, ask questions, provide feedback, or share resources. It provides an additional channel for communication, particularly in larger meetings where it may be challenging for every participant to speak verbally.
As the host, you have control over the chat settings. You can choose to allow or disable public or private chat, control who participants can chat with, and manage the ability to share files or links. Depending on the nature of your meeting, you can customize these settings to ensure a productive and focused discussion.
Utilizing the chat and emojis feature in Zoom fosters collaboration, encourages engagement, and provides an avenue for participants to contribute to the meeting in a nonverbal manner.
In the next section, we’ll explore how to use breakout rooms in Zoom, enabling small group discussions or activities within a larger meeting.
Using Breakout Rooms
Breakout rooms in Zoom offer a valuable feature for facilitating small group discussions or activities within a larger meeting. Whether you need to divide participants into smaller teams, conduct brainstorming sessions, or provide focused group work, breakout rooms allow for a more interactive and engaging meeting experience. Let’s explore how you can use breakout rooms in Zoom:
Enabling Breakout Rooms:
- As the host, ensure that breakout rooms are enabled in your Zoom settings. You can do this by logging into your Zoom account on the web and navigating to the “Settings” section.
- During a meeting, click on the “Breakout Rooms” option in the Zoom toolbar. This will open a Breakout Rooms panel.
- Click on the “Create Breakout Rooms” button to automatically assign participants to breakout rooms. Alternatively, you can manually assign participants to specific breakout rooms.
- Choose the number of breakout rooms you need based on the size and requirements of your meeting. You can also set a time limit for the breakout sessions if desired.
- Click on the “Open All Rooms” button to automatically move participants into their assigned breakout rooms.
Managing Breakout Rooms:
- Joining Breakout Rooms: As the host, you have the ability to join any of the breakout rooms to check on participants, provide guidance, or answer questions.
- Automatic or Manual Closing: You can choose to either manually close the breakout rooms or set a timer for automatic closure. This helps ensure that participants return to the main meeting after the designated breakout session time.
- Recalling Participants: As the host, you can recall participants from their breakout rooms back to the main meeting at any time. This is useful when you want to wrap up the breakout session or move on to the next agenda item.
- Breakout Room Assignments: If needed, you can reassign participants to different breakout rooms during the meeting. This allows you to alter groupings or accommodate any changes in the meeting flow.
Breakout rooms provide a valuable opportunity for participants to engage in more focused discussions, collaborative work, or team-building exercises. They encourage active participation, foster peer interaction, and allow for more in-depth exploration of topics or tasks.
As the host, it’s important to provide clear instructions and guidelines for participants before starting breakout sessions. This ensures that everyone understands the goals and expectations of the breakout activities.
Using breakout rooms in Zoom adds an interactive and collaborative element to your meetings, allowing for more dynamic and engaging discussions among participants.
In the next section, we’ll explore how to change the virtual background in Zoom, giving you the ability to customize your video background during meetings.
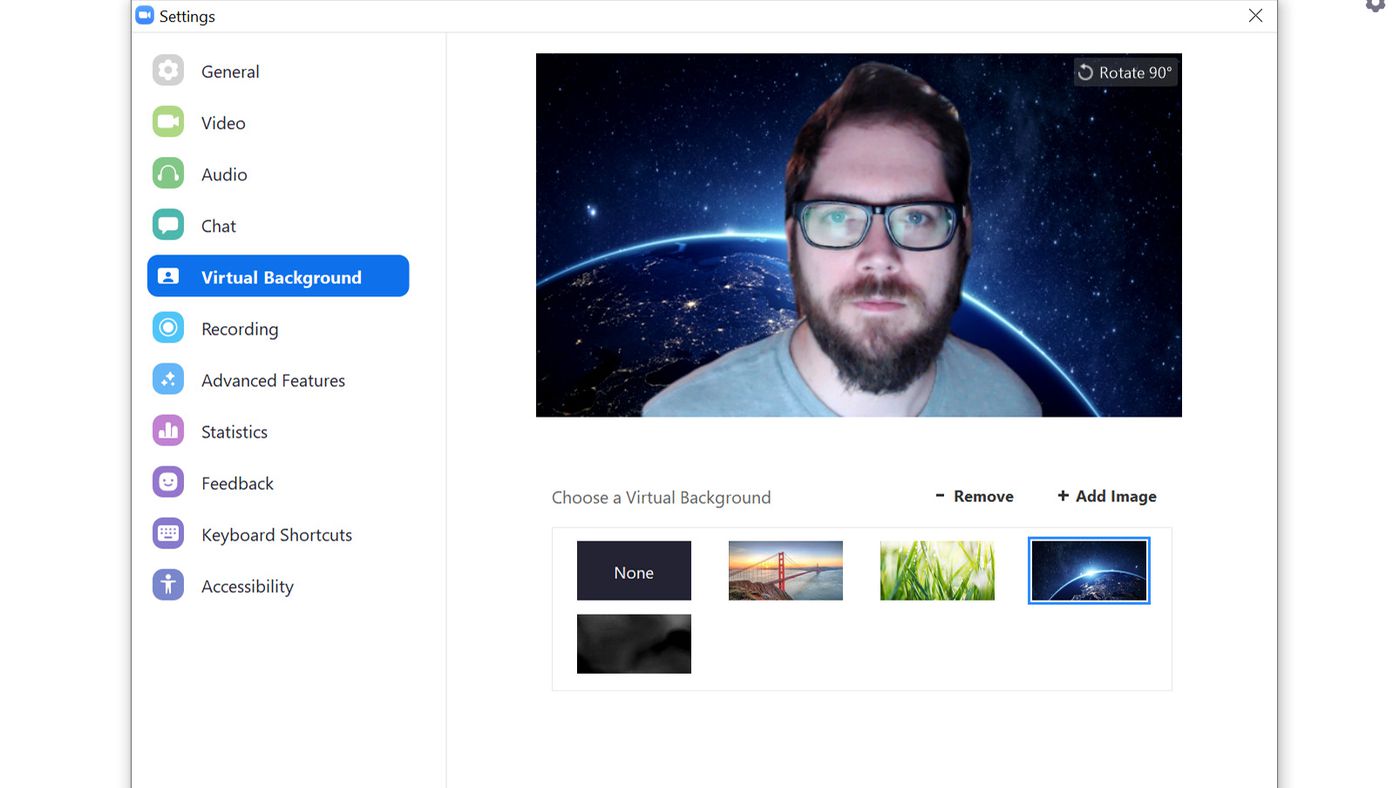
Changing the Virtual Background
Zoom offers a fun and creative feature called virtual background that allows you to change your video background during meetings. By using virtual backgrounds, you can add a touch of personalization or professionalism to your video calls. Let’s explore how you can change the virtual background in Zoom:
Selecting a Virtual Background:
- Ensure that you have the Zoom desktop application installed on your computer. The virtual background feature is not available in the web version of Zoom.
- Sign in to your Zoom account and join or start a meeting.
- Click on the “^” arrow next to the “Stop Video” button in the Zoom toolbar at the bottom of the screen.
- A dropdown menu will appear. Click on the “Choose Virtual Background” option.
- You will be presented with a selection of preloaded virtual backgrounds. You can choose from these or click on the “+” button to upload your own image or video as a virtual background.
- Select the desired virtual background by clicking on it. You can preview how you appear with the virtual background before applying it.
Tips for Using Virtual Backgrounds:
- Choose the Right Background: Select a virtual background that matches the type of meeting or the atmosphere you want to create. You can choose professional backgrounds, scenic landscapes, or even use a branded backdrop for a more cohesive appearance.
- Consider Lighting: Lighting can affect the quality of your virtual background. Make sure you have adequate lighting to avoid shadows or poor visibility when using a virtual background.
- Use a Green Screen: For the best results, consider using a physical green screen. This allows Zoom to more accurately detect the outline of your body and provide a seamless virtual background experience.
- Avoid Busy Backgrounds: Busy or cluttered backgrounds can distract from the main focus of the meeting. Opt for simple, clean backgrounds that do not compete with your presence.
- Test Before a Meeting: Before joining an important meeting, test your virtual background to ensure it appears as intended and doesn’t cause any technical issues.
The virtual background feature in Zoom allows you to personalize your video calls, create a professional image, or add a touch of fun to your meetings. Experiment with different virtual backgrounds to find the style that suits your preferences and enhances your overall meeting experience.
In the next section, we’ll explore how to use Zoom on mobile devices, enabling you to participate in virtual meetings while on the go.
Using Zoom on Mobile Devices
Zoom provides a convenient and user-friendly app for mobile devices, allowing you to participate in virtual meetings, webinars, and online collaborations while on the go. With Zoom on your mobile device, you can stay connected and engaged, even when you’re not at your computer. Here’s how you can use Zoom on mobile devices:
Downloading and Signing In:
- Visit the app store on your mobile device (App Store for iOS or Google Play Store for Android) and search for the Zoom app.
- Download and install the Zoom app on your device.
- Open the Zoom app and sign in using your Zoom account credentials. If you don’t have an account, you can create one directly from the app.
Joining Meetings:
- Meeting ID or Invitation: If you have the meeting ID and password, enter them in the provided fields. Alternatively, you can tap on a meeting invitation link to join a meeting directly.
- Calendar Integration: If you have integrated your mobile device’s calendar with Zoom, you can tap on a meeting reminder in your calendar to join the meeting.
- Upcoming Meetings: In the Zoom app, you can access your upcoming meetings by tapping on the “Meet & Chat” tab. This will display a list of scheduled meetings that you can join with a single tap.
Participating in Meetings:
- Video and Audio: During a meeting, you can enable or disable your video and audio by tapping on the respective icons at the bottom of the screen. You can also switch between front and back cameras if your device supports it.
- Chat and Emojis: The Zoom mobile app allows you to access the chat feature by tapping on the “Chat” icon. From there, you can send messages to all participants or privately to individuals. You can also use emojis to express reactions.
- Screen Sharing: If the meeting host allows, you can share your screen directly from your mobile device. Tap on the “Share Content” option and follow the prompts to share your screen with others.
- Host Controls: If you are the meeting host, you have access to host controls on the mobile app. Tap on the “Participants” icon to manage participant settings, mute or remove participants, or assign co-hosts.
Using Zoom on your mobile device offers flexibility and convenience, allowing you to participate in virtual meetings from anywhere. Whether you’re on a smartphone or tablet, the Zoom app provides a seamless meeting experience.
Remember to have a stable internet connection and find a quiet, well-lit location for the best mobile meeting experience. Additionally, familiarize yourself with the mobile app’s features and interface to navigate the meeting smoothly.
In the next section, we’ll explore how to troubleshoot common issues that may arise while using Zoom.
Troubleshooting Common Issues
While using Zoom, you may encounter common issues that can impact your meeting experience. It’s important to be aware of these issues and know how to troubleshoot them to ensure smooth and uninterrupted virtual communication. Here are some common issues and possible solutions:
Poor Audio or Video Quality:
- Check Your Internet Connection: Ensure that you have a stable internet connection. If your connection is weak, try moving closer to your router or connecting to a different network.
- Close Unnecessary Applications: Close any bandwidth-intensive applications running in the background to optimize your internet connection and allocate resources to Zoom.
- Restart Your Device: Sometimes, a simple restart of your computer or mobile device can resolve temporary audio or video issues.
Audio Echo or Feedback:
- Use a Headset: If you’re experiencing audio echo or feedback, using a headset can help reduce these issues by isolating the audio input and output.
- Mute Participants: If the echo is coming from a specific participant, ask them to mute themselves when they are not speaking.
- Adjust Speaker Volume: Lowering the volume on your speakers or using headphones can help prevent audio feedback caused by sound getting picked up by your microphone.
Unable to Join or Start a Meeting:
- Check Meeting ID and Password: Double-check that you have entered the correct meeting ID and password, if applicable.
- Ensure You’re Using the Correct Link: If you’re joining a meeting from a link, make sure it is the correct invitation link provided by the meeting host.
- Check Firewall or Antivirus Settings: Temporarily disabling firewall or antivirus software can help troubleshoot any potential connection issues. Remember to enable them after troubleshooting.
Unresponsive or Frozen Screen:
- Check Your Internet Connection: A poor or unstable internet connection can cause screens to freeze or become unresponsive. Check your connection and consider reconnecting if necessary.
- Close Unnecessary Applications: Closing resource-intensive applications can free up system resources and prevent screen freezing.
- Restart the Zoom Application: If the screen is frozen, try quitting and relaunching the Zoom application.
If the above troubleshooting steps do not resolve the issue, consult the Zoom Help Center or contact Zoom support for further assistance. They can provide specific guidance based on your situation and help resolve any persistent issues.
Remember to stay updated with the latest version of Zoom and periodically check for updates to ensure that you have access to the latest features and bug fixes.
In this section, we have highlighted some common issues and troubleshooting steps, but it’s always a good idea to refer to official support resources for more detailed assistance.
Conclusion
Zoom has become an essential tool for virtual communication, whether it’s for business meetings, remote learning, or connecting with friends and family. In this article, we have explored various aspects of using Zoom effectively, from getting started with creating an account to troubleshooting common issues.
We covered the basics of setting up a Zoom account, scheduling and joining meetings, and understanding the Zoom interface. We also delved into essential features such as audio and video settings, screen sharing, recording meetings, managing participants, using chat and emojis, utilizing breakout rooms, changing the virtual background, and using Zoom on mobile devices.
Throughout the article, we emphasized the importance of troubleshooting common issues that may arise during Zoom usage. By being aware of these potential obstacles and having some troubleshooting solutions at your disposal, you can overcome challenges and ensure a seamless meeting experience.
Remember to always keep your Zoom application updated to benefit from the latest features, security enhancements, and bug fixes. Additionally, consult the official Zoom Help Center or reach out to Zoom support for more specific guidance if you encounter any persistent issues.
As you continue to use Zoom, explore its features, and adapt to virtual communication, remember to strike a balance between efficiency and creativity. Utilize the various tools and settings to tailor your meetings to your specific needs, while also keeping an engaging and interactive atmosphere.
Zoom has brought people together from all corners of the world, bridging the distance and facilitating meaningful connections. By harnessing its power and understanding its features, you can make the most of this versatile platform.