Introduction
Welcome to the world of Zoom, where virtual meetings have become the new norm. With the increasing reliance on video conferences, it’s essential to know how to access and manage your Zoom recordings. Whether you’re a student attending online classes, a professional participating in virtual meetings, or just someone who wants to save memorable moments, finding and accessing your Zoom recordings is crucial.
Zoom has gained widespread popularity due to its user-friendly interface and robust features. One notable feature is the ability to record meetings, allowing participants to review the discussion or refer back to important details. However, once the meeting is over, you might find yourself wondering, “Where do I find my Zoom recordings?”
In this article, we will explore various methods to locate and retrieve your Zoom recordings. Whether the recordings are saved on your computer or stored in the cloud, we’ll cover all the possible options to ensure you have easy access to your valuable meeting content.
Zoom Meetings and Recordings
Zoom meetings have revolutionized the way we communicate and collaborate remotely. They provide a platform for individuals and teams to connect in real-time, irrespective of their physical locations. With Zoom’s recording feature, you can capture these meetings and revisit them at your convenience.
Recording a Zoom meeting is as simple as clicking a button. Once enabled, Zoom will capture the audio, video, and screen sharing content of the meeting. This feature is particularly useful for participants who may need to review the material covered, take notes, or share the recording with others who were unable to attend the meeting.
When it comes to Zoom recordings, it’s important to note that they can be saved in different locations based on your settings and preferences. These recordings can be stored on your local device or on the Zoom Cloud, depending on the options you choose.
Before we dive into the methods of accessing your Zoom recordings, it’s essential to understand the different types of recordings available:
- Local Recordings: Local recordings are saved on your computer’s hard drive or the device you are using to host the Zoom meeting. These recordings are stored as video files with audio and screen-sharing data combined.
- Cloud Recordings: Cloud recordings are securely saved on the Zoom Cloud, a remote storage facility provided by Zoom. These recordings are accessible through the Zoom web portal and can be easily shared with others.
The availability of these options may depend on your Zoom account type and the settings enabled by your organization or the meeting host. With this understanding, let’s explore the various places you can find your Zoom recordings.
Where to Find Zoom Recordings
After recording a Zoom meeting, the next step is to locate and access the recordings. Here are several common places where you can find your Zoom recordings:
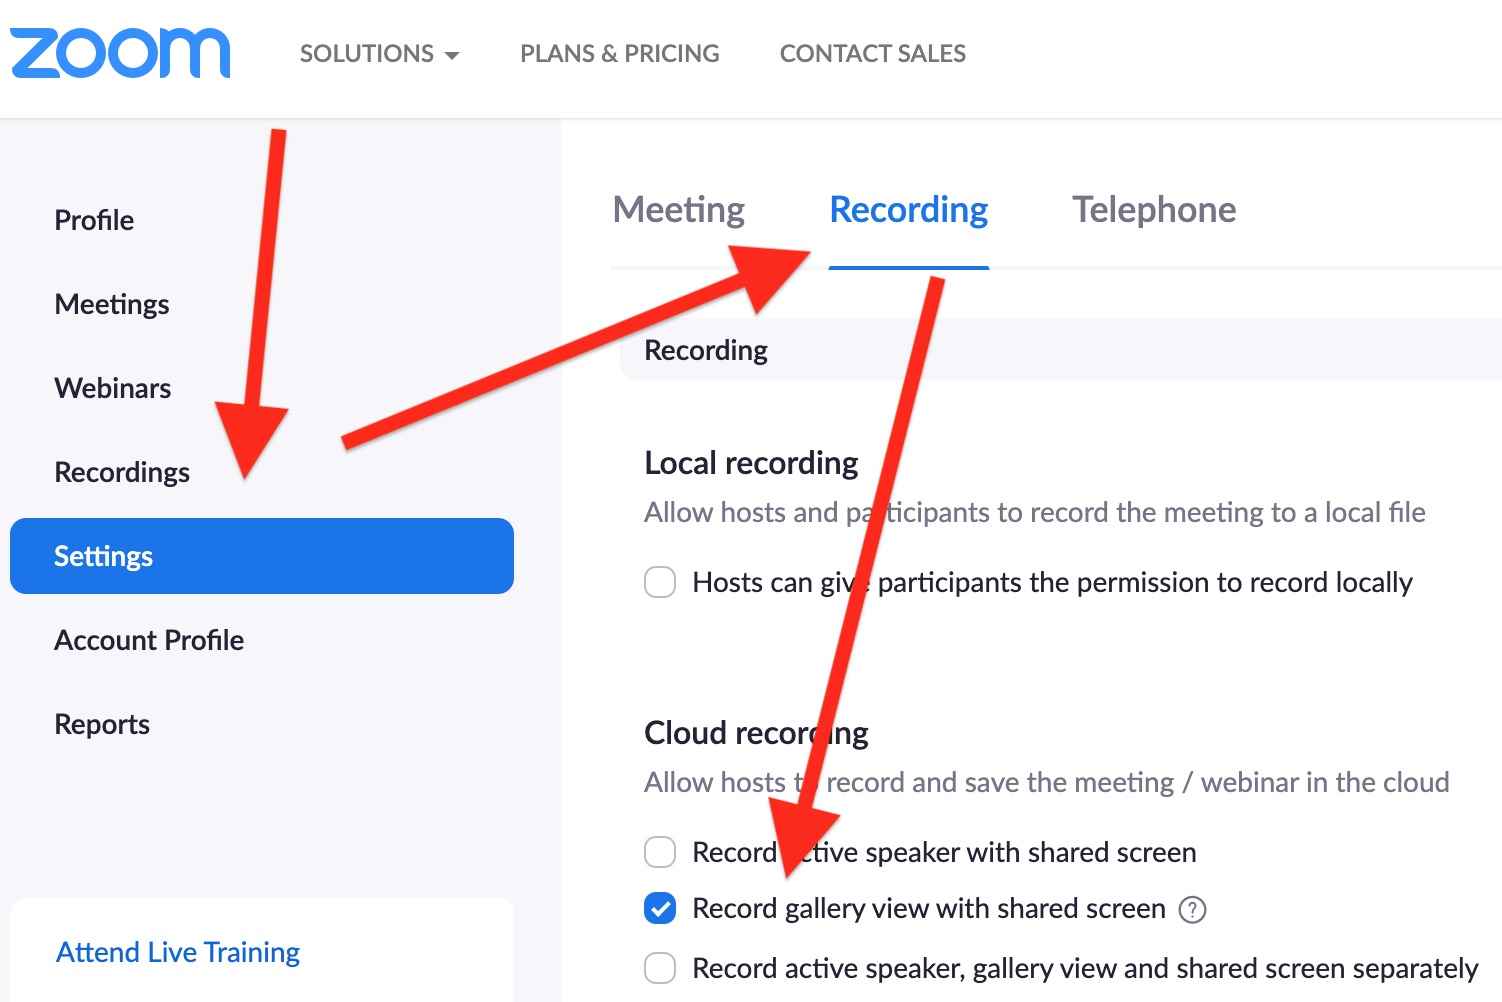
- Zoom Cloud: The Zoom Cloud is a secure online storage option provided by Zoom. If you have enabled cloud recording in your meeting settings, your recordings will be automatically saved to the Zoom Cloud. To access these recordings, log in to your Zoom account through the web portal and navigate to the “Recordings” tab. From there, you can view, download, and share your recordings as needed.
- Local Recordings: If you have enabled local recording in your Zoom settings, your recordings will be saved directly to your computer or device. The default location for local recordings is usually in a designated Zoom folder, but you can choose a specific folder or path during the recording process. Use your file explorer or finder to navigate to the designated location and find your Zoom recordings.
- Shared Drives or Folders: If your organization uses shared drives or folders, it’s possible that your Zoom recordings are saved in these locations. Check with your IT department or colleagues to determine if there are specific folders where Zoom recordings are stored. Access these shared drives or folders, and look for the recordings based on the designated file structure.
- External Storage Devices: If you have chosen to save your recordings on an external storage device, such as a USB drive or an external hard drive, make sure the device is connected to your computer. Use your file explorer or finder to access the device and locate the folder or directory where your Zoom recordings are saved.
- Email Attachments: If someone has shared a Zoom recording with you via email, it’s possible that the recording is attached to the email message. Search your inbox or relevant email folders for any messages containing Zoom recordings. Download the attachment and save it to a location on your computer for easy access.
- Video Hosting Platforms: If you have chosen to automatically send your Zoom recordings to a video hosting platform, such as YouTube or Vimeo, you can find your recordings on these platforms. Log in to your account on the hosting platform and look for the uploaded recordings in your video library.
By checking these various locations, you should be able to locate your Zoom recordings and access them for review or sharing purposes.
Zoom Cloud
If you have opted to save your Zoom recordings to the Zoom Cloud, accessing them is a breeze. Here’s how you can find your recordings in the Zoom Cloud:
- First, log in to your Zoom account through the Zoom web portal using your credentials.
- Once logged in, navigate to the “Recordings” tab located on the left-hand side of the screen. Click on it to access your recorded Zoom meetings.
- On the “Recordings” page, you will find a list of all your recorded Zoom meetings. The recordings are organized by date and time, making it easy to locate the specific meeting you’re looking for.
- Find the recording you want to access, and click on its title or thumbnail to open it.
- Within the recording, you will have various playback options. You can watch the video, listen to the audio, and view any shared screen content that was captured during the meeting.
- If you wish to download the recording to your local device, click on the “Download” button provided. This will save the recording as a video file on your computer or device.
- Additionally, you can choose to share the recording directly from the Zoom Cloud. Click on the “Share” button to obtain a link that you can send to others, allowing them to access the recording without needing a Zoom account.
By utilizing the Zoom Cloud, you have the advantage of secure storage, easy access, and the ability to share recordings with others effortlessly. Make sure to manage your Zoom Cloud storage capacity to ensure you have enough space for your recordings.
Local Recordings
If you have chosen to save your Zoom recordings locally on your computer or device, accessing them is straightforward. Here’s how you can find your local Zoom recordings:
- Open the file explorer (Windows) or finder (Mac) on your computer.
- Navigate to the default Zoom folder where local recordings are typically saved. The exact location may vary depending on your operating system and settings. On Windows, it is often found in the “Documents” folder under a subfolder called “Zoom.” On Mac, it is typically saved in the “Documents” folder under a subfolder labeled “Zoom.” If you have chosen a custom location during the recording process, navigate to that specific directory.
- Once you’ve located the Zoom folder or directory, look for the subfolder that corresponds to the date of the meeting you wish to access. Zoom organizes local recordings by date to make it easier to locate specific meetings.
- Open the folder for the desired meeting date, and you should find the recorded Zoom meeting files inside. These files typically have a .mp4 extension and contain both video and audio content of the meeting.
- Double-click on the recording file to play it using your default video player. The recording will start playing, allowing you to review the meeting content.
- If you want to share the recording with others, you can copy the recording file to a different location, such as a shared drive, email attachment, or external storage device. Right-click on the recording file and select “Copy” or “Cut” from the menu, then navigate to the desired location and paste the file.
By following these steps, you can easily locate and access your locally saved Zoom recordings. Remember to back up your local recordings regularly to prevent accidental loss of important meeting content.
Shared Drives or Folders
If your organization uses shared drives or folders to store important files, it’s possible that your Zoom recordings are saved in these locations. Here’s how you can locate your Zoom recordings in shared drives or folders:
- Consult with your IT department or colleagues to determine if there are specific shared drives or folders where Zoom recordings are stored. They can provide you with the necessary information to access these locations.
- Once you have the details, open the file explorer (Windows) or finder (Mac) on your computer.
- Navigate to the designated shared drive or folder where Zoom recordings are stored. This location may be different depending on your organization’s file structure and naming conventions.
- Look for subfolders or directories within the shared drive or folder that correspond to the appropriate date or meeting names. These subfolders help to organize the recorded Zoom meetings and make it easier to locate specific recordings.
- Open the desired subfolder to access the recorded Zoom meeting files.
- Within the subfolder, you should find the recording files with a .mp4 extension. These files contain both the video and audio content of the recorded Zoom meeting.
- To play the recording, simply double-click on the file, and it will open with your default video player, allowing you to review the meeting content.
- If you need to share the recording with others, you can copy the file from the shared drive or folder to a different location, such as your local device, email attachment, or external storage device. Right-click on the recording file and select “Copy” or “Cut” from the menu. Then navigate to the desired location and paste the file.
By following these steps and utilizing shared drives or folders, you can easily locate and access your Zoom recordings within your organization’s file management system.
External Storage Devices
If you have chosen to save your Zoom recordings on an external storage device such as a USB drive or an external hard drive, accessing them is a matter of connecting the device to your computer. Here’s how you can find your Zoom recordings on external storage devices:
- Plug in your external storage device, such as a USB drive or external hard drive, into an available USB port on your computer.
- Once connected, open the file explorer (Windows) or finder (Mac) on your computer.
- Navigate to the connected external storage device. It should appear as a separate drive or volume in the file explorer or finder.
- Click on the external storage device to open it and access its contents.
- If you have stored your Zoom recordings directly on the root directory of the external storage device, you should see the recording files with a .mp4 extension.
- If you have saved your Zoom recordings in subfolders, navigate through the folder structure until you find the desired recording files.
- To play a recording, double-click on the file, and it will open with your default video player, allowing you to review the meeting content.
- If you need to share the recording with others, you can copy the file from the external storage device to a different location, such as your local device, email attachment, or shared drive. Right-click on the recording file and select “Copy” or “Cut” from the menu. Then navigate to the desired location and paste the file.
By following these steps and connecting your external storage device to your computer, you can easily locate and access your Zoom recordings stored on the device.
Email Attachments
If someone has shared a Zoom recording with you via email as an attachment, finding and accessing the recording is a simple process. Here’s how you can locate your Zoom recordings within your email attachments:
- Open your email client or webmail service and sign in to your email account.
- Using the search bar or filters, locate the email containing the Zoom recording attachment. You can search for keywords related to the meeting or the sender’s name to narrow down the search.
- Once you have found the relevant email, open it to view its contents.
- Look for the attachment icon or link within the email. It is usually represented by a paperclip or a file preview thumbnail.
- Click on the attachment icon or link to download the recording file to your computer or device. Depending on your email client or webmail service, you may have the option to directly open the attachment or save it to a specific folder.
- Choose the appropriate option that suits your needs. If you prefer to play the recording using your default video player, save it to a location on your computer. Otherwise, you can choose to open it directly if your email client allows for media playback in the browser.
- Once downloaded or opened, the recording will be accessible for playback, allowing you to review the Zoom meeting content.
- If you need to share the recording with others, you can forward the email containing the attachment or save the file to a different location, such as a shared drive or cloud storage service. This way, you can easily distribute the recording to the desired recipients.
By following these steps, you can easily locate and access your Zoom recordings that were shared with you via email attachments. Just remember to keep your email inbox organized for easy retrieval of important recordings.
Video Hosting Platforms
If you have chosen to automatically send your Zoom recordings to a video hosting platform, such as YouTube or Vimeo, accessing your recordings is a straightforward process. Here’s how you can find your Zoom recordings on video hosting platforms:
- Open your web browser and navigate to the video hosting platform that you have selected to host your Zoom recordings, such as YouTube or Vimeo.
- Log in to your account on the video hosting platform using your credentials.
- Once logged in, access your video library or dashboard, where all your uploaded videos are stored.
- In your video library or dashboard, you should see a list of all your uploaded videos, including your recorded Zoom meetings.
- Look for the specific recording that you want to access. The videos are usually organized by upload date or in a customizable order determined by your settings and preferences.
- Click on the title or thumbnail of the recording to open it and view the playback options.
- You can watch the recording directly on the video hosting platform’s website by clicking the play button. You may also have the option to adjust the video quality or enable captions if they are available.
- If you want to share the recording, most video hosting platforms provide a shareable link or embedding options. You can copy the link and share it with others via email, messaging apps, or social media platforms.
By utilizing video hosting platforms, you can easily upload, store, and share your Zoom recordings with others. These platforms offer additional features such as privacy settings, video analytics, and customization options to enhance your recording sharing capabilities.
Conclusion
Locating and accessing your Zoom recordings is essential for reviewing important meetings, sharing content with others, and keeping a record of valuable discussions. In this article, we have explored several methods to help you find your Zoom recordings effortlessly.
By utilizing the Zoom Cloud, you can easily access your recorded meetings by logging in to your Zoom account through the web portal. The Zoom Cloud provides secure storage, convenient playback options, and the ability to share recordings with others.
If you have chosen to save your recordings locally, you can locate them on your computer or device by navigating to the default Zoom folder or a designated custom location. These recordings are easily playable using your computer’s default video player.
For organizations that use shared drives or folders, checking these locations may lead you to your Zoom recordings. Collaborate with your IT department or colleagues to access the specific location and find the recordings based on the file structure in place.
If you have saved your recordings on external storage devices, such as USB drives or external hard drives, connecting the device to your computer will allow you to easily access and play the recordings.
Furthermore, if someone has shared a Zoom recording with you via email attachment, locating and accessing the recording is as simple as opening the email and downloading the attachment.
Lastly, if you have chosen to automatically send your recordings to a video hosting platform, such as YouTube or Vimeo, accessing your recordings is easy through the platform’s video library or dashboard.
By keeping these methods in mind, you can quickly locate and access your Zoom recordings, ensuring that you have the necessary files at your fingertips when you need them. Whether it’s for reference, collaboration, or sharing, having easy access to your Zoom recordings will enhance your virtual meeting experience.