Introduction
With the increasing popularity of remote work and virtual meetings, Zoom has become one of the most widely used video conferencing platforms. It allows people to connect and collaborate seamlessly, no matter where they are located. One of the most valuable features Zoom offers is the ability to record meetings, presentations, and webinars.
Being able to save recordings on Zoom is incredibly beneficial for several reasons. First and foremost, it serves as a crucial resource for documentation and reference. By recording your meetings, you can keep a record of important discussions, decisions, and presentations. This is especially helpful for those who may have missed the meeting or need to revisit the content at a later date.
Furthermore, Zoom recordings can be used for training purposes. They allow you to capture demonstrations, tutorials, or workshops that can be shared with colleagues or participants who were unable to attend. These recordings can serve as valuable learning resources for remote teams or individuals seeking to enhance their skills.
Additionally, saving Zoom recordings can be valuable for compliance and legal purposes. Certain industries or organizations may have regulatory requirements or internal policies that necessitate the archiving of important conversations. By recording and saving these meetings, you can ensure compliance and protect yourself or your organization in case of any disputes or misunderstandings.
Now that we understand the importance of saving recordings on Zoom, let’s explore the various options and steps involved in this process. Whether you prefer automatic local recordings, cloud-based storage, or manual saving during meetings, this guide will walk you through the steps to help you effortlessly save your Zoom recordings.
Why is it important to save recordings on Zoom
There are several compelling reasons why it is important to save recordings on Zoom. Let’s take a closer look at some of these reasons:
- Documentation and Reference: Recording your Zoom meetings provides you with a valuable source of documentation and reference. It allows you to capture important conversations, decisions, and presentations in their entirety. This can be extremely useful when you need to recall specific details or refer back to past discussions.
- Flexible Learning Resources: Zoom recordings can be used as powerful learning resources. You can capture demonstrations, tutorials, or workshops, and share them with colleagues or participants who were unable to attend. These recordings serve as valuable learning materials that can be accessed anytime, anywhere.
- Compliance and Legal Requirements: Certain industries or organizations have regulatory requirements or internal policies that mandate the archiving of important conversations. By saving your Zoom recordings, you can ensure compliance and meet any legal obligations. These recordings can also serve as evidence in case of disputes or misunderstandings.
- Increased Collaboration: Saving Zoom recordings promotes collaboration and inclusive communication. Participants who were unable to attend a meeting can review the recording afterwards, keeping everyone on the same page. It also allows teams to revisit past discussions and build upon previous ideas, fostering a collaborative working environment.
- Knowledge Sharing and Training: Recording meetings and presentations can facilitate knowledge sharing and training within your organization. You can capture best practices, new strategies, or important updates, and share them with your team or employees. This can be particularly beneficial for remote teams or individuals seeking to enhance their skills.
The ability to save recordings on Zoom opens up a world of possibilities. It enables you to create a comprehensive record of your virtual meetings, presentations, and webinars. By harnessing the power of these recordings, you can maximize productivity, learning, and collaboration for yourself and your team.
Step-by-step guide to saving recordings on Zoom
Saving your recordings on Zoom is a straightforward process. Whether you prefer automatic local recordings, cloud-based storage, or manual saving during meetings, this step-by-step guide will walk you through each option:
- Option 1: Automatic local recording
- Start a Zoom meeting or webinar as the host.
- Click on the “Record” button at the bottom of the Zoom window.
- From the menu that appears, select the option “Record on this Computer”.
- Continue with your meeting or webinar, and Zoom will automatically save the recording to your computer. After the meeting ends, the recording will be available in the designated folder on your computer.
- Option 2: Recording to the cloud
- Start a Zoom meeting or webinar as the host.
- Click on the “Record” button at the bottom of the Zoom window.
- From the menu that appears, select the option “Record to the Cloud”.
- Continue with your meeting or webinar, and Zoom will automatically save the recording to the cloud.
- Once the meeting ends, you can access the recorded file in the “Recordings” section of your Zoom account.
- Option 3: Manually saving recordings during a Zoom meeting
- Start a Zoom meeting or webinar as the host.
- Click on the “Record” button at the bottom of the Zoom window.
- From the menu that appears, select the option “Record to this Computer” or “Record to the Cloud”.
- When you want to start the recording, click on the “Record” button again.
- To stop the recording, click on the “Stop Recording” button.
- After the meeting ends, the recording will be available in the designated folder on your computer or in the “Recordings” section of your Zoom account.
If you want Zoom to automatically save your recordings to your local computer, follow these steps:
If you prefer to save your Zoom recordings to the cloud, follow these steps:
If you want more control over when to save your recordings during a Zoom meeting, you can manually start and stop the recording. Follow these steps:
By following these steps, you can effortlessly save your Zoom recordings and choose the method that best suits your needs. Now, let’s explore some tips for organizing and managing your Zoom recordings.
Option 1: Automatic local recording
If you prefer the convenience of having Zoom automatically save your recordings to your local computer, follow these simple steps:
- Start a Zoom meeting or webinar as the host.
- Look for the “Record” button located at the bottom of the Zoom window and click on it.
- A menu will appear with different recording options. From the menu, select “Record on this Computer”.
- You can now continue with your meeting or webinar as usual. Zoom will automatically save the recording directly to your computer.
- Once the meeting or webinar ends, you can find the recording in the designated folder on your computer. By default, Zoom saves recordings in the “Documents” or “Zoom” folder, but you may have configured a different location. Check the settings to confirm the save location.
Automatic local recording is a convenient option, as Zoom takes care of saving the recordings seamlessly in the background. It eliminates the need for manual intervention and ensures that you won’t accidentally forget to save an important session.
It is worth noting that automatic local recording requires sufficient storage space on your computer, especially for longer or high-resolution recordings. Ensure that you have enough available storage to accommodate the recordings and avoid any unexpected interruptions during your meetings.
Remember that the recordings will be saved in video file formats, such as MP4 or M4A, and can be easily played using various media players. You can also edit or share these recordings with others as needed.
With the option of automatic local recording, keeping a record of your Zoom meetings becomes effortless. You can confidently facilitate discussions, presentations, or webinars, knowing that Zoom is reliably saving your recordings for future reference.
Option 2: Recording to the cloud
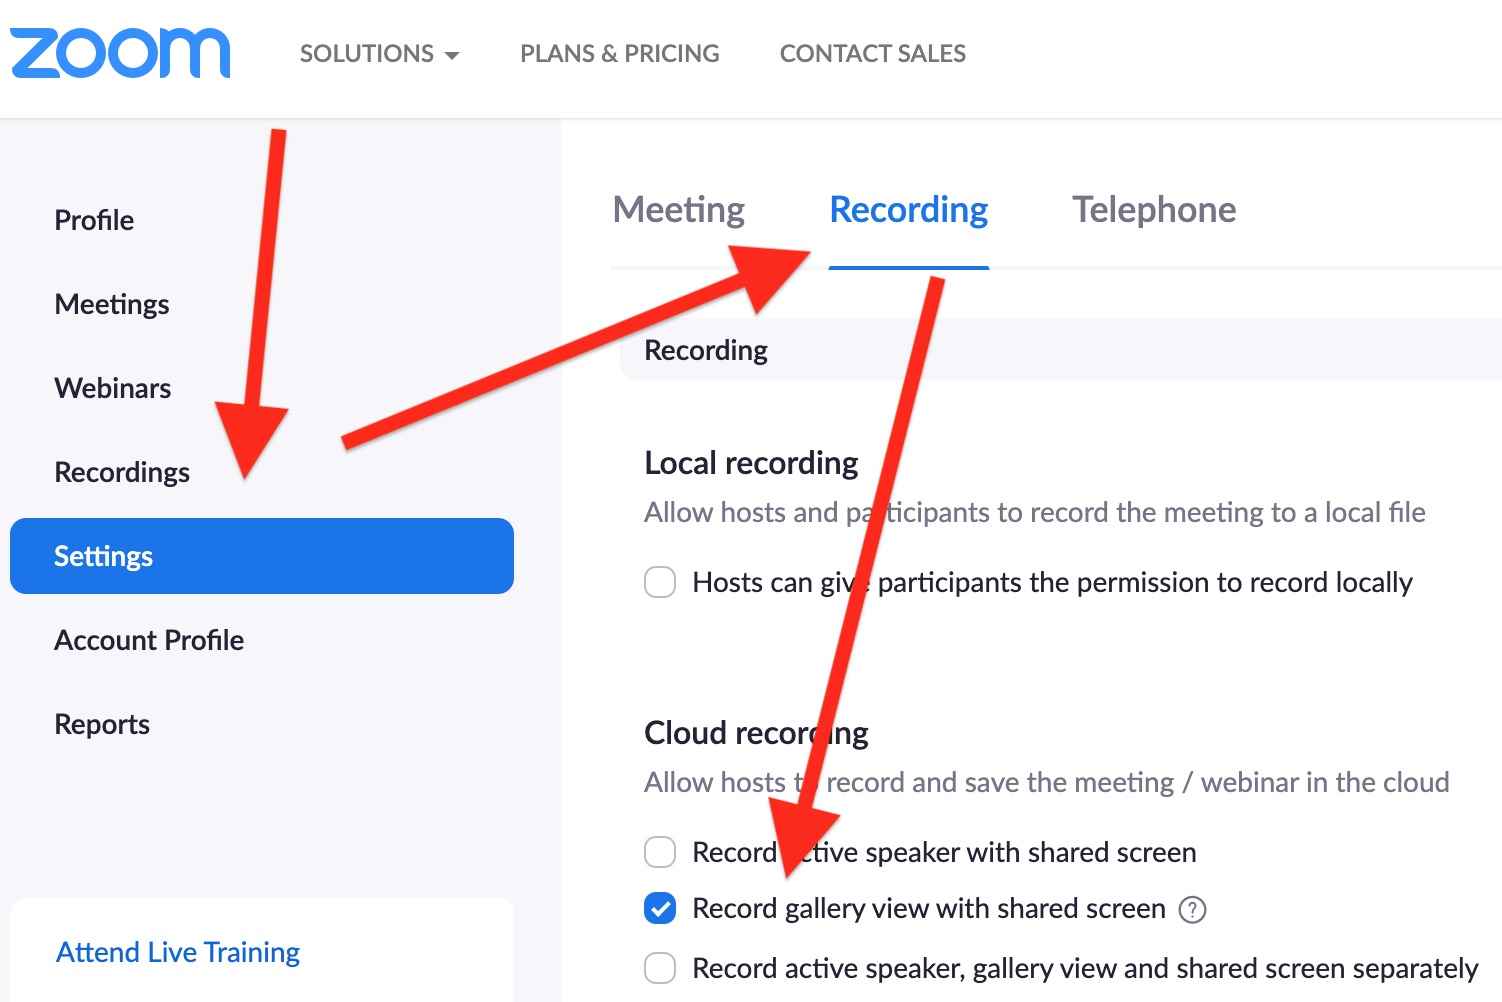
If you prefer to save your Zoom recordings to the cloud, Zoom provides a seamless option for recording and storing your meetings, presentations, and webinars. Follow these steps to enable recording to the cloud:
- Start a Zoom meeting or webinar as the host.
- Look for the “Record” button at the bottom of the Zoom window and click on it.
- From the menu that appears, select the option “Record to the Cloud”.
- Continue with your meeting or webinar as usual, and Zoom will automatically start recording and save the file directly to the cloud.
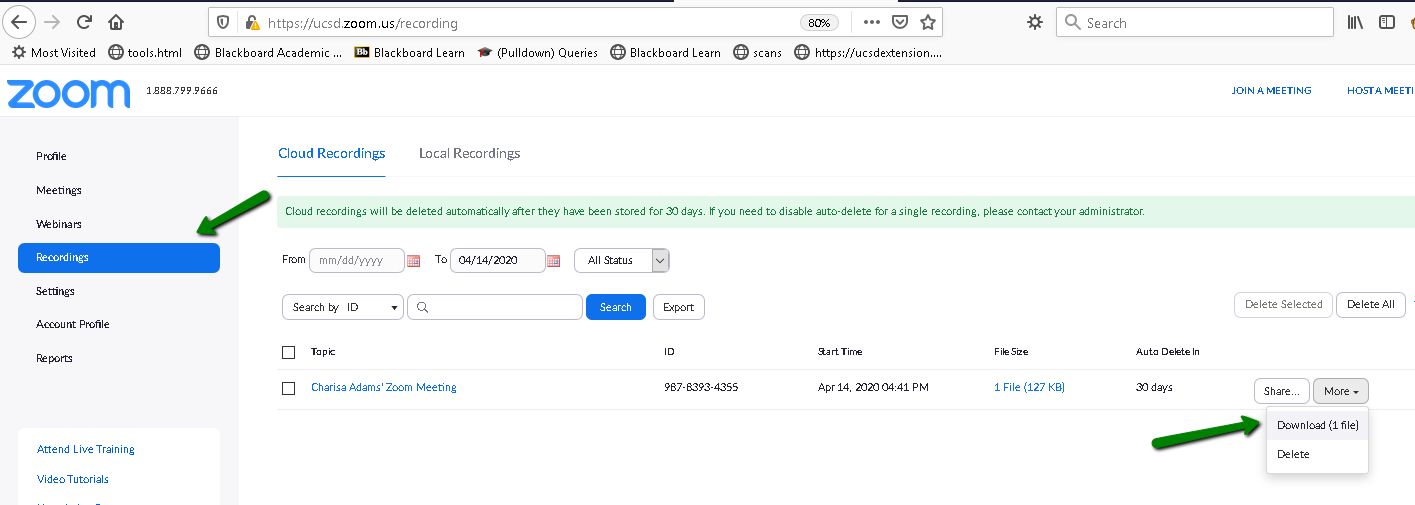
- Once the meeting or webinar concludes, the recorded file will be processed and made available in the “Recordings” section of your Zoom account.
The option to record to the cloud offers several advantages. First, it eliminates the need to store large video files on your local computer, saving valuable storage space. Additionally, recordings saved to the cloud can be easily accessed and shared with others, providing convenient collaboration and seamless knowledge sharing.
With cloud storage, you have the flexibility to access your recordings from any device with an internet connection. This means you can easily review or share your recordings on different computers, smartphones, or tablets, regardless of your physical location.
It’s important to note that recordings saved to the cloud may be subject to storage limitations depending on your Zoom subscription plan. Be mindful of the storage capacity available in your account and manage your recordings accordingly. If necessary, consider downloading and archiving important recordings on your local storage or external drives to free up space in your Zoom cloud storage.
By opting for recording to the cloud, you can enjoy the benefits of secure online storage and accessibility, making it an ideal solution for organizations with distributed teams or individuals who require remote access to their recordings.
Option 3: Manually saving recordings during a Zoom meeting
If you prefer more control over when to save your recordings during a Zoom meeting, you can choose to manually start and stop the recording. Follow these steps to manually save recordings:
- Start a Zoom meeting or webinar as the host.
- Once the meeting has commenced, locate the “Record” button at the bottom of the Zoom window.
- Click on the “Record” button to start recording the meeting.
- During the meeting, you can pause or stop the recording as needed by clicking on the respective buttons that appear on the Zoom interface.
- When you are ready to stop recording, click on the “Stop Recording” button.
- After the meeting concludes, the recorded file will be saved based on the recording option you chose at the beginning of the meeting (local or to the cloud).
- If you selected the option to save the recording locally, you can find the file in the designated folder on your computer. If you opted to save to the cloud, the recording will be processed and made available in the “Recordings” section of your Zoom account.
Manually saving recordings during a Zoom meeting gives you the flexibility to decide when to start and stop recording, allowing you to capture only the portions that are essential or relevant for your needs. This option can be particularly useful when you have intermittent discussions or presentations within a meeting and do not require a continuous recording.
It is important to note that manually saving recordings requires your active participation in monitoring and managing the recording process. Be attentive to your meeting flow and ensure that you start and stop the recording at the appropriate times to capture the desired content.
Additionally, it is advisable to communicate with your meeting participants about the recording process. Inform them if the meeting is being recorded and obtain their consent if necessary, especially in situations where privacy or confidentiality is a concern.
By utilizing the option to manually save recordings during a Zoom meeting, you have more control over the content you capture, ensuring that you record the most relevant portions while preserving privacy and consent among participants.
Tips for organizing and managing Zoom recordings
As you save and accumulate Zoom recordings, it’s important to have a system in place for organizing and managing them effectively. Here are some helpful tips to keep your Zoom recordings organized:
- Create a consistent naming convention: Use a standardized naming convention for your Zoom recordings. Include details such as the date, meeting topic, or participants’ names to easily identify and locate specific recordings.
- Organize recordings into folders: Create folders on your computer or in your cloud storage specifically dedicated to storing Zoom recordings. Categorize them based on projects, departments, or any other relevant criteria to maintain a well-structured recording library.
- Label recordings with keywords and tags: Add descriptive keywords or tags to your Zoom recording files. This will facilitate quick search and retrieval when you need to locate a specific recording based on its content or topic.
- Regularly review and delete unnecessary recordings: Periodically go through your recordings and delete any that are no longer needed. Keeping your recording library clutter-free will make it easier to navigate and find the most relevant recordings when you need them.
- Backup recordings: To safeguard your Zoom recordings, consider implementing a backup strategy. Make copies of your important recordings and store them in separate locations, such as external hard drives or cloud storage services, to prevent loss due to hardware failures or accidental deletions.
- Share recordings securely: When sharing Zoom recordings, be cautious about maintaining privacy and protecting sensitive information. If necessary, consider password-protecting the recordings or sharing them via secure file-sharing platforms to restrict access to authorized individuals.
- Use video editing software: If you need to trim, enhance, or combine parts of your Zoom recordings, consider using video editing software. This can help you create more polished and concise recordings for sharing or archiving purposes.
- Keep track of recording settings: Stay informed about the recording settings available in your Zoom account. Familiarize yourself with the options for recording audio, video, and screen sharing, as well as the storage limits of your plan, to effectively manage your recording needs.
By implementing these tips, you can maintain an organized and manageable collection of Zoom recordings. Whether it’s for future reference, training, or compliance purposes, having a well-organized recording library will save you time and ensure easy access to valuable information.
Conclusion
Saving recordings on Zoom is a valuable feature that allows you to capture and preserve important meetings, presentations, and webinars. Whether you choose automatic local recording, cloud-based storage, or manually saving recordings during a Zoom meeting, each option offers its own benefits and flexibility.
By saving Zoom recordings, you create a comprehensive documentation resource for reference, training, compliance, and collaboration purposes. You can easily revisit past discussions, share knowledge with remote teams, meet regulatory requirements, and enhance learning opportunities.
Remember to follow the step-by-step guide provided to save your recordings based on your preferred option. Automatic local recording offers convenience, while recording to the cloud provides easy accessibility and storage. Manual recording gives you full control over what and when to capture.
To manage your Zoom recordings effectively, apply the tips for organization and management. Establish a consistent naming convention, create folders, label recordings with keywords, regularly review and delete unnecessary recordings, backup your important files, and share recordings securely. Using video editing software can also help you refine your recordings as needed.
With these guidelines, you can make the most of Zoom’s recording capabilities and ensure that your valuable content is organized, easily accessible, and securely stored. Whether for professional or personal use, saving Zoom recordings is a powerful tool for capturing and preserving virtual communication and collaboration.