Introduction
Welcome to the world of Zoom, a powerful video conferencing platform that has revolutionized the way we connect and collaborate remotely. With its seamless features and user-friendly interface, Zoom has become a go-to choice for conducting meetings, webinars, and virtual events. One of the standout features of Zoom is the ability to record your meetings, ensuring that valuable discussions and presentations can be captured for future reference or sharing with absent attendees. However, finding and accessing those recorded meetings may sometimes seem like a daunting task.
In this guide, we will walk you through the steps to easily find and retrieve your Zoom recordings. Whether you are a host looking for a specific meeting recording or a participant wanting to access a session you missed, we’ve got you covered. We will explain how to locate past meetings, find the meeting recording, and provide tips on troubleshooting if you encounter any difficulties along the way.
So, if you’re ready to unlock the treasure trove of recorded Zoom meetings, let’s dive in and explore the various methods to retrieve your valuable content. From accessing your Zoom account to finding and downloading the recordings, we’ll guide you through the process step by step. By the end of this guide, you’ll be an expert in navigating the Zoom platform and locating your recordings with ease.
Accessing Your Zoom Account
Before diving into the process of finding your Zoom recordings, you’ll need to access your Zoom account. Here are the steps to get started:
- If you haven’t already, go to the Zoom website (https://zoom.us) and sign in with your Zoom credentials. If you don’t have an account yet, you can easily create one by clicking on the “Sign Up, It’s Free” button.
- Once you’re logged in, you’ll be directed to the Zoom dashboard, which is your central hub for managing your account and meetings.
- Take a moment to familiarize yourself with the dashboard. Here, you will find various options and features, including the ability to schedule and join meetings, view your upcoming meetings, access your settings, and of course, find your past meetings and recordings.
- Now that you’re familiar with the dashboard, it’s time to move on to locating your past meetings and the associated recordings. Read on to discover the different methods to accomplish this.
Accessing your Zoom account is the first step towards finding your recordings. By following the steps outlined above, you will be ready to explore the wealth of recorded meetings that are waiting for you. Now, let’s move on to the next section where we will uncover the process of locating your past meetings.
Locating Past Meetings
Once you have accessed your Zoom account, it’s time to locate your past meetings where the recordings are stored. Here are a few methods to help you find the meetings you’re looking for:
1. Zoom Dashboard
The first and most straightforward method is to navigate to the Zoom dashboard. Once you’re on the dashboard, you will see a list of your upcoming scheduled meetings. To find past meetings:
- Scroll down on the dashboard until you see the “Previous Meetings” section.
- Click on the meeting you want to retrieve the recording for.
- Within the meeting details, you will find a “Recording” tab. Click on it to access the recording associated with the meeting.
2. Zoom Web Portal
If you prefer accessing your Zoom account through the Zoom Web Portal, follow these steps to locate your past meetings:
- Log in to the Zoom Web Portal using your credentials.
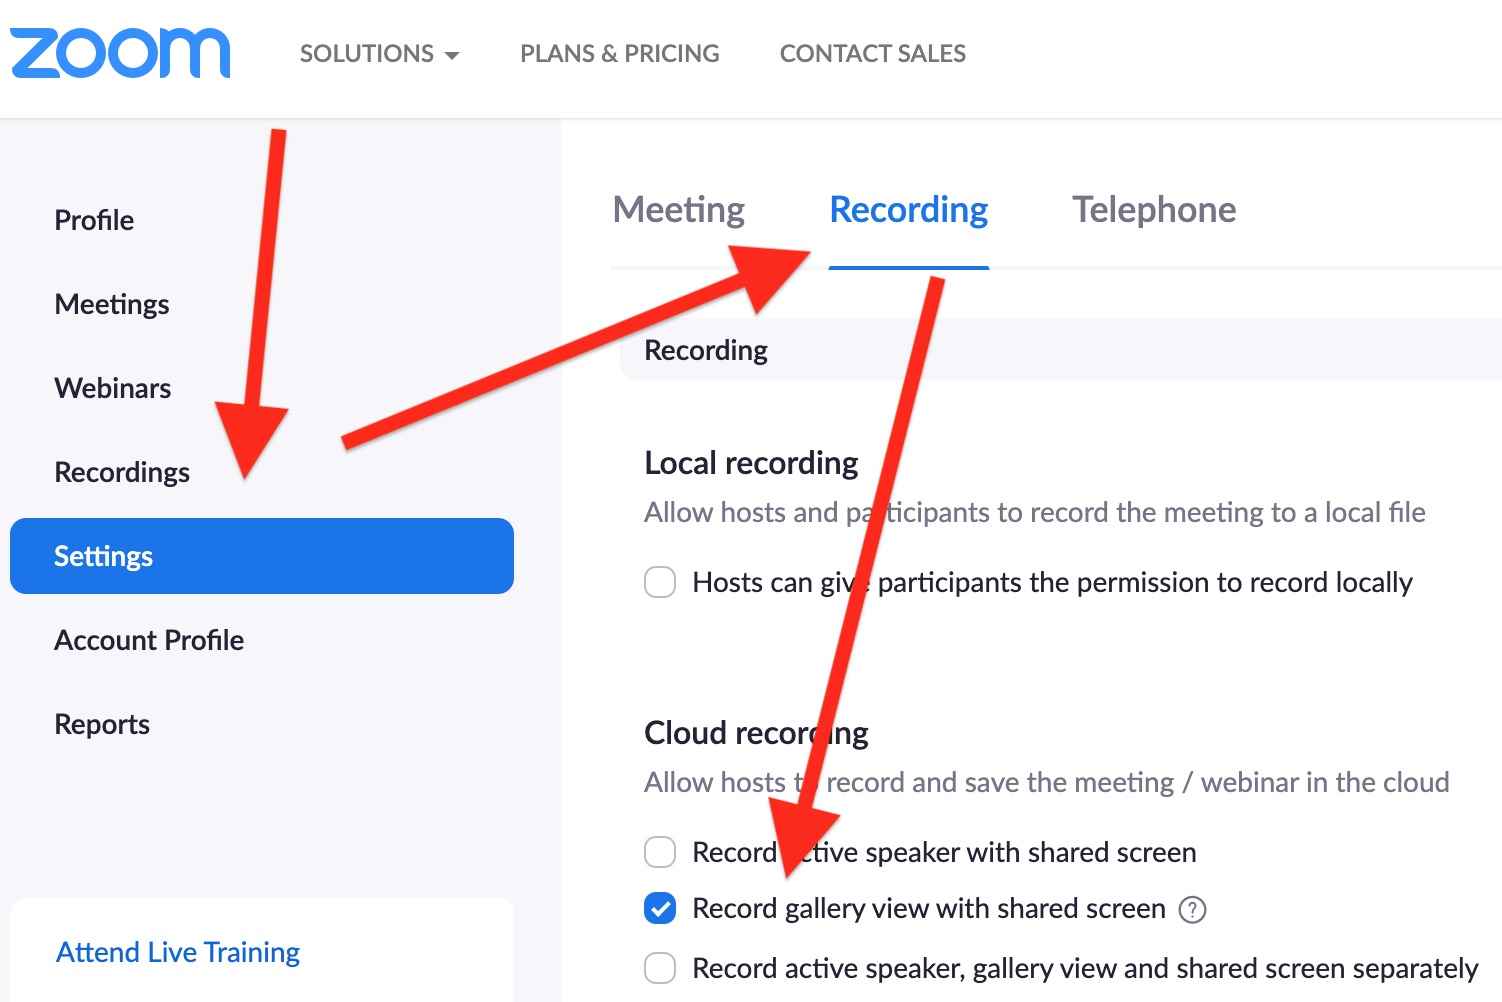
- In the navigation menu on the left, click on “Recordings”.
- You will be directed to a page where you can view and manage your recorded meetings.
- Use the search options or filters to narrow down your search and find the specific meeting you’re looking for.
3. Zoom Recording emails
If you had opted to receive email notifications for your Zoom recordings, finding your past meetings becomes even easier:
- Search your inbox for emails with the subject line containing “[Zoom Recording]”.
- Open the email for the specific meeting you want to access.
- Click on the recording link provided in the email to quickly access the recording.
By utilizing these methods, you’ll be able to locate your past meetings swiftly and effortlessly. Once you find the desired meeting, you can proceed to retrieve and download the recording, which we will cover in the next section.
Finding the Meeting Recording
Now that you have located your past meetings, it’s time to find the recording you’re looking for. The process may vary depending on whether the recording is stored in the cloud or saved locally on your device. Here’s how to find the meeting recording using both methods:
Cloud Recording
If the meeting recording was saved in the cloud, follow these steps to locate it:
- Once you have accessed the meeting details page, look for the “Recording” tab.
- Under the “Recording” tab, you will find a list of available recordings for that meeting.
- Click on the recording you want to access. You may have options to play, download, or share the recording.
- If you choose to download the recording, select the desired file format (e.g., MP4 or M4A) and click the download button.
Local Recording
If the meeting recording was saved locally on your device, use the following steps to find it:
- Locate the folder on your device where Zoom saves local recordings. By default, it is in the “Documents” folder on Windows and the “Documents” or “Movies” folder on Mac.
- Open the folder and look for a subfolder with the meeting date as the folder name.
- Inside the subfolder, you will find the recording file. It is usually named with the meeting ID and timestamp.
By following these steps, you’ll be able to find the meeting recording, whether it is saved in the cloud or locally on your device. Once you have located the recording, you may proceed to download it for future reference or sharing purposes, which will be discussed in the next section.
Downloading the Recording
Once you have found the meeting recording, downloading it is a simple process. Here’s how you can download the recording based on whether it is stored in the cloud or saved locally on your device:
Cloud Recording
To download a meeting recording stored in the cloud, follow these steps:
- Access the meeting details page where the recording is located.
- Under the “Recording” tab, click on the recording you want to download.
- Look for the “Download” option and click on it.
- Choose the desired file format (e.g., MP4 or M4A) and click the download button.
- The recording will start downloading to your device. Once the download is complete, you can access it in the designated folder on your computer.
Local Recording
To download a meeting recording that is saved locally on your device, follow these steps:
- Locate the recording file in the folder where Zoom saves local recordings.
- Right-click on the recording file and select “Save As” or “Download”.
- Choose the destination folder where you want to save the recording and click “Save” or “Download”.
- The recording will be saved to the specified folder on your device, ready for you to access and playback at any time.
By following these steps, you’ll be able to successfully download your Zoom meeting recordings. Whether stored in the cloud or saved locally, downloading the recording ensures that you have a copy that you can easily access and share as needed.
Viewing a Cloud Recording
Once you have successfully located and downloaded a cloud recording, you may want to view it to review the content or share it with others. Here are the steps to view a cloud recording:
- Access your Zoom account and navigate to the meeting details page where the cloud recording is stored.
- Under the “Recording” tab, locate the specific recording you want to view.
- Click on the recording to open it.
- Depending on your settings and the recording file type, you may have different viewing options:
- For MP4 recordings, you can play the recording directly in your web browser using the built-in video player.
- If the recording is in a different format (e.g., M4A), you may need to download the file and play it using a compatible media player on your computer.
- To play the recording in the Zoom web player, simply click on the play button on the video player interface.
- While viewing the recording, you can utilize the controls on the video player to pause, skip, adjust the volume, or go into full-screen mode.
- If you prefer to download the recording for offline viewing, look for the download button provided in the video player interface.
By following these steps, you’ll be able to easily view your cloud recordings directly from your Zoom account. Whether you choose to play the recording in the Zoom web player or download it for offline viewing, you’ll have full control over how you access and experience the recorded meeting content.
Locating Local Recordings
If you have chosen to save your Zoom meeting recordings locally on your device, locating these recordings may require a bit of exploration. Here’s how to locate your local recordings:
Windows
- Open the File Explorer on your Windows computer by pressing the Windows key + E on your keyboard.
- Navigate to the “Documents” folder.
- Look for a subfolder named “Zoom” within the “Documents” folder. This is where Zoom saves local recordings by default.
- Open the “Zoom” folder, and you should find folders named with the date and time of each recorded meeting.
- Within each dated folder, you will find the respective recording file. The file may be named with the meeting ID and a timestamp.
Mac
- Open Finder on your Mac.
- Go to the “Documents” or “Movies” folder. Zoom saves local recordings in one of these locations by default.
- Look for a subfolder called “Zoom” within the chosen folder.
- Open the “Zoom” folder, and you should see folders with dates and timestamps for each meeting recording.
- Within each dated folder, you will find the respective recording file. The file may be named with the meeting ID and a timestamp.
By following these steps, you’ll be able to successfully locate your locally saved Zoom meeting recordings on both Windows and Mac operating systems. Once you have found the folder and the recording file, you can proceed to access, play, or share the recordings as needed.
Transferring Local Recordings
If you have Zoom recordings saved locally on one device and need to transfer them to another device or share them with someone else, you can easily do so by following these steps:
- Locate the folder on your device where Zoom saves local recordings. The location will depend on your operating system (e.g., “Documents” folder on Windows, “Documents” or “Movies” folder on Mac).
- Open the Zoom folder to access the recordings.
- Select the recording files that you want to transfer or share. You can choose one or multiple files by holding down the Ctrl key on Windows (Command key on Mac) while selecting the files.
- Copy the selected files by right-clicking and choosing “Copy” or by pressing Ctrl+C on Windows (Command+C on Mac).
- Navigate to the destination folder or location where you want to transfer or share the recordings.
- Paste the copied files by right-clicking and choosing “Paste” or by pressing Ctrl+V on Windows (Command+V on Mac).
- The recording files will be transferred or copied to the new location or device.
Once the transfer is complete, you can access the recordings from the new location or share them with others through email, cloud storage platforms, or any other preferred method.
Transferring local Zoom recordings allows you to keep your valuable meeting content accessible on multiple devices or share them with colleagues, clients, or team members seamlessly. By following the steps outlined above, you’ll be able to transfer your local recordings swiftly and efficiently.
Troubleshooting Tips
While using Zoom and managing your recordings, you may encounter some common issues or obstacles. Here are a few troubleshooting tips to help you overcome them:
1. Missing or Deleted Recordings:
If you cannot find a specific recording, double-check your Zoom account to ensure it was not deleted or moved to a different location. Additionally, confirm that you are searching in the correct folder or using the correct filters in the Zoom Web Portal.
2. Recording Not Available:
If you cannot access a recording, it is possible that the host of the meeting restricted the recording’s availability. Contact the meeting host or administrator to verify if the recording is accessible and to resolve any permission issues.
3. Corrupted or Incomplete Recordings:
If a recording is corrupted or incomplete, it may be due to an interruption during the recording process or a technical issue. Try playing the recording with a different media player or attempt to re-download it if it was stored in the cloud. If the issue persists, reach out to Zoom support for further assistance.
4. Recording Quality:
If you are unsatisfied with the quality of your recordings, ensure that you have enabled the highest quality settings in your Zoom account and during the recording process. Additionally, ensure that you have a stable internet connection and sufficient storage space on your device for saving high-quality recordings.
5. Video or Audio Playback Issues:
If you are experiencing problems with video or audio playback in your recordings, verify that your media player is up to date and supports the file format of the recording. It may also help to restart your device or try playing the recording on a different device to troubleshoot any hardware or software-related issues.
Keep in mind that these troubleshooting tips serve as general guidelines, and the specific issues you encounter may require additional troubleshooting steps or assistance from Zoom support. However, with patience and persistence, you can overcome most common recording-related challenges and ensure a seamless experience with your Zoom recordings.
Conclusion
Congratulations! You have now become well-versed in finding and managing your Zoom recordings. By following the steps provided in this guide, you can easily access your Zoom account, locate past meetings, find the associated meeting recordings, and download or view them as needed. Whether the recordings are stored in the cloud or saved locally on your device, you now have the knowledge to navigate the Zoom platform and retrieve your valuable content.
Remember, the Zoom dashboard and the Zoom Web Portal are your go-to places for locating past meetings and recordings. From there, you can download the recordings for offline access or view them directly using the Zoom web player. In case of any issues or troubleshooting needs, you can refer back to the troubleshooting tips section for practical solutions.
Maximize the effectiveness of Zoom by using these recordings for various purposes — from reviewing important details and sharing information with absent attendees to keeping a record of successful meetings and training sessions. The ability to access and manage your Zoom recordings efficiently will streamline your workflow and enhance collaboration within your organization or team.
Now that you have mastered the art of finding Zoom recordings, go ahead and unlock the full potential of your recorded meetings. Use them as a valuable resource to improve communication, knowledge sharing, and productivity in your virtual endeavors. Happy Zooming!