Introduction
Welcome to the complete guide on where Zoom recordings save. With the rise of remote work and online meetings, Zoom has become an indispensable tool for connecting people across distances. Whether you’re using Zoom for business meetings, webinars, or educational purposes, it’s essential to understand where your recorded sessions are saved.
For many users, the location of Zoom recordings can be a bit confusing. Do they save automatically? Can you choose where they are stored? Are they saved locally or in the cloud? These questions often arise, especially for users who need to access their recordings later or share them with others.
This comprehensive guide will walk you through all the details you need to know about the storage and management of Zoom recordings. We’ll explore the default recording location, the difference between local and cloud recordings, and how to access and organize your recorded Zoom sessions. Whether you’re an individual, a small team, or a large organization, understanding how to locate and manage your Zoom recordings will help you stay organized and make the most of this powerful communication tool.
So let’s dive in and demystify the world of Zoom recordings. By the end of this guide, you’ll have a clear understanding of where your Zoom recordings are saved and how to effectively manage them.
Where Do Zoom Recordings Save: A Complete Guide
Zoom offers two options for recording your meetings: local recordings and cloud recordings. Each option has its own advantages and considerations, depending on your needs and preferences. In this complete guide, we’ll take a closer look at both recording options, how to access them, and how to manage your Zoom recordings effectively.
Local recordings are saved directly to your computer’s hard drive or the storage location you specify. This means that the recordings are stored locally on your device, making them easily accessible for editing or sharing. When you record a session locally, Zoom saves the recording as an MP4 file.
On the other hand, cloud recordings are stored securely on Zoom’s servers. This option is ideal if you have limited storage capacity on your computer or if you want to easily access your recordings from any device with an internet connection. Cloud recordings are stored in the Zoom web portal and can be played or downloaded from there. Zoom provides ample storage space for your cloud recordings, but keep in mind that recordings are subject to a time limit based on your account type.
The choice between local and cloud recordings depends on various factors, such as storage capacity, convenience, and the need for collaboration. Local recordings offer flexibility and control, allowing you to easily access and edit the files on your device. However, they may take up significant space on your computer if you record frequent or long sessions.
Cloud recordings, on the other hand, eliminate storage concerns and provide easy accessibility from anywhere. You can access your recordings through the Zoom web portal, which allows you to manage and share them with others effortlessly. However, cloud recordings might require additional steps to edit or download, depending on your needs.
Now that you have a brief overview of the recording options available, let’s explore how to access and manage your Zoom recordings based on the recording method you chose.
Locating Zoom Recordings
After you’ve recorded a Zoom session, it’s essential to know where to find your recordings. The location of your Zoom recordings depends on whether you chose to save them locally or in the cloud. Let’s explore how to locate your recordings based on the recording method you used.
If you saved your recordings locally, they are typically stored in a specific folder on your computer. By default, Zoom saves local recordings in the “Documents” folder on Windows, while on Mac, they are saved in the “Documents” folder or the user’s home directory. To locate your local recordings, navigate to the specified folder and look for a subfolder named “Zoom” or a folder with the meeting or webinar name. Within this folder, you should find the recorded session as an MP4 file.
On the other hand, if you opted for cloud recordings, accessing them is a bit different. Cloud recordings are managed through the Zoom web portal, which is accessible through your browser. To access your cloud recordings, follow these steps:
- Open your preferred web browser and navigate to the Zoom web portal.
- Sign in with your Zoom account credentials.
- Once logged in, click on the “Recordings” tab on the left-hand side of the screen.
- You will be presented with a list of all your recorded sessions. You can use the search bar or filters to locate specific recordings.
- Click on the title of the recording to view details or play the recording directly in your browser.
- To download the recording to your computer, click on the “Download” button beside the recording’s title.
By following these steps, you can easily locate and access your Zoom recordings, whether they are saved locally on your computer or stored in the cloud.
Now that you know where to find your recordings, let’s explore how to effectively manage and organize them for easier access in the next sections.
Default Recording Location
When you record a Zoom session, the application automatically saves the recordings in a default location. The default recording location depends on your operating system and can be customized to suit your preferences. Let’s take a closer look at the default recording location settings for both Windows and Mac.
On Windows, Zoom typically saves local recordings in the “Documents” folder. To access this location, open the File Explorer and navigate to the “Documents” folder. Within the “Documents” folder, you should find a subfolder labeled “Zoom” where your recordings are stored.
For Mac users, Zoom saves local recordings in the “Documents” folder or the user’s home directory, depending on the user’s settings. To locate your recordings, open Finder and navigate to either the “Documents” folder or your home directory. Look for a subfolder named “Zoom” where your recordings will be stored.
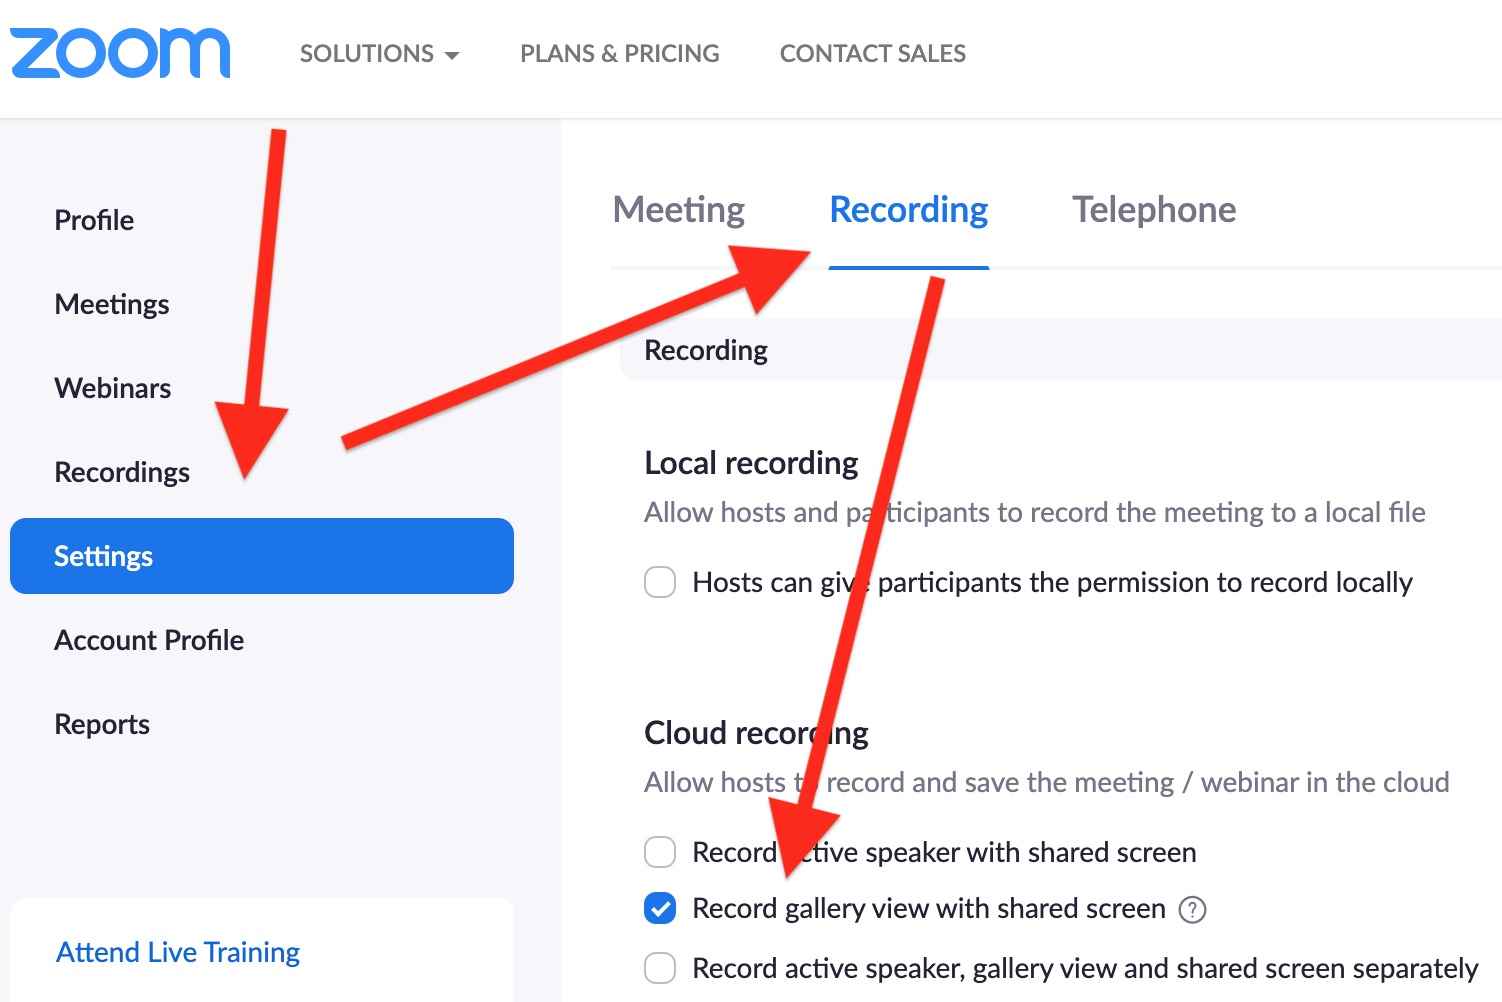
If you’re unsure of the exact location of your recordings, you can check the Zoom settings to confirm or change the default recording location. Here’s how to access the recording settings in Zoom:
- Open the Zoom application on your computer and sign in if necessary.
- Click on the settings gear icon in the top right corner of the application window.
- In the settings menu, select the “Recording” tab.
- Under the “Local recording” section, you can view and change the default location for your local recordings.
By accessing the recording settings in Zoom, you can customize the default location to a folder of your choice. This allows you to easily maintain an organized recording library and access your recordings with ease.
It’s important to note that cloud recordings do not have a default location on your computer. Instead, they are stored securely on Zoom’s servers and can be accessed through the Zoom web portal, as mentioned in the previous section. Cloud recordings offer the advantage of not taking up storage space on your local device, making them a convenient option for long-term storage or sharing with others.
Now that you’re familiar with the default recording location settings, let’s explore how to change the location if needed and delve into the differences between local and cloud recordings in the upcoming sections.
Changing the Default Recording Location
If you prefer to have your Zoom recordings saved in a different location than the default settings, you have the option to change the recording location. By customizing the recording location, you can ensure that your recordings are saved in a specific folder that is easily accessible and fits your organizational preferences.
Here’s how to change the default recording location in Zoom:
- Open the Zoom application on your computer and sign in if necessary.
- Click on the settings gear icon in the top right corner of the application window.
- In the settings menu, select the “Recording” tab.
- Under the “Local recording” section, click on the “Change” button beside the current default location.
- A file explorer window will open, allowing you to choose a new folder for your recordings.
- Navigate to the desired folder and click “OK” or “Select Folder” to set it as your new default recording location.
- From now on, all your local recordings will be saved in the new location you specified.
By following these steps, you can easily change the default recording location in Zoom and ensure that your recordings are saved exactly where you want them.
It’s important to note that changing the default recording location only affects future recordings. Any existing recordings in the previous default location will remain there unless manually moved to the new location. Therefore, if you have recordings saved in the old default location that you want to move to the new location, you’ll need to do so manually by copying or moving the files.
Keep in mind that changing the default recording location is specific to local recordings. Cloud recordings, as mentioned earlier, are stored on Zoom’s servers and accessed through the Zoom web portal. You won’t have the option to change the default location for cloud recordings, as they are managed entirely within the Zoom platform.
Now that you know how to change the default recording location, let’s explore the differences between local and cloud recordings in the next section.
Local Recordings vs. Cloud Recordings
When it comes to recording Zoom sessions, you have the option to save your recordings locally on your computer or store them in the cloud on Zoom’s servers. Understanding the differences between local and cloud recordings can help you choose the best option for your needs. Let’s explore the advantages and considerations of each.
Local recordings are saved directly to your computer’s hard drive or the storage location you specify. This means that the recordings are stored locally on your device, making them easily accessible for editing or sharing. When you record a session locally, Zoom saves the recording as an MP4 file.
The main advantages of local recordings include:
- Flexibility and Control: Local recordings allow you to have full control over your recordings. You can easily access them on your device, edit them using video editing software, and share them as needed.
- Easy Access and Playback: Since local recordings are stored on your device, you can play them directly using your preferred media player without an internet connection.
However, there are some considerations to keep in mind when using local recordings:
- Storage Space: Local recordings can take up a significant amount of storage space on your computer, especially if you record extended or frequent sessions. Make sure to manage your storage capacity to avoid running out of space.
- Portability: Local recordings are tied to the device where they are saved. If you need to access the recordings on another device, you’ll have to manually transfer them.
On the other hand, cloud recordings are stored securely on Zoom’s servers. This option is ideal if you have limited storage capacity on your computer or if you want to easily access your recordings from any device with an internet connection. You can access your cloud recordings through the Zoom web portal and play them directly in your browser or download them when needed.
Some advantages of cloud recordings include:
- No Storage Concerns: Cloud recordings do not consume storage space on your local device. They are safely stored on Zoom’s servers, eliminating the need to manage your storage capacity.
- Access Anywhere: Cloud recordings can be accessed from any device with an internet connection, providing you with the flexibility to view or share them whenever and wherever you need.
However, there are a few things to consider with cloud recordings:
- Internet Required: To access or download cloud recordings, you need an internet connection. If you’re in a location with limited or no internet access, accessing your recordings may be challenging.
- Additional Steps for Downloads: To download a cloud recording, you need to go through the Zoom web portal and follow the necessary steps. This can be slightly more time-consuming compared to directly accessing local recordings on your device.
Considering the advantages and considerations of both local and cloud recordings can help you make an informed decision based on your specific requirements. Whether you prioritize flexibility and control or need easy accessibility from any device, Zoom provides options that cater to your needs.
Next, let’s dive into how to view and manage your local recordings in the following section.
Viewing and Managing Local Recordings
With local recordings, you have the advantage of easy access and full control over your Zoom session recordings. By knowing how to view and manage your local recordings, you can stay organized and make the most of this valuable resource. Let’s explore the steps involved in viewing and managing your local Zoom recordings.
To view and manage your local recordings, follow these steps:
- Navigate to the default recording location on your computer where Zoom saves the local recordings. By default, local recordings are saved in the “Documents” folder on Windows and either the “Documents” folder or the user’s home directory on Mac.
- Look for a subfolder labeled “Zoom” within the default recording location. The Zoom folder contains all your recorded sessions.
- Within the Zoom folder, you’ll find individual folders for each recorded session. These folders are typically named with a combination of the date and time of the recording or the name of the meeting or webinar.
- Open the folder corresponding to the recording you want to view or manage.
- Inside the folder, you’ll find the recorded session saved as an MP4 file. Double-click the file to play the recording using your preferred media player.
Once you have accessed your local recording, you have various options for managing and utilizing the recording:
- Editing: If you need to make any edits to your recording, you can use video editing software to trim, crop, add effects, or enhance the video and audio quality.
- Sharing: Local recordings provide the flexibility to share the recorded session with others. You can send the recording to colleagues, clients, or team members via email, cloud storage services, or file-sharing platforms.
- Archiving: If you have completed a project or a series of meetings, it’s a good practice to archive the recordings in a separate folder. This way, you can keep your default recording location organized and easily locate specific recordings in the future.
- Deleting: To free up storage space on your computer, you can delete local recordings that are no longer needed. However, make sure to keep a backup of important recordings before deleting them.
By effectively managing your local Zoom recordings, you can maintain an organized library of recorded sessions and make use of the recordings for various purposes, including training, documentation, or reference materials.
Next, let’s explore how to access and manage your Zoom cloud recordings in the following section.
Accessing and Managing Cloud Recordings
Cloud recordings offer the convenience of easily accessing your Zoom session recordings from any device with an internet connection. By understanding how to access and manage your cloud recordings, you can efficiently organize and utilize your recorded sessions. Let’s explore the steps involved in accessing and managing your Zoom cloud recordings.
To access and manage your cloud recordings, follow these steps:
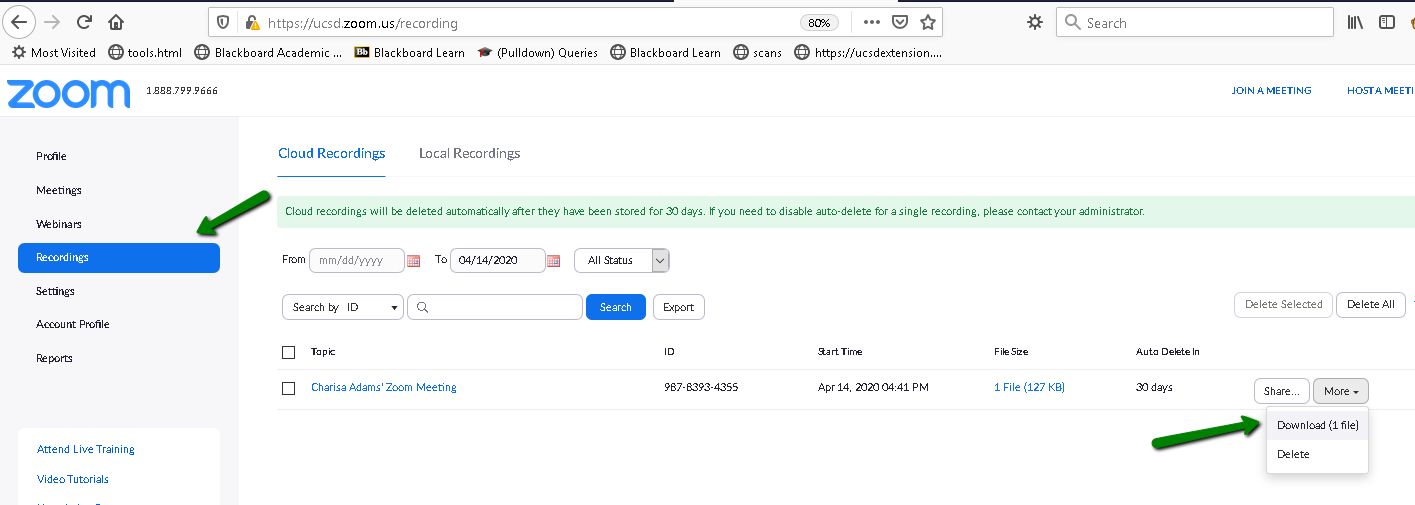
- Open your preferred web browser and navigate to the Zoom web portal.
- Sign in using your Zoom account credentials.
- Once logged in, click on the “Recordings” tab on the left-hand side of the screen.
- You will be presented with a list of all your recorded sessions. You can use the search bar or filters to locate specific recordings.
- Click on the title of the recording to view additional details or play the recording directly in your browser.
- To download the recording to your computer, click on the “Download” button beside the recording’s title. This will save a copy of the recording to your local device.
Once you have accessed your cloud recording, you have various options for managing and utilizing the recording:
- Sharing: Cloud recordings provide the convenience of sharing the recorded session with others. You can generate sharing links or invite specific individuals to view the recording through email or other messaging platforms.
- Downloading: If you need to have a local copy of the recording, you can download it to your computer. This allows you to access the recording even without an internet connection.
- Deletion: If you no longer need a particular cloud recording, you can delete it to free up space in your Zoom account. However, ensure that you have a backup of the recording if it contains important information.
- Organizing: Within the Zoom web portal, you can create folders or use tags to organize your cloud recordings. This can help you keep track of recordings related to specific projects, teams, or events.
- Playback Controls: While viewing a cloud recording, you can use the playback controls provided to pause, rewind, fast forward, or adjust the playback speed of the recording.
By effectively managing your cloud recordings, you can easily access, share, and utilize your Zoom sessions for various purposes such as training, documentation, or review.
It’s important to note that cloud recordings are subject to a time limit based on your Zoom account type. Make sure to review your account limitations and consider archiving important recordings if they are nearing expiration.
Now that you know how to access and manage your cloud recordings, let’s explore the option of storing Zoom recordings on external drives in the next section.
Storing Zoom Recordings on External Drives
If you have limited storage space on your computer or want to keep your Zoom recordings separate from your local device, storing them on an external drive is a practical and efficient solution. By utilizing external drives, you can free up space on your computer while still maintaining easy access to your recorded Zoom sessions. Let’s explore how you can store your Zoom recordings on external drives.
To store Zoom recordings on an external drive, follow these steps:
- Connect your external drive to your computer using the appropriate USB or other connection method.
- Navigate to the default recording location on your computer where Zoom saves local recordings. By default, Zoom saves local recordings in the “Documents” folder on Windows and either the “Documents” folder or the user’s home directory on Mac.
- Copy the entire Zoom folder, which contains your recorded sessions, to your external drive. You can do this by right-clicking on the Zoom folder and selecting “Copy,” then navigating to your external drive and right-clicking and selecting “Paste.”
- Wait for the files to transfer to the external drive. The time it takes will depend on the size and number of recordings you have.
- Once the transfer is complete, you can safely disconnect the external drive from your computer.
By following these steps, you can store your Zoom recordings on an external drive, keeping them separate from your computer’s internal storage. By doing so, you can free up space on your local device while still having easy access to your recorded sessions whenever you need them.
It’s important to note that when using external drives to store your Zoom recordings, make sure to keep the drives in a safe and secure location. Additionally, consider creating backups of your external drives to protect against data loss or drive failures.
When you want to access or use the recordings stored on the external drive, simply connect the drive to your computer and navigate to the Zoom folder. You’ll find all your recorded sessions saved in the same folder structure as they were originally.
Now that you know how to store your Zoom recordings on external drives, let’s explore some tips for effectively organizing your recordings in the next section.
Tips for Organizing Zoom Recordings
As you accumulate Zoom recordings, it’s important to establish an effective organizational system to easily locate and manage your recorded sessions. Here are some helpful tips for organizing your Zoom recordings:
- Use Descriptive File Names: When saving your Zoom recordings, use descriptive file names that clearly indicate the subject, date, or participants of the recorded session. This will make it easier to identify specific recordings when you need them.
- Create Folders or Categories: Consider creating folders or categories to organize your recordings based on projects, teams, or specific events. This allows you to keep related recordings together and simplifies the process of locating them in the future.
- Add Tags or Labels: Utilize tags or labels to further categorize your recordings. This can help you quickly filter and search for specific recordings based on specific criteria or keywords.
- Implement a Naming Convention: Establish a consistent naming convention for your Zoom recordings to maintain uniformity. For example, you can start each file name with the date and then include other relevant information.
- Set Up Subfolders: If you have a large number of recordings, you can create subfolders within your main recording folder to further organize them. This can help reduce clutter and make it easier to find specific recordings.
- Archive Old Recordings: Regularly review your recordings and archive or delete older ones that are no longer needed. This helps free up storage space and keeps your recording library organized and manageable.
- Backup Your Recordings: It’s important to regularly back up your Zoom recordings to ensure they are protected from data loss. Consider using external drives, cloud storage services, or other backup methods to safeguard your recordings.
- Document Recording Details: Maintain a separate document or spreadsheet to keep track of important details about your recordings, such as the date, participants, purpose, and any key points discussed during the session. This can serve as a reference for later use or to easily locate specific recordings.
- Consider Metadata: Leverage metadata options within your file system or media player to add relevant information to your recordings. This can include tags, keywords, or descriptions that further aid in organizing and searching for specific recordings.
- Regularly Review and Refine: Periodically review and refine your organizational system based on your evolving needs and preferences. This ensures that your Zoom recordings remain well-organized and easily accessible over time.
By implementing these tips, you can establish a structured and effective way to organize your Zoom recordings, making it easier to locate, manage, and utilize them as needed.
Now that you have learned how to organize your Zoom recordings, let’s summarize the key points covered in this guide.
Conclusion
In this comprehensive guide, we have explored the various aspects of where Zoom recordings save and how to effectively manage them. Understanding the storage options, accessing and managing local and cloud recordings, and organizing your recorded sessions are essential for a seamless Zoom experience.
We learned that Zoom offers two options for recording: local recordings and cloud recordings. Local recordings save directly to your device’s storage, providing flexibility and control. Cloud recordings, on the other hand, store recordings securely on Zoom’s servers, offering easy accessibility from any device.
To locate local recordings, we examined the default recording location settings and how to change them to suit your preferences. For cloud recordings, we discussed accessing them through the Zoom web portal and the various management options available.
Additionally, we discussed the benefits and considerations of both local and cloud recordings, helping you make an informed choice based on your needs. We explored how to view, manage, and leverage local recordings on your computer, as well as how to access, share, and utilize cloud recordings through the Zoom web portal.
To optimize your Zoom recording workflow, we provided tips for organizing your recordings effectively. By using descriptive file names, creating folders or categories, and implementing consistent naming conventions, you can easily locate and manage your recorded sessions. Archiving old recordings, backing up your files, and maintaining a separate document to track recording details are also crucial for staying organized.
Remember to adapt and refine your organizational system as your needs evolve, ensuring your Zoom recordings remain easily accessible and well-managed over time.
By implementing the insights and techniques from this guide, you can confidently navigate the world of Zoom recordings, maximizing the benefits of this powerful communication tool in both personal and professional settings.