Introduction
Welcome to the world of Zoom, a popular video conferencing platform that has become essential in our increasingly connected and remote work environments. One of the many features Zoom offers is the ability to record meetings and webinars directly to the cloud, allowing you to access and share them with ease. In this guide, we will walk you through the steps to download a Zoom recording from the cloud, ensuring that you have a copy of your important discussions, presentations, and collaborations readily available on your device.
Whether you need to review a meeting for reference, share it with absent participants, or simply want to keep a backup for future purposes, having the ability to download Zoom recordings is invaluable. We will show you how to navigate the Zoom interface, find the recording you need, and download it effortlessly to your device, so you can access it anytime, anywhere.
Before we dive into the steps, please ensure that you have a Zoom account and access to the cloud recordings feature. If you are unsure of how to enable cloud recordings or have any other account-related queries, we recommend visiting the Zoom support website or contacting their customer service for assistance. Now, let’s get started on downloading your Zoom recordings from the cloud.
Step 1: Log in to your Zoom account
In order to download Zoom recordings from the cloud, you need to first log in to your Zoom account. This ensures that you have the necessary access and permissions to view and manage your recordings. Follow the steps below to log in:
- Open your preferred web browser and navigate to the Zoom website.
- Click on the “Sign In” button located on the top-right corner of the webpage.
- Enter your Zoom login credentials, including your email address and password.
- Click the “Sign In” button to proceed.
- If you have enabled two-factor authentication for your Zoom account, you may be prompted to enter the verification code sent to your registered device. Enter the code to complete the login process.
Once you have successfully logged in to your Zoom account, you will have access to all the features and settings associated with your account. From here, you can proceed to the next step to download your Zoom recording from the cloud.
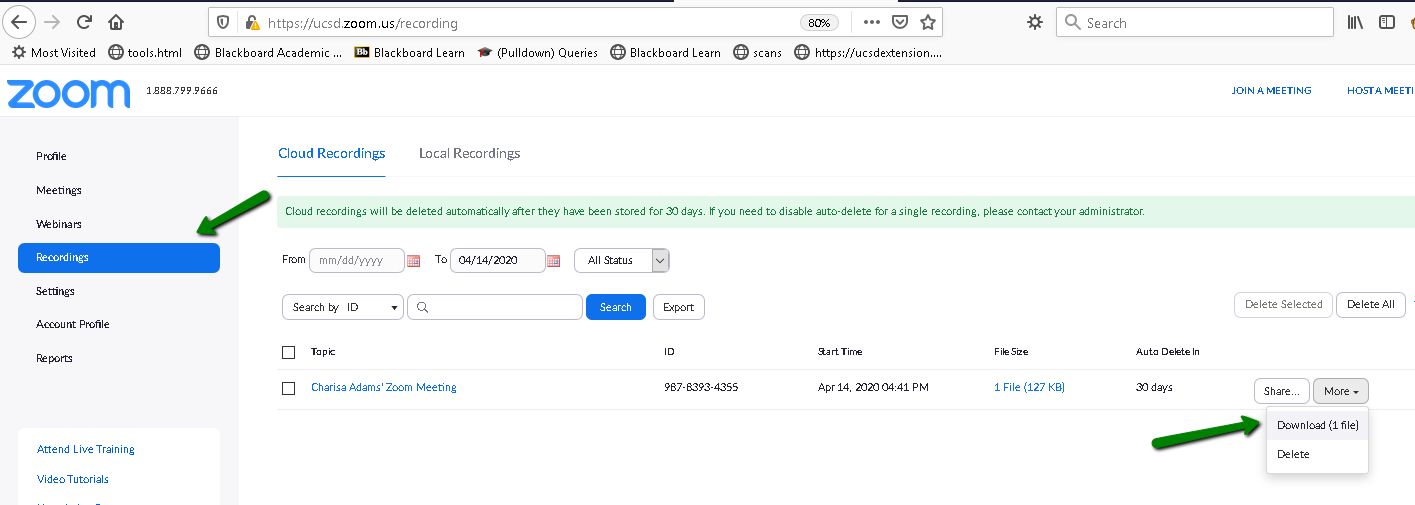
Step 2: Navigate to the Cloud Recordings tab
Now that you have logged in to your Zoom account, it’s time to navigate to the Cloud Recordings tab where your recorded meetings and webinars are stored. Follow the steps below to find the Cloud Recordings tab:
- On the Zoom homepage, you will see a navigation panel on the left-hand side of the screen. Locate and click on the “Recordings” tab.
- Within the “Recordings” tab, you will find several options. Look for the “Cloud Recordings” option and click on it.
- After clicking on the “Cloud Recordings” option, you will be redirected to a page that displays all the recordings saved in the cloud.
- On this page, you can browse through your recordings and access various settings associated with each recording, such as sharing options and playback preferences.
- If you have a large number of recordings, you can use the search bar at the top of the page to quickly find a specific recording by its title, date, or other relevant details.
Once you arrive at the Cloud Recordings page, you are ready to locate and download the specific recording you are interested in. Proceed to the next step for further instructions.
Step 3: Locate the recording you want to download
Now that you have reached the Cloud Recordings tab, it’s time to locate the specific recording you wish to download. Follow the steps below to find your desired recording:
- Scan through the list of recordings displayed on the Cloud Recordings page. The recordings will typically be organized chronologically, with the most recent ones appearing at the top of the list.
- If you have a large number of recordings or want to narrow down your search, you can utilize the search bar located at the top of the page. Enter keywords, such as the meeting or webinar title, date, or participants’ names, to filter the recordings.
- You can also use the filter options provided on the page to refine your search based on criteria like time range, meeting host, or recording type.
- Once you have located the recording you want to download, click on its title or thumbnail image to view more details.
- The recording details page will provide additional information about the recording, such as its duration, size, and sharing options.
By following these steps, you should now be able to locate the specific recording you desire to download. In the next step, we will guide you through the process of downloading the recording to your device.
Step 4: Click on the recording to open the options menu
After locating the recording you want to download, the next step is to access the options menu for that specific recording. Follow the steps below to open the options menu:
- On the Cloud Recordings page, find the desired recording and click on its title or thumbnail image. This will open a new page with more details about the recording.
- Once the recording details page is open, you will see various options and settings related to that specific recording.
- Look for the options menu, typically represented by three vertical dots or a “More” button, near the top-right or top-left corner of the page. Click on this menu to reveal a dropdown list of actions you can perform on the recording.
- Depending on your Zoom settings and permissions, the options available in the menu may vary. However, there should be a “Download” or “Save” option within the dropdown list.
- Click on the “Download” or “Save” option to initiate the download process for the recording.
By following these steps, you should now have accessed the options menu for the specific recording you want to download. In the next step, we will guide you through the process of selecting a location to save the recording on your device.
Step 5: Select the Download option
Now that you have opened the options menu for the desired recording, the next step is to select the “Download” option to begin the downloading process. Follow the steps below to proceed:
- After opening the options menu, scan through the list of actions available for the recording. Look for the “Download” or “Save” option, usually represented by an icon or text.
- Click on the “Download” or “Save” option to initiate the downloading process.
- Depending on your web browser settings, a file download prompt may appear asking for confirmation to save the recording on your device. Confirm the download by clicking “Save” or “Download”.
- Alternatively, the recording may start downloading automatically without displaying a prompt. The file will be saved in your default downloads folder or the location specified in your browser settings.
- Once the download begins, a progress indicator may appear, showing the status of the download process.
- Wait for the download to complete. The time it takes to download the recording will depend on its size and your internet connection speed.
By following these steps, you should now have successfully selected the “Download” option for the recording. In the next step, we will guide you through selecting a location to save the recording on your device.
Step 6: Choose a location to save the recording on your device
After initiating the download process for the recording, the next step is to choose a location on your device where you want to save the file. Follow the steps below to select a location to save the recording:
- When prompted to save the file, a window or dialog box will appear on your screen.
- Browse through your device’s directories and folders to select a location where you want to save the recording. You can choose to save it in the default downloads folder or navigate to a specific folder of your choice.
- If desired, you can create a new folder by clicking on the “New Folder” or “Create Directory” button and specifying a name for the folder.
- Once you have selected the desired location, click on the “Save” or “OK” button to save the recording in the chosen location.
- The recording will now be downloaded and saved to the selected location on your device.
By following these steps, you should now have successfully chosen a location to save the recording on your device. In the final step, we will discuss waiting for the download to complete.
Step 7: Wait for the download to complete
After selecting the location to save the recording, the final step is to wait for the download to complete. The time it takes to download the recording will depend on various factors such as the file size and the speed of your internet connection. Follow the steps below to ensure a successful download:
- Once you have chosen the location to save the recording on your device, the download process will begin automatically.
- During the download, a progress indicator may appear, showing the status of the download process. This can give you an estimate of how much time is remaining.
- While the recording is downloading, it’s important to avoid interrupting the process or closing the browser window. Doing so may result in an incomplete or corrupted recording file.
- Depending on the size of the recording and the speed of your internet connection, the download process may take a few seconds to several minutes.
- Once the download is complete, you will see a notification or confirmation message indicating that the recording has been successfully saved to the selected location on your device.
By following these steps and patiently waiting for the download to complete, you should now have successfully downloaded the Zoom recording from the cloud to your device. You can now access and utilize the recording as needed for reference, sharing, or future playback.
Conclusion
Downloading Zoom recordings from the cloud is a straightforward process that allows you to have a local copy of your important meetings and webinars. By logging in to your Zoom account, navigating to the Cloud Recordings tab, locating the desired recording, opening the options menu, selecting the “Download” option, choosing a location to save the file, and patiently waiting for the download to complete, you can quickly and easily access your recordings whenever you need them.
Having downloaded recordings provides you with the flexibility to review important discussions, share them with absent participants, or keep them for future reference. Remember to ensure that you have the necessary permissions and access to the recordings within your Zoom account before attempting to download them.
If you encounter any issues during the download process or have any questions about downloading Zoom recordings from the cloud, we recommend visiting the Zoom support website or reaching out to their customer service for assistance. Enjoy the convenience and accessibility of having your Zoom recordings readily available on your device. Happy downloading!