Introduction
Welcome to the guide on how to reset an Acer Chromebook. Whether you’re experiencing performance issues, encountering software glitches, or simply want to start fresh, resetting your Chromebook can often be the solution. In this article, we will explore the step-by-step methods to reset your Acer Chromebook effectively.
Acer Chromebooks are popular for their simplicity, speed, and security, running on Google’s Chrome OS. However, like any operating system, they can encounter problems over time. Resetting your Acer Chromebook can help resolve various issues, such as freezing, crashes, or persistent software errors.
There are several methods you can use to reset your Acer Chromebook, depending on the severity of the problem or your personal preference. In this guide, we will cover the troubleshooting process, performing a powerwash, creating a recovery drive, and even using key combinations to reset your Chromebook.
It’s important to note that resetting your Chromebook will remove all locally stored files, apps, and settings, so be sure to back up any important data before proceeding. Additionally, make sure your Chromebook is connected to a stable internet connection as some reset methods require accessing online resources for recovery.
By the end of this guide, you will have the knowledge and tools necessary to perform a successful reset on your Acer Chromebook, allowing you to resolve technical issues, improve performance, and enjoy a fresh start.
Part 1: Troubleshooting Common Issues
Before jumping into resetting your Acer Chromebook, it’s important to troubleshoot common issues that you may be facing. This step will help determine if a reset is necessary or if there is a simpler solution to the problem.
Here are some common issues you might encounter and the troubleshooting steps to address them:
- Slow Performance: If your Acer Chromebook is running slowly, try closing all unnecessary tabs and extensions. Clearing the browsing history and cache can also help improve performance. Restart your Chromebook and see if the speed improves.
- Wi-Fi Connectivity Problems: If you’re having trouble connecting to Wi-Fi or experiencing frequent disconnects, restart your Chromebook and router. Ensure that you’re within range and check if other devices can connect to the network. Resetting your Wi-Fi settings on the Chromebook may also help resolve the issue.
- App Crashes: If specific apps are crashing or freezing, check for any available updates in the Chrome Web Store. Try uninstalling and reinstalling the problematic app to see if that resolves the issue. If the problem persists, consider resetting the specific app’s settings to default.
- Chrome OS Updates: Chrome OS regularly receives updates to improve performance and security. Ensure that your Acer Chromebook is running the latest version of Chrome OS. Go to Settings > About Chrome OS > Check for Updates to see if any updates are available and install them.
- Malware or Virus Infections: Though rare on Chrome OS, malware or virus infections can still occur. Run a system scan using the built-in Chromebook security tools like Chrome Cleanup or a trusted anti-malware software to detect and remove any potential threats.
If you have tried the troubleshooting steps above and the issues persist, it may be time to consider resetting your Acer Chromebook. The following sections will guide you through the different methods available.
Part 2: Performing a Powerwash
A powerwash, also known as a factory reset, is one of the quickest and easiest ways to reset your Acer Chromebook to its original settings. This method erases all locally stored data and returns the device to its default state, as if you just took it out of the box.
Here’s how to perform a powerwash on your Acer Chromebook:
- Make sure to back up any important files or documents as they will be permanently deleted during the powerwash process.
- Click on the clock in the bottom right corner of the screen to open the taskbar.
- Select the “Settings” gear icon to access the Chromebook’s settings menu.
- In the settings menu, scroll down and click on “Advanced” to expand the options.
- Under the “Reset settings” section, click on “Powerwash”.
- A confirmation pop-up window will appear explaining that all local data will be deleted. Review the information and click “Restart” to begin the powerwash process.
- Follow the on-screen instructions to set up your Acer Chromebook as if it were brand new. This includes signing in with your Google account and configuring any desired settings.
Once the powerwash is complete, your Acer Chromebook will be reset to factory settings. This process can often resolve software-related issues and provide a clean slate for your device.
It’s important to note that a powerwash only resets the software settings of the Chromebook, not the Chrome OS version. If you’re still experiencing problems after a powerwash, you may need to consider other reset methods, which will be discussed in the following sections.
Part 3: Creating a Recovery Drive
Creating a recovery drive is an essential step in resetting your Acer Chromebook, especially if you encounter more severe issues that cannot be resolved through a powerwash. A recovery drive allows you to reinstall the Chrome OS and restore your Chromebook to its factory settings.
Follow these steps to create a recovery drive for your Acer Chromebook:
- Ensure that you have a USB flash drive with a minimum of 8GB of storage capacity. Keep in mind that all the data on the USB drive will be erased during the process.
- On a separate computer, visit the official Chrome OS recovery website [LINK].
- Scroll down to the “Create recovery media” section and click on the “Get started” button.
- Choose your Acer Chromebook model from the list provided.
- Insert the USB flash drive into the computer and select it from the list of available drives.
- Click on the “Create now” button to begin the recovery drive creation process.
- Once the process is complete, safely eject the USB drive from the computer.
- Now, on your Acer Chromebook, shut it down completely.
- Insert the created recovery drive into one of the USB ports of your Chromebook.
- Turn on your Chromebook and press and hold the Esc and Refresh keys together.
- While still holding the keys, press the Power button once.
- Release the Esc and Refresh keys when the “Chrome OS is missing or damaged” screen appears.
- Follow the on-screen instructions to complete the recovery process.
Once the recovery process is finished, your Acer Chromebook will be restored to its original state. This method is useful for resolving more complex software issues that cannot be fixed through a powerwash.
Keep in mind that creating a recovery drive is a proactive step that can save you in the event of system failure or other critical errors. It’s recommended to create a recovery drive even if you’re not currently experiencing any issues.
Part 4: Resetting Using Key Combinations
Another method to reset your Acer Chromebook is by using key combinations. These key combinations are useful when your Chromebook is experiencing issues that prevent you from accessing the settings menu or performing a powerwash.
Here’s how you can reset your Acer Chromebook using key combinations:
- Power off your Acer Chromebook completely.
- Press and hold the Refresh key (the key with the circular arrow icon) on the keyboard.
- While holding the Refresh key, press the Power button to turn on the Chromebook.
- Keep holding the Refresh key until you see the “Chrome OS is missing or damaged” screen.
- Release the Refresh key.
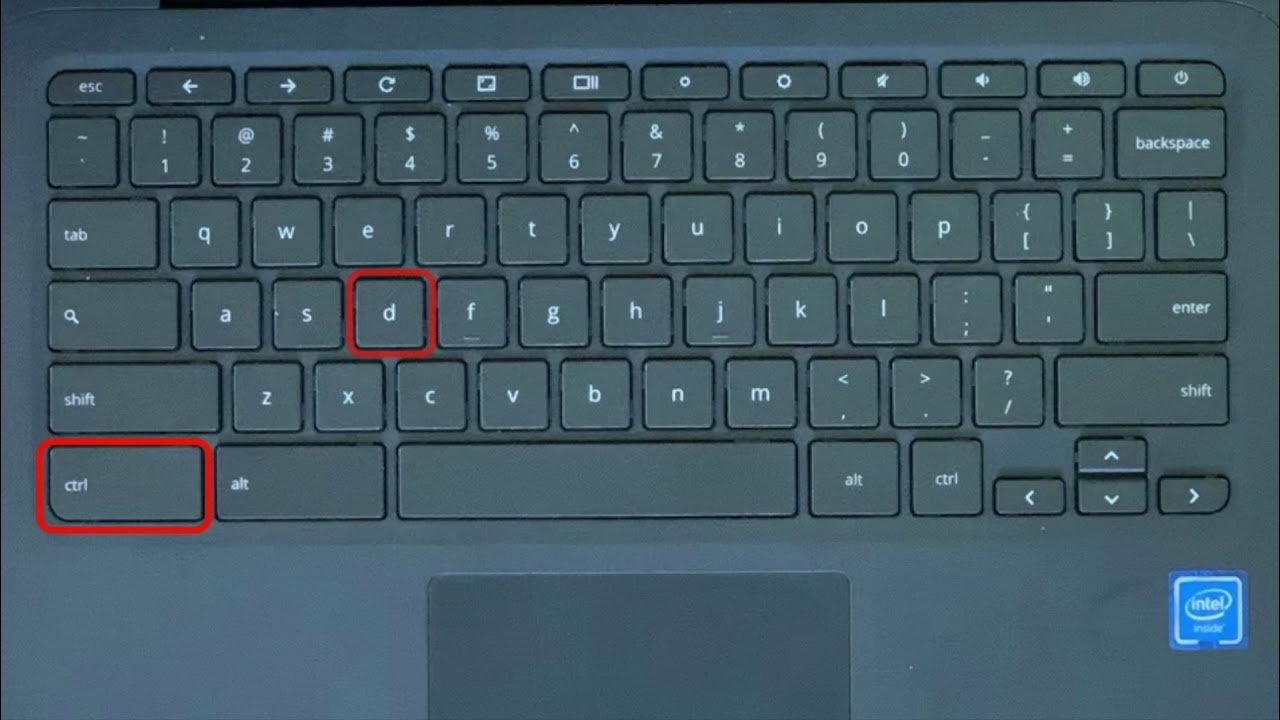
- On the “Chrome OS is missing or damaged” screen, press Ctrl+D on the keyboard.
- Follow the on-screen instructions to confirm the reset process.
- Once confirmed, the Chromebook will reset and go through the initial setup process.
It’s important to note that performing a reset using key combinations will erase all local data on your Acer Chromebook. Be sure to back up any important files before attempting this method.
Resetting your Chromebook using key combinations can be particularly helpful if your device is unresponsive or experiencing severe software issues. This method allows you to initiate a reset without needing access to the Chrome OS settings menu.
If you encounter any issues or errors during the reset process, consult the Acer support website or reach out to their customer support for further assistance.
Part 5: Resetting from the Settings Menu
If you’re able to access the settings menu on your Acer Chromebook, resetting your device can be done directly through the Chrome OS settings. This method is convenient and straightforward for users who prefer a graphical interface for performing a reset.
Follow the steps below to reset your Acer Chromebook from the settings menu:
- Click on the clock in the bottom right corner of the screen to open the taskbar.
- Select the “Settings” gear icon to open the Chromebook’s settings menu.
- In the settings menu, scroll down and click on “Advanced” to expand the options.
- Under the “Reset settings” section, click on “Powerwash”.
- A pop-up window will appear explaining that all local data will be deleted. Review the information and click “Restart” to initiate the reset process.
- Follow the on-screen instructions to complete the reset process, including signing in with your Google account and configuring any desired settings.
Resetting from the settings menu provides a user-friendly way to perform a reset on your Acer Chromebook. It allows you to easily access the necessary options and guides you through the process step by step.
Again, keep in mind that a reset will erase all locally stored data and settings on your Chromebook. Prior to resetting, ensure that you have backed up any important files or documents.
If you encounter any difficulties during the reset process or have any questions, refer to the official Acer support website or contact their customer support for assistance.
Conclusion
Resetting your Acer Chromebook can be a valuable solution when you encounter performance issues, software glitches, or simply want to start fresh. In this guide, we discussed several methods to reset your Acer Chromebook effectively.
We started by troubleshooting common issues to determine if a reset is necessary. This process allows you to identify and resolve minor problems without the need for a full reset.
If troubleshooting doesn’t resolve the issue, performing a powerwash is a quick and easy way to reset your Acer Chromebook. This method erases all locally stored data and returns the device to its default settings.
In more severe cases or if a powerwash proves ineffective, creating a recovery drive allows you to reinstall the Chrome OS and restore your Chromebook to factory settings. This method ensures a clean slate and can resolve complex software issues.
For situations where you cannot access the settings menu, resetting using key combinations provides an alternative solution. By following specific key combinations, you can initiate a reset without requiring access to the Chrome OS settings.
Lastly, if you have access to the settings menu, resetting your Acer Chromebook can be done directly through the Chrome OS settings. This user-friendly method guides you through the process with a graphical interface.
Remember, before proceeding with any reset method, make sure to back up any important files or documents, as the reset process will erase all locally stored data.
By following the steps outlined in this guide, you now have the knowledge and tools necessary to effectively reset your Acer Chromebook. Whether it’s to resolve technical issues, improve performance, or start fresh, resetting your Chromebook can provide a clean slate and a better user experience.
If you encounter any difficulties or have further questions, consult the official Acer support website or reach out to their customer support for personalized assistance.